
Terminalfour Search
Terminalfour Search allows you to configure how your sites will be indexed for display within your website's search.
Introduction
Terminalfour Search allows you to set up and configure what data should be crawled and indexed for your website search. Data can be crawled from websites, or it can be retrieved from other sources such as XML, CSV, and JSON files.
What you’ll need to get started
- A login to the Terminalfour Search application
- Log a support ticket with Client Support to request access.
- Access to SearchStax Site search
How do I start?
Go to the Terminalfour Search login and enter your username and password
You can choose to reset your password if you have an account but forgot your password.
How do I use it?
Displaying Configurations
A configuration outlines a data source and all of the rules associated around how the data from that source should be indexed and mapped.
When you first log in it's quite likely there will already be one or more existing configurations unless you're setting up a search for the first time.
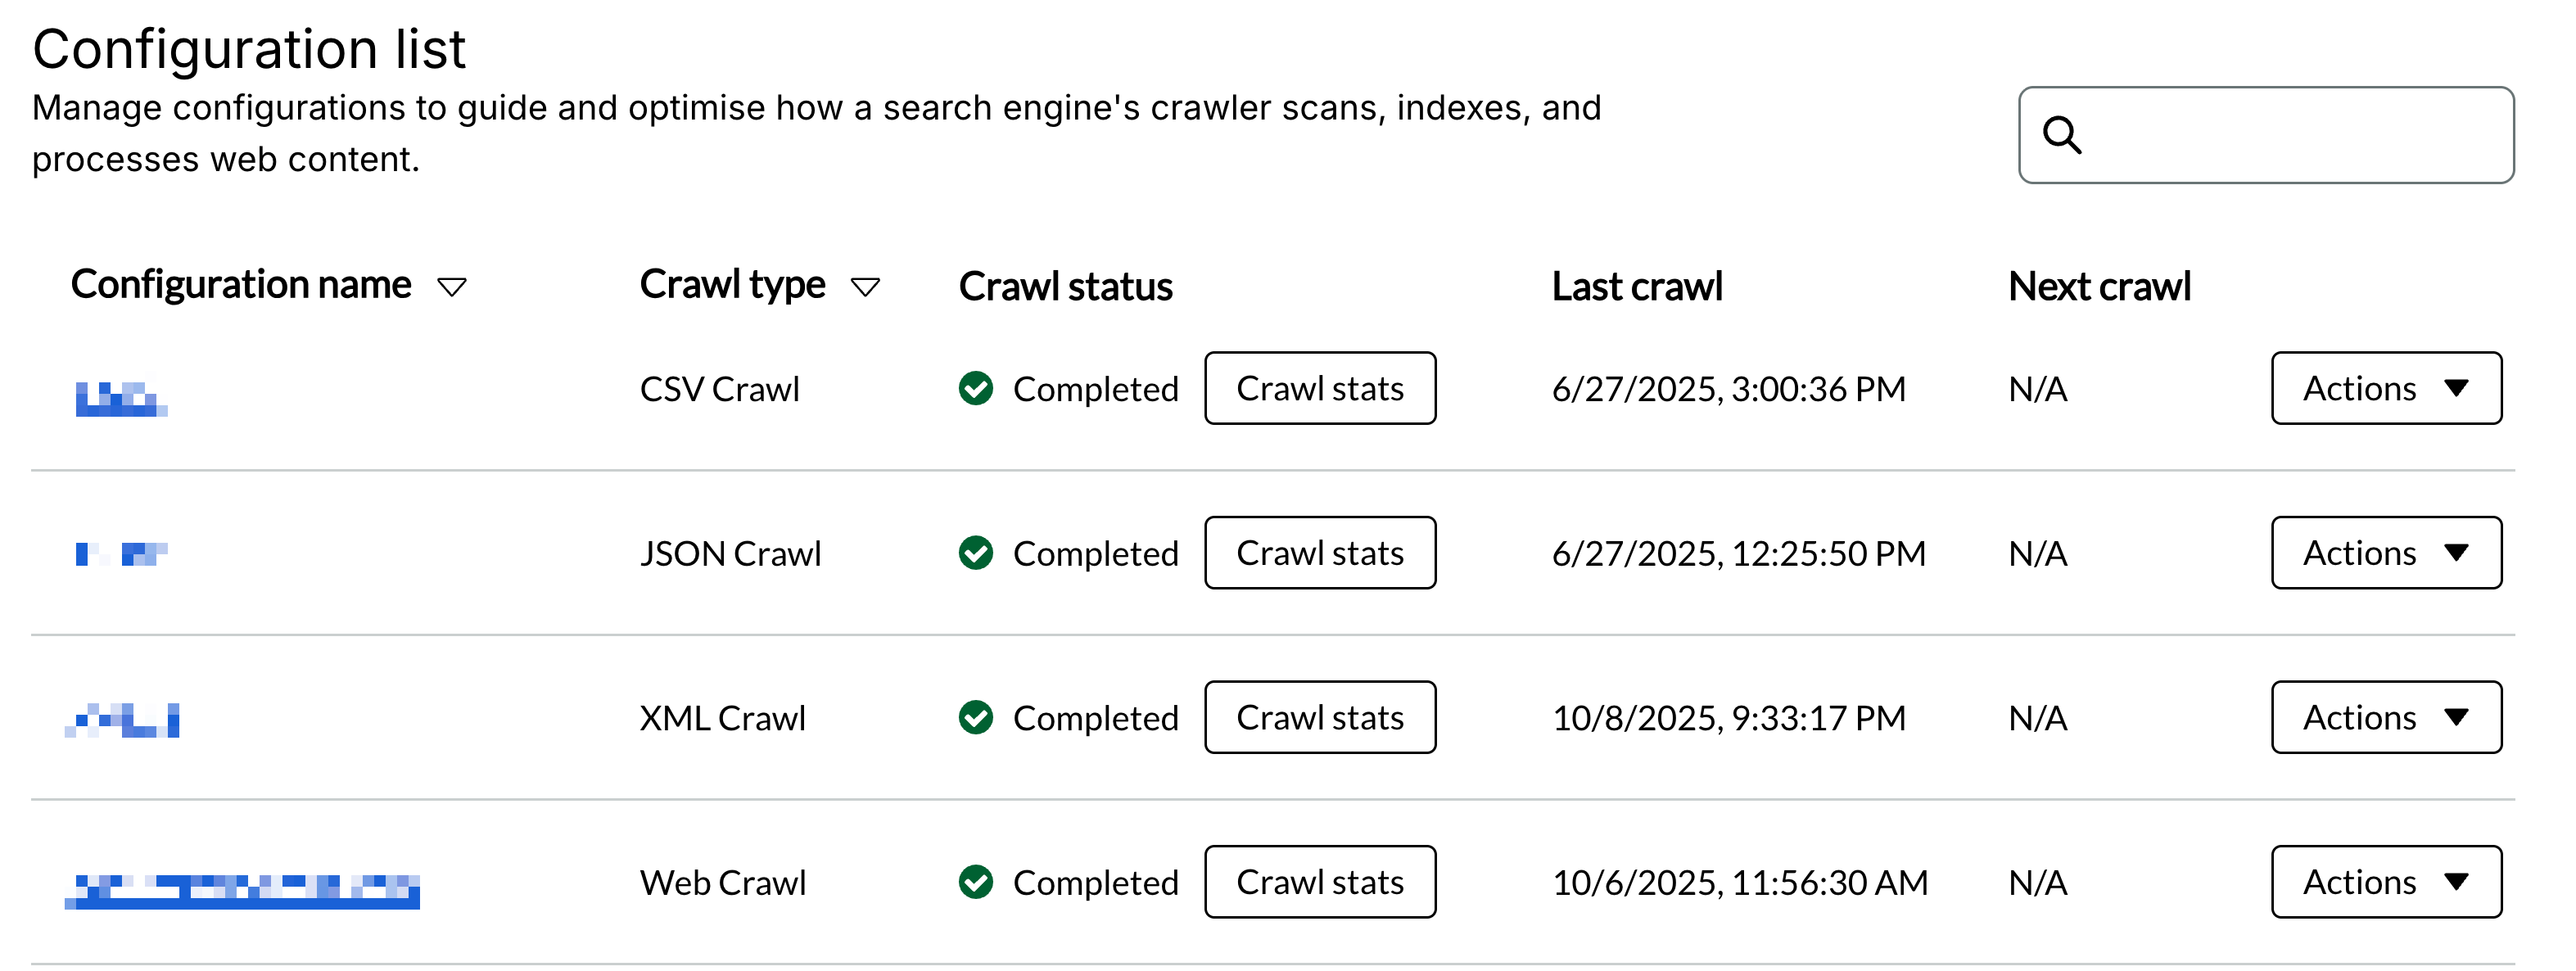
You'll see a table that outlines:
- The configuration name
- The crawl type
- Web crawl
- CSV Crawl
- JSON Crawl
- XML Crawl
- Crawl status
- The status of the previous crawl
- It will display "No crawls yet" if you've never run the crawl before
- You can also access the stats of this previous crawl here
- The status of the previous crawl
- Last crawl
- The date and time of when the last crawl took place
- Next crawl
- The date and time when the next crawl is scheduled to take place
For each configuration listed there will be an "Actions" button.
Clicking actions will allow you to:
- Run crawl
- Immediately crawl this configuration
- View crawl stats
- Schedule crawl
- Allows you to schedule a crawl in the future and define how frequently that crawl should happen
- Edit configuration
- Duplicate configuration
- This is useful if you're creating many configurations that are similar but not identical.
- You can duplicate a crawl and tweak the settings you want to see changed.
- Delete configuration
- This cannot be undone. Proceed with caution.
Scheduling a crawl
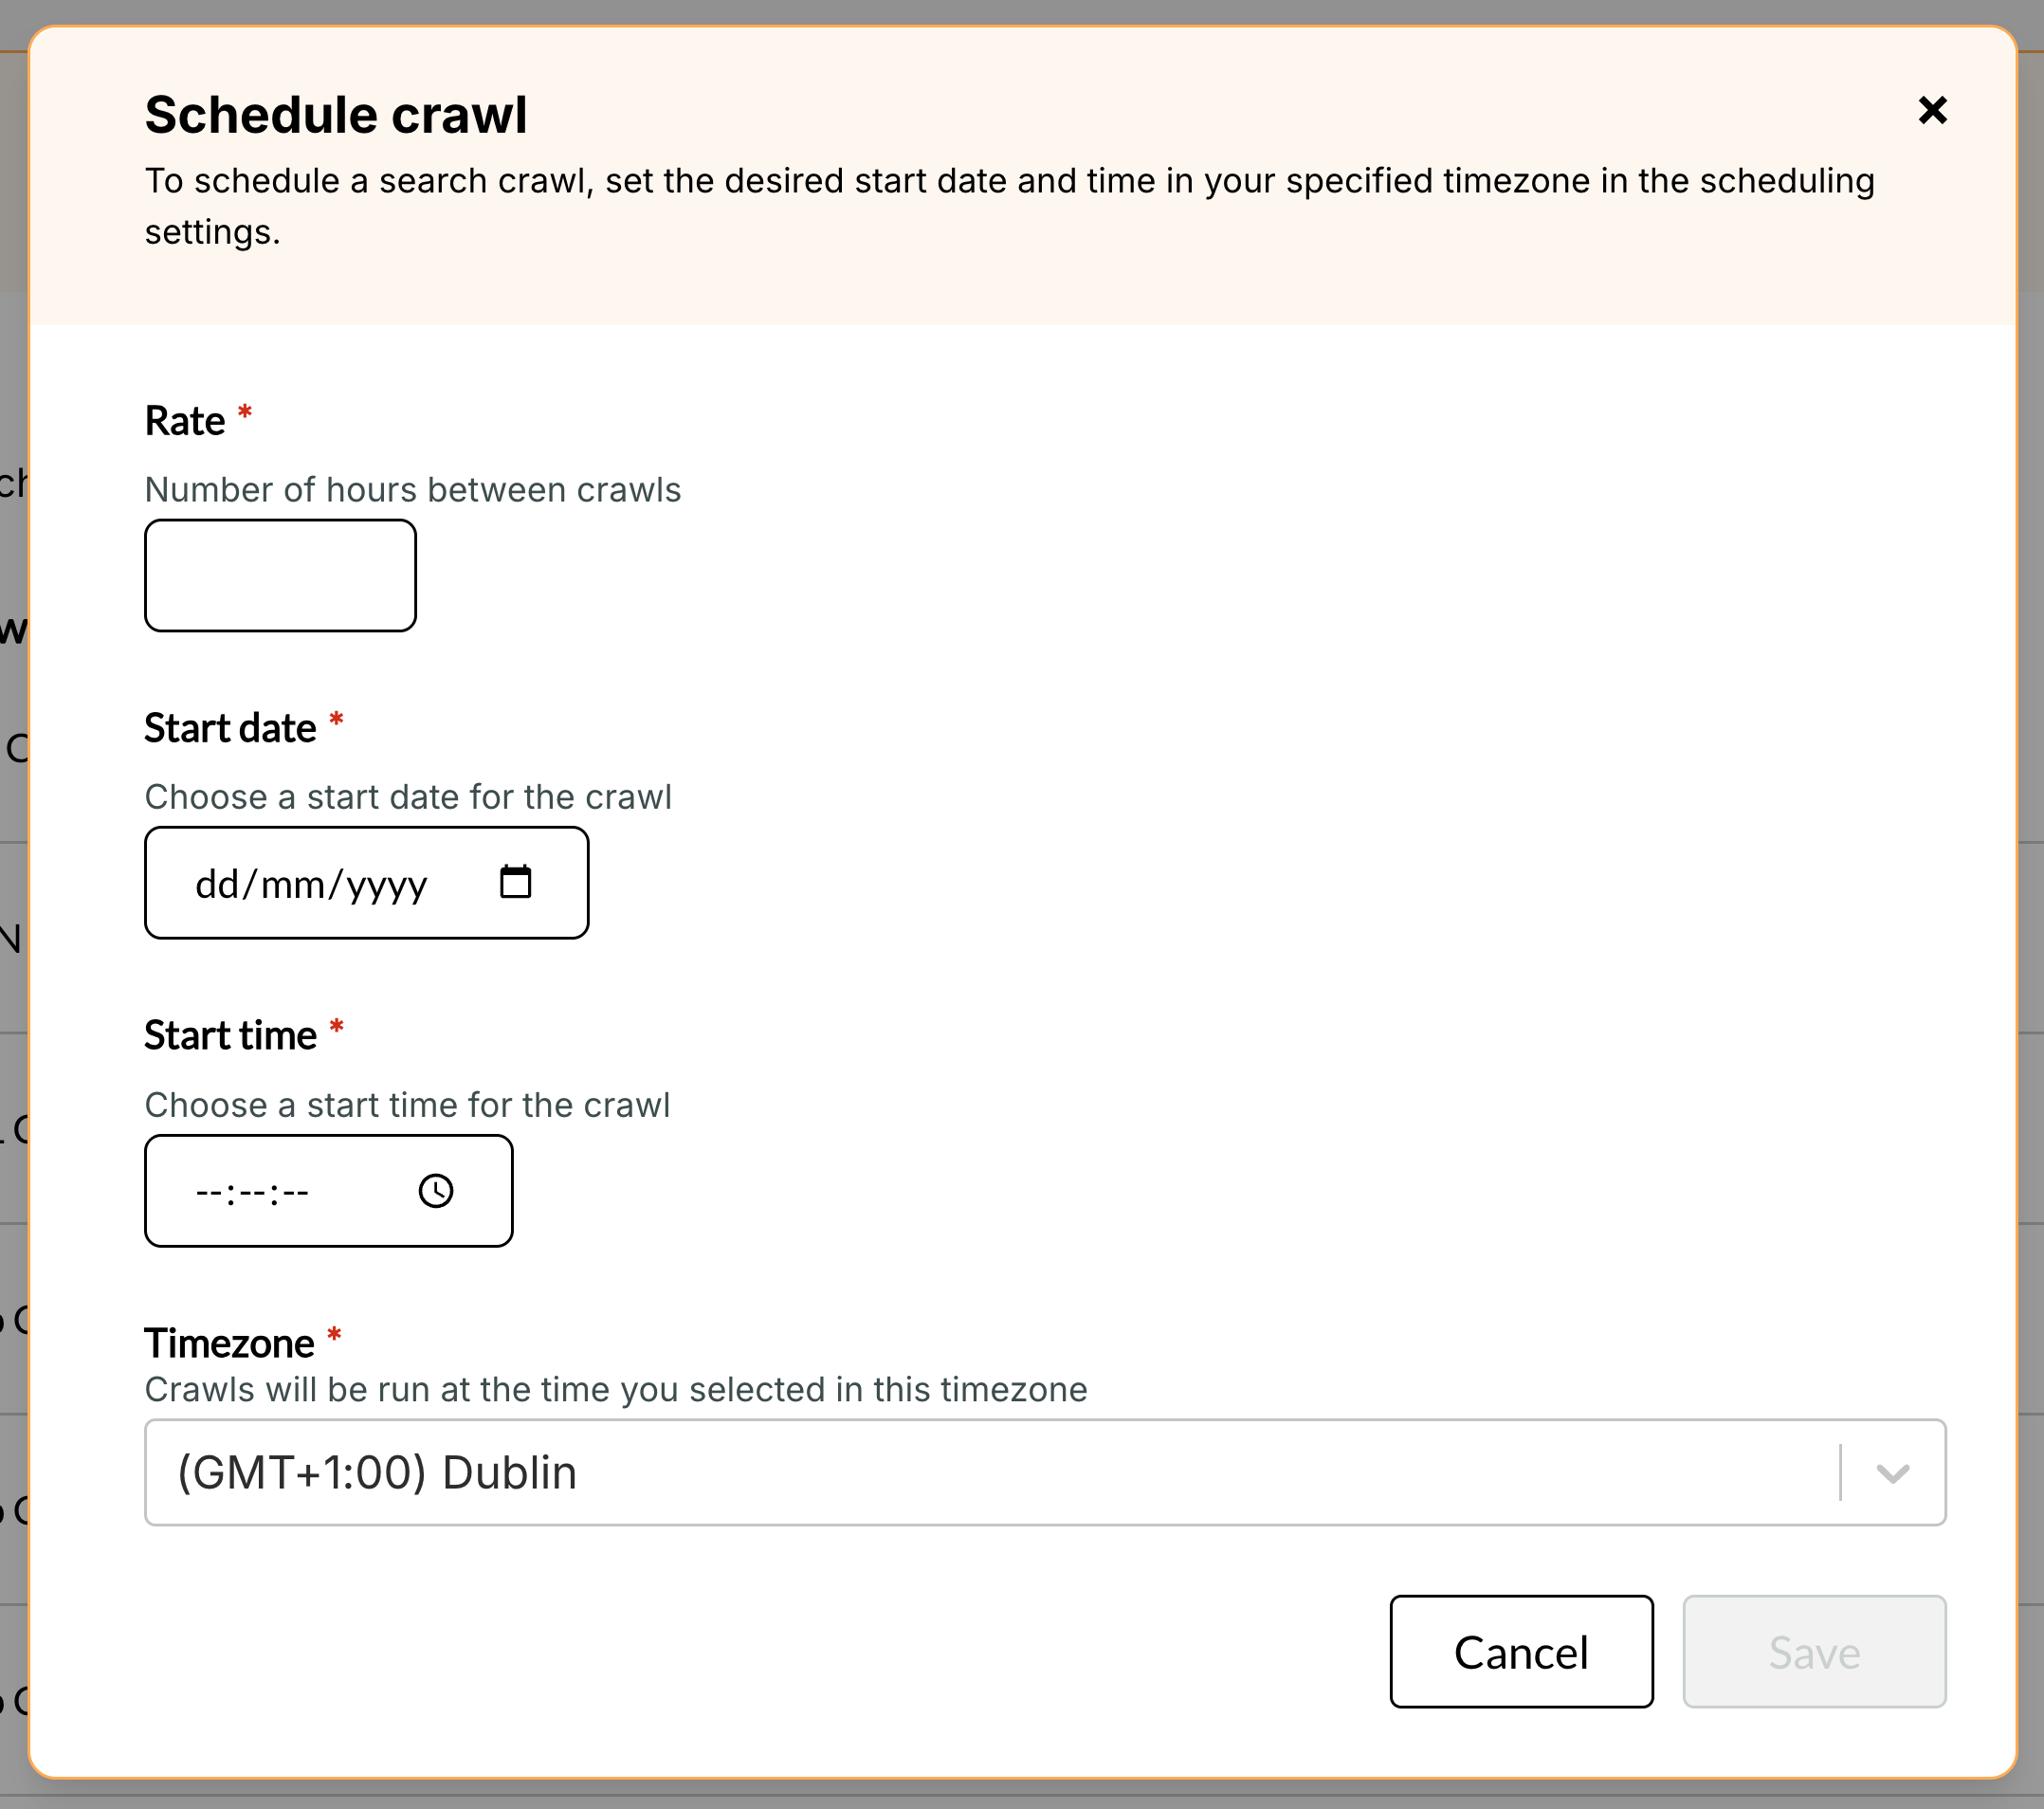
When scheduling a crawl you must first set a Rate.
The rate defines the time in hours between subsequent crawl starts.
If rate is set to 24 hours, the crawl runs once daily at the specified time.
The Start date defines when this scheduled crawl should first run.
The Start time defines what time of day the crawl should run.
The Timezone will default to your system's local timezone. We allow you to set it explicitly so it's clear exactly when a schedule will run if you're working with colleagues across timezones.
If you need to change an existing scheduled crawl, first delete the existing scheduled crawl from the actions menu before creating a new one.
Create a Configuration
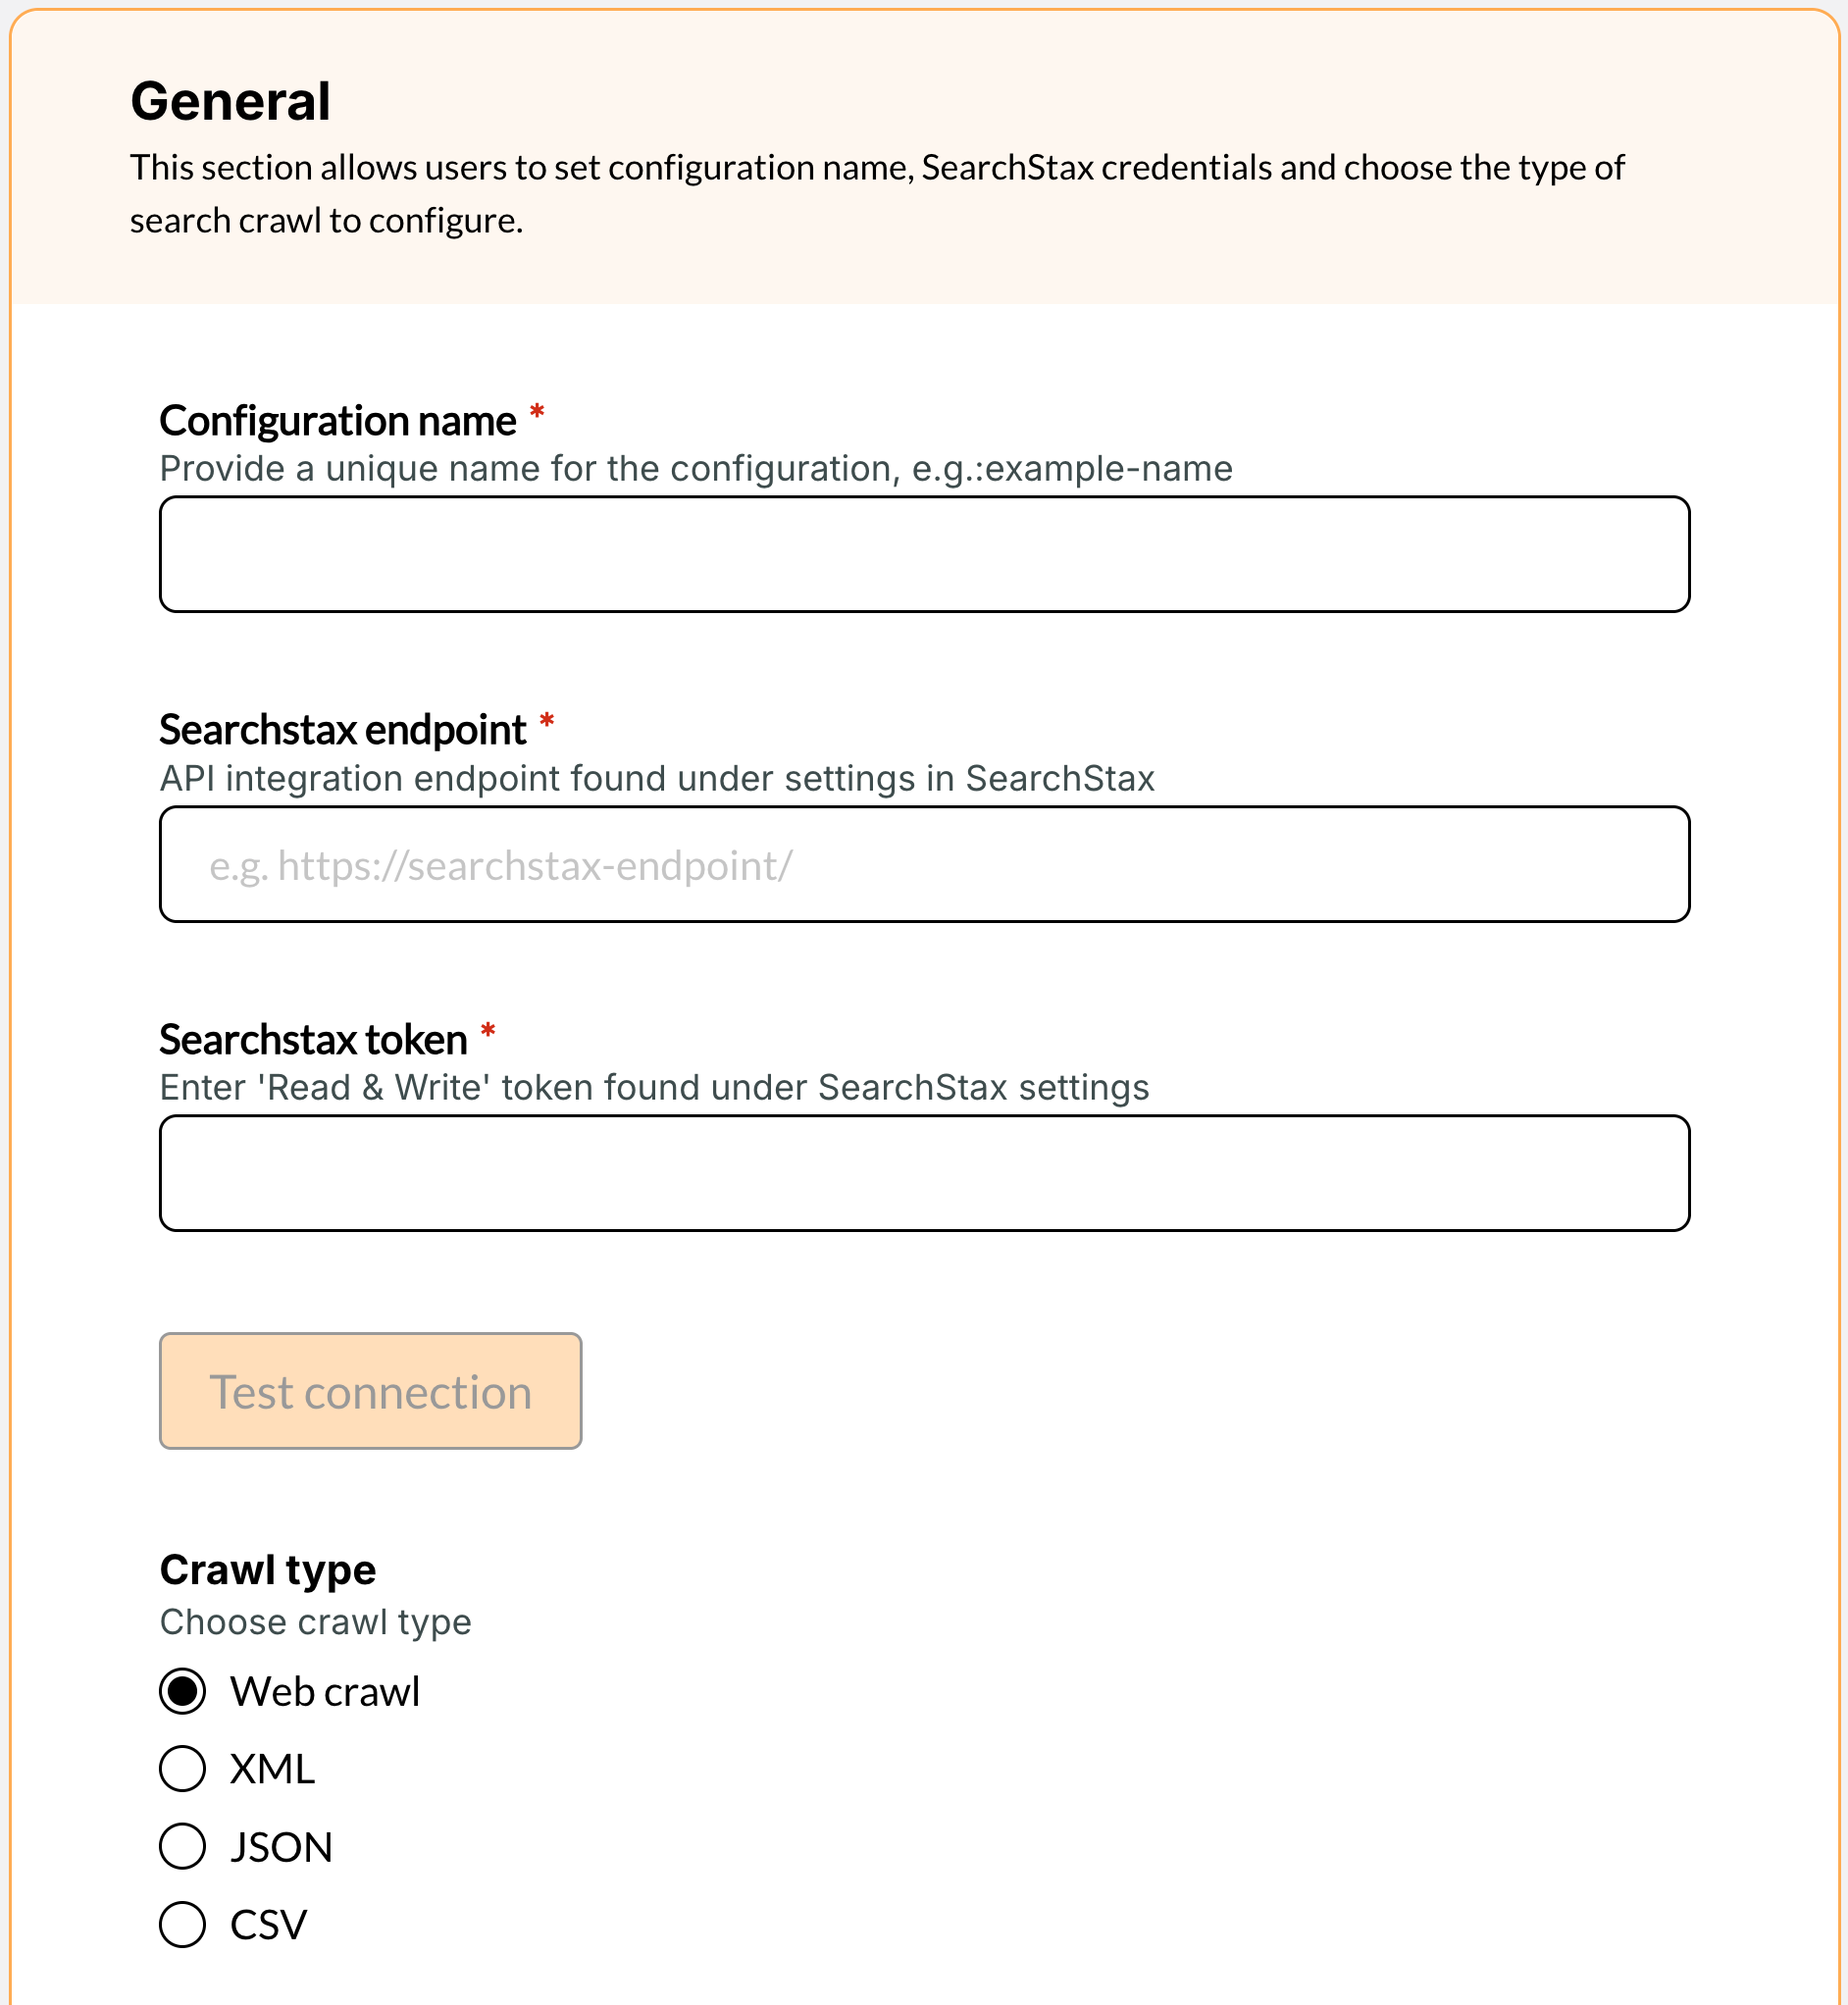
- Provide a name
- Ensure it's unique to your organization and descriptive of the purpose
- Searchstax endpoint and Searchstax token
- These can be found within the SearchStax site search dashboard under "App settings > Data management > Ingest API"
- Make sure the URL you provide does not include the
/updateat the end. - Once you've added the searchstax endpoint and token you can test the connection to make sure it's working as expected.
- Select crawl type from one of the following options
- Web crawl
- XML
- JSON
- CSV
Web Crawl Settings
All required fields are indicated with a red asterisk next to the field name within the Terminalfour Search application.
Seed
Enter URL from which a web crawler will begin to traverse a site. Each link found on the provided URL will be followed and each link found on those pages will be followed etc.
This will continue until no new pages are found.
You can have several seeds if required.
Success threshold
The minimum percentage of documents that must be gathered for an update to succeed. If the threshold is not met the crawl is considered failed and the indexed pages will not be sent to SearchStax.
For example, if the crawler finds 1000 pages on your site and the next day it crawls again and only finds 1, this is likely an indication that your site is experiencing a problem or the crawler is failing to accurately crawl your site.
To prevent a bad crawl from breaking your search you can set a success threshold to be met to ensure a crawl contains enough pages to be considered successful.
If you set a value of 75, it means "once a crawl is completed, the crawler should have found a total number of pages/documents that is at least 75% of the number it found in the previous crawl for the crawl to be considered a success and data pushed to the search index".
It is ignored on the very first crawl.
Page crawl delay
The number of seconds the crawler will wait between requests to the server.
This setting allows a crawl to be spaced out over time so that your site does not experience enormous spikes in traffic.
We recommend making this number as small as your web server can handle to ensure crawls complete in a timely manner.
A value of 0.1 seconds is a recommended starting point.
Timeout
The maximum number of seconds the crawler will wait for a page to respond before it abandons the request.
Fetch interval
When Search crawls your site, it may revisit each page multiple times during the same crawl to detect any new links that have appeared since the previous check.
The fetch interval indicates how long a page can go between visits before being recrawled again within that same crawl session.
This value should not be made too short or pages will be continuously crawled unnecessarily.
For instance, if set to 4 hours, a page won't be recrawled until at least 4 hours has passed since its last visit during this crawl session.
Sitemap URL
You may optionally provide a Sitemap XML file that outlines all the links on your site to be crawled.
URL regex filter
The search crawler needs to know what pages should be crawled or ignored while it's crawling your site. You'll likely want to ensure that it only crawls your own domain and doesn't crawl external sites that are found in links.
This field cannot be left empty, you'll need to explicitly define a regular expression for pages you want included in the index.
You may also want to exclude pages from your site if you don't want them appearing in your search results.
To add an exclude ensure it has a - character before the regular expression.
To add an include ensure it has a + character before the regular expression.
Ensure excludes are added before includes. Excludes are processed first, followed by includes, so the order matters for the rules to apply correctly.
If you add an exclude, previously crawled excluded URLs will be removed from the index on the next crawl.
Examples:-^https:\/\/mysite\.edu\/admin\/* (exclude admin pages)+^https:\/\/mysite\.edu\/* (include all pages from mysite.edu)
Index start comment
A HTML comment that tells the crawler where it should start indexing data on a page.
The crawler will include all data until it reaches the end of the page or an Index end comment.
You can have several index start and end comments within a single page to ensure you just crawl the data you need.
Index end comment
A HTML comment that tells the crawler where it should stop indexing data on a page.
The crawler will include all data it finds starting from an Index start comment until it reaches the end of the page or an Index end comment.
This is outside the comments and won't be processed.
<!-- Search text crawl start -->
This is between the Index start and end comments and will be processed
<!-- Search text crawl end -->
You can have several index start and end comments within a single page to ensure you just crawl the data you need.
Content size limit
The maximum size in megabytes a page or document can be for it to be crawled by the crawler.
Any pages or documents found larger than this size will be ignored.
Crawl document
A toggle that indicates whether documents (PDFs, Word Documents, Powerpoint Slides, Excel files, and Open document files) should be included in the crawl and displayed in your search results.
XML Crawl Settings
All required fields are indicated with a red asterisk next to the field name within the Terminalfour Search application.
XML URL
Enter the URL of the XML file that needs to be crawled.
Once entered, click the "Populate" button. This analyzes the file structure and automatically populates the fields below based on detected patterns.
Element to be processed
Choose from the dropdown which XML node should be processed by the crawl.
For complicated XML structures you may need to select "Define manually" and enter a JMESpath expression to identify the node containing the data you'd like imported.
JMESpath is a query language for JSON/XML. For guidance, see https://jmespath.org/tutorial.html.
Unique identifier
Use the dropdown to select an element or attribute that contains a unique identifier. This allows the crawler to update existing documents if they change between crawls.
For more complicated XML files you may need to select "Define manually" where you can enter a comma separated list of JMESpath expressions to denote a unique identifier.
JSON Crawl Settings
All required fields are indicated with a red asterisk next to the field name within the Terminalfour Search application.
JSON URL
Enter the URL of the JSON file that needs to be crawled.
Once entered, click the "Populate" button. This analyzes the file structure and automatically populates the fields below based on detected patterns.
Element to be processed
If your JSON file starts with an array [...], this field is not displayed. If it starts with an object {...}, select which property contains the array of items.
Choose from the dropdown which JSON node contains the array of items that should be processed by the crawl.
For complicated JSON structures you may need to select "Define manually" and enter a JMESpath expression to identify the element containing the array you'd like imported.
JMESpath is a query language for JSON/XML. For guidance, see https://jmespath.org/tutorial.html.
Unique identifier
Use the dropdown to select an element or attribute that contains a unique identifier. This allows the crawler to update existing documents if they change between crawls.
For more complicated JSON structures you may need to select "Define manually" where you can enter a comma separated list of JMESpath expressions to denote a unique identifier.
CSV Crawl Settings
All required fields are indicated with a red asterisk next to the field name within the Terminalfour Search application.
CSV delimiter
Select the delimiter used in the CSV file. By default this is a comma character (e.g. ,).
You can select a different separator from the list provided or choose "custom delimiter" to provide one that isn't listed.
CSV URL
Enter the URL of the CSV file that needs to be crawled.
Once entered, click the "Populate" button. This analyzes the file structure and automatically populates the fields below based on detected patterns.
Unique identifier
Use the dropdown to select a column that contains a unique identifier. This allows the crawler to update existing documents if they change between crawls.
If the CSV file contains no single column with a unique identifier you can click "Define manually" where you can enter a comma separated list of column headers that, when combined, denote a unique identifier.
Mapping Options
Static values
Static values allow you to define some fields that will be added to the SearchStax index alongside the content found during a crawl.
By defining a static value field you're saying that for every page found you want to add the same data alongside any content found. For example, if you're using a web crawl to crawl your main site you might define a Static values with:
Static field name: sitename
Field value: main-university-site
You can also set the field type that should be pushed to SearchStax. The available field types are:
- General
- Text
- Text english
- Multiple texts english
- String
- Date
- Boolean
These additional tags are then available within SearchStax's dashboard and can be used to modify your search facets or tweak search relevancy.
You can have as many or as few static values mapped as required.
Dynamic values
Dynamic values are similar, in that they are used to define fields that will be added to SearchStax. But where static values adds the same value to every page/document/item found, dynamic values will take values found in the indexed content and ensure that's dynamically added to the indexed item.
For web crawls you may want to take values from meta tags in the HTML source code and map those to fields in SearchStax so you can use those in facets or for tweaking relevancy.
For example, mapping the <meta name="description"> tag to a 'description' field in SearchStax.
For XML/JSON/CSV crawls, here is where you can define which fields in the source data should be pushed to SearchStax.
Be sure you select the appropriate SearchStax field type for your requirements. The field types are:
- General
- Text
- Text english
- Multiple texts english
- String
- Date
- Multiple values
- When selecting multiple values you can choose what separator should be used to split the multiple values
- Boolean
You can have as many or as few dynamic values mapped as required.
Back to top