
Behavioral Personalization
- In some situations, it can be useful to personalize content on your website based on a visitor’s interests or previously selected persona.
- There are numerous ways to deliver behavioral personalization within Terminalfour. In this example, you will create a simple form that allows website visitors to select a persona preference, which can then be stored and used to personalize content across the website.
- When the visitor returns to your website in the future, their saved persona preference can be used to deliver personalized content on the page.
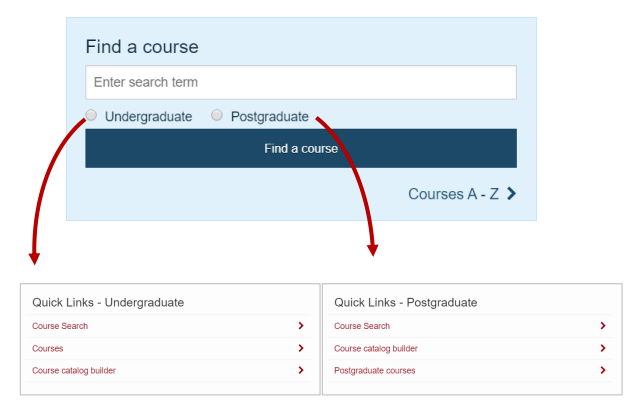
Example on https://training.terminalfour.net/ of a personalized homepage based on the visitor’s selected persona and previous interactions with the website.
Create Persona List
- Go to Assets > Lists.
- Click on + Add new list to add a new list with the following values:
| Name | Value |
|---|---|
| Default | Default |
| Undergraduate | Undergraduate |
| Postgraduate | Postgraduate |
Create a General Content Content Type
This Content Type is used to add general content to the page.
- Go to Assets > Content types.
- Click on + Create content type to add a new content type called General Content with the following values:
| Name | Description | Type | Max Size | Required |
|---|---|---|---|---|
| Persona | The content will display when the visitor’s persona matches this value. | Select Box List used for values: Persona List (this is the list created earlier) |
80 | Yes |
| Heading | Enter a main heading/title for this content. | Plain text | 250 | Yes |
| Main body | Enter the main body of the content. | Plain text | 5000 | Yes |
- Create a Content Layout "text/general-content".
- You can download the content layout code from the media library. Your trainer will show you how.
- Alternatively, you may use the code below.
<div class="panel personalized" id="QL-<t4 type="content" name="Persona" output="selective-output" modifiers="" process-format="true" format="$value" />"><!-- panel personalized -->
<t4 type="content" name="Heading" output="selective-output" modifiers="" process-format="true" format="<h3>$value</h3>" />
<t4 type="content" name="Main body" output="normal" modifiers="medialibrary,nav_sections" />
</div>
Create a Related Content Navigation
- Go to Assets > Navigation.
- Click + Add new navigation to add a new Related Content navigation with the following values.
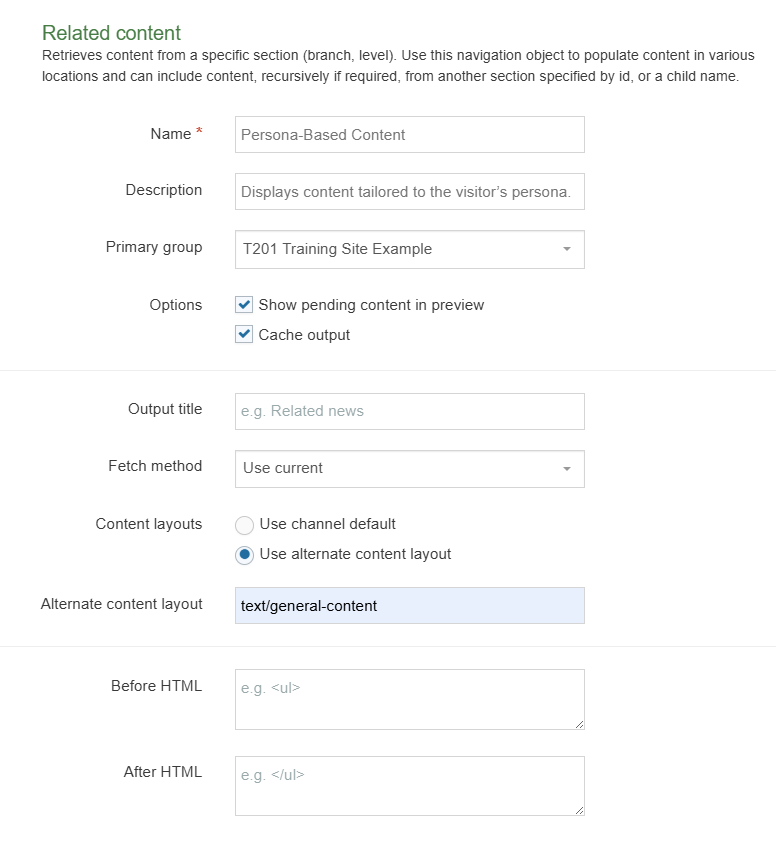
- Copy the navigation tag you receive at the end of the creation process.
Add the Persona Form code to your page
We’re going to use a form as a trigger mechanism to capture visitor input and store their persona preference for future personalization.
In this example, the visitor will choose whether they are interested in Undergraduate or Postgraduate information.
You can add this form directly to your Page Layout, or add it to a section as a block of content using a Code Content Type. In the example below, the form is added to the Page Layout.
- Go to Assets > Page Layouts.
- Edit the page layout that requires the form.
- Add the following code where the search form needs to be located within the Page Layout.
For example, you can add it to the very bottom of your Header code.
<form class="home-course-search" action="#"> <!-- Enter Search Location -->
<div class="row">
<div class="small-12 columns">
<label>
<span class="sr-only">Search</span>
<input type="text" placeholder="Enter search term" name="keyword">
</label>
</div>
</div>
<input id="UG-CourseType" type="radio" value="Undergraduate" name="courseType"> <!-- Need to match the Persona -->
<label for="UG-CourseType">Undergraduate</label>
<br class="show-for-medium-only">
<input id="PG-CourseType" type="radio" value="Postgraduate" name="courseType"> <!-- Need to match the Persona -->
<label for="PG-CourseType">Postgraduate</label>
<br class="show-for-medium-only">
<input id="DF-CourseType" type="radio" value="Default" name="courseType"> <!-- Need to match the Persona -->
<label for="DF-CourseType">Any (Default)</label>
<input class="button small primary expand" type="submit" value="Find a course">
</form>
- Replace # with the URL of where your search results will be. (not needed in this exercise).
- Click Save changes to save the Page Layout
Add JavaScript Code to the Media Library
We will use a jQuery script to deliver persona-based content personalization. In simple terms, the script remembers whether a visitor selected Undergraduate or Postgraduate content and then displays the matching content block when they return to the website.
Your trainer will provide the JavaScript file, or you can create the file yourself using the code provided in Step 4.
Add the script to your Page Layout:
- Go to Assets > Page Layouts.
- Edit the Page Layout where persona-based content personalization will be applied.
- Click on </> Generate Handlebars Expression and locate the JavaScript file your trainer uploaded to the Media Library, or upload it now (see step 4 below). Paste your Handlebars expression into the Footer of your Page Layout.
- (optional) If required you can use the code below to create your own JavaScript file and add it to the Media Library.
$(document).ready(function() {
if ( $('.personalized').length ){
$('.personalized').hide();
checkCookie("courseType");
}; //end check for existence
$('.home-course-search').submit(function() {
setCookie('courseType',"",7);
var searchParameter = $('.home-course-search input[name="courseType"]:checked').val();
setCookie('courseType',searchParameter,7);
});
function checkCookie(cookieName) {
var level = getCookie(cookieName);
if (level == "") {
$('#QL-Default').show();
}
else if(level === "Undergraduate"){ $('#QL-Undergraduate').show();
}
else if(level === "Postgraduate"){ $('#QL-Postgraduate').show();
}
else { $('#QL-Default').show(); } }
function setCookie(cname, cvalue, exdays) {
var d = new Date();
d.setTime(d.getTime() + (exdays*24*60*60*1000));
var expires = "expires="+d.toUTCString();
document.cookie = cname + "=" + cvalue + "; " + expires + ";" + "path=/";
}
function getCookie(cname) {
var name = cname + "=";
var ca = document.cookie.split(';');
for(var i=0; i<ca.length; i++) {
var c = ca[i];
while (c.charAt(0)==' ') c = c.substring(1);
if (c.indexOf(name) != -1) return c.substring(name.length, c.length);
}
return "";
}
});
Add persona-based content to a section
- In your site structure, add a new section and apply the page layout that includes persona-based content personalization.
- Within the section, add several content items using the General Content Content Type. Set the first item to the Default persona, the second to Undergraduate, and the third to Postgraduate.
- Save and approve all your content.
Publish Site and Test
- Go to Sites & Channels > Publish Channels.
- Publish your site.
- The persona-based personalization should function in a similar way as the Training Sample Site.
Enter a search keyword, select Undergraduate, and click Search. - When you return to the page, the content will be personalized and display a heading specific to the Undergraduate persona.
Feedback survey
Congratulations on completing the Advanced Web Developer Training module.
Please provide feedback in our on-line survey.