
Personalization Using Cookies
- In some situations it might be useful to customize the content on your website based on the previous browsing habits of your visitor.
- There are numerous ways to personalise content with cookies within Terminalfour. In this example you are going to create a simple form which when used by your website visitor will create and store a cookie on the users device.
- When your web visitor returns to your website in the future the cookie will be used to personalize the content on the web page.
Example on https://training.terminalfour.net/ of a personalized homepage, based on the previous browsing habit of the visitor.
Create Cookie Preference List
- Go to Assets > Lists.
- Click on + Add new list to add a new list with the following values:
| Name | Value |
|---|---|
| Default | Default |
| Undergraduate | Undergraduate |
| Postgraduate | Postgraduate |
Create a General Content Content Type
This Content Type is used to add general content to the page.
- Go to Assets > Content types.
- Click on + Create content type to add a new content type called General Content with the following values:
| Name | Description | Type | Max Size | Required |
|---|---|---|---|---|
| Cookie Preference | The content will show up if the cookie from the course search form matches this value. | Select Box (List of Names which will be used in the cookie - This is the list created in Step 1) | 80 | Yes |
| Heading | Enter a main heading/title for this content. | Plain text | 250 | Yes |
| Main body | Enter the main body of the content. | Plain text | 5000 | Yes |
- Create a Content Layout "text/general-content".
- You can download the content layout code from the media library. Your trainer will show you how.
- Alternatively, you may use the code below.
<div class="panel quicklinks small-12 medium-3 medium-pull-9 columns" id="QL-<t4 type="content" name="Cookie Preference" output="selective-output" modifiers="" process-format="true" format="$value" />"><!-- panel quicklinks -->
<t4 type="content" name="Heading" output="selective-output" modifiers="" process-format="true" format="<h3>$value</h3>" />
<t4 type="content" name="Main body" output="normal" modifiers="medialibrary,nav_sections" />
</div>
Create a Related Content Navigation
- Go to Assets > Navigation.
- Click + Add new navigation to add a new Related Content navigation with the following values.
-Configuration.png)
- Copy the navigation tag you receive at the end of the creation process.
Add the Search Form code and Navigation object to your layout
- Go to Assets > Page Layouts.
- Edit the page layout that requires the cookie personalization.
- Add the following code where the search form needs to be located within the layout.
- Replace action /course-hub/basic-course-search/ with the URL of where the search results will be.
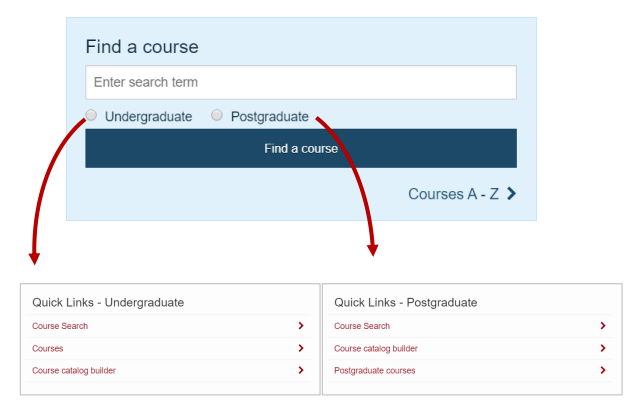
The Cookie is created when the form is submitted.
<form class="home-course-search" action="/course-hub/basic-course-search/"> <!-- Enter Search Location -->
<div class="row">
<div class="small-12 columns">
<label>
<span class="sr-only">Search</span>
<input type="text" placeholder="Enter search term" name="keyword">
</label>
</div>
</div>
<input id="UG-CourseType" type="radio" value="Undergraduate" name="courseType"> <!-- Need to match the Cookie Preferences -->
<label for="UG-CourseType">Undergraduate</label>
<br class="show-for-medium-only">
<input id="PG-CourseType" type="radio" value="Postgraduate" name="courseType"> <!-- Need to match the Cookie Preferences -->
<label for="PG-CourseType">Postgraduate</label>
<input class="button small primary expand" type="submit" value="Find a course">
</form>
- Within the same page layout, add the navigation tag you created earlier where the content needs to be located on the page.
Add JavaScript Code to the Media Library
- Go to Assets > Page Layout.
- Edit the page layout that requires the cookie personalization.
- Click on </> Generate Handlebars Expression and locate the JavaScript file you uploaded to the Media Library. Paste your Handlebars expression into the Header of the Page Layout.
- If needed you may use the code below to create your JavaScript file.
$(document).ready(function() {
if ( $('.quicklinks').length ){
$('.quicklinks').hide();
checkCookie("courseType");
}; //end check for existence
$('.home-course-search').submit(function() {
setCookie('courseType',"",7);
var searchParameter = $('.home-course-search
input[name="courseType"]:checked').val();
setCookie('courseType',searchParameter,7);
});
function checkCookie(cookieName) {
var level = getCookie(cookieName);
if (level == "") {
$('#QL-Default').show();
}
else if(level === "Undergraduate"){
$('#QL-Undergraduate').show();
}
else if(level === "Postgraduate"){
$('#QL-Postgraduate').show();
}
else {
$('#QL-Default').show();
}
}
function setCookie(cname, cvalue, exdays) {
var d = new Date();
d.setTime(d.getTime() + (exdays*24*60*60*1000));
var expires = "expires="+d.toUTCString();
document.cookie = cname + "=" + cvalue + "; " + expires + ";" + "path=/";
}
function getCookie(cname) {
var name = cname + "=";
var ca = document.cookie.split(';');
for(var i=0; i<ca.length; i++) {
var c = ca[i];
while (c.charAt(0)==' ') c = c.substring(1);
if (c.indexOf(name) != -1) return c.substring(name.length, c.length);
}
return "";
}
});
Add content to a section
- In your site structure, add a new section and apply the page layout that contains the cookie personalization.
- In a section, add 3 pieces of content using the "General Content" Content Type. Set the first piece of content to a Cookie Preference as Default, the second as Undergraduate and the third as Postgraduate.
- Save and approve all pieces of content.
Publish Site
- Go to Sites & Channels > Publish Channels.
- Publish your site.
- The cookie personalization should work the same as the Sample Site - http://training.terminalfour.com/.
Type in a keyword, select Undergraduate and press search. - When you return to the page, the content on the page should appear with a heading that is specific for Undergraduate.
Feedback survey
Congratulations on completing the Advanced Web Developer Training module.
Please provide feedback in our on-line survey.