
Form Builder
- The Terminalfour Form Builder is an editor, enabling you to easily create advanced web forms without programming. The forms you create can be fully customized to meet your needs.
- A form is defined in Terminalfour using a content type as its basis. When a form is created and a submission made, Terminalfour creates a corresponding content type to manage the content.
- This editor is only available to Administrators, but once the form is created, you can permit any user role to add a form to a Section by means of a Content Type. They can also view the results within a Section.
- Your forms are stored on a dedicated form bank server, which your Terminalfour installation connects to using authentication.
How to create a new form
- Create a new form.
- Select field types to add new fields to your form.
- Go to Engage -> Forms & Transactions -> + Add new form.
- Fill in the relevant information at the General settings level:
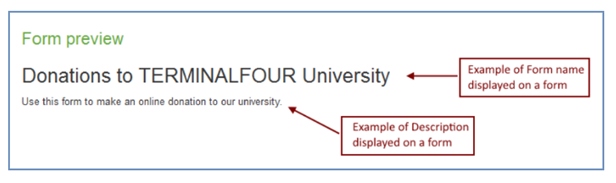
- Form name: The name used to identify your form.
- Description: enter a clear description with what this form is to be used for.
- Display options:
- Show name on form: check this box to display this form as a heading <h2> at the top of your published form.
- Show description on form: check the box to display the description as paragraph text <p> towards the top
of your published form. - Include styling: leaving this box checked will style your form using the default Bootstrap CSS to style your form. Uncheck the box to use your own CSS style associated with your page layout.
- Click Next ->
How to add fields to the new form
- Click on a field type to add it to your form.
- Add as many fields as are necessary for your form (maximum of 75 fields per form).
- The blue Submit button is a configurable default field.
- Click on the blue Edit area to customize the fields in your form.
- To reorder the fields, grab the field title and drag it to another area.
- Once you’ve set up the fields, click Save and continue ->
Field / input types
To get started, click on a field type to add it to your form:
| Icon | Field type | Description |
 |
Text input | Adds a text input used for text, numbers, passwords, web addresses etc. |
 |
Email input | Adds an email input with an option to allow the user to receive a confirmation of their submission by email |
 |
Dropdown | Allows users to select a single option from a dropdown |
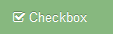 |
Checkbox | Allows multiple options to be selected from a group |
 |
Radio group | Allows users to select a single option from a group |
 |
Date | Allows users to select a date and optional time |
 |
Date range | Allows a start and end date to be set |
 |
Text area | Allows multiple lines of text to be entered |
 |
WYSIWYG |
Displays a WYSIWYG editor to enter HTML. TinyMCE, the WYSIWYG editor that Form Builder uses, follows the WAI specification making it compatible with screen readers. |
 |
File | Uploads a file |
 |
Hidden | Adds an input that will submit a value without the user seeing it |
| Advanced inputs | ||
 |
CC info | Adds the required fields to accept payment information from the user. i.e. credit card number, expiry date etc. Only one occurrence allowed per form |
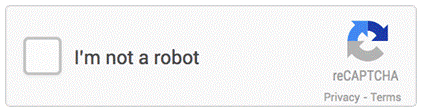
| reCAPTCHA | Adds a to help prevent spam submissions (available from Terminalfour v8.2.10) | |
| Static elements | ||
 |
Heading | Adds a Heading to the form |
 |
Paragraph | Adds text to the form - useful to explain parts of your form to users |
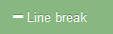 |
Line break | Adds a line between fields to divide the form into sections |
How to add dependencies
- This is an optional area.
- Select +Add dependency.
- Configure dependencies as are applicable to your form.
- The select field drop down will show you the fields you’d previously selected for your form.
- Select operator to add logic to your submissions.
- Enter a value if needed.
- Apply the “then” properties.
- Add as many dependencies as you need.
- Remove or reorder the dependencies by dragging and dropping.
- Click Next ->

How to set up submissions
- Save submissions to:
- Terminalfour only: this will save submissions to an unpublished section within Terminalfour.
- Named child section: will save submission to a child section. The name you give it will be the name of the section and drops in under the Form section.
- Specified section: save submissions to a specific section dedicated to receive the form submissions.
- Submission name mapping: select the field you wish your submissions to be mapped to.
- Channel mapping: if needed, select the channel associated with submissions for this form.
- Additional Submission Options:
- Also submit to: configure how you want to process online payments. Check this box if the form requires the payment gateway to be turned on.
- Webhook URL: enter a webhook URL.
When a form submission is received in Terminalfour, the submission data will be sent to the URL in the Webhook URL field.
- Redirection options on success:
- Show a message: select showing a message on success.
- Redirect location on submission success: select either a specific section on your Site Structure, or redirect to a URL.
- Redirection options on failure:
- Show a message: select showing a message on failure.
- Redirect location on submission failure: same as above with submission success.
- Click Next ->
How to set up for email
- Select users and/or groups that are in the Terminalfour system.
- Non-application recipients: you can also add email addresses for people or groups who are not in the Terminalfour system.
- Additional options:
- Subject field mapping: select the subject field—this will become the email subject.
- Recipient minimum user level: select a minimum recipient Terminalfour user level.
- Sender / Reply-to mapping: sets the sender reply-to headers to allow replies to be sent to the correct address.
- Select Save and continue ->.
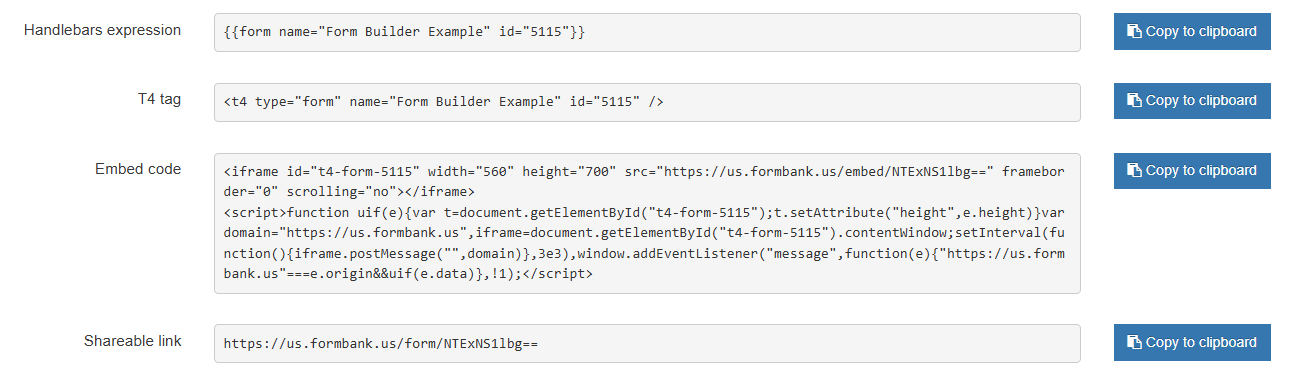
- Copy the Handlebars expression and click Finish ->
How to enable the new form
- The Handlebars expression needs to be placed into a Code only Content Type.
- Go to a Section for your form or create a new one.
- If it’s not already, enable the Code only Content Type.
- Select +Create content from the Actions menu.
- Name: name your form.
- Code: drop your Handlebars expression into the code field.
- Save changes.
How to test your form
- Preview your form.
- Fill out at least, the required fields.
- Submit the form.
- Verify that you are redirected to the correct landing page.
- Check submission
- Open the task scheduler. Administration -> Task scheduler. Make sure a submissions task has been created, and wait for the amount of time selected in the Execution interval column so that the task is triggered.
- Publish your site or section. Check that the form displays.
How to gather new submissions
- Once submissions return to Terminalfour, you can gather your submissions and distribute the information accordingly.
- Check to see that submissions have been returned to whichever section you determined would hold form submissions (check the Pending number).
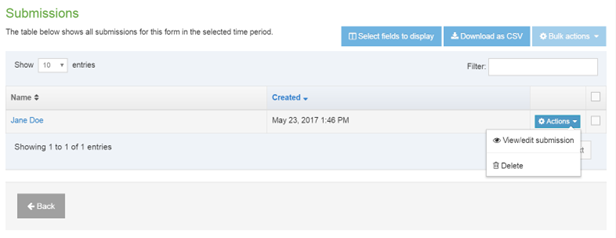
- Clicking onto the form-as-content link will bring you to the actual Content type.
- A better way to manage form submissions is to go to Engage -> Forms & Transactions.
- Find your form, and from the blue Actions bar, select View submissions.
- Information includes the total number of submissions for the form, and a graph that shows the date range of the submissions. For each submission data includes date of submission, IP address of the person submitting the form and each form field value.

.png)
How to distribute and organize form submissions
- Toward the bottom of the submission report page, select Download as CSV.
- To delete a submission, select Delete from the blue Actions bar. It will be marked as Inactive content.
- To entirely remove a submission from the system, it must be purged.
- You may select multiple submissions, and then use the Bulk actions bar for multiple deletions.
reCAPTCHA
- reCaptcha is a form to help prevent spam submissions.
- You can use Google reCAPTCHA V2 in your TERMINALFOUR forms.
- Choose to use reCAPTCHA on all your forms or on a per form basis.
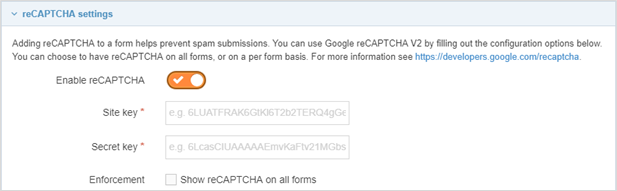
How to enable reCAPTCHA
- Go to Administration -> Settings -> Form builder -> reCAPTCHA settings
- Enable reCAPTCHA using the toggle button.
- Site key: This is provided by Google when registering a reCAPTCHA site.
- Secret key: This is provided by Google when registering a reCAPTCHA site.
- Enforcement: Check the box if you want to use reCAPTCHA on all your forms.
- Click Save changes to save the configuration.
if 'Show reCAPTCHA on all forms' is not selected, it will only be shown on forms where it has been explicitly added.
Feedback survey
Congratulations on completing the Advanced Web Developer Training module.
Please provide feedback in our on-line survey.