Wrapper content type
In this last exercise, you will build an Accordion content type to learn how to work with sequences of content items of the same type.
- Allows a sequence of content items of the same type to be wrapped in markup.
- Used for sliders, accordions, tabs, card groups and other repeatable items.
first and last Helpers
The first Helper will be true when the content item is the first piece of content in a section.
{{#first}}
<h1>First content item in the section</h1>
{{/first}}The last Helper will be true when the content item is the last piece of content in a section.
{{#last}}
<footer>Last content item in the section</footer>
{{/last}}
firstOfType and lastOfType Helpers
These Helpers let you know if an item of content is the first and last of its type in a section:
{{#firstOfType}}
Only output if first of this content type in section
{{/firstOfType}}{{#lastOfType}}
Only output if last of this content type in section}}
{{/lastOfType}}
firstInSequence and lastInSequence Helpers
Perhaps more flexible though, are these Helpers which allow you to determine if an item of content is the first and last of its type in an uninterrupted sequence of content in a section.
The firstInSequence Helper will be true when the content item is the first piece of content using this content type in an uninterrupted sequence of content in a section.
{{#firstInSequence}}
Only output if first of this content type in an uninterrupted sequence in this section
{{/firstInSequence}}
The lastInSequence Helper will be true when the content item is the last piece of content using this content type in an uninterrupted sequence of content in a section.
{{#lastInSequence}}
Only output if last of this content type in an uninterrupted sequence in this section
{{/lastInSequence}}
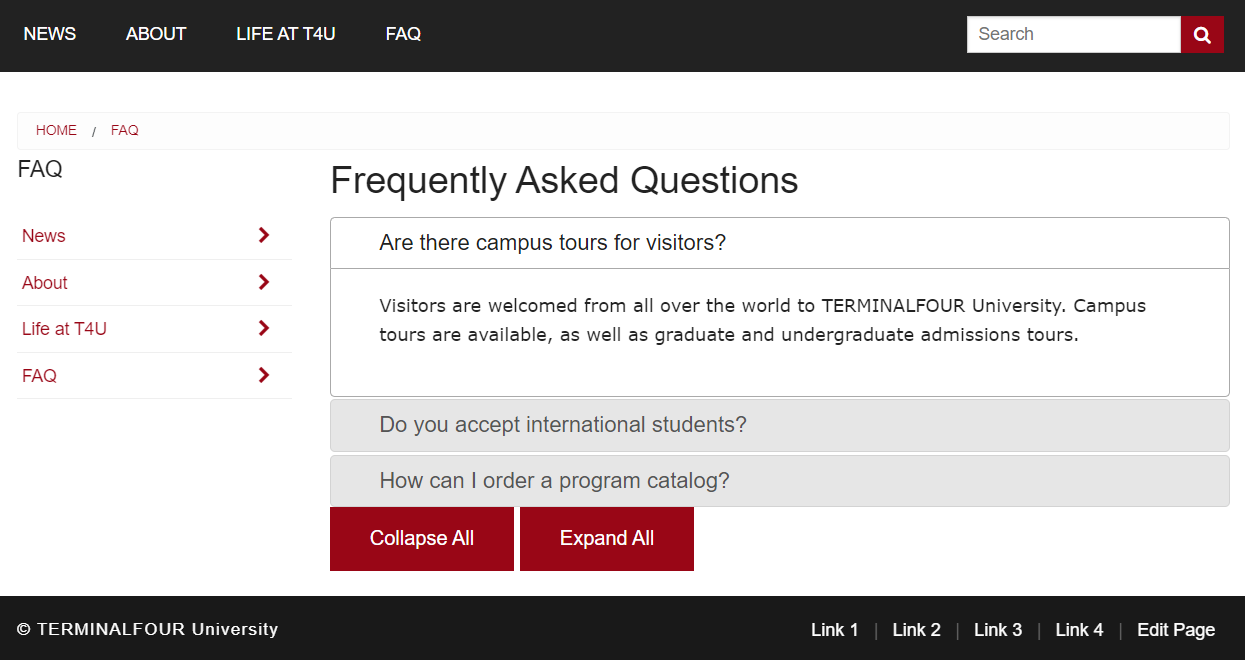
Let's now demonstrate the use of these Helpers. In the following exercises, you will build an accordion component that displays FAQs.
Setting up the jQuery UI library
The accordion component is generated using the jQuery UI Library. In order to use this library, you will need to upload three files into your media library and then target them using Handlebars in your page layout. These files have been previously uploaded to the media library, let's learn how to reference them using Handlebars in the page layout.
- Go to Content > Media Library.
- Click into "T205 Training Site Example" and then into Developer Assets.
- Click into the CSS and JavaScript folders to retrieve the corresponding ids of the required libraries.
- Go to Assets > Page Layouts.
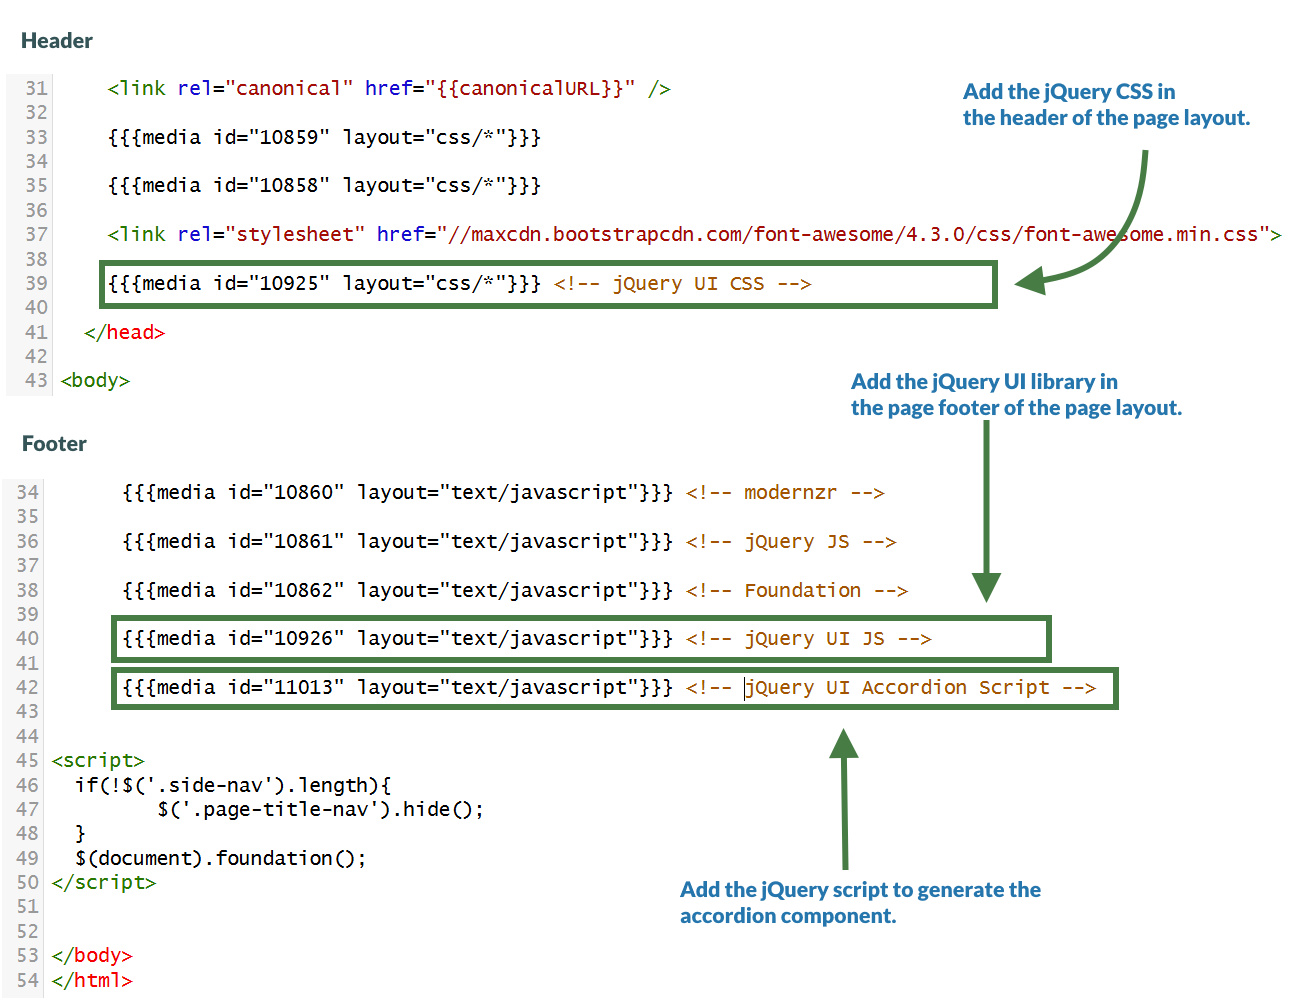
- Click your page layout name to edit it. (Use the Filter tool to search). Open the </> Header code tab.
- Use the media Helper to create the link to the jQuery UI CSS file.
{{{media id="10925" layout="css/*"}}} <!-- jQuery UI CSS-->
- Open the </> Footer code tab.
- Use the media Helper to create the link to the jQuery UI file.
{{{media id="10926" layout="text/javascript"}}} <!-- jQuery UI JS -->
- Use the media Helper to insert the jQuery accordion script that generates the accordion component.
{{{media id="11013" layout="text/javascript"}}} <!-- jQuery UI Accordion Script -->
- Click Save changes to save the changes to your page layout.
Using the sectionLevel Helper
In this exercise, let's improve the page layout by linking to the jQuery UI library CSS and JS files only when you are in the "FAQ" section of your site, which is the only section that needs to display an accordion and therefore make use of this library.
The sectionLevel Helper is used to output the current Section Level in the hierarchy of the site. The channel root is considered level 1. Direct children of that section are considered level 2, etc.
- Go to Assets > Page Layouts.
- Click your page layout name to edit it. (Use the Filter tool to search). Open the </> Header code tab.
- Use the eq and sectionLevel Helpers to insert the jQuery UI CSS file into the header of the page layout only when in the level 2 sections of the site structure.
{{#eq (sectionLevel) 2}}
{{{media id="10925" layout="css/*"}}} <!-- jQuery UI CSS -->
{{/eq}}
- Use the eq and sectionLevel Helpers to insert the jQuery UI JS and jQuery UI accordion script files into the footer of the page layout only when in the level 2 sections of the site structure.
{{#eq (sectionLevel) 2}}
{{{media id="10926" layout="text/javascript"}}} <!--jQuery UI JS -->
{{{media id="11013" layout="text/javascript"}}} <!--jQuery UI Accordion Script -->
{{/eq}}
- Click Save changes to save the changes to your content layout.
- Update your preview to check the result.
Creating the "Accordion" content type
- Go to Assets > Content Types > Create content type.
- Fill in the General content type information:
- Name: enter a name here. This should suggest what type of content it is used for.
- Description: describe in more detail when to use this content type.
- Minimum user level: if you wish to restrict who can use this content type, you can set a level here. If content types are created in groups, a user must be a member of the group as well as meet the minimum user level criteria to use the content type.
- Enable direct edit: decide if direct edit can be used for this content type.
- Mark as eForm: If checked, this allows your content type to collect eForm data.
- Workflow: if relevant, enable a workflow for content created using this content type.
- Primary group: Select your group. This allows you to select the group which is permitted to use this content type. Click Toggle shared groups to share the content type with more than one group.
- Select the Elements Tab.
- Each content type has a Name element by default. This is used to name the content and is typically not displayed on the published site.
- Add the other elements you need by filling in the information as outlined in the table below. Click add element to begin filling in the details for each element.
- Once you have added all your elements, click Save changes. The Content layout tab opens.
| Name | Description | Type | Max Size | Required | Show |
|---|---|---|---|---|---|
| Accordion Component Heading | Optional main accordion heading | Plain Text | 80 | No | Yes |
| Accordion Heading | The heading/title of the accordion item | Plain Text | 80 | Yes | Yes |
| Accordion Body | The content of the accordion item | HTML | 100000 | Yes | Yes |
Use the firstInSequence and lastInSequence Helpers to ensure the accordion is surrounded appropriately with a wrapper div.
Creating the "text/html" content layout
- Go to Assets > Content Types.
- Click your content type name to edit it. (Use the Filter tool to search). Open the Content layouts tab.
- Click into the Content layouts tab.
- Choose to edit your "text/html" content layout.
- In the Content layout code tab of your "text/html" content layout add the code as per below:
- Use the firstInSequence Helper to embed the "text/before" content layout at the beginning of the accordion. Then embed your "text/middle" content layout. Finally, use the lastInSequence Helper to embed the "text/after" content layout at the end of the accordion.
{{#firstInSequence}}
[Embed the text/before content layout]
{{/firstInSequence}}
[Embed the text/middle content layout]
{{#lastInSequence}}
[Embed the text/after content layout]
{{/lastInSequence}}
- Click Save changes to save the changes to your content layout.
Creating the "text/before" content layout
- Go to Assets > Content Types.
- Click your content type name to edit it (Use the Filter tool to search).
- Open the Content layouts tab and click Add content layout.
- Fill in the General information tab.
- Name: "text/before".
- File Extension: Default - unless this is used with a different File Extension. This requires other extensions being permitted in the Channel.
- Syntax Type: HTML/XML – this determines which syntax is highlighted.
- Content layout processor: Update the content layout processor to Handlebars Content.
- Click into the Content layout code tab.
- Copy the code below as your "text/before" content layout code.
- Since the "Accordion Component Heading" element is not a required element use the ifSet Helper to output it only if it has been set.
- Make sure to replace the [Open ifSet], [Accordion Component Heading] and [Close ifSet] placeholders with Handlebars code.
[Open ifSet]
<h2>[Accordion Component Heading]</h2>
[Close ifSet]
<div id="accordion"> <!-- open #accordion -->
- Click Save changes to save the changes to your content layout.
Creating the "text/middle" content layout
- Go to Assets > Content Types.
- Click your content type name to edit it (Use the Filter tool to search).
- Open the Content layouts tab and click Add content layout.
- Fill in the General information tab.
- Name: "text/middle".
- File Extension: Default - unless this is used with a different File Extension. This requires other extensions being permitted in the Channel.
- Syntax Type: HTML/XML – this determines which syntax is highlighted.
- Content layout processor: Update the content layout processor to Handlebars Content.
- Click into the Content layout code tab.
- Copy the code below as your "text/middle" content layout code.
- Make sure to replace the [Accordion Heading] and [Accordion Body] placeholders with Handlebars code.
<h3>[Accordion Heading]</h3>
<div>[Accordion Body]</div>
- Click Save changes to save the changes to your content layout.
Creating the "text/after" content layout
- Go to Assets > Content Types.
- Click your content type name to edit it (Use the Filter tool to search).
- Open the Content layouts tab and click Add content layout.
- Fill in the General information tab.
- Name: "text/after".
- File Extension: Default - unless this is used with a different File Extension. This requires other extensions being permitted in the Channel.
- Syntax Type: HTML/XML – this determines which syntax is highlighted.
- Content layout processor: Update the content layout processor to Handlebars Content.
- Click into the Content layout code tab.
- Copy the code below as your "text/after" content layout code.
</div> <!-- close #accordion -->
<div>
<a href="#" class="button">Collapse All</a>
<a href="#" class="button">Expand All</a>
</div>
- Click Save changes to save the changes to your content layout.
Let's add some sample content using the "Accordion" content type.
1. On the Site Structure screen, click on the name of your "FAQ" section.
2. The General information about this section screen appears, select the Content types tab.
3. Using the Filter feature, locate your content type.
4. Select the radio button to enable your content type for either the branch or section:
a. Enabled (branch): the content type can be used in this section as well as all its sub-sections.
b. Enabled (section): the content type can be used in this section only.
5. Click Save changes to confirm your selection. You can now use the "Accordion" content type to add content to your section.
6. Add at least two "Accordion Items" to your "FAQ" section of your website. Feel free to use this Lorem Ipsum generator.
- Update your preview to check the result.
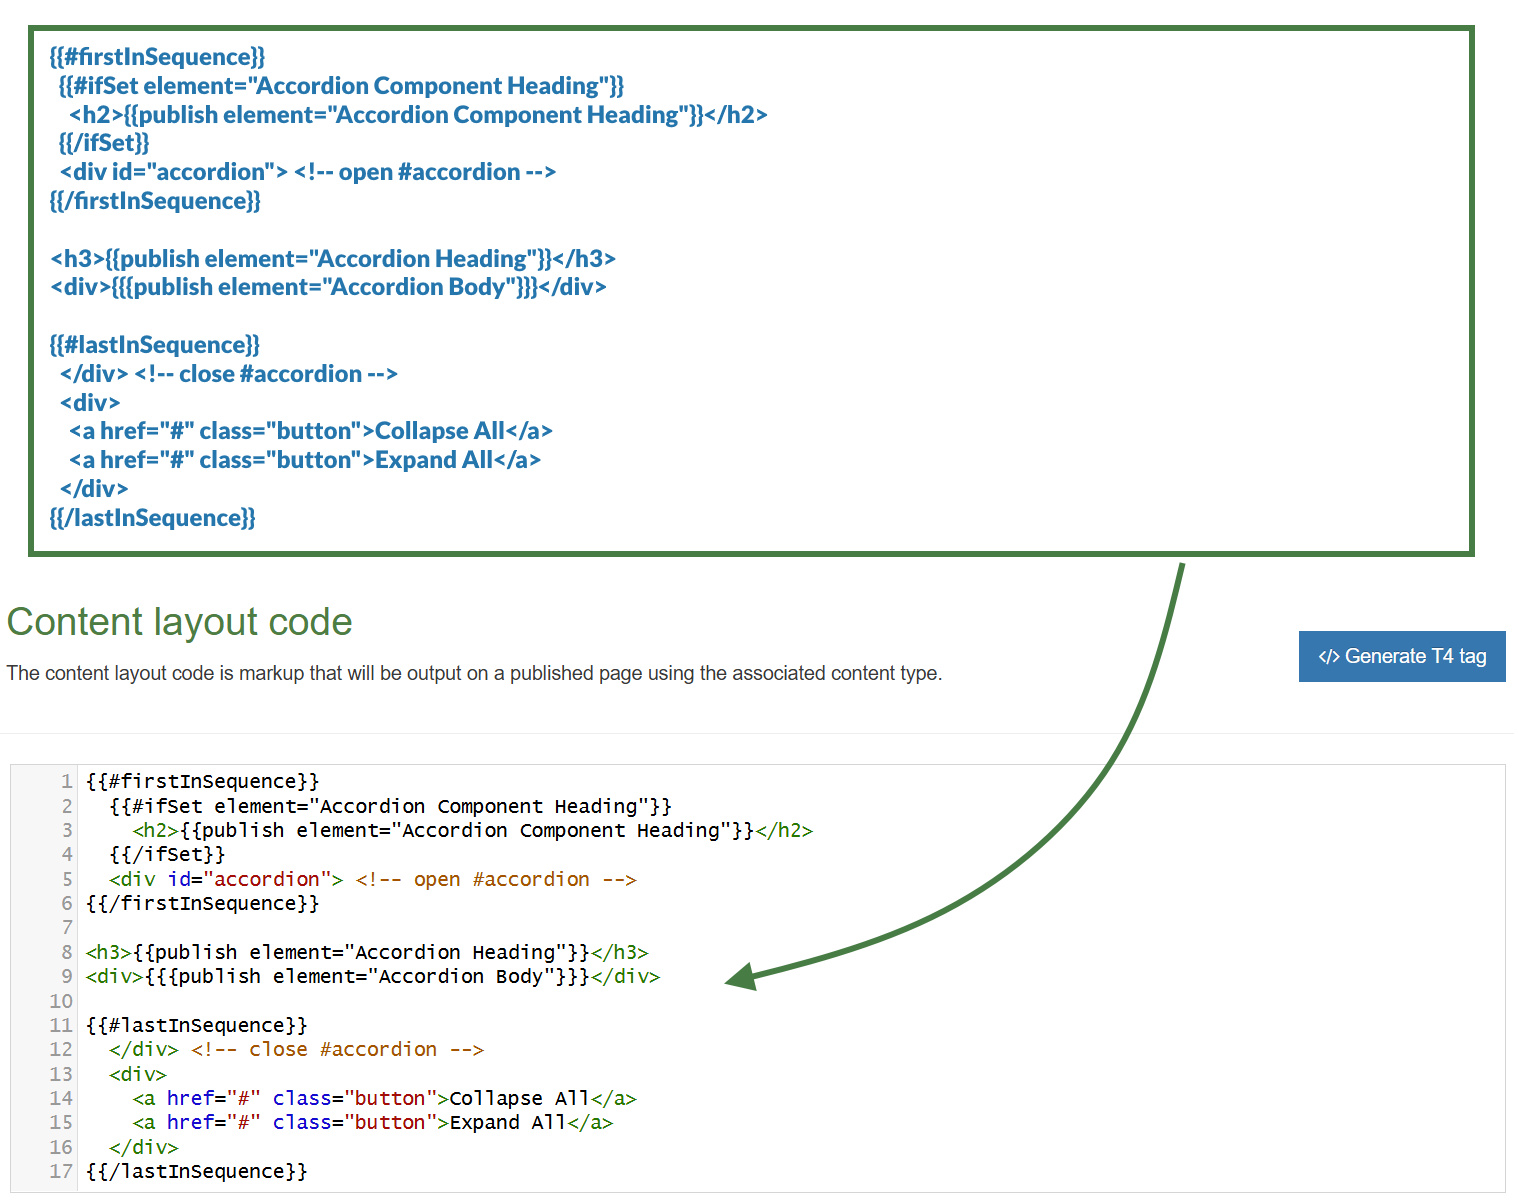
Updating the "text/html" content layout
Because this is so much shorter and easier to work with than the Programmable layout equivalent you should consider avoiding embedding alternate layouts altogether to improve performance and instead, do something like:
{{#firstInSequence}}
{{#ifSet element="Accordion Component Heading"}}
<h2>{{publish element="Accordion Component Heading"}}</h2>
{{/ifSet}}
<div id="accordion"> <!-- open #accordion -->
{{/firstInSequence}}
<h3>{{publish element="Accordion Heading"}}</h3>
<div>{{{publish element="Accordion Body"}}}</div>
{{#lastInSequence}}
</div> <!-- close #accordion -->
<div>
<a href="#" class="button">Collapse All</a>
<a href="#" class="button">Expand All</a>
</div>
{{/lastInSequence}}
- Click Save changes to save the changes to your content layout.
- Update your preview to check the result.