
T203 Advanced Implementer: CDN/PXL
- A Content Delivery Network (CDN) is a system of distributed servers that deliver media based on the user’s geographic location, the webpage’s origin, and the selected delivery server.
- PXL enables dynamic image manipulation, allowing you to adjust size, file format, and visual appearance through filters as images are delivered to site visitors. All processed images are automatically served via the Terminalfour CDN.
- Read more about https://docs.terminalfour.com/documentation/developerresources/cdn-pxl/cdnpxl-overview/.
Before we start
Be sure you have the following added to your training site:
- Your Terminalfour instance must be hosted with AWS to use CDN/PXL
- You need a Channel to preview and publish your content
- You need a Content Type to add images using a Media element and an HTML element
Enable CDN/PXL
- To enable CDN/PXL go to: Administration > Settings > CDN/PXL
General Settings
- Enable CDN & PXL: enables the use of CDN and PXL features system wide.
- Client organization identifier: this is set by your Terminalfour Client Services team.
- Environment identifier: this is set by your Terminalfour Client Services team.
- CDN/PXL base URL: this is set by your Terminalfour Client Services team.
- Click Save changes to save the general settings.
Channel configuration
- An additional CDN/PXL configuration option has been added to the Channel settings. This setting is named CDN/PXL S3 folder name and is located under Publish Options.
- This is the directory where CDN/PXL Media Items will be published for that Channel. The value of this setting must be unique on your system and cannot match any other Channel's or Microsite's CDN/PXL S3 folder name value.
- To add CDN/PXL to your channel go to: Administration > Set up Sites & Channels > Channels.
- Locate your channel and edit it (actions > Edit).
- Scroll down to Publish options.
- CDN/PXL S3 folder name: enter a unique value e.g. my_channel-cdn-pxl.
- Click Save changes.
Supported file types
Once processed each file is cached globally to ensure that your site visitors are served the right image quickly. While the CDN can cache and distribute any file type only image files can be used with PXL. The following file types have been verified and tested:
- XLSX application/vnd.openxmlformats-officedocument.spreadsheetml.sheet
- DOCX application/vnd.openxmlformats-officedocument.wordprocessingml.document
- PDF application/pdf
- MP3 audio/mpeg
- ZIP application/zip
- CSS text/css
- JPG image/jpeg
- SVG image/svg+xml
- PNG image/png
- PPTX application/vnd.openxmlformats-officedocument.presentationml.presentation
- HTML text/html +TXT text/plain
- MP4 video/mp4
With PXL you can manipulate images on the fly by appending filter parameters to the image URL. PXL supports the following file extensions.
- .jpg/.jpeg
- .png
- .webp
- .tiff
How do I use CDN/PXL on my site?
- Once you have CDN/PXL enabled on your site you add either of the following attributes to a Handlebars expression or T4 Tag in a Content Layout, Media Layout or Media Element:
| Attribute | Example | Notes |
|---|---|---|
| cdn="<BOOLEAN_VALUE>" | cdn="true" |
Files are published to the CDN when the attribute’s value is “true”. A "false" or other value will publish the files to the Channel's output directory which is the default behaviour. |
| pxl-filter-id="<PXL_FILTER_ID>" | pxl-filter-id="1" | Only valid PXL filter IDs are applied to an image and published to PXL. If the PXL filter ID doesn’t exist, the file will be published locally as normal. |
Creating filters
- A Filter is a defined preset to make image manipulations on the fly, so you don’t have to create multiple copies of the same image. A single image can be output in multiple sizes, formats and have effects applied to it.
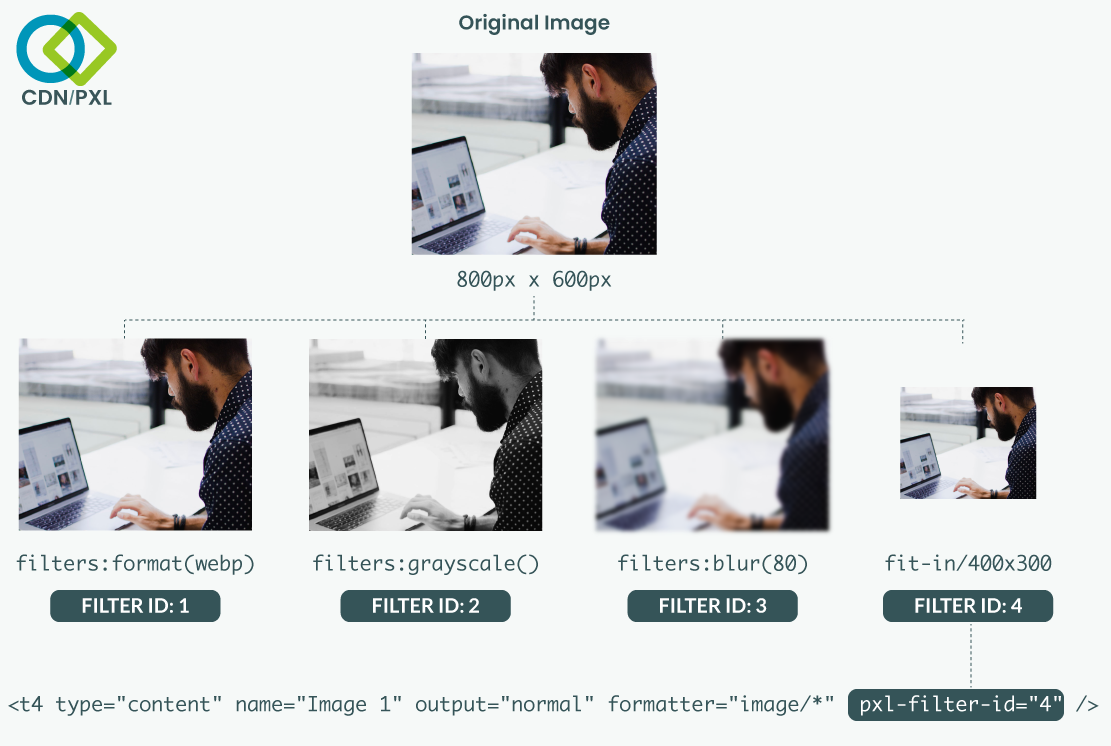
- In this example, we’ll create a Filter to create a grayscale version of the image. The original image, in the Media Library, will not be altered.
- Go to Administration > Settings > CDN/PXL > + Create PXL filter
- Name: the name used to identify this filter.
- Description: used to give more information about what this filter does.
- Filter rules: determines what changes and filters are applied.
e.g. fit-in/800x600/filters:grayscale()/filters:format(webp)
This will create an instance of the image that:
-
- Is resized to 800px wide and 600px high
- Is grayscale
- Is output as WebP
A full list of filter rules is available at: https://docs.terminalfour.com/documentation/developer-resources/cdnpxl/#toc-filter-rules
- Click Save changes.
Using a PXL filter
- Now that we have a Filter created let’s apply it to an image from the Media Library by using a Content Type that includes a Media element.
.png)
- Create a Content Type with one Media element and output the Image twice.
- The first without a PXL filter – this will be our control image.
- The second applying a PXL filter to the image.
- Click into the Content layouts tab.
- Select the "text/html" content layout and open the </> Content layout code tab.
- Click on the </> Generate Handlebars Expression button.
- In the Content tab:
- Information to output (select the Element radio button)
- Element: the Element option is used to output elements to the page.
- Metadata: the Metadata option allows output of specific Metadata (HTML anchor, Content ID, Last Modified Date, Publish Date, etc.).
- Fulltext: used to output a fulltext link.
- Content Element: select your image element from the drop-down.
- Handlebars helper: select the Media Helper to output your image.
- Media Output: Select the content layout you want to apply to the output of the image: e.g. "image/normal".
- CDN/PXL Options
- Serve the file from the CDN (This will switch to auto-selected once you select the "Apply a PXL Filter" radio button below).
- Apply a PXL Filter
- PXL Filter: select the filter you wish to apply from the drop-down.
- Options: leave the default options.
- Information to output (select the Element radio button)
- Click the Copy to clipboard button and paste the Handlebars expression into your content layout.
- The Handlebars expression you generated should look similar to the code below:
{{{media id=(mediaId element="Image") layout="image/normal" pxl-filter-id="1"}}}
- Save the changes to your layout and test the output by previewing your content.
CDN/PXL attributes in your Handlebars expressions
| Description | Original | With CDN attributes | With PXL attributes |
|---|---|---|---|
|
File element
|
{{{file element="File"}}} |
{{{file element="File" cdn="true"}}} |
{{{file element="File" pxl-filter-id="1"}}} |
|
Image element |
{{{file element="Image"}}} |
{{{file element="Image" cdn="true"}} |
{{{file element="Image" pxl-filter-id="1"}}} |
| Media element | {{{media id=(mediaId element="Image") layout="image/*"}}} |
{{{media id=(mediaId element="Image") layout="image/*" cdn="true"}}} |
{{{media id=(mediaId element="Image") layout="image/*" pxl-filter-id="1"}}} |
| Media T4 tag | {{{media id="15" layout="image/*"}}} |
{{{media id="15" layout="image/*" cdn="true"}}} |
{{{media id="15" layout="image/*" pxl-filter-id="1"}}} |
CDN/PXL attributes in your T4 tags
| Description | Original | With CDN attributes | With PXL attributes |
|---|---|---|---|
| File element | <t4 type="content" name="file" output="file" /> | <t4 type="content" name="file" output="file" cdn="true" /> |
<t4 type="content" name="file" output="file" pxl-filter-id="1"/> |
| Image element | <t4 type="content" name="image" output="image" /> |
<t4 type="content" name="image" output="download" cdn="true"/> <t4 type="content" name="image" output="file" cdn="true"/> |
<t4 type="content" name="image" output="download" pxl-filter-id="1"/> <t4 type="content" name="image" output="file"pxl-filter-id="1"/> |
| Media element | <t4 type="content" name="media" output="normal" formatter="" /> |
<t4 type="content" name="media" output="normal" formatter="" cdn="true"/> <t4 type="content" name="media" output="normal" formatter="image/layout WithCdnApplied" /> |
<t4 type="content" name="media" output="normal" formatter="" pxl-filter-id="1"/> <t4 type="content" name="media" output="normal" formatter="image/ layoutWithPxlFilterApplied" /> |
| Media T4 tag | <t4 type="media" formatter="image/*" id="15" /> |
<t4 type="media" id="15"cdn="true"/> <t4 type="content" formatter="image/layout WithCdnApplied" id="15" /> |
<t4 type="media" id="15" pxl-filter-id="1"/> <t4 type="media" formatter="image/layoutWith PxlFilterApplied" id="15" /> |
Responsive images and CDN/PXL
- Paying attention to image performance will speed up your site and ensure that you’re serving the best image format and size to your site visitor’s device.
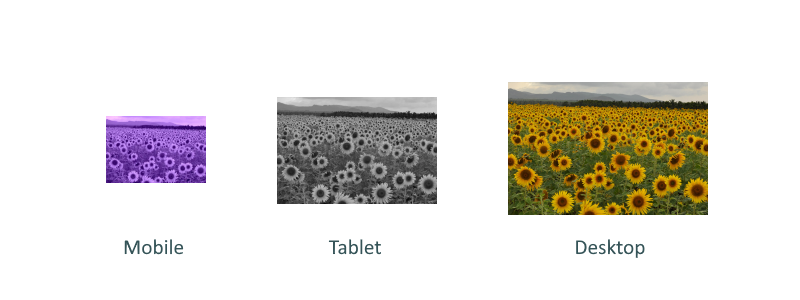
Creating an image element that does this can end up looking like this:
<picture>
<source srcset="/small.webp 650w, /med.webp 1000w, /large.webp 1600w" type="image/webp">
<source srcset="/small.jpg 650w, /med.jpg 1000w, /large.jpg 1600w" type="image/jpeg">
<img src="smal.jpg" alt="My great image">
</picture>This is not something you want to create each time. Using a Media Layout that uses CDN/PXL filters to create the images would ensure that you could create this once, roll it out across your site, and update as your image requirements change.
To use PXL in a Media Layout replace the file URLs with a Handlebars expression:
<picture>
<source srcset="{{{file element="Media" pxl-filter-id="2"}}}" 650w,
...
Alternatively, if using T4 Tags:
<picture>
<source srcset="<t4 type="content" name="Media" output="file" modifiers="" pxl-filter-id="2" /> 650w,
...
Then, when you want to use the Media Tag you can use a single Handlebars expression with your custom layout:
{{{media id="28" layout="image/pxl"}}}
Alternatively, if using a T4 Tag with your custom formatter:
<t4 type="media" id="28" formatter="image/pxl" />
Create a CDN/PXL media layout
- To create a new CDN/PXL Media Layout go to: Assets > Content Types.
- Using the filter box, find the Media content type: Actions > Edit Content layouts > +Add Content layout.
- Name: give the new layout a name, e.g., image/pxl-your-name.
- File extension: leave as default.
- Syntax type: HTML/XML.
- Content layout processor: Handlebars Content.
- Content layout code:
<picture>
<source srcset="/small.webp 650w, /med.webp 1000w, /large.webp 1600w" type="image/webp">
<source srcset="/small.jpg 650w, /med.jpg 1000w, /large.jpg 1600w" type="image/jpeg">
<img src="small.jpg" alt="My great image">
</picture>Update the sample layout above by replacing the example file URL’s with Handlebars expressions like so:
<picture>
<source srcset="{{{file element="Media" pxl-filter-id="1"}}} 650w,
{{{file element="Media" pxl-filter-id="2"}}} 1000w,
{{{file element="Media" pxl-filter-id="3"}}} 1600w" type="image/webp">
<source srcset="{{{file element="Media" pxl-filter-id="4"}}} 650w,
{{{file element="Media" pxl-filter-id="5"}}} 1000w,
{{{file element="Media" pxl-filter-id="6"}}} 1600w" type="image/jpeg">
<img src="{{{file element="Media"}}}" alt="{{publish element="Description"}}">
</picture>
Alternatively, if using T4 tags:
<picture>
<source srcset="<t4 type="content" name="Media" output="file"
cdn="true" pxl-filter-id="1" /> 650w,
<t4 type="content" name="Media" output="file"
cdn="true" pxl-filter-id="2" /> 1000w,
<t4 type="content" name="Media" output="file"
cdn="true" pxl-filter-id="3" /> 1600w" type="image/webp">
<source srcset="<t4 type="content" name="Media" output="file"
cdn="true" pxl-filter-id="4" /> 650w,
<t4 type="content" name="Media" output="file"
cdn="true" pxl-filter-id="5" /> 1000w,
<t4 type="content" name="Media" output="file"
cdn="true" pxl-filter-id="6" /> 1600w" type="image/jpeg">
<img src="<t4 type="content" name="Media" output="file" />"
alt="<t4 type="content" name="Description" output="normal"
modifiers="striptags,htmlentities" />">
</picture>
- Click Save changes.
Assign your Media Layout to a Media Type
- Now that you have created a Media Layout you will need to assign it to a Media Type to test its output.
- A new Media Type can be created, or an existing one can be edited. The Media Layout can be added to the list of associated layouts and set as the default or additional Media Layout.
- To assign a Media Layout go to: Administration > Settings > Media Library > Media Types tab.
- Using the filter box, find the Image media type:
- Click Actions > Edit > + Add row.
- Select your Media Layout, e.g., image/pxl-your-name/.
- Click Save changes.
Use your Media Layout
- Add an image to your content using the HTML element and preview your content to test the filters in your Media Layout.
- Create or edit a piece of content.
- Find an image in the Media Library.
- Click Actions > Select with layout.
- Use your Media Layout e.g., image/pxl-your-name.

- Preview your content and observe the image with different browser widths.
Feedback survey
Congratulations on completing the CDN/PXL training course.
Please provide feedback in our on-line survey.