
Page titles
In this exercise, you will learn how to output custom page titles in the title tag of your page layout.
- You will learn how to output a "Custom Page Title" by using a field from the SectionMetaDescription content type.
- On fulltext pages, you will output a content element from the page layout.
- Finally, you will build logic into your code to output the appropriate title depending on whether the element contains data and whether you are in a fulltext page or not.
How to display a custom page title
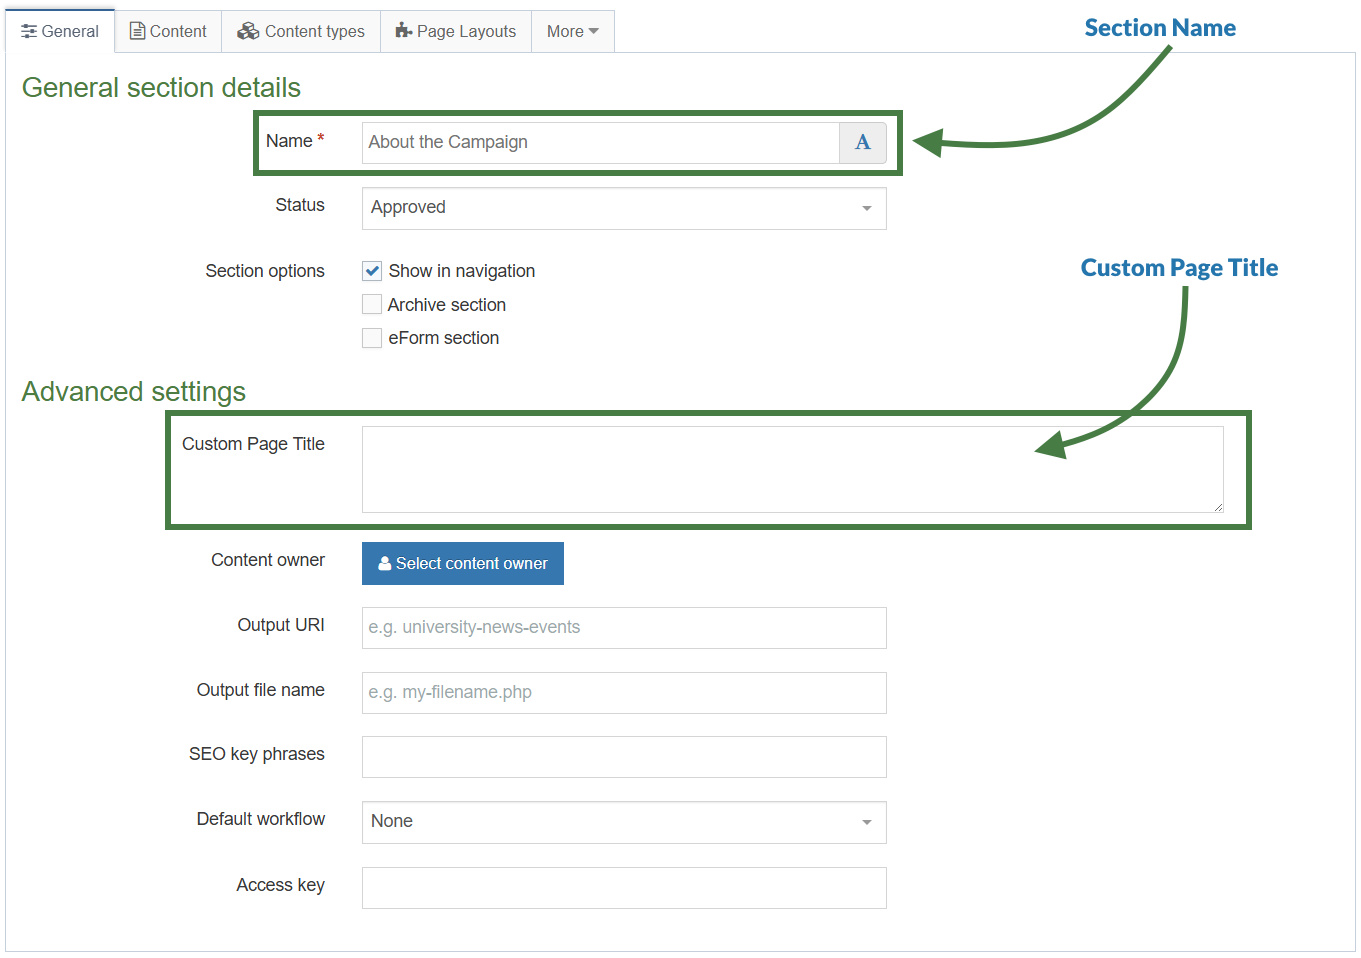
In this exercise, you will use the section Helper to output a "Custom Page Title". This field is configured in the SectionMetaDescription content type and is available within the General tab of your sections.
- Go to Assets > Page Layouts.
- Click your page layout name to edit it. (Use the Filter tool to search).
- Open the </> Header code tab.
- Click on the </> Generate Handlebars Expression button.
- Open the Section tab:
- Section metadata (select the Section meta field radio button)
- Section name
- Section ID
- Section meta field
- Edit section link
- Section links: Do not select.
- Section meta fields: select the "Custom Page Title" from the drop-down.
- Section metadata (select the Section meta field radio button)
- Click the Copy to clipboard button to copy the Handlebars expression.
- Add the new Handlebars code below to the Header code of the page layout.
<title>{{section field="Custom Page Title"}} - Terminalfour University</title>
- Click Save changes to save the changes to your page layout.
- Update your preview to check the result.
How to use the if/else Helpers
- Go to Assets > Page Layouts.
- Click your page layout name to edit it. (Use the Filter tool to search).
- Open the </> Header code tab.
- You can use the if Helper to check if the SectionMetaDescription has a field called “Custom Page Title” and whether it is set to a value. If so, output the title tag with the name of the “Custom Page Title” field.
- Use the else Helper for when the “Custom Page Title” field is not set, in which case, you can display the section name using the sectionName Helper.
- Click on the </> Generate Handlebars Expression button.
- Open the </> Misc tab.
- Select the "if" helper from the Helpers drop-down.
- Click Copy to clipboard and paste the starting if/else block into your page layout.
- Modify the starting code as per below:
- Replace the condition in the if statement to check for the value of the "Custom Page Title".
- Output the "Custom Page Title" if it has been set.
- Output the Section name if the "Custom Page Title" is empty.
{{#if (section field="Custom Page Title")}}
<title>{{section field="Custom Page Title"}} - Terminalfour University</title>
{{else}}
<title>{{sectionName}} - Terminalfour University</title>
{{/if}}
- Click Save changes to save the changes to your page layout.
- Update your preview to check the result.
The fulltext Helper (block level variant)
The fulltext Helper has both a standard and block level variant. It behaves differently depending on which is used.
The fulltext Helper when used in a standard expression outputs a link to the fulltext page of a given content type. You will learn to use this variant in an upcoming exercise.
The fulltext Helper when used in a block level expression, which you will use in this exercise, allows you to know if you are viewing a fulltext page.
How to use the fulltext Helper (block level variant)
- Go to Assets > Page Layouts.
- Click your page layout name to edit it. (Use the Filter tool to search).
- Open the </> Header code tab.
- Click on the </> Generate Handlebars Expression button.
- Open the </> Misc tab.
- Select the "fulltext" helper from the Helpers drop-down.
- Click Copy to clipboard and paste the starting fulltext block into your page layout.
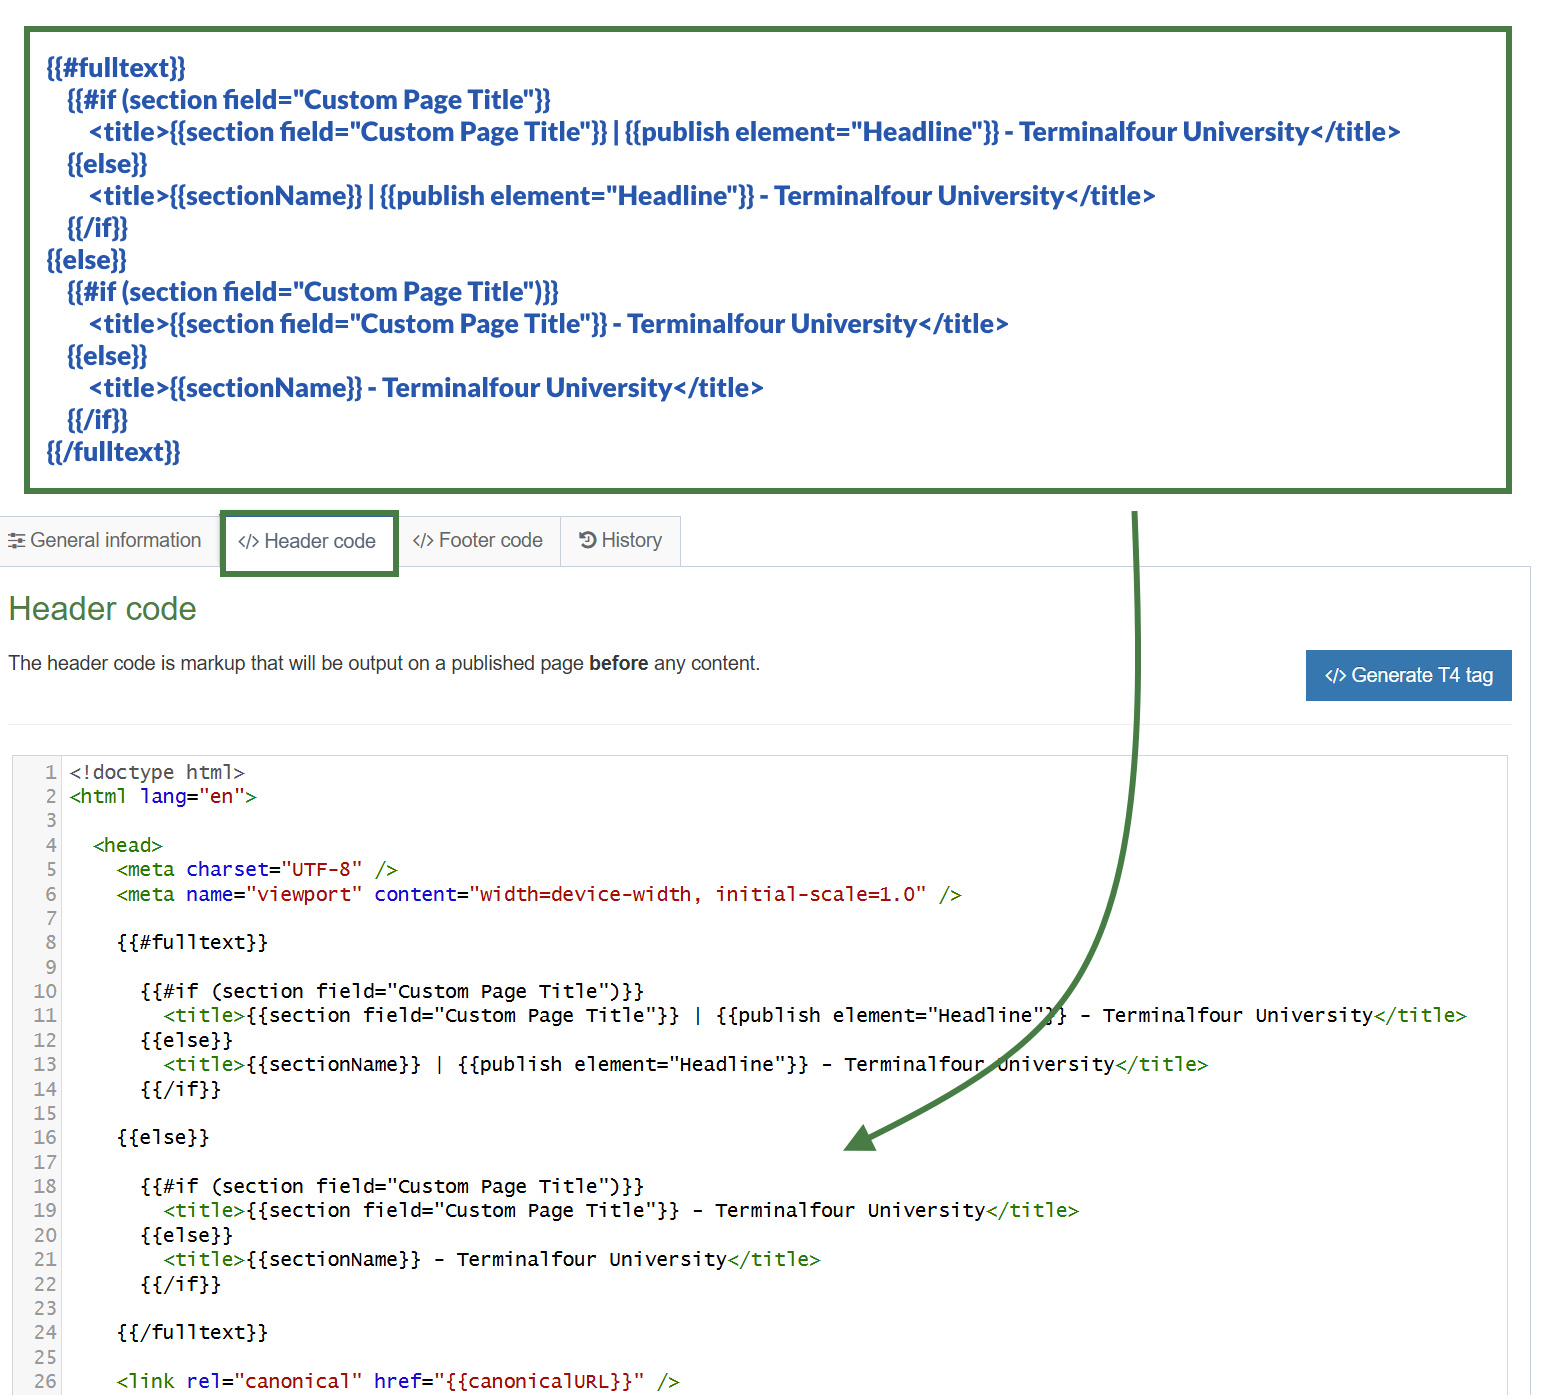
- Let's add the fulltext Helper to the code to output the appropriate title when you are in a fulltext page. Update the code by outputting the "Headline" element within the title tag only when in a fulltext page.
{{#fulltext}}
{{#if (section field="Custom Page Title")}}
<title>{{section field="Custom Page Title"}} | {{publish element="Headline"}} - Terminalfour University</title>
{{else}}
<title>{{sectionName}} | {{publish element="Headline"}} - Terminalfour University</title>
{{/if}}
{{/fulltext}}
A great benefit of using the fulltext Helper as a block level expression in page layouts is that you have access to the elements of the content type which is something that isn't possible using t4 tags. This allows you to use the publish Helper to output the "Headline" element of the fulltext content type.
- Let's now handle the case when you are not in a fulltext page, to do this you can make use of the else Helper to add an else condition. Add the original code that you wrote in How to use the if/else Helpers inside of the else block:
{{#fulltext}}
{{#if (section field="Custom Page Title")}}
<title>{{section field="Custom Page Title"}} | {{publish element="Headline"}} - Terminalfour University</title>
{{else}}
<title>{{sectionName}} | {{publish element="Headline"}} - Terminalfour University</title>
{{/if}}
{{else}}
{{#if (section field="Custom Page Title")}}
<title>{{section field="Custom Page Title"}} - Terminalfour University</title>
{{else}}
<title>{{sectionName}} - Terminalfour University</title>
{{/if}}
{{/fulltext}}
Note that by adding an else condition to the fulltext Helper, you are now also creating a nested if within your logic.
- Click Save changes to save the changes to your page layout.
- Update your preview to check the result.
Preview
The preview Helper is used to determine whether or not the page is currently being previewed or not. It allows you to output content only in Preview.
- You will learn how to use the preview Helper and how to output the channel name, section name and publish URL when in Preview.
How to use the preview Helper
- Go to Assets > Page Layouts.
- Click your page layout name to edit it. (Use the Filter tool to search).
- Open the </> Header code tab.
- Click on the </> Generate Handlebars Expression button.
- Open the </> Misc tab:
- Helpers: select preview from the Helpers drop-down.
- Click the Copy to clipboard button to copy the Handlebars expression. The Handlebars expression generated should look like the code below:
{{preview}}
<p>Only output in Preview and Direct Edit</p>
{{else}}
<p>Only output on the published page</p>
{{/preview}}
- Paste the code into your page layout.
- Click Save changes to save the changes to your page layout.
- Update your preview to check the result.
Displaying the channelName, sectionName and publishURL in preview
- Go to Assets > Page Layouts.
- Click your page layout name to edit it. (Use the Filter tool to search).
- Open the </> Header code tab.
- Click on the </> Generate Handlebars Expression button.
- Open the Channel tab:
- URLs: do not select
- Channel information
- Channel ID
- Channel Name (select the Channel Name)
- Channel Description
- Click the Copy to clipboard button to copy the Handlebars expression and paste into your page layout.
- To generate an expression that outputs the Section name click into the Section tab and select the Section name radio button.
- To generate an expression that outputs the Publish URL click into the Channel tab and select the Publish URL radio button.
- Add the new Handlebars code below to the Header code of the page layout.
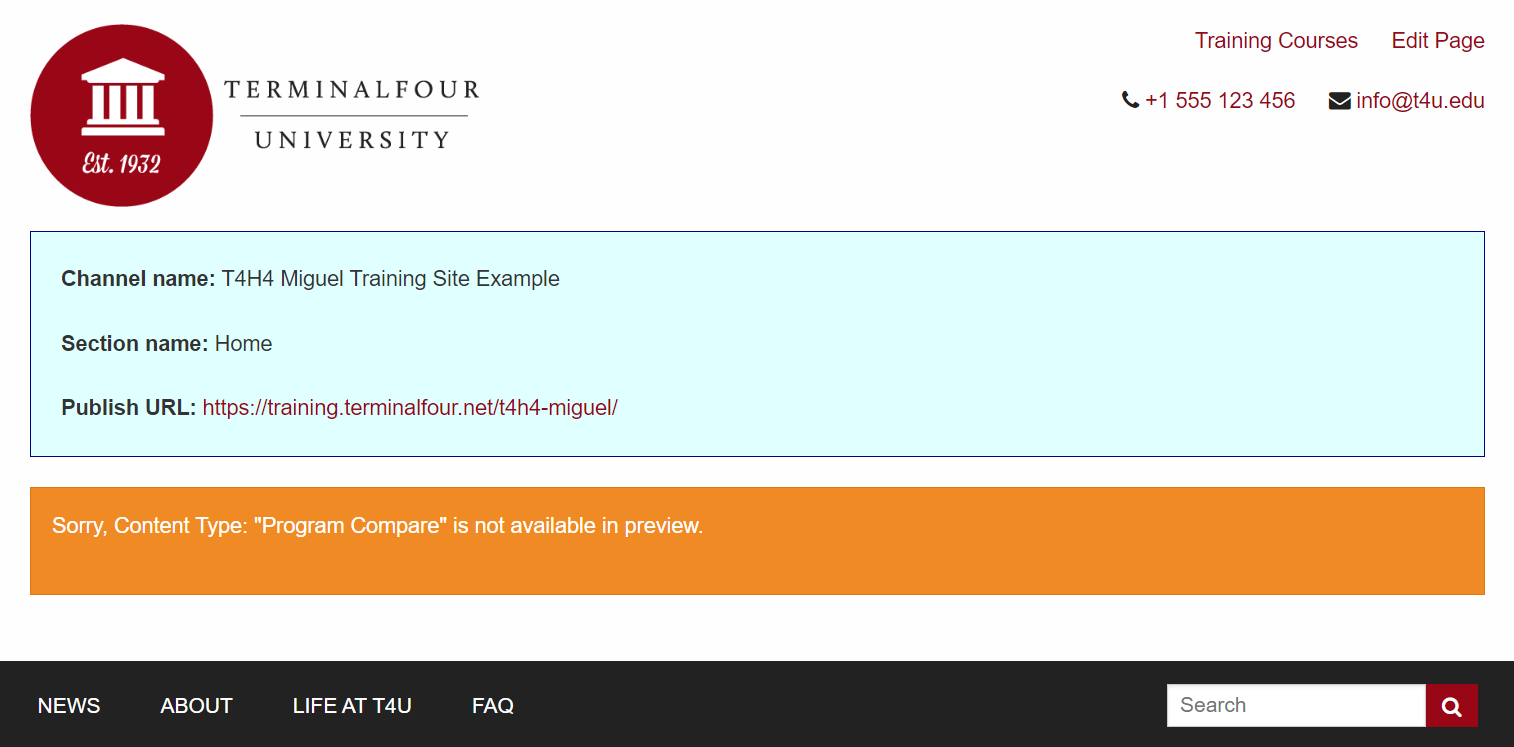
{{#preview}}
<p><strong>Channel name:</strong> {{channelName}}</p>
<p><strong>Section name:</strong> {{sectionName}}</p>
<p><strong>Publish URL:</strong> {{publishURL}}</p>
{{/preview}}
- Click Save changes to save the changes to your page layout.
- Update your preview to check the result.
Styling the preview
- Copy the code below into your page layout.
<div class="row">
<div class="small-12 columns text-left hide-for-small-only" >
<div class="panel callout">
{{#preview}}
<p><strong>Channel name:</strong> {{channelName}}</p>
<p><strong>Section name:</strong> {{sectionName}}</p>
<p><strong>Publish URL:</strong><a href="{{publishURL}}"> {{publishURL}}</a></p>
{{else}}
<p><strong>This is the published Page.</strong></p>
{{/preview}}
</div>
</div>
</div>
<style>
.panel.callout {
background-color: lightcyan;
border-color: darkblue;
margin-top: 1rem;
}
</style>
- Click Save changes to save the changes to your page layout.
- Update your preview to check the result.
Adding a warning message to the preview
- You may want to display a placeholder "warning" message when in preview only, a possible use case is an alert informing of functionality that may not be available in preview.
- Let's add a warning message to the display. Copy the code below into your page layout.
<div class="row">
<div class="small-12 columns text-left hide-for-small-only" >
<div class="panel callout">
{{#preview}}
<p><strong>Channel name:</strong> {{channelName}}</p>
<p><strong>Section name:</strong> {{sectionName}}</p>
<p><strong>Publish URL:</strong><a href="{{publishURL}}"> {{publishURL}}</a></p>
</div>
</div>
</div>
<div class="row">
<div class="small-12 columns text-left hide-for-small-only" >
<div class="alert-box alert warning">
<p>Sorry, Content Type: "Program Compare" is not available in preview.</p>
</div>
</div>
</div>
{{else}}
<p><strong>This is the published Page.</strong></p>
</div>
</div>
</div>
{{/preview}}
<style>
.panel.callout {
background-color: lightcyan;
border-color: darkblue;
margin-top: 1rem;
}
</style>
- Click Save changes to save the changes to your page layout.
- Update your preview to check the result.