
Terminalfour Search Implementation
This course is aimed at front-end developers and takes you through the tasks that you will perform when working on implementing new/additional Terminalfour Search implementations.
What this training will cover:
- Setting up a site for a crawl,
- Crawling and indexing a site,
- Creating a search results page (including filters and facets),
- Tuning and customizing the order of the results.
Prerequisites to completing the course
- HTML,
- JavaScript,
- CSS familiarity.
What you will need before you begin
Before you start, you'll need:
- Access to a Terminalfour Search Crawler,
- A SearchStax Site Search account,
- Access to a Terminalfour environment.
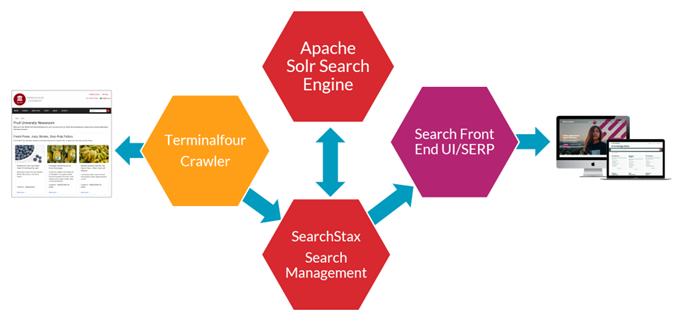
Overview of Solution Components
Prepare your site for a crawl
Before a search engine can show your site in search results, it needs to explore and understand your content.
This section explains how to get your website ready for that process, including steps to make sure pages can be found, loaded, and understood correctly. By preparing your site for crawling, you help web crawlers index your content more accurately.
This section outlines the essential steps to prepare your website for crawling, including:
- configuring server responses
- managing URL accessibility, and
- optimizing site and content structure for discoverability.
Good pre-crawl preparation ensures that the indexing process is efficient and comprehensive, reducing the risk of missed or misinterpreted content.
A website has been published for you to crawl, follow the instructions below to locate and view the site.
How to locate and explore your sample site
- Open a web browser and go to:
- Explore the site and observe the content structure by viewing the source code:
- Homepage: https://training.terminalfour.net/t4-fruit-university/
- News Item: https://training.terminalfour.net/t4-fruit-university/news/pineapple-denied-access-to-pizza-party-again/
- Event: https://training.terminalfour.net/t4-fruit-university/events/fruitfest/
- Program: https://training.terminalfour.net/t4-fruit-university/study/undergraduate/bsc-in-citrus-biology/
- Staff Profile: https://training.terminalfour.net/t4-fruit-university/directory/clementine-valero/
Create a Search App
- A search App is the foundation of a Site Search project.
- It serves as a container for your data, analytics, and search configurations.
- It records the history of searches, clicks, searches per session and other analytics over a period.
How to create a search app
- Your trainer will invite you via an email from SearchStax to join the Terminalfour_ClientTraining account. Follow the instructions in the email to access the account.
- Go to https://searchstudio.searchstax.com/
- Log in with your Email Address and Password.
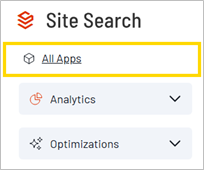
- In the SearchStax Terminalfour_ClientTraining account, go to https://searchstudio.searchstax.com/search-apps
SearchStudio Dashboard >> All Apps >> CREATE APP
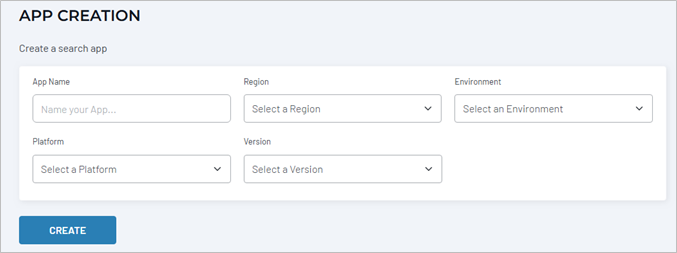
- Fill in the details
- App name: name your profile, your trainer might suggest a naming convention to follow. i.e. yourName
- Region: choose one close to your location
- Environment: Production
- Platform: Custom App
- Version: N/A
- Click CREATE
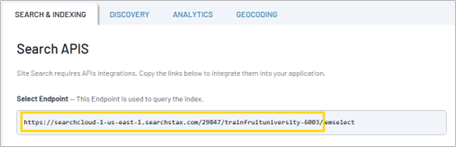
- Your Searchstax Search App queries the index of your site using API integrations.
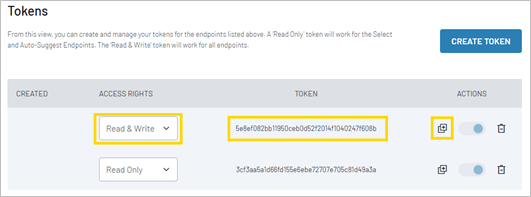
Make a note of your API endpoint and token, you will paste them into a Terminalfour Crawler Configuration later.
You will need:
-
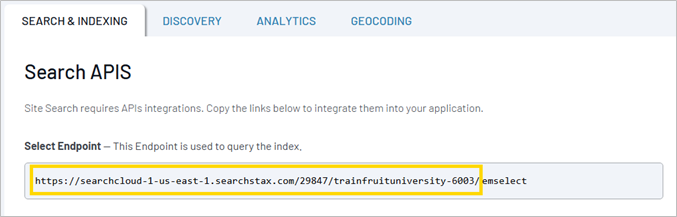
- Searchstax EndPoint:
-
-
- Edit the Endpoint to remove “emselect” from the end of the endpoint value e.g., https://searchcloud-1-us-east-1.searchstax.com/29847/trainfruituniversity-6003/
-
-
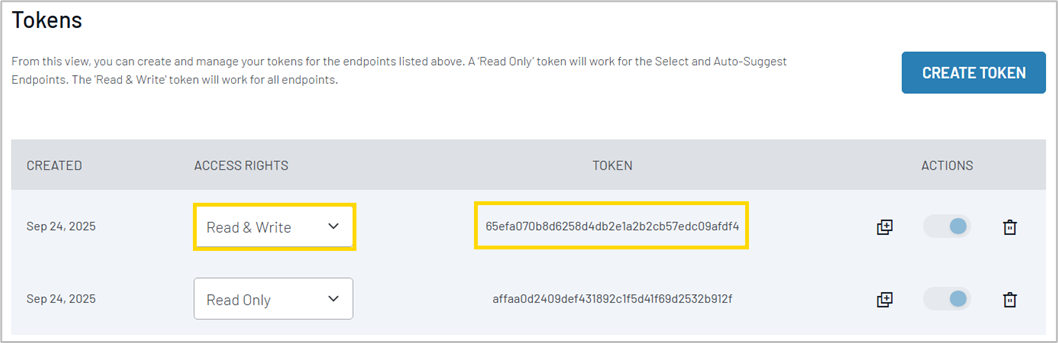
- Read and Write Token:
-
-
- e.g., 65efa070b8d6258d4db2e1a2b2cb57edc09afdf4
Note: To return to the API screen at any time, go to
App Settings >> All APIs
- e.g., 65efa070b8d6258d4db2e1a2b2cb57edc09afdf4
-
Log in to Search Crawler
- Terminalfour Search Crawler is used to crawl and build an index of your site.
- A crawl creates an index of your site and connects to your Searchstax App using APIs.
- Log into Terminalfour Search Crawler using the credentials provided by your trainer.
How to log in to Terminalfour search crawler
- Open a web browser and navigate to the Terminalfour search crawler.
https://search.terminalfour.net/configuration-list/t4-training

- Enter the Email and Password credentials provided by your trainer; then click Log in.
- Email: provided by your trainer.
- Password: provided by your trainer.
- Terminalfour Search opens.
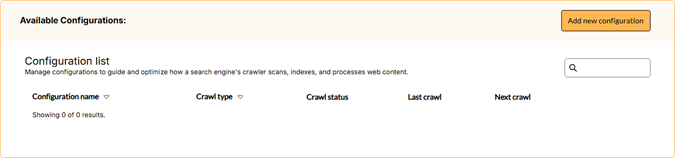
Add a Configuration
Use configurations to guide and optimize how Terminalfour Search scans, indexes, and processes your content.
How to add a new configuration
- To add a new configuration, go to:
Terminalfour search >> Home >> Add new configuration
-
- General
This section allows users to set configuration name, SearchStax credentials and choose the type of search crawl to configure.
-
-
- Configuration name: Provide a unique name for the configuration, e.g.: example-name.
- Searchstax endpoint: API integration endpoint found in SearchStax settings.
-
Edit the Endpoint to remove “emselect” from the end of the Endpoint value.
i.e., https://searchcloud-1-us-east-1.searchstax.com/29847/trainfruituniversity-6003/
-
-
- Searchstax Token: Enter 'Read & Write' token found under SearchStax settings.
-
e.g., 3b6063638995h9b61440c4016cb759be9c7d44f1
-
-
- Test connection: Click Test connection.
-

If you do not get a successful connection review your Searchstax endpoint and Searchstax token credentials.
-
-
- Crawl type: Choose crawl type -in this exercise we will choose a Web crawl.
-
-
- Origin URL and crawl settings
Define the base URL for a website. Specify the parameters and rules for how search engine should crawl and index the site's content.
-
-
- Seed: Enter the starting URL where the web crawler will begin exploring the site.
-
i.e.: https://training.terminalfour.net/t4-fruit-university/
You can add multiple seed URL’s by clicking Add another if you want to add sub domains, or other sites.
-
-
- Success threshold: Minimum percentage of documents that must be gathered for an update to succeed.
- Page crawl delay: Number of seconds the crawler will delay between success requests to the server.
- Timeout: Max. time (in seconds) the crawler will wait for a network response before abandoning the request.
- Fetch interval: Default number of hours between re-fetches of a page. Set as 1 hour.
- Sitemap URL: This is a way to ensure all URL’s/pages in your site are found by the crawler, even if a link to a page is not found elsewhere on your website.
- Enter the domain where the XML version of your sitemap can be found. e.g.: https://docs.terminalfour.com/sitemap.xml
- URL filter regex: Enter matching pattern to determine whether URL is included or ignored by the crawl.
-
+^https://training\.terminalfour\.net/t4-fruit-university/
You MUST have Excludes listed before your Includes (i.e., - before +) AND you MUST escape special characters:
-^https://training\.terminalfour\.net/t4-fruit-university/athletics
+^https://training\.terminalfour\.net/t4-fruit-university/
-
- Content
Define the type of content that can be processed by search engine along with the maximum size for each content item.
-
-
- Index start comment: A phrase to indicate where extraction should start. E.g.: Search text crawl start
- Index end comment: A phrase to indicate where extraction should end. E.g.: Search text crawl end
- Content size limit: Size limit in kilobytes of the content to be downloaded for each page.
- Crawl documents: Include pdfs, docx, pptx, xlsx, odt, ods, odp.
-
-
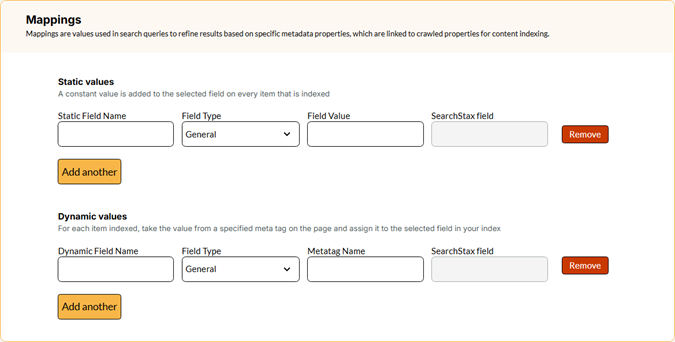
- Mappings
Mappings are values used in search queries to refine results based on specific metadata properties, which are linked to crawled properties for content indexing.
-
-
- Static values: A constant value that is added to the specified field on every item that is indexed.
-
We will leave this unpopulated for now and return to it later in the training.
-
-
- Dynamic values: For each item indexed, take the value from a specified meta tag on the page and assign it to the selected field in your index.
-
We will leave this unpopulated for now and return to it later in the training.
- Click Save
You will now return to the Available Configurations screen.
Run a Crawl
Now that you have saved your Configuration, you are ready to run your first crawl.
How to run your first crawl
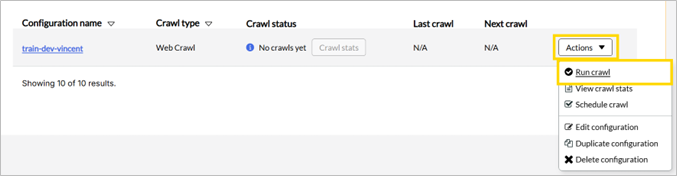
- In Terminalfour Search, go to Home >> Configurations.
Locate your Configuration (you can use the filter box provided).
- Click Actions >> Run crawl.
After a few minutes your crawl should be complete.
Check Results of a Crawl
After a few minutes, the initial crawl of your website will be complete.
Once finished, review the results of your crawl. You have several options:
- View crawl stats in Terminalfour Search
- Use this to confirm that your Crawl has created an index of your URLs
- Preview your search engine results using Searchstax’s Preview
- Use this to confirm that your index has integrated with the Search App
- View your Search Engine Results Page (SERP) using Hosted Search Experience in Searchstax
- Use this to see the starting point of your Search Engine Results Page (SERP)
View Crawl Stats
A quick way to see what the crawler has indexed from your site is to click Crawl stats and:
- Observe the number of URLs fetched
- View fetched URLs
- Check for any errors
How to View Crawls Stats
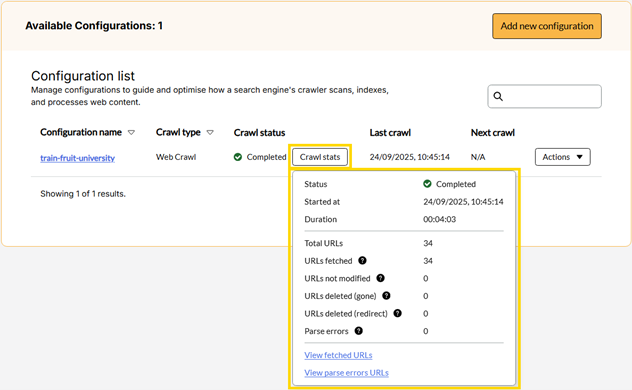
- In your Terminalfour Search, go to Home >> Configurations
- Locate your configuration and Click Crawl stats
- Observe the number of Total URLs (it should be 34)
- Click View fetched URLs to observe the list of URLs found
- Click View parse errors URLs to observe any errors
- Locate your configuration and Click Crawl stats
Preview of search results
Now let’s confirm that your Terminalfour Crawler Configuration has successfully integrated with your Searchstax Search App.
- Go to your Searchstax Search Application and use the Preview method.
- The number of results should match the number of URLs fetched by your Terminalfour Crawler.
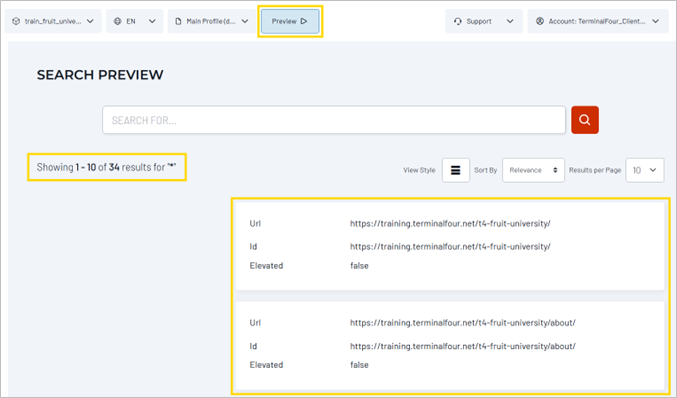
How to Preview
- In your Searchstax Search App, click Preview
- The Preview screen opens
- Check that all URLs are showing as results
Hosted Search Experience
The Hosted Search Experience is a prebuilt search interface hosted by SearchStax. It uses your Terminalfour Crawler’s index and the Searchstax Search App’s settings.
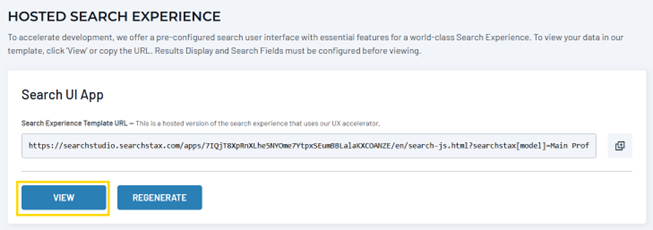
How to open and share your Hosted Search URL
- In your Searchstax Search App,
Go to: Configurations >> Search UI >> Hosted Search Experience
- Click View to open the hosted page
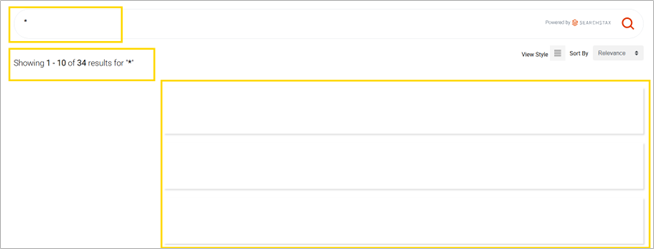
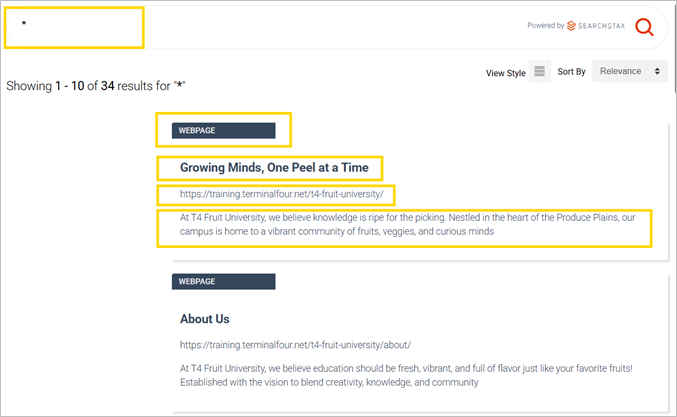
- Enter a search query using *
- Copy the URL and share it in the training’s Zoom chat
- Observe that all your URLs are listed as results but not displaying any Titles or Descriptions
Schedule a Crawl
Now that you have confirmed that the crawl has been configured correctly you can set a crawl schedule for future re-crawls of your site.
Configure a crawl schedule.
How to schedule a crawl
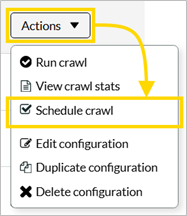
- In your Terminalfour Crawler go to Actions >> Schedule Crawl
- Rate: Number of hours between crawls
- Start date: Choose a start date for the crawl
- Start time: Choose a start time for the crawl
- Timezone: Choose a time zone for the crawl
Result Fields
The Results Fields screen lets you configure two important features:
- It lets you choose which data fields Solr will return in your search results.
- It also lets you assign returned field values to specific display areas on the search-results “card.”
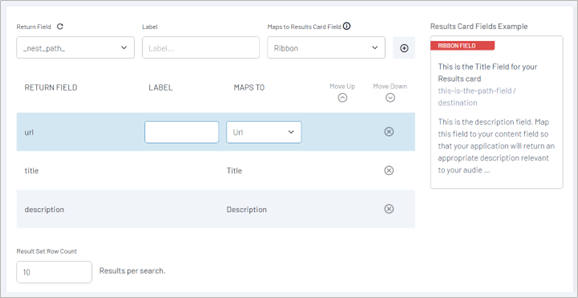
How to configure Result Fields
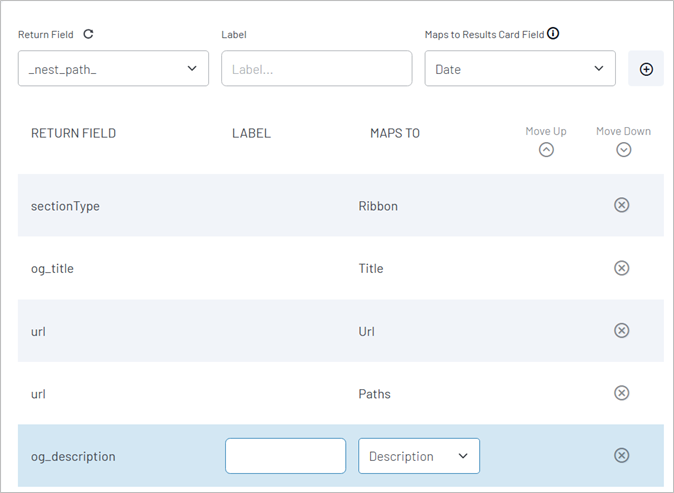
- In your SearchStudio application, go to Configurations >> Basic Configurations >> Results Fields
- Return field: select a field to map to the default Result Card.
- Label: optional label for your chosen field – useful if the original field name is not descriptive enough.
- Maps to Results Card Field: allows the SearchJS to map your chosen field to a specified Result Card Field.
- Delete the existing mappings of Title and Description and experiment by mapping others.
| Return Field | Maps to Result Card Field | What it Does |
|---|---|---|
| url | Url | Determines where the result card goes when clicked |
| url | Paths | Displays the URL in the search result card |
| H1 | Title | Displays the <H1> as the Title in the search result card |
| content | Description | Displays the content field as the result item’s Description in the search result card |
If you don’t see any useful Search Fields to map you can update your crawler configuration to include some new mappings and come back here to complete your result fields configuration.
Mappings
Mappings are key to successful search implementation.
Review your website’s source code and identify metadata that would be useful to map into your search index.
Once you have mapped metadata into your search index you can utilize these as “Search Fields” to determine:
- Search result ranking relevancy
- Search result display cards
- Search Result Facets and Filters
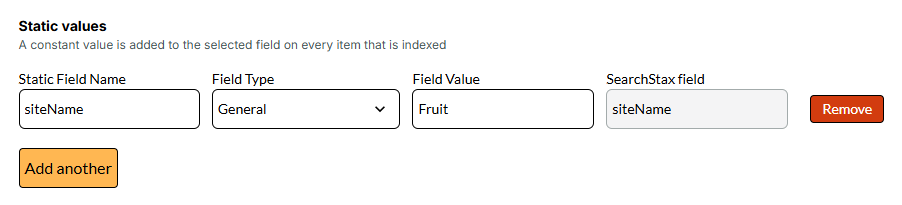
Static values
Static values let you define fields that are added to the SearchStax index alongside the content discovered during a crawl.
By creating a static value field, you specify that the same piece of data should be applied to every page included in the crawl. This is useful for tagging or categorizing content consistently.
For example, when crawling your main website, you might configure a static value as follows:
- Static Field name: siteName
- Field value: main-university-site
This ensures that every indexed page from that crawl is tagged with the same site identifier, making it easier to filter or segment content later.
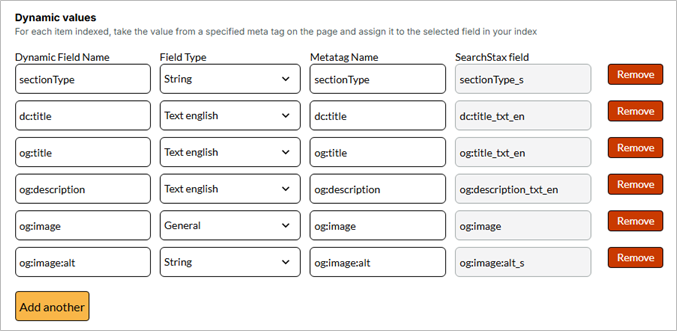
Dynamic values
Dynamic values are similar to static values in that they define fields added to SearchStax. However, instead of assigning the same value to every document, dynamic values extract data from the content being indexed and map it to fields in SearchStax.
This allows you to capture page-specific information and use it for filtering, faceting, or improving search relevance.
For web crawls, dynamic values are often used to extract data from HTML meta tags and map them to SearchStax fields. For example:
Mapping the <meta name="description"> tag to a description field in SearchStax
For XML, JSON, or CSV crawls, dynamic field mappings define which fields from the source data should be indexed in SearchStax. This ensures that relevant structured data is carried over and made searchable.
How to Add Mappings
- In your Terminalfour Search Configuration, scroll down to Mappings.
Add Static and Dynamic Mappings values – use the tables below as a guide.
| Static Field Name | Field Type | Field Value |
|---|---|---|
| siteName | General | Fruit |
| Dynamic Field Name | Field Type | Metatag Name |
|---|---|---|
| sectionType | String | sectionType |
| dc:title | Text English | dc:title |
| og:title | Text English | og:title |
| og:description | Text English | og:description |
| og:image | String | og:image |
| og:image:alt | Text English | og:image:alt |
-
- Click Update.
You will return to the Configurations listing screen. - Click Actions >> Run crawl.
- After the crawl has completed, navigate to your SearchStax Search Application to view the newly added fields.
Note: You may need to reload the schema in SearchStax before the new fields become visible.
- Click Update.
Updating Result Fields
Configurations >> Basic Configurations >> Results Fields
Once your updated Metadata Mappings have been added to your Crawler’s index it is time to utilize them in your Results Fields.
Go to your Searchstax Search Application and map your newly mapped fields to your Result Card.
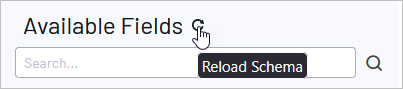
Note the Reload Schema icon above the list of fields. If you can’t find a field in the list, try reloading the schema.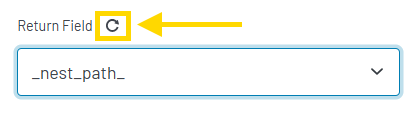
After adding the above fields click Publish.
Reload your Hosted Search Experience
Now that you have mapped fields to your Results Card, go to your hosted Search Experience to observe the changes to your displayed results.
Promotions
Optimizations >> Promotions
Promotions in the Search Optimizations area help you feature key content at the top of search results. Use them to promote content for seasonal events, high-impact keywords, or specific campaigns.
Promotions are a Profile-level feature. Changes to the list of promotions can be assigned to one or more Profiles as required.
A Search Profile applies Data Filters first, then Ranking, Rules, Smart Ranking, and finally Promotions.
How to create a promotion
- In your SearchStudio, go to Optimizations >> Promotions
- Enable this promotion: Ensure this is enabled.
- Click CREATE A PROMOTION.
- Give your promotion a name i.e., Bananas Foster and click CREATE.
- Search Term: Bananas.
- Condition: Contains.
- Click on the INDEXED ITEMS tab:
- Search for Bananas and observe the results and their order
- Click on the Bananas Foster result to add this to the PROMOTED ITEMS area
- Click PUBLISH.
- Refresh your Hosted Search Experience and search for Bananas. observe that Bananas Foster is now the first result
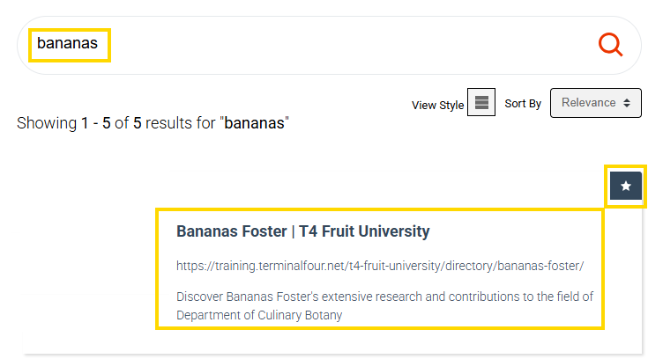
When using the Hosted Search Experience and Preview, promotions are identified by a star icon displayed on the right-hand side of the promoted results.
Faceting
Configurations >> Basic Configurations >> Faceting
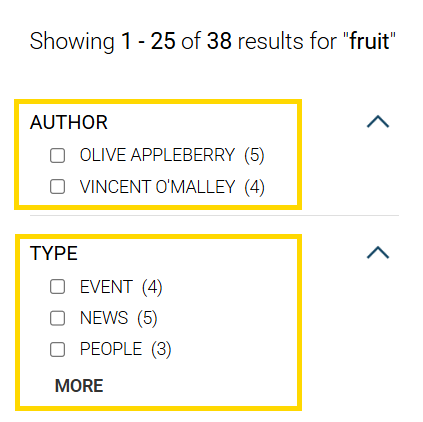
A facet is a type of dynamic filter designed to help users get where they need to quickly.
“Facets” are the lists of field values that appear on your application’s search page. The lists are populated from the set of matching items and are used to “drill down” and better “focus” the search.
Choose which fields will be used as facets in your search app. Once enabled, you will need to define at least one facet.
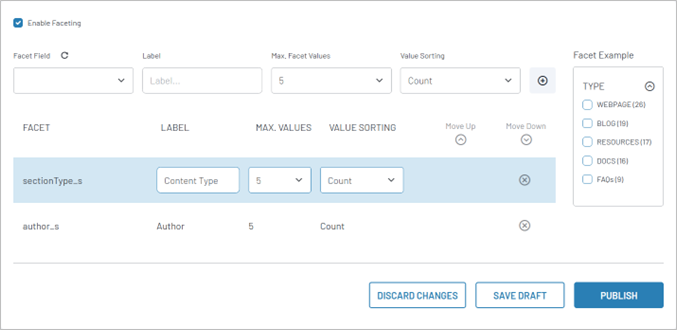
How to configure Facets
- In your Terminalfour Search Crawler configuration, edit the Mappings to add the fields you want use as Facets:
Dynamic Field Name Field Type Metatag Name SeachStax Field author String author author_s sectionType String sectionType sectionType_s - In your SearchStudio application, go to Configurations >> Basic Configurations >> Faceting
- Enable Faceting: Check the box to enable
- Use the table below as a guide to add facets for Author and Type.
- Facet Field: Select a field to use
- Label: This will appear on your SERP as the Heading/Label of the Facet
- Max. Facet Values: how many categories should appear in the Facet?
- Value Sorting: How to sort the categories in your facet
- Click + to add the facet field
- You can use the "Move Up" and "Move Down" buttons to change the order of your facets.
- Click Publish
| Facet Field | Label | Max. Facet Values | Value Sorting |
|---|---|---|---|
| author_s | Author | 5 | Count |
| sectionType_s | Type | 5 | Alphanumeric |
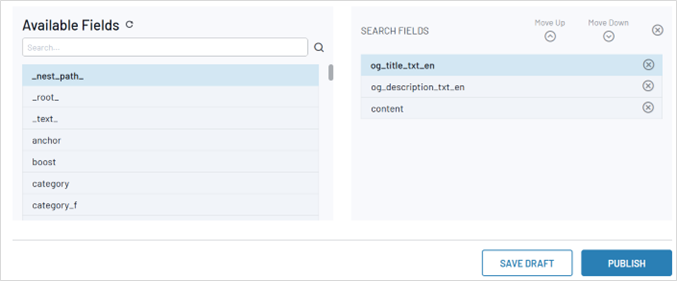
Search Fields
Configurations >> Basic Configurations >> Search Fields
Your Search App matches user queries against a list of Search Fields. This list is a powerful tool for focusing the search on relevant material.
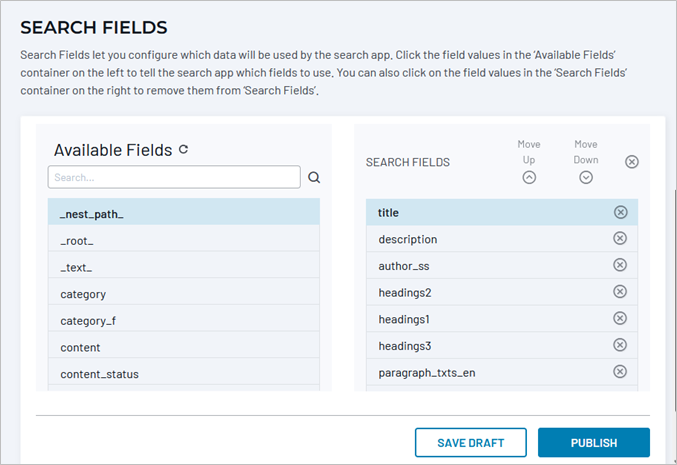
Click on an available field name to move it into the list of fields to search. The (X) button on the right removes a field from the active list.
Note the Reload Schema icon above the list of fields. If you can’t find a field in the list, try reloading the schema. Changes to your website’s Solr schema are not automatically updated in Site Search.
Experiment by adding some search fields to specify which fields the search engine should analyze.
Stemming
Stemming is a process of removing and replacing word suffixes to arrive at a common root form of the word.
Stemming is one of several text normalization techniques that converts raw text data into a readable format for natural language processing tasks.
Stemming can be a very useful tool to help optimize your search results.
On your Fruit University hosted Search Experience:
- A search for “blueberries” will yield a matching result.
- A search for “blueberry” will not yield results.
A demonstration of stemming can be found here: https://text-processing.com/demo/stem/
- Blueberries Stemmed to blueberri
- Blueberry Stemmed to blueberri
Set your Search Fields to use a “stemming” field type i.e. a field set in your crawler configuration with a Field Type of Text English.
A field that is configured with a Field Type of Text English is identified with a suffix of _txt_en.
Using og_title_txt_en as one of your Search Fields for example, will yield results when searching for either blueberry or blueberries.

How to use stemming in your Search Fields
- In your SearchStudio application, go to Configurations >> Basic Configurations >> Search Fields
- Click Reload Schema: this will update the Available Fields to include fields recently added to your crawler’s
configuration. - Search Available Fields: use the search to find and select a field. Click a field to add it to the Search Fields on
the right i.e.- og_title_txt_en
- og_description_txt_en
- content
- Click Publish
- Click Reload Schema: this will update the Available Fields to include fields recently added to your crawler’s
Spell Check
Configurations >> Basic Configurations >> Spell Check
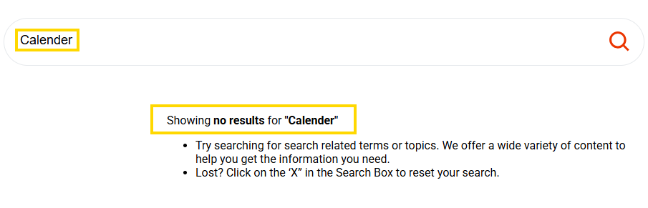
When a query returns no results, the Spell Check feature locates similar-looking words in the index (Data Driven) or in a custom list (Dictionary Driven). The Spell Check feature automatically runs a new query based on the similar word.
Spell Check is triggered by No ResultsIf Spell Check is not enabled, searching for "calender" will yield No Results
Enable the Spell Check to resolve the problem.
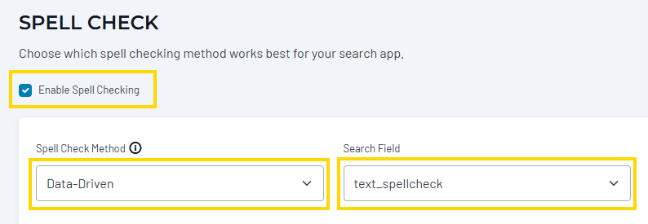
How to configure Spell Check
- In your SearchStudio application, go to Configurations >> Basic Configurations >> Spell Check
- Enable Spell Checking: check this box
- Spell Check Method: Select Data-Driven.
-
Search Field: Select text__spellcheck.
- Click Publish
Search again for 'calender' and this time the Spell Check will yield a result
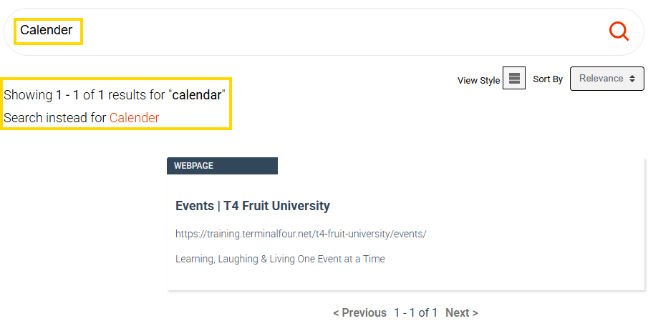
Experiment with different Search Fields to determine which works best for your content.
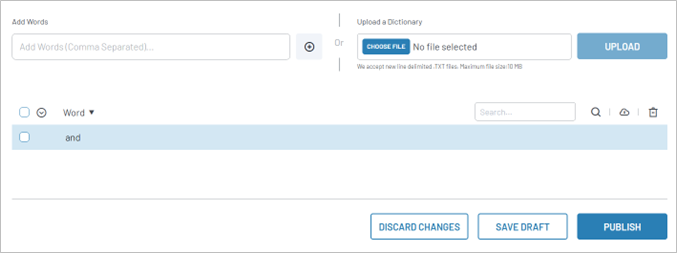
Stopwords
Configurations >> Basic Configurations >> Stopwords
Stopwords are common words (like articles, prepositions, conjunctions, or pronouns) that do not add meaning to a search. Since they appear on almost every page, including them can skew the results. They’re useful in writing for sentence structure, but not in searches.
In your Hosted Search Experience, search for “bananas and blueberries”.
Observe that there are 36 results.
This is the total number of results that contain the word “bananas” OR “and” OR “blueberries”.
Many of your pages contain the word “and” but do not have any relevance to bananas or blueberries.
Add “and” to your list of Stopwords and re-run your search for “bananas and blueberries”.
This time, “and” is ignored by the query processor and you will only get results that contain the word “bananas” AND/OR “blueberries” found within the Search Fields you have defined.
How to configure Stopwords
- In your SearchStudio application, go to Configurations >> Basic Configurations >> Stopwords
- Add Words: enter the word you want to add to the list of Stop Words, i.e. “and”.
- +: Click the ‘+’ symbol to add the word to the Stop Words dictionary
- Click Publish
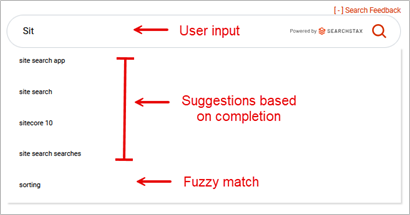
Auto-Suggest
Optimizations >> Auto-Suggest
The SearchStax Auto-Suggest feature helps website visitors by suggesting search terms based on an index of past user queries.
How Auto-Suggest Works
The dictionary is built nightly by looking at the last three months of search terms where the ClickThrough-Rate is greater than 10%.
More detailed information available at https://www.searchstax.com/docs/searchstudio/searchstax-studio-auto-suggest/
How to configure Auto-Suggest
- In your Searchstax Search Application, go to
Optimizations >> Auto-Suggest - Enable Auto-Suggest.
- Suggestion Method:
- Data allows suggestions based on user search behavior.
- Dictionary uses the list of words you add to the Auto-Suggest configuration.
- Display: set the maximum number of suggestions to display. I.e., 4.
- Display Suggestions After: set the minimum number of characters a visitor must type before suggestions begin to appear. I.e., 2.
- Add Word: add “Banana”.
- Click + to add your word to the Dictionary list
- Click Publish.
- Preview your search and test your Auto-Suggest configuration by typing “ba”.
Observe that “banana” appears as a search suggestion. - Click on the “banana” suggestion and observe that a search is processed with the query of “banana”.

Trouble shooting information for Auto-Suggest can be found at:
https://www.searchstax.com/docs/hc/auto-suggest-issues/
Synonyms
Optimizations >> Synonyms
Terminology you use on your website might differ from the terminology used by your website visitors. When people search, they don’t all use the same words—even when they’re looking for the exact same thing.
Adding well-chosen synonyms can dramatically improve search results for university users. The key is to cover how students, faculty, and staff actually phrase things, not just official terminology.
Just as fruits and vegetables can be known by different names depending on region, culture, or familiarity, users bring their own vocabulary to your search. By accounting for these variations, you make it easier for visitors to find what they’re looking for, improving both the accuracy of search results and the overall user experience.
Take a look at the No Result Searches in your analytics to identify opportunities for adding useful synonyms.
- fees <-> tuition
- schedule <-> calendar
- syllabus <-> curriculum
Bilberries and blueberries are closely related fruits.
Your Fruit University website does not contain any use of the word bilberries, but there are references to blueberries, therefore searching for bilberries will not find any results.
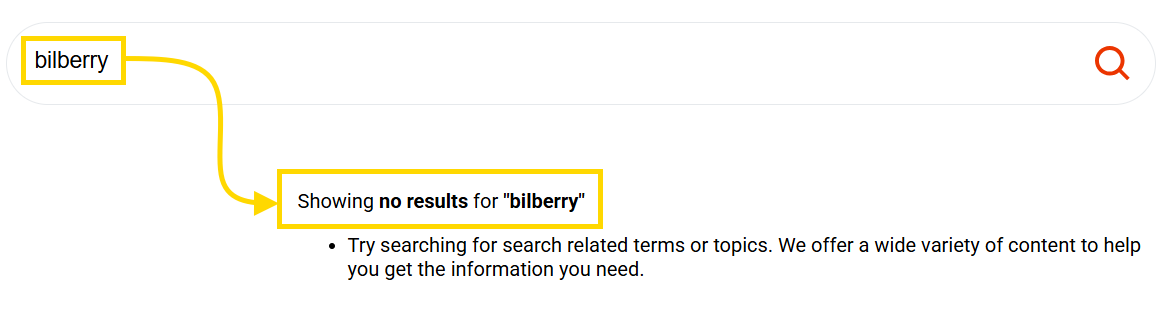
Create a Synonym so that searches for bilberry will yield results of blueberry and/or bilberry
How to add Synonyms
- In your Searchstax Search Application, go to:
Optimizations >> Synonyms
Word Is Synonym to bilberry <-> blueberry - Click the + to add the synonym
- Press Publish
- Test your synonym using your Hosted Search Experience, observe that a search for bilberry will now display results that include blueberry.
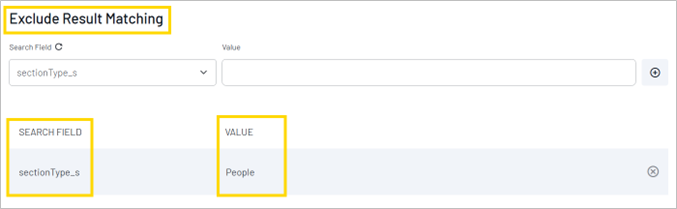
Data Filters
Data Filters let you add both Include and Exclude filters to place limits on your search results.
Experiment with Data Filters to include and/or exclude something from your search results.
In the example below we will use Excludes to stop Fruit University’s Staff Directory items appearing in the search results.
How to Exclude Items from Search Results
- In your SearchStudio, go to Configurations >> Advanced Configurations >> Data Filters.
- Enable Data Filters: Ensure this is enabled.
- Exclude Result matching:
- SEARCH FIELD: sectionType_s.
- VALUE: People (note that values are case sensitive).
- Click Publish.
- Refresh your Hosted Search Experience and observe that “People” items are no longer appearing in your search results.
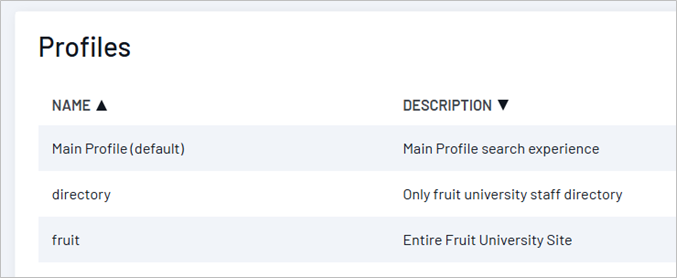
Search Profiles
Search Profiles are named collections of search settings that let you create different search experiences from the same underlying data index.
Key characteristics:
- Each Profile can have different Data Filters, Ranking rules, Promotions, Search Fields, and UX configurations
- Additional Profiles can be created as needed for specific search experiences
When to create Additional Profiles
- Section-specific searches - Global site search plus separate Staff/Faculty Directory, Blog search, News search, Program/Course search
- Different audiences - Public search versus authenticated user search with additional content
- Content-type filtering - All content indexed, but filtered by type (documents vs. pages vs. media)
- Multi-site management - Different campus locations or departments sharing the same index but showing filtered results
The SearchStax Site Search solution’s Search Profile Selector lets you choose which Site Search App and which Search Profile to view and modify.
In this exercise we will create three new profiles
- Fruit: a Fruit University-wide search
- Directory: Staff/Faculty Directory-only search
- Vegetable: a Fruit University-wide search
Note that the Hosted Search Experience is configured for a specific search profile (or “model”), as shown by
thesearchstax[model]=modelName
parameter at the end of the URL. This provides a convenient way for developers to test competing models side-by-side.
How to create a search profile
In this exercise we will create three new search profiles:
- Directory
- Fruit
- Vegetable
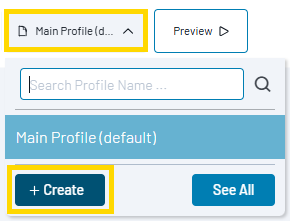
- In your Site Search App, click the Profile drop-down menu (currently set to your Main Profile)
- Click +Create.
- Profile Name: give your profile a name i.e.:
- Fruit
- Directory
- Vegetable
-
Copy configurations from: use this if you'd like to copy search and results configurations from other profiles
- Description: give your profile a description.
- Profile Name: give your profile a name i.e.:
- Click Create.
Add a Crawl Configuration for Vegetable University
Using what you have learned, create a crawl configuration for your Vegetable University website
https://training.terminalfour.net/t4-vegetable-university/
To expedite this process, you can duplicate your existing Fruit University crawl configuration
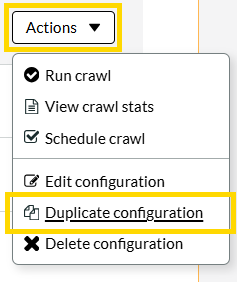
How to Duplicate a crawl configuration
- Go to you Terminalfour Search Configuration List
- Locate your Fruit University Crawl Configuration
- Click Actions >> Duplicate configuration
- Configuration a name: i.e. my-vegetable-university
- Searchstax endpoint: already populated
- Searchstax token: already populated
- Seed: https://training.terminalfour.net/t4-vegetable-university/
- URL filter regex: +^https://training\.terminalfour\.net/t4-vegetable-university/
- Mappings
- Static values
- Change the static value for siteName from Fruit to Vegetable
We will use this later in the Data Filters of our Vegetable Search Profile
- Change the static value for siteName from Fruit to Vegetable
- Static values
- Click Save.
Create a custom SERP Template
To manage a template, we will use Terminalfour.
Create a section in your Terminalfour instance using the credentials provided by your trainer.
How to log into Terminalfour
- Go to https://training.terminalfour.net/terminalfour/
- Username: S201 Implementer
- Password: S201 Implementer
Hosting your SERP in Terminalfour
The Hosted Search Experience is preconfigured to provide an appropriate search experience to the Search App’s index and settings.
You can use the Searchstax Hosted Search Experience source code as the framework of your SERP template and customize it as required.
How to generate a SERP Template
Each Site Search App has its own Hosted Search Experience. To access it, navigate to:
Your Search App > Configurations > Search UI > Hosted Search Experience.
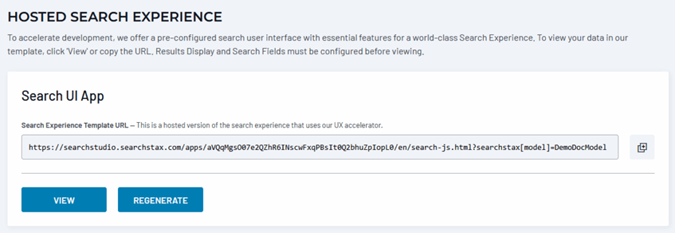
Click the View button to open the Hosted Search App in a browser window. You can copy the URL to share with stakeholders and coworkers.
- In your SearchStudio, go to Configurations >> Search UI >> Hosted Search Experience.
- Click VIEW, a new tab opens.
- View the pages Source Code.
- Copy everything and paste into your T4 Content Type Layout.
Resources for Devs
Terminalfour Search Crawler Documentation:
SearchStax Developer Documentation:
Handlebars.js Documentation:
Template CSS and Styling
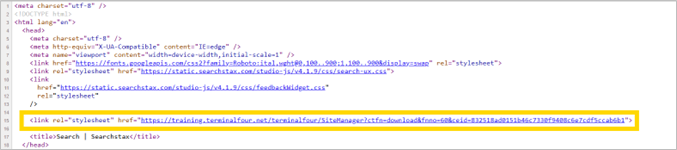
There is a CSS file that can be used for default styling. It can be found within the SearchStax UI Source. The CSS file is linked to in the <header> there is also a <style> tag in the header of the source code. It is recommended to remove this and reference it from the Terminalfour Media Library.
How to remove the style tag from your template
- Go to your SERP content layout.
- Find <style lang="css"> (line 14).
- Delete all the style tag (lines 14 through to ~200).
- Replace with a T4 Media Tag pointing to the style file id:
- Click </>Generate T4 Tag.
- Select the Media tab.
- Click Select media.
- Locate the CSS file (go to Media Category: S201 Training Website).
- Click on the file: S201 SERP style.
- Select the path/* formatter.
- Click Copy to clipboard.
<t4 type="media" id="12053" formatter="path/*" />
-
- The T4 tag will output the path to the CSS file. Update the code as follows:
<link rel="stylesheet" href="<t4 type="media" id="12053" formatter="path/*" />">
-
- Click Save changes.
- Preview your SERP to test the output. View the page Source to observe the <style> CSS is now replaced by a <link rel="stylesheet" href=""> instead of 184 lines of CSS code.
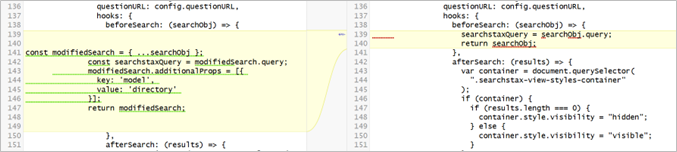
Using Hooks to select a profile
Your Search Template is currently using your Main Profile (default).
Use Hooks in your template to specify which profile to use.
In the example below, we are updating the template to use our directory profile.
When specifying the model value in your SERP template code, the value is case sensitive.
The value must exactly match the name of an existing profile in your Search Application. If the specified model value does not exactly match a profile name (including letter case), the system will automatically fall back to the MainProfile (default).

Replace with:
const modifiedSearch = { ...searchObj };
const searchstaxQuery = modifiedSearch.query;
modifiedSearch.additionalProps = [{
key: 'model',
value: 'directory'
}];
return modifiedSearch;.png)
After Before
Using Hooks to manipulate a searchField
You have mapped dc:title to your result card’s Title.
For your web pages this includes the site name i.e., Home | Terminalfour Fruit University.
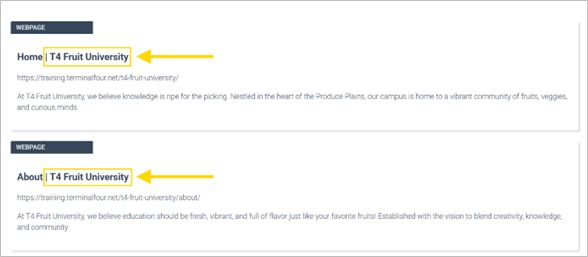
Update your SERP template to remove the site name suffix from your Titles
How to remove the suffix from your Title
BEFORE
-648x508.png)
Add to Hooks, before the “return results”, at approximately line 158:
results.forEach(result => {
if (result.title) {
result.title = result.title.replace(' | T4 Fruit University', '');
}
});
AFTER
-648x534.png)
Save the changes to your template and preview your Search Results Page
Observe that the suffixes of " | T4 fruit University" are now removed from your Titles.
Displaying “Unmapped Fields”
The Site Search Results Fields screen lets you assign returned field values to specific display areas on the search-results “card.” These are known as “mapped fields.”
The remaining “unmapped fields” are returned by the emselect endpoint as an array of fieldname/value pairs. The array is available to the searchResultTemplate of the Result Widget.
To display the value of a single unmapped field, you must either iterate over the unmappedFields or use something like afterSearch to extract unmappedFields.fieldName into a custom property on the result.
In the Hosted Search Experience template, unmapped fields are already templated to display immediately after your mapped fields using the "#unmappedFields" block.
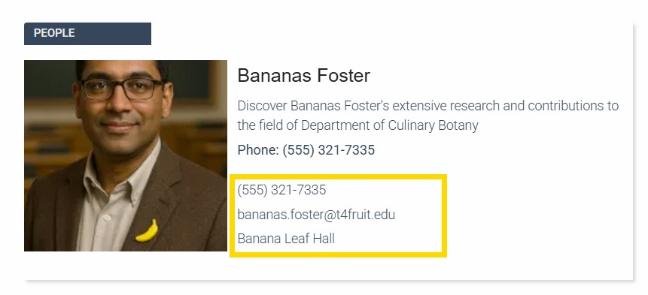
In the screenshot below unmapped fields are displaying Phone, Email, and Building Name (highlighted in yellow box).
In this exercise update your Crawl Configuration to include Metadata Mappings of;
- peopleEmail,
- peoplePhone, and
- peopleBuilding.
How to Add Mappings
- In your Terminalfour Search Configuration
- Scroll down to Mappings.
- Update Dynamic values – use the screen shot and table below as a guide.
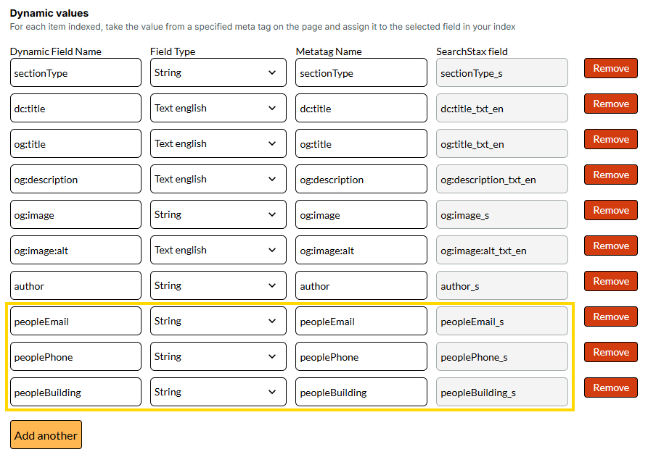
| Dynamic Field Name | Field Type | Metatag Name |
|---|---|---|
| peopleEmail | String | peopleEmail |
| peoplePhone | String | peoplePhone |
| peopleBuilding | String | peopleBuilding |
- Click Update.
You will return to the Configurations listing screen. - Click Actions >> Run crawl.
- After the crawl has completed, go to your Searchstax Search Application to observe the newly mapped fields are available.
How to update Results Fields to display "Unmapped Fields"
Once your updated Metadata Mappings have been added to your Crawler’s index it is time to utilize them as "unmapped fields" in your Results Card.
Go to your Searchstax Search Application and map your newly added "people" fields to your Results Card using "No Mapping".
Reload the Schema by clicking the Return Field "reload" icon

Add your three "people" fields;
| Return Field | Label | Maps to Results Card Field |
|---|---|---|
| peoplePhone | No Mapping | |
| peopleEmail | No Mapping | |
| peoplebuilding | No Mapping |
Click Publish.
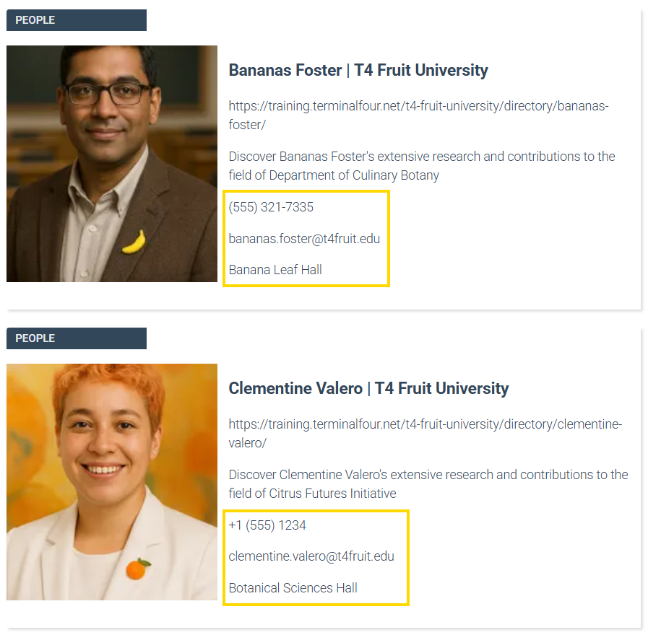
View your Hosted Search Experience and observe the three unmapped fields display in the Results Cards for People results.
Customizing Unmapped Fields in a Results Card
The previous exercise showed us how to display unmapped fields in a standard, non-customizable way using the existing "#unmappedFields" block found in your Hosted Search Experience template.
In this exercise we will learn how to display unmapped fields depending on what type of result is being displayed. this gives you more control over the way your unmapped fields are displayed.
In the example below, logic has been used to display unmapped fields for Phone, Email, and Building name if the result is a People result.

How to Customize the appearance of Unmapped Fields in a Results Card
First, let's remove the existing "#unmappedFields" block found in your Hosted Search Experience template
- Go to your SERP template (Terminalfour Content type content layout)
- Locate the "#unmappedFields" block and wrap an HTML comment around it
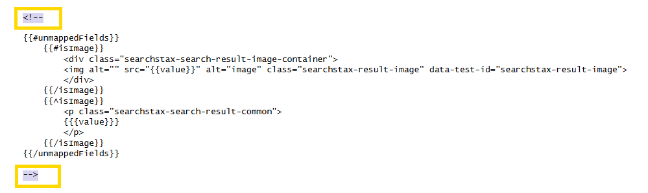
- Click Save changes.
- Preview your SERP, search for a People type of result and observe that the unmapped fields are no longer displaying.
Now that we have stopped using the "#unmappedFields" block, let's update our template to display them again, this time using logic in the template to control when, where and how we want them to appear.
In this example, we will display some unmapped People fields IF the sectionType being displayed = people
In order to do this, we first need to add the field sectionType to our Result Fields:

- In your SearchStudio Application, go to Configurations >> Results Fields
- Return Field: sectionType
- Maps to Results Card Field: No Mapping
- Click + to add the new configuration to your list of Results Fields
- Click Publish.
- Use the Preview within your search application to confirm that sectionType is present in your results data model.
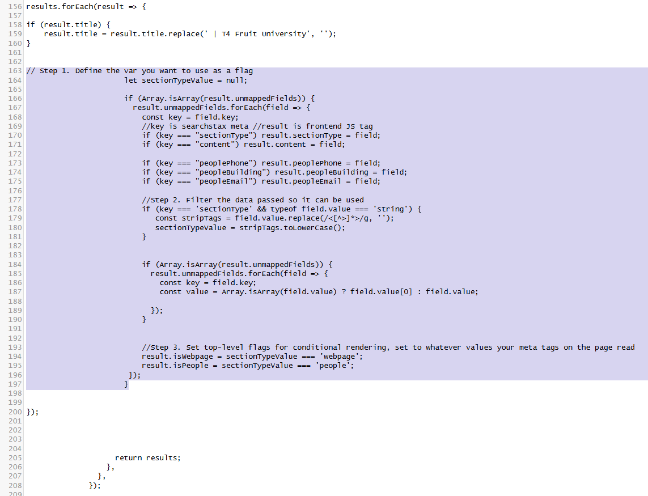
Now that sectionType has been added to your Results Fields it can be utilized in your template to identify when a result is a People type of result. To do that we must add logic to the afterSearch hook of your template
- Go to your SERP template (Terminalfour Content type content layout)
- locate the afterSearch area of your template.
- add the following code to approximately line 163 before });
// Step 1. Define the var you want to use as a flag
let sectionTypeValue = null;
if (Array.isArray(result.unmappedFields)) {
result.unmappedFields.forEach(field => {
const key = field.key;
//key is searchstax meta //result is frontend JS tag
if (key === "sectionType") result.sectionType = field;
if (key === "content") result.content = field;
if (key === "peoplePhone") result.peoplePhone = field;
if (key === "peopleBuilding") result.peopleBuilding = field;
if (key === "peopleEmail") result.peopleEmail = field;
//Step 2. Filter the data passed so it can be used
if (key === 'sectionType' && typeof field.value === 'string') {
const stripTags = field.value.replace(/<[^>]*>/g, '');
sectionTypeValue = stripTags.toLowerCase();
}
if (Array.isArray(result.unmappedFields)) {
result.unmappedFields.forEach(field => {
const key = field.key;
const value = Array.isArray(field.value) ? field.value[0] : field.value;
});
}
//Step 3. Set top-level flags for conditional rendering, set to whatever values your meta tags on the page read
result.isWebpage = sectionTypeValue === 'webpage';
result.isPeople = sectionTypeValue === 'people';
});
}
- Click Save changes to save this version of your template.
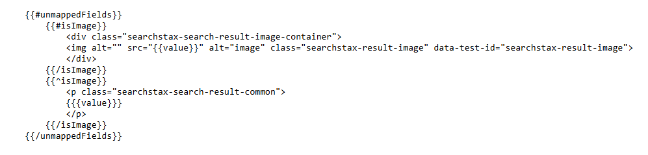
- Click back into your template, this time locate the searchResultTemplate area of your template code and add the following #isPeople block of code wherever you want Phone, Email, and Building information to appear on a People type of Result:
{{#isPeople}}
{{#peoplePhone}}
<p>
<i class="fa fa-phone"></i> {{{peoplePhone.value}}}
</p>
{{/peoplePhone}}
{{#peopleEmail}}
<p>
<i class="fa fa-envelope"></i> {{{peopleEmail.value}}}
</p>
{{/peopleEmail}}
{{#peopleBuilding}}
<p>
<i class="fa fa-building"></i> {{{peopleBuilding.value}}}
</p>
{{/peopleBuilding}}
{{/isPeople}}
In the screenshot below the #isPeople block has been added just before the commented out #unmappedFields block.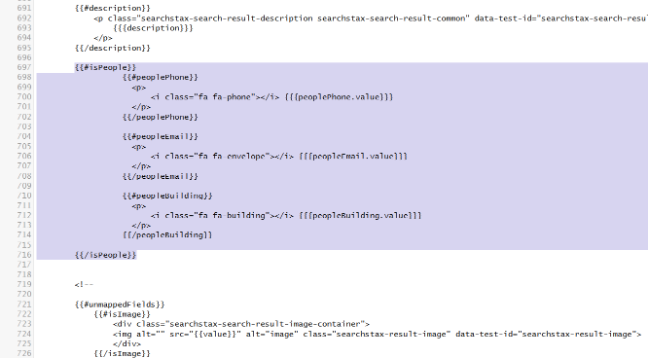
- Click Save changes to save this version of your template.
- Preview your SERP to observe the results. if successful, your People type of results will now display Phone, Email, and Building information. You can now modify the HTML to style the unmapped fields in anyway you like.
To further customize your People results, you can add inverse logic to only display blocks of code where sectionType IS NOT People
In Handlebars, the syntax {{^isPeople}} uses the caret (^) operator, which means an "inverse section".
{{^isPeople}}
This shows when it's NOT a People result
{{/isPeople}}
Add Search to your Website’s Search Bar
Now your search is ready to add to your website.
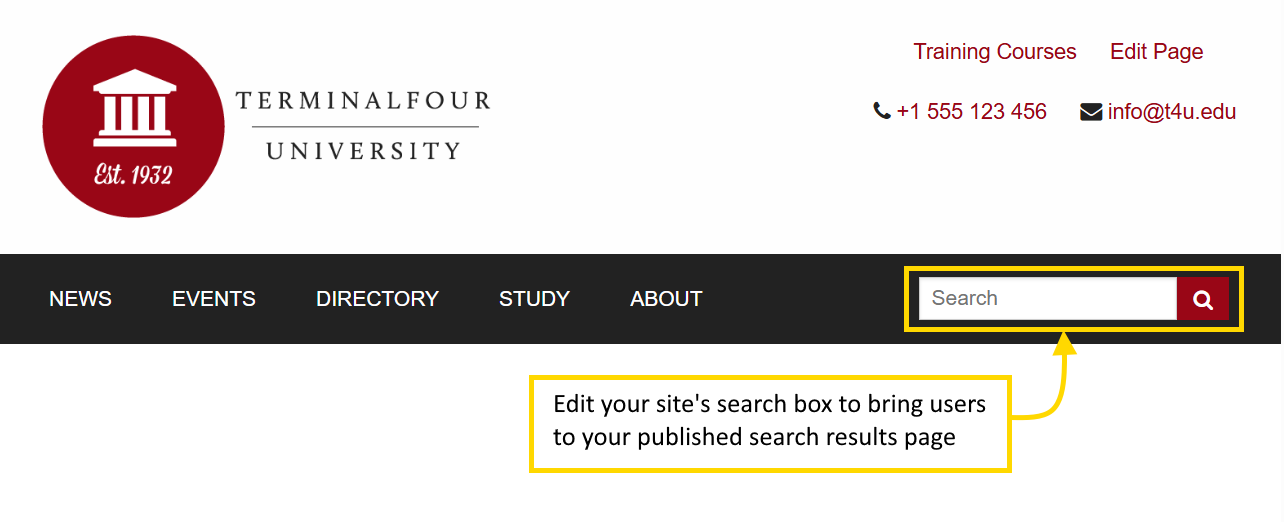
How to add the search solution to your website
- In your Page Layout's Footer:
- Add the following code before the </body>:
<script>
//Search Box
document.addEventListener('DOMContentLoaded', function () {
//must add input and button elements here. Make sure these exist on the page.
const input = document.getElementById('customSearchInput');
const button = document.getElementById('customSearchButton');
button.addEventListener('click', function () {
const query = input.value.trim();
if (!query) return;
const url = `https://training.terminalfour.net/t4-fruit-university/search/?searchstax[query]=${encodeURIComponent(query)}&searchstax[page]=1`;
window.location.href = url;
});
// Support pressing "Enter" inside the input
input.addEventListener('keydown', function (e) {
if (e.key === 'Enter') {
e.preventDefault();
button.click();
}
});
});
</script>
- In your Page Layout's Header:
Replace:
<input type="text" placeholder="Search" /> with
<input id="customSearchInput" type="text" placeholder="Search" />
- Replace
<div class="small-2 columns"><a href="#" class="button expand"><i class="fa fa-search"></i></a></div>
Feedback survey
Congratulations on completing the Terminalfour Search Implementation training course.
Please provide feedback in our on-line survey.