
Setting up a re-direct to Tomcat using the Jakarta ISAPI Redirector
Setting up a re-direct to Tomcat using the Jakarta ISAPI Redirector
Assumptions
- IIS 8 and the manager interface has been installed on the server
- Your web server is set to run on port 443
- Tomcat is listening on port 8009 for AJP connections (default).
- Your TERMINALFOUR context defined within your application server is called 'terminalfour.'
- Your server has been secured. Do not enable any of the following without ensuring this.
If any of the above is untrue please carefully read the settings below and alter them where appropriate.
Preparation
Create a New Folder for the Redirect Files
Create a folder on your disk to store the files required for this redirect. Having spaces in the path to this folder can be problematic so avoid this.
These files are usually placed within the Tomcat folder but this can make removing older versions of Tomcat problematic after an upgrade. For this reason, it is suggested you place the folder outside of Tomcat's folder.
Mod JK ISAPI Filter DLL
Download the latest JK connector (isapi_redirect-X.X.XX.dll) for your operating system from here:
http://www.gtlib.gatech.edu/pub/apache//tomcat/tomcat-connectors/jk/binaries/
Rename the DLL file to isapi_redirect.dll and place it into the folder created above.
Configuration Files
Create the following three files on your server as plain text files. Their names must match what's below and the paths in isapi_redirect.properties must be altered to use the path to your new folder created above. Once the files have been created, place them with the DLL file from above.
isapi_redirect.properties
# Configuration file for the Jakarta ISAPI Redirector
# The path to the ISAPI Redirector Extension, relative to the website
# This must be in a virtual directory with execute privileges
extension_uri=/jakarta/isapi_redirect.dll
# Full path to the log file for the ISAPI Redirector
log_file=c:\path\to\jakarta\folder\isapi_redirect.log
# Log level (debug, info, warn, error or trace)
log_level=info
# Full path to the workers.properties file
worker_file=c:\path\to\jakarta\folder\workers.properties
# Full path to the uriworkermap.properties file
worker_mount_file=c:\path\to\jakarta\folder\uriworkermap.properties
workers.properties
# Basic worker definition for Jakarta ISAPI Redirector
worker.list=t4worker
worker.t4worker.port=8009
worker.t4worker.host=localhost
worker.t4worker.type=ajp13
uriworkermap.properties
# Basic URI mapping file for IIS - Jakarta ISAPI Redirector
# [URL] = [WORKER]
# TERMINALFOUR TERMINALFOUR
/terminalfour/*=t4worker
Jakarta IIS Virtual Directory
- Locate your website within IIS , if you do not have a site defined within ISS then use the default website.
- Create a new virtual directory call jakarta
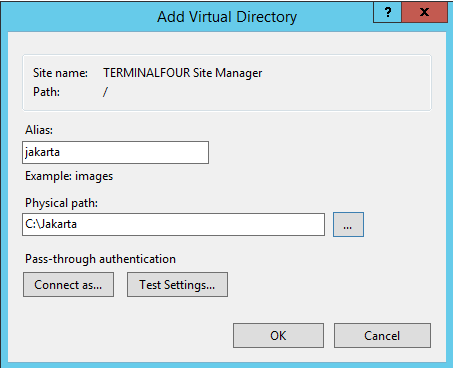
- Select the folder you created above as it's home folder
- Give the virtual folder Read, Run scripts and Execute permissions
Adding Required Server Roles/Features
- open the Server Manager Console
- Click on "Add roles and features"
- Go to "Features" and locate "WinRM IIS Extension"
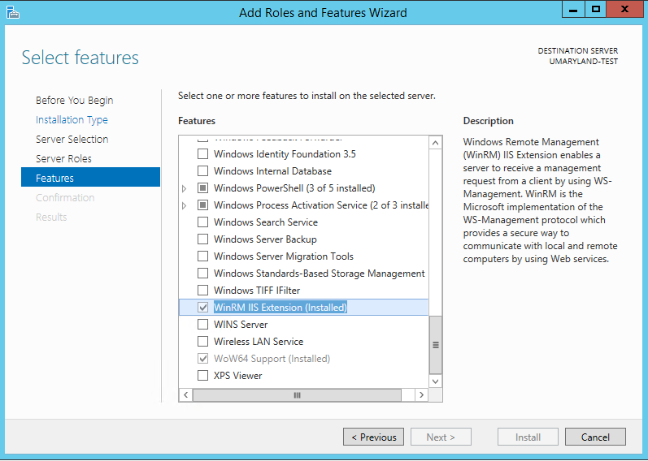
- Press "Install"
- This will add the "ISAPI Extensions" and "ISAPI Filters" Server Roles
Adding the ISAPI DLL to IIS
- Click on the IIS Site you created the Virtual Directory in open the Isapi Filters page
- Click Add on the right side of the page
- Enter a Name for the filter (this can be anything you like, it's for reference only)
- Enter the path to the isapi_redirect.dll file as the Executable

- Click Ok, and you'll see the filter listed.
Handler Mappings
- In the Connections panel, select the website you added the ISAPI filter to above, i.e. 'Default Web Site'
- Click 'Handler Mappings'
- Highlight 'ISAPI-dll' by clicking on it
- In the right panel, Actions, click 'Edit Feature Permissions...'
- In the pop-up window, check 'Execute' box, click OK
Error pages
In order for specific error messages to be passed to the front-end user you must permit Detailed errors on your website in IIS. To do this:
- Click on the web site in IIS
- Choose 'Error Pages'
- Choose 'Edit feature settings' from the Actions menu on the right
- Set the Error Responses to 'Detailed errors'
- Choose 'OK' to save the changes
Testing the Connector
From your server navigate to http://localhost/terminalfour/SiteManager. If the configuration above is correct, then you should see the TERMINALFOUR TERMINALFOUR login screen.
If your site requires a host header be sure to use that in your URL instead of localhost.
Potential Issues
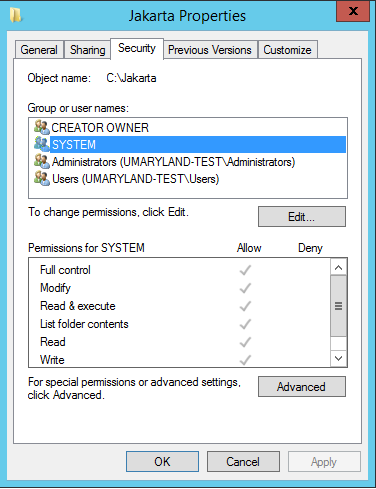
If you experience problems getting the filter to load then ensure that the file permissions are correct for the folder you've created. The user set for anonymous access should be able to read this directory.
Back to top