
Overview
Handlebars allows you to create content layouts and page layouts with placeholders and simple logic that will be filled in with data at Publish time, making it easier to manage and manipulate content in ways that are not possible using standard T4 Tags without needing extensive coding expertise or familiarity with the complexities of Programmable Layouts.
One of the key features of Handlebars is its simplicity. With a syntax that closely resembles regular HTML, users can quickly grasp the basics and start building more "dynamic" content types and page layouts.
Handlebars uses double curly braces {{}} to denote placeholders, which are then replaced with actual data when the layout is Published – much like the t4 tags you may be familiar with today.
The Terminalfour implementation of Handlebars comes with an extensive toolkit of "Helpers" to allow you to add logic to your layouts in a way that just isn't possible with t4 tags.
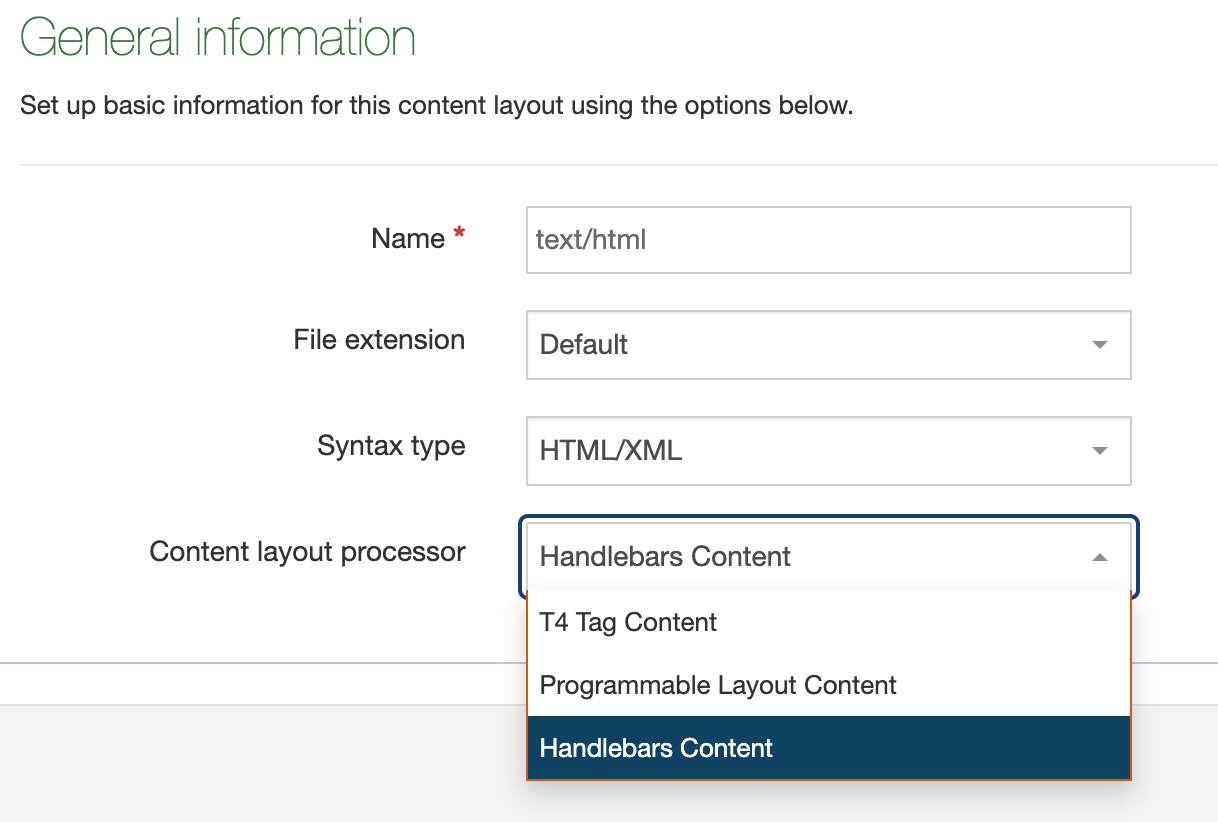
From Terminalfour 8.3.19 you can make use of Handlebars by selecting it as a processor type on your page layouts and content layouts:
Before we dive in...
8.3.19 is our initial release of Handlebars and we'll be extending the functionality and improving the experience over the next several releases of the platform.
Before we explore how Handlebars works it's important to mention a few items up front to help you make the best use of the feature.
Mixing t4 tags and Handlebars expressions
When setting the Content layout processor to Handlebars Content you can no longer use "T4 tags" in the layout. Instead you must use the Handlebars Helpers outlined in the rest of this guide.
Types of expressions
There are three main types of expressions you will be working with in your Handlebars code:
//Standard Expression:
{{exampleHelper "foo" example="bar"}}
//Block Expression:
{{#exampleHelper}}
<p>Some stuff</p>
{{/exampleHelper}}
//Subexpression:
{{exampleHelper (otherHelper)}}
Subexpressions
A subexpression is an expression inside another expression. It’s used when you want to call a helper or a calculation inside another expression. Subexpressions are wrapped in parentheses.
For example, if you wanted to use the publish Helper to output the Title element of a Content item it might look like this:
{{publish element="Title"}}
But if you wanted to make use of the built in upper Helper to output that value in uppercase you'd need to pass in the publish Helper into the upper Helper as a subexpression like this:
{{upper (publish element="Title")}}Notice that by using subexpressions you can combine different Helpers, thereby creating more powerful Handlebars expressions. You will look at several examples of doing this throughout this training, remember that when using subexpressions you will need to use parentheses in your syntax.
Types of parameters
You can pass as many unnamed or named parameters to your Custom Helpers as you'd like and in any order. You will see several different scenarios in the exercises.
//Unnamed Parameter:
{{exampleHelper "foo"}}
//Named Parameter:
{{exampleHelper example="bar"}}
"Double stashing" and "Triple stashing"
With some limited exceptions, Handlebars HTML-escapes values returned by an expression using two curly-braces (e.g. {{expression}}).
This means certain special characters will be converted to their HTML equivalents. For example, if a user entered a value of < then a "double-stashed" handlebars expression would convert that to <.
If you don't want Handlebars to escape a value, use the "triple-stash", {{{.
Double-stash example
{{publish element="Title"}}If a user enters the value <h2>Test</h2> into a Title element then this expression would output <h2>Test</h2> (the value is HTML-escaped)
Triple-stash example
{{{publish element="Title"}}}If a user enters the value <h2>Test</h2> into a Title element then this expression would output <h2>Test</h2> (the value is not HTML-escaped)
Error handling
Like with standard T4 tag based layouts and programmable layouts it's possible to configure things incorrectly and get undesired or unexpected results.
Preview & Direct Edit
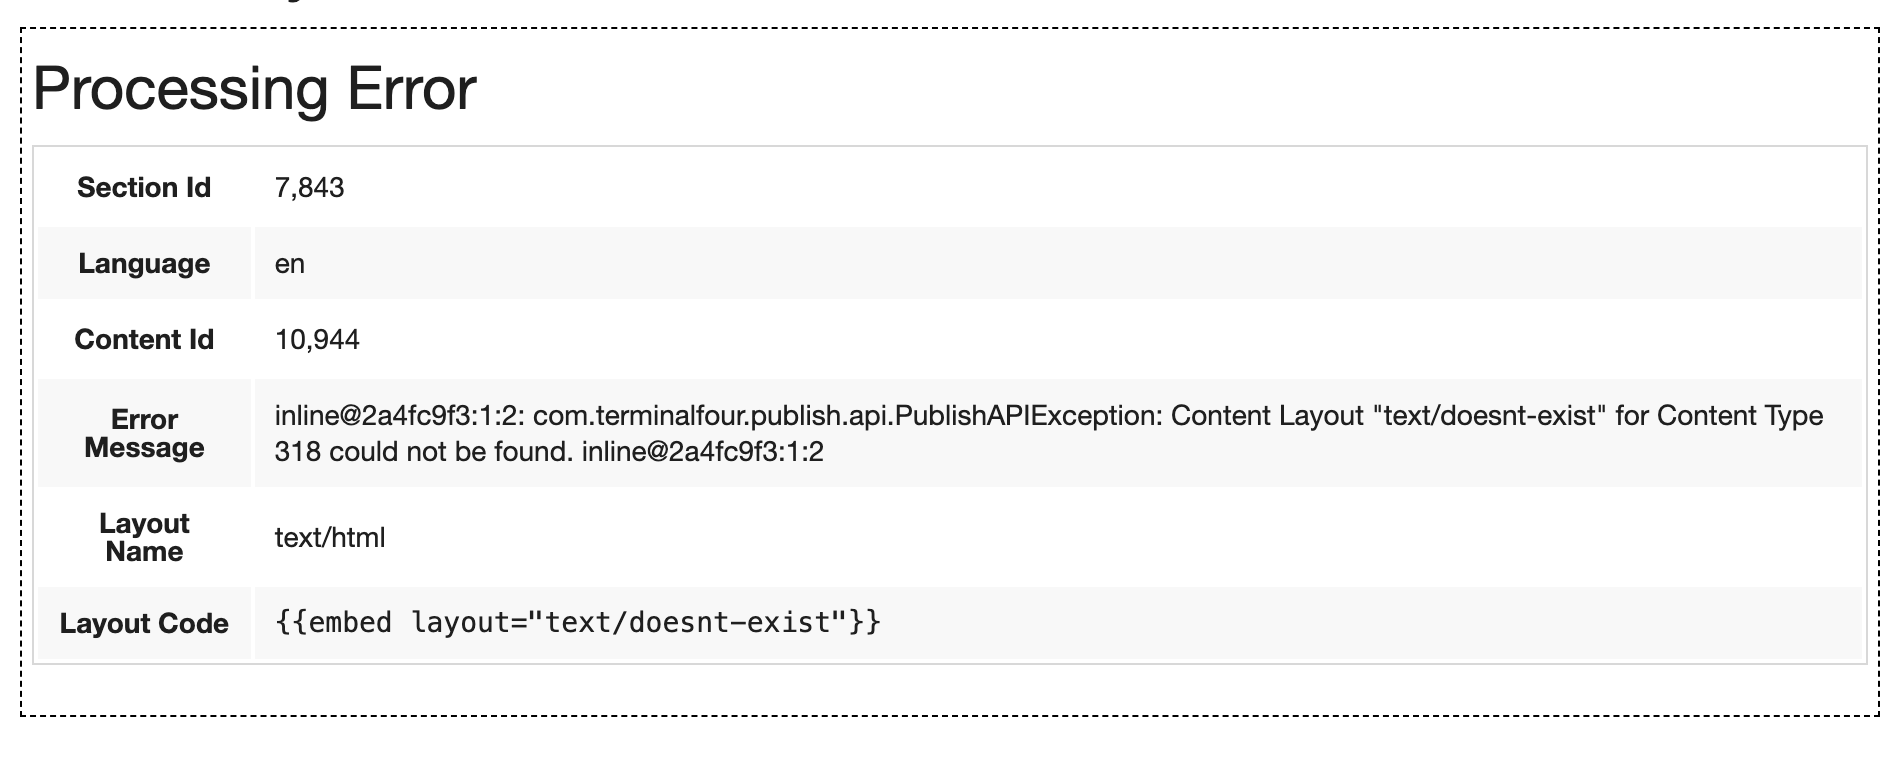
When an error is encountered with a Handlebars layout during Preview or Direct Edit we output an inline error message on the page to users.
This error is in the form of a table and displays the following info:
- The Section ID where the error is occurring
- The asset language
- The Content ID (if applicable)
- The error message
- The content layout name (if applicable)
- The layout code (if applicable)
This should give you enough information to find out where the problem exists so you can debug.
Example:
Publish
When a Publish happens and an error is encountered we could have done one of two things:
- We could ignore the error, and continue the Publish
- We could stop the publish to prevent breaking the live site
Both have their pros and cons and ultimately we'll need to hear from you, our users, about how you're using Handlebars to determine the best long term solution.
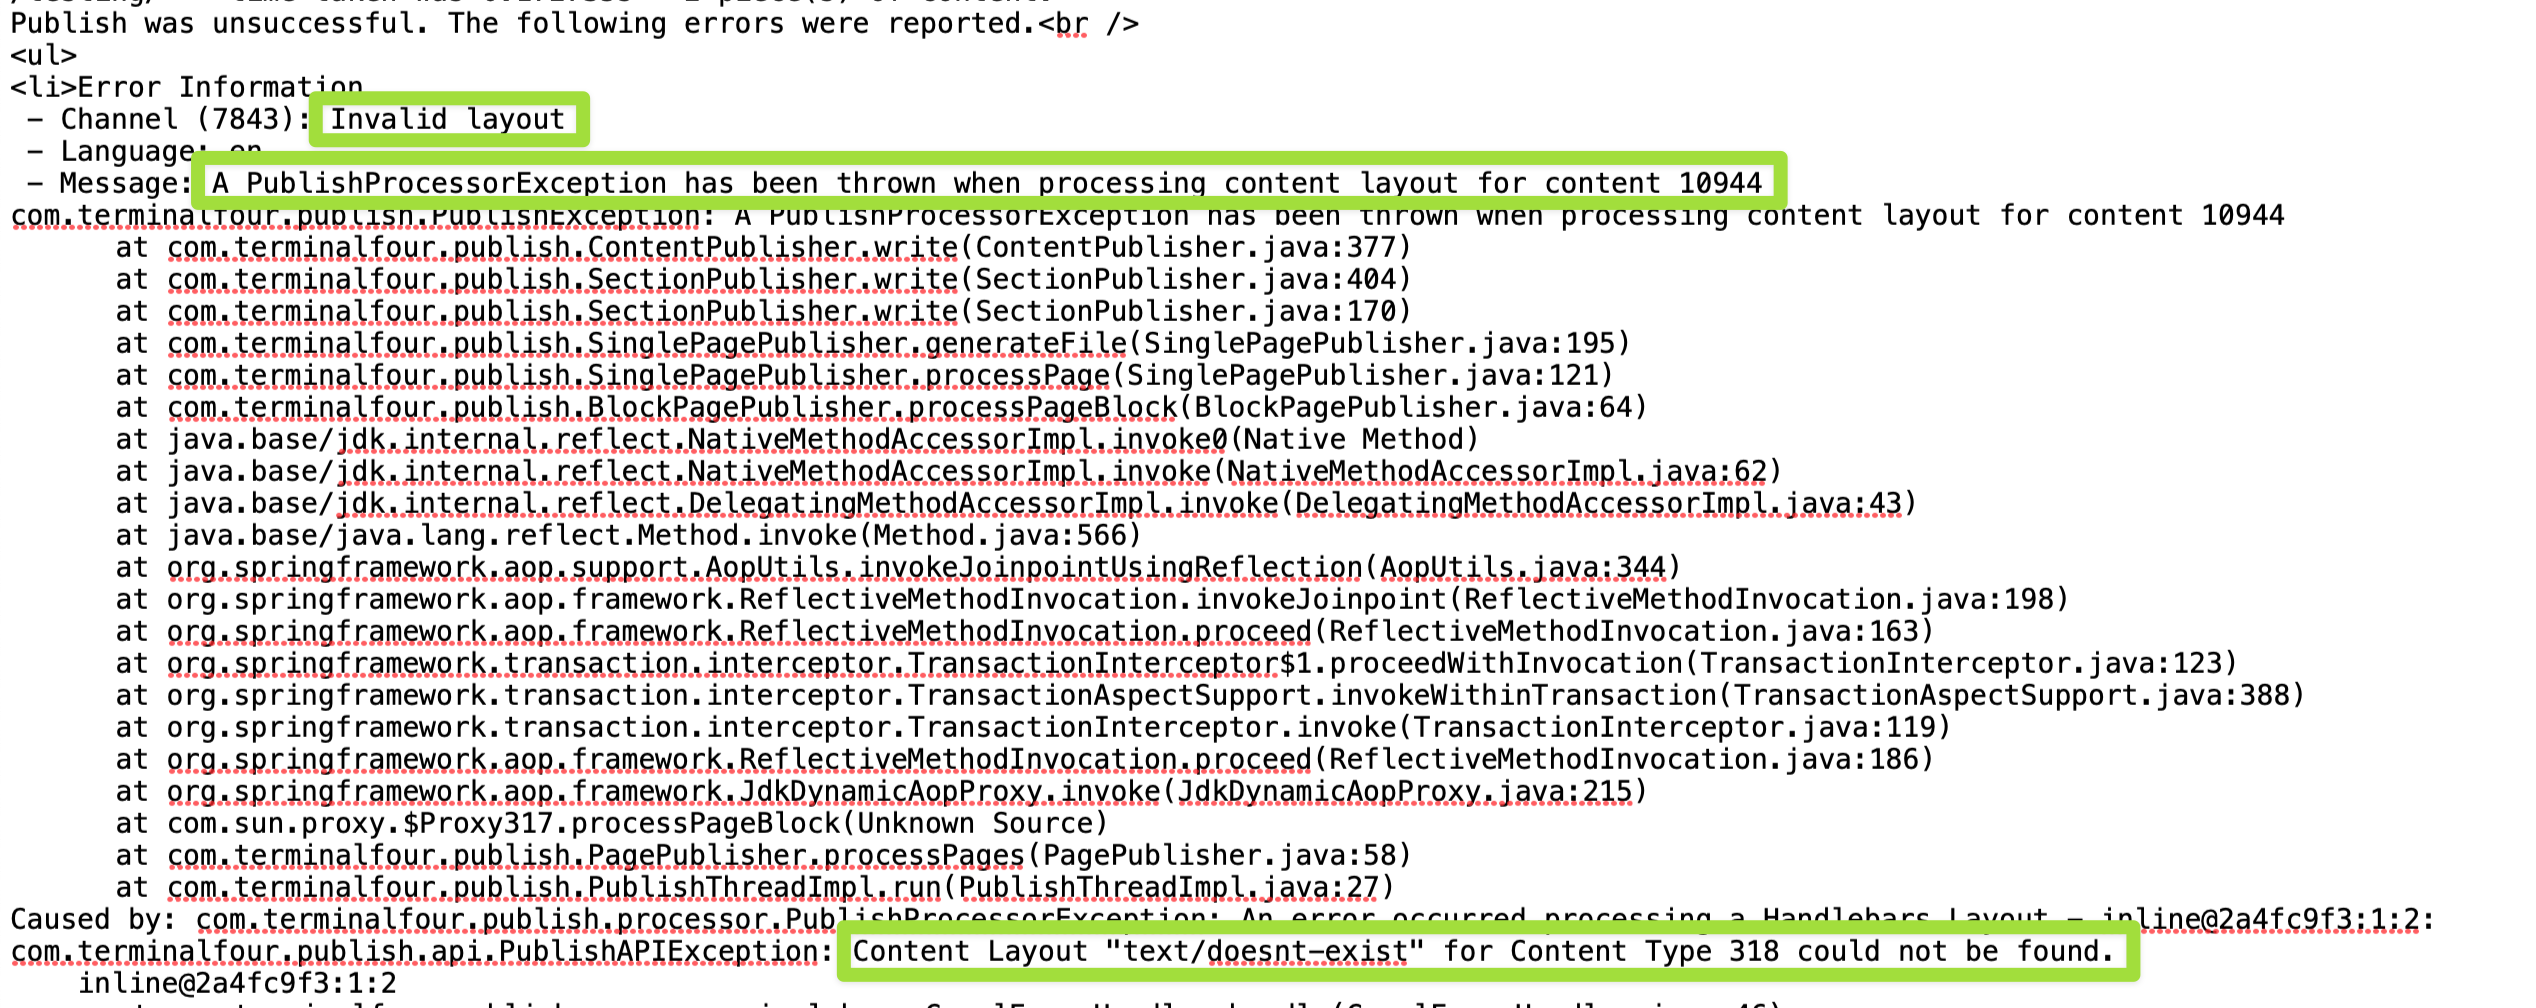
For now, we've taken the safest and least destructive option which is to fail the publish. This means if you accidentally introduce a breaking error in your most commonly used content type or page layout we'll prevent that error from getting pushed to your live site and ultimately breaking a significant portion of your web pages.
When the publish fails it does so with very clear messaging in the logs explaining the reason for the failure.
Example
Overview of JavaScript ES6 Syntax
String Literals
Prior to ES6 concatenation using the + operator was used.
var foo = "bar";
var oldWay = "The value of foo is: " + foo;
ES6 introduced Template literals which use backticks and allow interpolation with ${expression}.
var foo = "bar";
var newWay = `The value of foo is ${foo}`;
Spread Syntax
Spread syntax lets you break up elements of arrays or properties of an object. The code below shows using spread syntax to copy an object.
var obj = {
foo: "bar"
}
var newObj = {
...obj,
baz: "quz"
}
console.log (newObj);
output:
{
foo: "bar",
baz: "quz"
}
let and const
let and const both introduced in ES6 are two block-scoped ways of declaring variables.
let foo = "bar";
foo = "baz"; //This will work
const quz = "bar";
quz = "baz"; //This will error
Some other concepts
Type Coercion
The !! operator is a quick way to coerce any value into a Boolean (true or false).
let isValid = '';
typeOf isValid; // 'string'
typeOf !! isValid; // 'boolean'
Ternary Operator
The ternary operator ? is a shorthand for an if else statement.
let isValid = true;
let foo = isValid ? 'true' : 'false'
Before you start
Be sure you have the following added to your training site:
1. Duplicate the "T206: Training Site Example (Duplicate Me)" into your Site Structure
2. Duplicate the "T206 Training Site Example (Duplicate Me)" page layout
3. Create a "T206 Training Site Example" Channel
4. Duplicate the "T206 Training Site Example: General (Duplicate Me)" content type
5. Enable your "T206 Training Site Example: General" content type into your Home branch section.
Where to create Custom Helpers
There is no dedicated UI to manage Custom Helpers. Custom Helpers are added by adding an instance of a new System content type to a hidden section.
You will need to find the ID of the section you need to edit, to do so run the following SQL command in the query handler:
select * from config_option where config_key = 'handlebars.helpersSectionId'
Administrators can grant access to the query handler in the Environment section via:
Administration -> Settings -> Advanced
You can verify your access to the query manager by going to Administration -> Cache Management and changing the value of the "ctfn" attribute in the URL to "query" like so:
https://training.terminalfour.net/terminalfour/SiteManager?ctfn=query
In the training instance you will be using throughout this course, the Section Id needed to access the Custom Helpers hidden Section is: 8303. You may want to crate a bookmark to this section to access easily as you are completing the exercises in the course.
1. Hello, World!
- Let's start with a Hello World example to learn how to create Custom Helpers in Terminalfour. In the following exercises, you will learn where and how Custom Helpers are created and how to use context and options to output named and unnamed parameters.
Exercise 1.1: creating the "your_nameHelloWorld" Custom Helper
- Click on any section within your site structure.
- Modify the URL for your section by changing the section Id in the URL to '8303' and hitting enter. This will take you to the hidden section in the training instance where you can add your Custom Helpers.
- Click on the Add Content button to create a new Custom Helper.
- Name: Give your Custom Helper a name, "your_nameHelloWorld". (There should be no spaces in the name field, use camel case as a convention for your Custom Helpers names).
- Function Code: Enter your Custom Helper code into this field as specified below.
All Handlebars Custom Helpers start out as a function that has two arguments: context and options.
function (context, options) {
return `Hello, World!`;
}
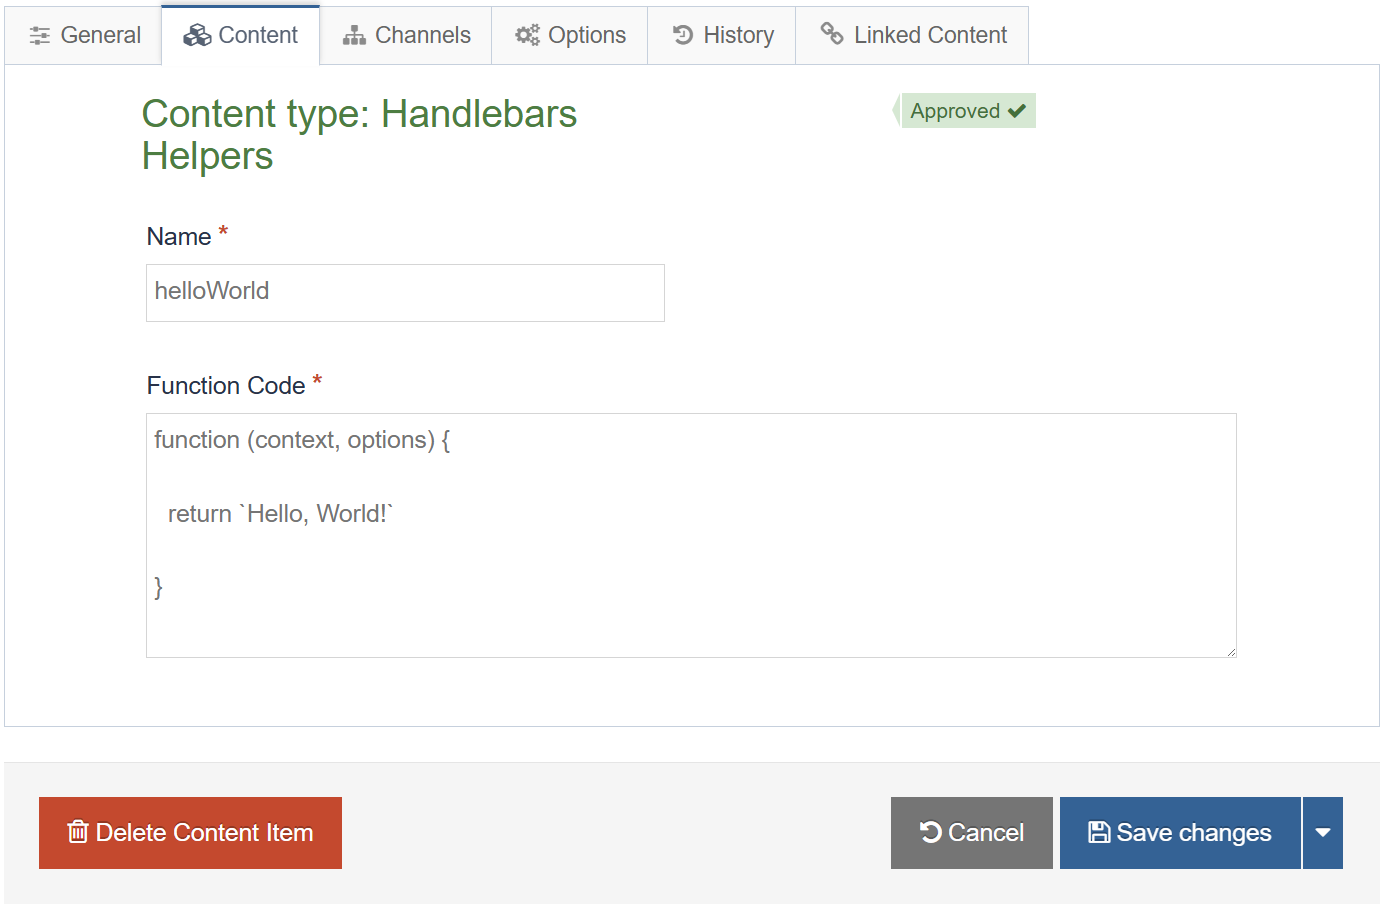
- Click Save changes to save the changes to your Custom Helper.
Exercise 1.2: updating the "text/html" content layout
- Go to Assets > Content Types.
- Click your content type name to edit it. (Use the Filter tool to search). Open the Content layouts tab.
- The Content layout tab is an area to add content layout(s) for your content type. Click into the "text/html" content layout to edit it.
- Add a Handlebars expression that uses the "your_nameHelloWorld" Custom Helper that you created in the previous exercise. To do this use the name of the newly created Custom Helper ("your_nameHelloWorld") inside the curly braces as below:
<p>{{your_nameHelloWorld}}</p>
- Click Save changes to save your content type.
Let's add some sample content using the "T206 [Your Name] Training Site Example: General" content type.
1. On the Site Structure screen, click on the name of your "Home" section.
2. The General information about this section screen appears, select the Content types tab.
3. Using the Filter feature, locate your content type.
4. Select the radio button to enable your content type for either the branch or section:
a. Enabled (branch): the content type can be used in this section as well as all its sub-sections.
b. Enabled (section): the content type can be used in this section only.
5. Click Save changes to confirm your selection. You can now use the "T206 [Your Name] Training Site Example: General" content type to add content to your section.
6. Add one content item to your "Home" section of your website. Give the Name element a value such as your own name and leave all the other elements blank.
- Update your preview to check the result.
Exercise 1.3: adding an unnamed parameter
- Go to Assets > Content Types.
- Click your content type name to edit it. (Use the Filter tool to search). Open the Content layouts tab.
- The Content layouts tab is an area to add content layout(s) for your content type. Click into the "text/html" default content layout to edit it.
- Update the existing code by adding an unnamed parameter like so (Replace the [Your Name] placeholder with your actual name):
<p>{{your_nameHelloWorld [Your Name]}}</p>
You can also pass an unnamed parameter using the publish Helper rather than hard coding in a value like so:
<p>{{your_nameHelloWorld (publish element="Name")}}</p>
Here a subexpression is created that passes the "Name" element of the content type as an unnamed parameter.
<p>{{your_nameHelloWorld (publish element="Name")}}</p>
- Click Save changes to save the changes to your content type.
- Go to your "your_nameHelloWorld" Custom Helper.
The context parameter will contain the first unnamed parameter passed to a Custom Helper. Additional unnamed parameters can be retrieved using options.You will now make use of the context parameter to access the unnamed parameter inside of your Custom Helper code.
- Update your Custom Helper code as per below:
function (context, options) {
return `Hello ${context}!`;
}
- Click Save changes to save the changes to your Custom Helper.
- Update your preview to check the result.
Exercise 1.4: adding exception handling to "your_nameHelloWorld"
You should always consider adding exception handling to your code, let's look at a couple of methods you can use to better capture potential errors in your code when using context and options.
Let's revisit the "your_nameHelloWorld" Custom Helper and add code to check whether the context parameter is set. Currently, if we use the "your_nameHelloWorld" Custom Helper and forget to pass an unnamed parameter we might get an unexpected result.
- Go to your "your_nameHelloWorld" Custom Helper and update the code as per below:
function (context, options) {
//create a variable called type to store whether context is referring to the global object
const type = Object.prototype.toString.call(context);
//return the String only if the global object is not being returned by context
if (type !== '[object global]' && type !== '[object Window]') {
return `Hello ${context}!`;
}
}
- Click Save changes to save the changes to your Custom Helper.
- Go to Assets > Content Types.
- Click your content type name to edit it. (Use the Filter tool to search). Open the Content layouts tab.
- The Content layouts tab is an area to add content layout(s) for your content type. Click into the "text/html" default content layout to edit it.
- Update the existing code by removing the unnamed parameter from the Handlebars expression as per below:
{{your_nameHelloWorld}}
- Update your preview to check the result.
Exercise 1.5: adding a named parameter
- Go to Assets > Content Types.
- Click your content type name to edit it. (Use the Filter tool to search). Open the Content layouts tab.
- The Content layouts tab is an area to add content layout(s) for your content type. Click into the "text/html" default content layout to edit it.
- Update the existing code by adding a Handlebars expression that uses the "your_nameGreetings" Custom Helper that you will create in the next exercise with a named parameter. To do this use the name of the Custom Helper ("your_nameGreetings") inside the curly braces and add the name parameter like so (Replace the [First Name] and [Last Name] placeholders with your name and last name respectively):
<p>{{your_nameGreetings firstName="[First Name]" lastName="[Last Name]"}}</p>
- Click Save changes to save the changes to your content type.
- Update your preview to check the result.
Notice the error being displayed to the page. The error is showing you that the Custom Helper fails because it does not exist when previewing.
Exercise 1.6: creating the "your_nameGreetings" Custom Helper
Let's create a new Custom Helper to use named parameters.
- Access the hidden section where your Custom Helpers are added via the bookmark you created at the start of training.
- Click on the Add Content button to create a new Custom Helper.
- Name: Give your Custom Helper a name, "your_nameGreetings". (There should be no spaces in the name field, use camel case as a convention for your Custom Helpers names).
- Function Code: Enter your Custom Helper code into this field as specified below.
To access named parameters you will use the options parameter and call the the hash method. You will then pass the name of your parameter to the hash method.
function (context, options) {
return `Greetings, ${options.hash('firstName')} ${options.hash('lastName')}!`;
}
- Click Save changes to save the changes to your Custom Helper.
- Update your preview to check the result.
Exercise 1.7: adding exception handling to "your_nameGreetings"
Now, let's also add exception handling to the "your_nameGreetings" Custom Helper. In this instance you are using the options parameter instead.
The hash method of the options parameter has a second parameter that is the default output so if the first parameter is null for some reason, the second parameter will be output instead.
- Go to your "your_nameGreetings" Custom Helper and update the code as per below:
function (context, options) {
return `Greetings, ${options.hash('firstName', 'First Name')} ${options.hash('lastName', 'Last Name')}!`;
}
- Click Save changes to save the changes to your Custom Helper.
- Go to Assets > Content Types.
- Click your content type name to edit it. (Use the Filter tool to search). Open the Content layouts tab.
- The Content layouts tab is an area to add content layout(s) for your content type. Click into the "text/html" default content layout to edit it.
- Update the existing code by removing the "firstName" and "lastName" named parameters from the Handlebars expression as per below:
<p>{{your_nameGreetings}}</p>
- Update your preview to check the result.
2. Escaping JSON
- In this exercise, you will create a Custom Helper, "your_nameEscapeJson" that will allow you to escape text to ensure it's safe to use as JSON output.
Exercise 2.1: creating the "your_nameEscapeJson" Custom Helper
- Access the hidden section where your Custom Helpers are added via the bookmark you created at the start of training.
- Click on the Add Content button to create a new Custom Helper.
- Name: Give your Custom Helper a name, "your_nameEscapeJson". (There should be no spaces in the name field, use camel case as a convention for your Custom Helpers names).
- Function Code: Complete the TODO below to create your Custom Helper:
- Return the JSON escaped string using the stringify method (HINT: Use the context parameter).
Click here to view the solution:
function (context, options) {
//1. TODO: Return the JSON escaped string using the stringify method (HINT: Use the context parameter).
return JSON.stringify(context);
}
- Return the JSON escaped string using the stringify method (HINT: Use the context parameter).
function (context, options) {
//1. TODO: Return the JSON escaped string using the stringify method (HINT: Use the context parameter).
return JSON.stringify();
}
- Click Save changes to save the changes to your Custom Helper.
- Go to Assets > Content Types.
- Click your content type name to edit it. (Use the Filter tool to search). Open the Content layouts tab.
- The Content Layout tab is an area to add content layout(s) for your content type. Click into the "text/html" content layout to edit it.
- Add a Handlebars expression that uses the "your_nameEscapeJson" Custom Helper. Make sure you pass the "Description" element as an unnamed parameter using the publish Helper.
- Let's also look at an additional way of adding exception handling to your layouts. In this case, let's add an ifSet Helper to output the JSON text only if the Description element has been previously populated. This will avoid situations where an empty string (context) is passed to the Custom Helper.
Adding an ifSet Helper in the content layout provides you with a very useful and practical method of exception handling. Rather than having to handle an empty or null context within the Custom Helper code you can do it in the content layout instead.
{{#ifSet element="Description"}}
<p>{{your_nameEscapeJson (publish element="Description")}}</p>
{{/ifSet}}
- Click Save changes to save the changes to your content layout.
- Go into the Home section of your site structure and update your existing content by adding text in the "Description" element.
Sample text to be converted to JSON:
"name": "[First Name]",
"last_name": "[Last Name]",
"academic_program": "[Computer Science]"
- Click Save changes to save your content.
- Update your preview to check the result.
3. Trim it to win it!
- In this exercise, you will create a Custom Helper, "your_nameTrim". The "your_nameTrim" Custom Helper can be used to remove whitespace before and after text.
Exercise 3.1: creating the "your_nameTrim" Custom Helper
- Access the hidden section where your Custom Helpers are added via the bookmark you created at the start of training.
- Click on the Add Content button to create a new Custom Helper.
- Name: Give your Custom Helper a name, "your_nameTrim". (There should be no spaces in the name field, use camel case as a convention for your Custom Helpers names).
- Function Code: Complete the TODO below to create your Custom Helper:
- Use the JavaScript trim function to remove whitespace and return the string.
Click here to view the solution:
function (context, options) {
//1. TODO: Use the JavaScript trim function to remove whitespace and return the string.
return context.trim();
}
- Use the JavaScript trim function to remove whitespace and return the string.
function (context, options) {
//1. TODO: Use the JavaScript trim function to remove whitespace and return the string.
return
}
- Click Save changes to save the changes to your Custom Helper.
- Go to Assets > Content Types.
- Click your content type name to edit it. (Use the Filter tool to search). Open the Content layouts tab.
- The Content layout tab is an area to add content layout(s) for your content type. Click into the "text/html" content layout to edit it.
- Add Handlebars expressions that use the "your_nameTrim" Custom Helper:
<pre>{{your_nameTrim " string to trim "}}</pre>
<pre>{{publish element="Name"}}</pre>
<pre>{{your_nameTrim (publish element="Name")}}</pre>
- Click Save changes to save your content type.
- Update your preview to check the result.
4. String search basics
- In this exercise, you will create your first block expression Custom Helper.
- Let's explore what is available within options and build a Custom Helper that uses some of its available methods.
- The "your_nameStringContains" Custom Helper you will build next checks whether a String is contained within a second String.
| Method | What it does |
|---|---|
| options.params | Returns a List <Object> of all positional parameters |
| options.param(int) | Gets a specific positional parameter by index |
| options.hash(String) | Gets a named (hash-style) param |
| options.fn() | Gets the template block (for block content) |
| options.inverse() | Gets the {{else}} block |
| options.tagType | Returns VAR, TRIPLE_VAR, SUB_EXPRESSION or SECTION |
The template block retrieved by the fn method refers to the content provided within the opening and closing of a block expression. The else block refers to any content after an optional else clause and that is retrieved by the inverse method.
Exercise 4.1: creating the "your_nameStringContains" Custom Helper
- Access the hidden section where your Custom Helpers are added via the bookmark you created at the start of training.
- Click on the Add Content button to create a new Custom Helper.
- Name: Give your Custom Helper a name, "your_nameStringContains". (There should be no spaces in the name field, use camel case as a convention for your Custom Helpers names).
- Function Code: Complete the TODOs below to create your Custom Helper:
- Get the string from context and store it into the "mainString" variable.
- Get the string to check using the param method.
- Return "this" using the fn method.
- Return "this" using the inverse method.
Click here to view the solution:
function (context, options) {
//1. TODO: Get the string from context and store it into the "mainString" variable.
const mainString = context;
//2. TODO: Get the string to check using the param method.
const stringToCheck = options.param(0);
const result = mainString.indexOf(stringToCheck);
if (result !== -1) {
//3. TODO: Return "this" using the fn method.
return options.fn(this);
}
//4. TODO: Return "this" using the inverse method.
return options.inverse(this);
}
function (context, options) {
//1. TODO: Get the string from context and store it into the "mainString" variable.
const mainString
//2. TODO: Get the string to check using the param method.
const stringToCheck
const result = mainString.indexOf(stringToCheck);
if (result !== -1) {
//3. TODO: Return "this" using the fn method.
return
}
//4. TODO: Return "this" using the inverse method.
return
}
- Click Save changes to save the changes to your Custom Helper.
- Go to Assets > Content Types.
- Click your content type name to edit it. (Use the Filter tool to search). Open the Content layouts tab.
- The Content layout tab is an area to add content layout(s) for your content type. Click into the "text/html" content layout to edit it.
- Add a Handlebars block expression that uses the "your_nameStringContains" Custom Helper:
{{#your_nameStringContains "string-to-check" "Terminalfour"}}
<p>Yes, the first string contains the second string!</p>
{{else}}
<p>No. The first string does not contain the second string!</p>
{{/your_nameStringContains}}
- Click Save changes to save your content type.
- Update your preview to check the result.
Adding different behaviors to the "your_nameStringContains" Custom Helper
The fulltext Helper for example takes on completely different behavior if it is used as a block expression vs a standard expression.
As a standard expression, the fulltext Helper will output a link to a fulltext page. In the code below, the fulltext Helper would generate a link to a fulltext page using the "Headline" element of a content type.
{{{fulltext linkText=(publish element="Headline")}}}In contrast, as a block expression, the fulltext Helper will let you know if the current page is a fulltext page or not.
{{#fulltext}}
<p>This is a fulltext page.</p>
{{else}}
<p>This is not a fulltext page.</p>
{{/fulltext}}
Learning to use the "tagType" variable
Let's learn how we can add different behaviors to our Custom Helpers. The key is to use the "options.tagType" variable which will return a string letting you know the type of expression:
function (context, options) {
return options.tagType;
}The returned value in the above code example will be one of the following:
| Value (options.tagType) | Expression |
|---|---|
| VAR | Standard expression |
| TRIPLE_VAR | Standard expression that is "triple stashed" |
| SUB_EXPRESSION | Subexpression |
| SECTION | Block expression |
You can use these values to provide different behaviors depending on the type of expression being used for your Custom Helpers.
Let's build an example where we are adding an additional behavior to your "your_nameStringContains" Custom Helper if it is used as a standard expression. When used as a standard expression, "your_nameStringContains" should return the length of the String passed in.
Exercise 4.2: updating the "your_nameStringContains" Custom Helper
- Access the hidden section where your Custom Helpers are added via the bookmark you created at the start of training.
- Click on the "your_nameStringContains" Custom Helper button to update it.
- Function Code: Complete the TODOs below to update your Custom Helper:
- Add an if statement that will execute the code for block expressions.
- Add an else condition that will handle all other expressions.
- Return the length of the passed in string if it's a standard expression.
Click here to view the solution:
function (context, options) {
//1. TODO: Add an if statement that will execute the code for block expressions.
if (options.tagType == "SECTION") {
const mainString = context;
const stringToCheck = options.param(0);
const result = mainString.indexOf(stringToCheck);
if (result !== -1) {
return options.fn(this);
}
return options.inverse(this);
}
//2. TODO: Add an else condition that will handle all other expressions.
else if (options.tagType == 'VAR' ||
options.tagType == 'TRIPLE_VAR' ||
options.tagType == 'SUB_EXPRESSION') {
//3. TODO: Return the length of the passed in string if it's a standard expression.
return context.length;
}
}
function (context, options) {
//1. TODO: Add an if statement that will execute the code for block expressions.
const mainString = context;
const stringToCheck = options.param(0);
const result = mainString.indexOf(stringToCheck);
if (result !== -1) {
return options.fn(this);
}
return options.inverse(this);
//2. TODO: Add an else condition that will handle all other expressions.
//3. TODO: Return the length of the passed in string if it's a standard expression.
}
- Click Save changes to save the changes to your Custom Helper.
- Update your preview to check the result.
Exercise 4.3: updating the "text/html" content layout
- Go to Assets > Content Types.
- Click your content type name to edit it. (Use the Filter tool to search). Open the Content layouts tab.
- The Content layout tab is an area to add content layout(s) for your content type. Click into the "text/html" content layout to edit it.
- Add a Handlebars expression that uses the "your_nameStringContains" Custom Helper as a standard expression. To do this use the Custom Helper ("your_nameStringContains") inside the curly braces as below:
<p>{{your_nameStringContains "count how many characters are in this string"}}</p>
- Click Save changes to save your content type.
- Update your preview to check the result.
Exercise 4.4: creating the "your_nameSelectedContains" Custom Helper
- The "your_nameSelectedContains" Custom Helper that you will create next can be used to evaluate if a user has selected a given string from a list in a content type.
- In this exercise, you will get additional practice using the fn and inverse methods, as well as, using the hash method to retrieve a named parameter passed to the custom Helper.
- Access the hidden section where your Custom Helpers are added via the bookmark you created at the start of training.
- Click on the Add Content button to create a new Custom Helper.
- Name: Give your Custom Helper a name, "your_nameSelectedContains". (There should be no spaces in the name field, use camel case as a convention for your Custom Helpers names).
- Function Code: Complete the TODOs below to create your Custom Helper:
- Add an if condition that returns the message "No string passed to compare" when the 'string_to_check' parameter is empty.
- Get the 'string_to_check' using the hash method.
- Return "this" using the fn method.
- Return "this" using the inverse method.
Click here to view the solution:
function (context, options) {
//1. TODO: Add an if condition that returns the message "No string passed to compare" when the 'string_to_check' parameter is empty.
if(!options.hash('string_to_check')) {
return `<div style="border: 1px solid #300;background-color:#fdd;color:#300;padding:1rem;font-size:1rem;border-radius:10px">No string passed to compare</div>`;
}
//2. TODO: Get the 'string_to_check' using the hash method.
const testString = options.hash('string_to_check');
let id = 'name';
if (options.hash('field_to_check') === 'name' || options.hash('field_to_check') === 'value') {
id = options.hash('field_to_check');
}
let result = false;
for (let i = 0; i < context.length; i++) {
if(context[i].get(id) === testString) {
result = true;
break;
}
}
if(result) {
//3. TODO: Return "this" using the fn method.
return options.fn(this);
}
//4. TODO: Return "this" using the inverse method.
return options.inverse(this);
}
function (context, options) {
//1. TODO: Add an if condition that returns the message "No string passed to compare" when the 'string_to_check' parameter is empty.
if() {
return `<div style="border: 1px solid #300;background-color:#fdd;color:#300;padding:1rem;font-size:1rem;border-radius:10px">No string passed to compare</div>`;
}
//2. TODO: Get the 'string_to_check' using the hash method.
const testString =
let id = 'name';
if (options.hash('field_to_check') === 'name' || options.hash('field_to_check') === 'value') {
id = options.hash('field_to_check');
}
let result = false;
for (let i = 0; i < context.length; i++) {
if(context[i].get(id) === testString) {
result = true;
break;
}
}
if(result) {
//3. TODO: Return "this" using the fn method.
return
}
//4. TODO: Return "this" using the inverse method.
return
}
- Click Save changes to save the changes to your Custom Helper.
- Go to Assets > Content Types.
- Click your content type name to edit it. (Use the Filter tool to search). Open the Content layouts tab.
- The Content layout tab is an area to add content layout(s) for your content type. Click into the "text/html" content layout to edit it.
- Add a Handlebars block expression that uses the "your_nameSelectedContains" Custom Helper:
{{#ifSet element="Academic Program"}}
{{#your_nameSelectedContains (selected element="Academic Program") string_to_check="Education" }}
<p>You must consult with an advisor first to select this academic program.</p>
{{else}}
<p>Your selection is now complete and has been forwarded to the registration office!</p>
{{/your_nameSelectedContains}}
{{/ifSet}}
- Click Save changes to save your content type.
- Go into the Home section of your site structure and update your existing content by adding an academic program in the "Academic Program" list element.
- Click Save changes to save your content.
- Update your preview to check the result.
5. It's about time: epoch edition
- In this exercise, you will get to create the "your_nameEpoch" Custom Helper. It will be used to compare the current date to a last published date. To do this it will base the comparison on the epoch time, the number of seconds since January 1, 1970, given a specific date.
Please be advised that date calculations in your Custom Helpers are based on the publish date not on when the page is being viewed.
Exercise 5.1: creating the "your_nameEpoch" Custom Helper
- Access the hidden section where your Custom Helpers are added via the bookmark you created at the start of training.
- Click on the Add Content button to create a new Custom Helper.
- Name: Give your Custom Helper a name, "your_nameEpoch". (There should be no spaces in the name field, use camel case as a convention for your Custom Helpers names).
- Function Code: Complete the TODOs below to create your Custom Helper:
- Get the "lastPublished" date from context and store it into the "lastPublished" variable.
- Pass the "lastPublished" date to the floor method to convert it to seconds. (HINT: Use the getTime() method).
Click here to view the solution:
function (context, options) {
//1. TODO: Get the "lastPublished" date from context and store it into the "lastPublished" variable.
const lastPublished = new Date(context);
//2. TODO: Pass the "lastPublished" date to the floor method to convert it to seconds. (HINT: Use the getTime() method).
const lastPublishedEpoch = Math.floor(lastPublished.getTime() /1000);
const now = new Date();
const nowEpoch = Math.floor(now.getTime() /1000);
if (nowEpoch > lastPublishedEpoch) {
return "The current date is after the last published date.";
} else if (nowEpoch < lastPublishedEpoch) {
return "The current date is before the last published date.";
} else {
return "The current date is exactly the same as the last published date.";
}
}
function (context, options) {
//1. TODO: Get the "lastPublished" date from context and store it into the "lastPublished" variable.
const lastPublished = new Date();
//2. TODO: Pass the "lastPublished" date to the floor method to convert it to seconds. (HINT: Use the getTime() method).
const lastPublishedEpoch = Math.floor( /1000);
const now = new Date();
const nowEpoch = Math.floor(now.getTime() /1000);
if (nowEpoch > lastPublishedEpoch) {
return "The current date is after the last published date.";
} else if (nowEpoch < lastPublishedEpoch) {
return "The current date is before the last published date.";
} else {
return "The current date is exactly the same as the last published date.";
}
}
- Click Save changes to save the changes to your Custom Helper.
- Go to Assets > Content Types.
- Click your content type name to edit it. (Use the Filter tool to search). Open the Content layouts tab.
- The Content layout tab is an area to add content layout(s) for your content type. Click into the "text/html" content layout to edit it.
- Add a Handlebars expression that uses the "your_nameEpoch" Custom Helper. Make sure to pass the "date" element as an unnamed parameter using the publish Helper.
Consider making the "Date" element required within your content type as an additional way of adding exception handling and ensuring you are not passing an empty value to your Custom Helper.
<p>{{your_nameEpoch (dateFormat (dateElement element="Date") "YYYY/MM/dd hh:mma")}}</p>
- Click Save changes to save your content type.
- Go into the Home section of your site structure and update your existing content by adding a date in the "Date" element.
- Click Save changes to save your content.
- Update your preview to check the result.
6. From start to finish: handling date ranges
- The "your_nameDateRange" Custom Helper can be used to check whether a date is between a range of dates and then output a corresponding message.
- Let's use the "your_nameDateRange" Custom Helper to check whether the current date falls between a holiday start date and a holiday end date and then output a corresponding message to the page.
Please be advised that date calculations in your Custom Helpers are based on the publish date not on when the page is being viewed.
Exercise 6.1: creating the "your_nameDateRange" Custom Helper
- Access the hidden section where your Custom Helpers are added via the bookmark you created at the start of training.
- Click on the Add Content button to create a new Custom Helper.
- Name: Give your Custom Helper a name, "your_nameDateRange". (There should be no spaces in the name field, use camel case as a convention for your Custom Helpers names).
- Function Code: Complete the TODOs below to create your Custom Helper:
- Get the holiday start date from context.
- Get the holiday end date using the param method.
- Return "Holiday opening hours".
- Return "Regular opening hours".
Click here to view the solution:
function (context, options) {
//1. TODO: Get the holiday start date from context.
const holidayStart = context;
//2. TODO: Get the holiday end date using the param method.
const holidayEnd = options.param(0);
let todaysDate = new Date();
// Remove "IST" or any extra time zone abbreviation
const cleanedHolidayStart = holidayStart.replace(/ [A-Z]{3,4}$/, '');
const cleanedHolidayEnd = holidayEnd.replace(/ [A-Z]{3,4}$/, '');
const d1 = new Date(cleanedHolidayStart);
const day1 = String(d1.getDate());
const month1 = String(d1.getMonth() + 1);
const year1 = d1.getFullYear();
const d2 = new Date(cleanedHolidayEnd);
const day2 = String(d2.getDate());
const month2 = String(d2.getMonth() + 1);
const year2 = d2.getFullYear();
let from = new Date(year1, month1-1, day1);
let to = new Date(year2, month2-1, day2);
let isBetweenDates = (todaysDate > from && todaysDate < to);
if (isBetweenDates) {
//3. TODO: Return "Holiday opening hours".
return "Holiday opening hours";
}
//4. TODO: Return "Regular opening hours".
return "Regular opening hours";
}
function (context, options) {
//1. TODO: Get the holiday start date from context.
const holidayStart =
//2. TODO: Get the holiday end date using the param method.
const holidayEnd =
let todaysDate = new Date();
// Remove "IST" or any extra time zone abbreviation
const cleanedHolidayStart = holidayStart.replace(/ [A-Z]{3,4}$/, '');
const cleanedHolidayEnd = holidayEnd.replace(/ [A-Z]{3,4}$/, '');
const d1 = new Date(cleanedHolidayStart);
const day1 = String(d1.getDate());
const month1 = String(d1.getMonth() + 1);
const year1 = d1.getFullYear();
const d2 = new Date(cleanedHolidayEnd);
const day2 = String(d2.getDate());
const month2 = String(d2.getMonth() + 1);
const year2 = d2.getFullYear();
let from = new Date(year1, month1-1, day1);
let to = new Date(year2, month2-1, day2);
let isBetweenDates = (todaysDate > from && todaysDate < to);
if (isBetweenDates) {
//3. TODO: Return "Holiday opening hours".
return
}
//4. TODO: Return "Regular opening hours".
return
}
- Click Save changes to save the changes to your Custom Helper.
- Go to Assets > Content Types.
- Click your content type name to edit it. (Use the Filter tool to search). Open the Content layouts tab.
- The Content layout tab is an area to add content layout(s) for your content type. Click into the "text/html" content layout to edit it.
- Click into the </> Content layout code tab and add a Handlebars expression that uses the "your_nameDateRange" Custom Helper:
Consider making the "Start Date" and "End Date" elements required within your content type as an additional way of adding exception handling and ensuring you are not passing an empty value to your Custom Helper.
<p>{{your_nameDateRange (publish element="Start Date") (publish element="End Date")}}</p>
- Click Save changes to save your content type.
- Go into the Home section of your site structure and update your existing content by adding a dates to the "Start Date" and and "End Date" elements.
- Click Save changes to save your content.
- Update your preview to check the result.
7. Number formatting
- In this exercise, you will create a Custom Helper that allows you to format numbers as needed. The "your_nameNumberFormat" custom helper will receive four parameters: a number to format, the number of decimal places, the decimal separator character and a thousands separator character.
Exercise 7.1: creating the "your_nameNumberFormat" Custom Helper
- Access the hidden section where your Custom Helpers are added via the bookmark you created at the start of training.
- Click on the Add Content button to create a new Custom Helper.
- Name: Give your Custom Helper a name, "your_nameNumberFormat". (There should be no spaces in the name field, use camel case as a convention for your Custom Helpers names).
- Function Code: Complete the TODOs below to create your Custom Helper:
- Get the decimal length and store it into the "decimalLength" variable.
- Get the thousands separator character and store it in the "thousandsSep" variable.
- Get the decimal separator character and store it in the "decimalSep" variable.
- Get the number to format from context and pass it to the parseFloat method.
Click here to view the solution:
function (context, options) {
//1. TODO: Get the decimal length and store it into the "decimalLength" variable.
let decimalLength = options.param(0);
//2. TODO: Get the thousands separator character and store it in the "thousandsSep" variable.
let thousandsSep = options.param(1);
//3. TODO: Get the decimal separator character and store it in the "decimalSep" variable.
let decimalSep = options.param(2);
//4. TODO: Get the number to format from context and pass it to the parseFloat method.
let value = parseFloat(context);
let regex = '\\d(?=(\\d{3})+' + (decimalLength > 0 ? '\\D' : '$') + ')';
let num = value.toFixed(Math.max(0, ~~decimalLength));
return (decimalSep ? num.replace('.', decimalSep) : num).replace(new RegExp(regex, 'g'), '$&' + thousandsSep);
}
function (context, options) {
//1. TODO: Get the decimal length and store it into the "decimalLength" variable.
let decimalLength =
//2. TODO: Get the thousands separator character and store it in the "thousandsSep" variable.
let thousandsSep =
//3. TODO: Get the decimal separator character and store it in the "decimalSep" variable.
let decimalSep =
//4. TODO: Get the number to format from context and pass it to the parseFloat method.
let value = parseFloat();
let regex = '\\d(?=(\\d{3})+' + (decimalLength > 0 ? '\\D' : '$') + ')';
let num = value.toFixed(Math.max(0, ~~decimalLength));
return (decimalSep ? num.replace('.', decimalSep) : num).replace(new RegExp(regex, 'g'), '$&' + thousandsSep);
}
- Click Save changes to save the changes to your Custom Helper.
- Go to Assets > Content Types.
- Click your content type name to edit it. (Use the Filter tool to search). Open the Content layouts tab.
- The Content layout tab is an area to add content layout(s) for your content type. Click into the "text/html" content layout to edit it.
- Add a Handlebars expression that uses the "your_nameNumberFormat" Custom Helper. Make sure to pass in all four parameters to your Custom Helper.
<p>{{your_nameNumberFormat 1234567.89 2 ',' '.'}}</p>
- Click Save changes to save your content type.
- Update your preview to check the result.
8. Embed your YouTube video and amp up your content!
- In this exercise, you will create a Custom Helper, "your_nameVideoEmbed" that will allow you to output video.
- The "your_nameVideoEmbed" Helper can be used to convert a youtube video into an iframe effectively. This allows users to paste YouTube links into a plain text field in various formats and have them be converted effectively into an iframe to be output on the page.
Exercise 8.1: creating the "your_nameVideoEmbed" Custom Helper
- Access the hidden section where your Custom Helpers are added via the bookmark you created at the start of training.
- Click on the Add Content button to create a new Custom Helper.
- Name: Give your Custom Helper a name, "your_nameVideoEmbed". (There should be no spaces in the name field, use camel case as a convention for your Custom Helpers names).
- Function Code: Copy/Paste the code below to create your Custom Helper:
function (context, options) {
const media = {};
if(context.match('https?://(www.)?youtube|youtu.be')) {
const ytrx = `^.*(?:(?:youtu\.?be\/|v\/|vi\/|u\/\w\/|embed\/)|(?:(?:watch)?\?v(?:i)?=|\&v(?:i)?=))([^#\&\?"']*).*`;
const ytr = context.match(ytrx);
media.type = 'youtube';
media.id = ytr[1];
}
if (media.type === 'youtube') {
return `<iframe class="embed-responsive-item" width="560" height="315" src="https://www.youtube.com/embed/${media.id}" frameborder="0" allowfullscreen></iframe>`;
}
// error handling
if (publishConfig.isPreview ()) {
return `<div style="background: #fdd; color: #411; padding: 1rem; font-size: 1rem; border: 1px solid #411;border-radius: .25rem;margin-bottom: 1rem"><strong>Preview error:</strong> Invalid video link added</div>`;
}
else {
return `<script>console.warn('Video embed cannot be created because an invalid video URL was supplied')</script>`;
}
}
- Click Save changes to save the changes to your Custom Helper.
- Go to Assets > Content Types.
- Click your content type name to edit it. (Use the Filter tool to search). Open the Content layouts tab.
- The Content layout tab is an area to add content layout(s) for your content type. Click into the "text/html" content layout to edit it.
- Add a Handlebars expression that uses the "your_nameVideoEmbed" Custom Helper. Make sure you pass the "Video" element as an unnamed parameter.
The your_nameVideoEmbed Custom Helper will generate an iframe <iframe> tag, notice that you will need to triple-stash your expression so the html being generated gets parsed correctly and the video displays within an embedded iframe to your page.
{{#ifSet element="Video URL"}}
{{{your_nameVideoEmbed (publish element="Video URL")}}}
{{/ifSet}}
- Click Save changes to save the changes to your content layout.
- Go into the Home section of your site structure and update your existing content by adding a Video URL of your choice in the "Video URL" element.
- Click Save changes to save your content.
- Update your preview to check the result.
Exercise 8.2: updating the "your_nameVideoEmbed" Custom Helper
Let's enhance the "your_nameVideoEmbed" Custom Helper to handle an additional case where rather than a video URL is entered a YouTube video Id is entered instead.
- Access the hidden section where your Custom Helpers are added via the bookmark you created at the start of training.
- Click into "your_nameVideoEmbed Custom Helper".
- Function Code: Complete the TODOs below to update your Custom Helper:
- Add an else condition to handle the case where a YouTube video Id is entered rather than a video URL.
- Set the media.type.
- Set the media.id.
Click here to view the solution:
function (context, options) {
const media = {};
if(context.match('https?://(www.)?youtube|youtu.be')) {
const ytrx = `^.*(?:(?:youtu\.?be\/|v\/|vi\/|u\/\w\/|embed\/)|(?:(?:watch)?\?v(?:i)?=|\&v(?:i)?=))([^#\&\?"']*).*`;
const ytr = context.match(ytrx);
media.type = 'youtube';
media.id = ytr[1];
}
//1. TODO: Add an else condition to handle the case where a YouTube video Id is entered rather than a video URL.
else {
//2. TODO: Set the media.type.
media.type = 'youtube';
//3. TODO: Set the media.id.
media.id = context;
}
if (media.type === 'youtube') {
return `<iframe class="embed-responsive-item" width="560" height="315" src="https://www.youtube.com/embed/${media.id}" frameborder="0" allowfullscreen></iframe>`;
}
// error handling
if (publishConfig.isPreview ()) {
return `<div style="background: #fdd; color: #411; padding: 1rem; font-size: 1rem; border: 1px solid #411;border-radius: .25rem;margin-bottom: 1rem"><strong>Preview error:</strong> Invalid video link added</div>`;
}
else {
return `<script>console.warn('Video embed cannot be created because an invalid video URL was supplied')</script>`;
}
}
function (context, options) {
const media = {};
if(context.match('https?://(www.)?youtube|youtu.be')) {
const ytrx = `^.*(?:(?:youtu\.?be\/|v\/|vi\/|u\/\w\/|embed\/)|(?:(?:watch)?\?v(?:i)?=|\&v(?:i)?=))([^#\&\?"']*).*`;
const ytr = context.match(ytrx);
media.type = 'youtube';
media.id = ytr[1];
}
//1. TODO: Add an else condition to handle the case where a YouTube video Id is entered rather than a video URL.
//2. TODO: Set the media.type.
//3. TODO: Set the media.id.
if (media.type === 'youtube') {
return `<iframe class="embed-responsive-item" width="560" height="315" src="https://www.youtube.com/embed/${media.id}" frameborder="0" allowfullscreen></iframe>`;
}
// error handling
if (publishConfig.isPreview ()) {
return `<div style="background: #fdd; color: #411; padding: 1rem; font-size: 1rem; border: 1px solid #411;border-radius: .25rem;margin-bottom: 1rem"><strong>Preview error:</strong> Invalid video link added</div>`;
}
else {
return `<script>console.warn('Video embed cannot be created because an invalid video URL was supplied')</script>`;
}
}
- Click Save changes to save the changes to your Custom Helper.
- Go into the Home section of your site structure and update your existing content modifying the "Video" element by passing in a YouTube video Id. In the URL below you would enter: "2v6wxLVfbvg" into the "Video" element.
https://www.youtube.com/watch?v=2v6wxLVfbvg
- Click Save changes to save your content.
- Update your preview to check the result.
9. The text that adapts: responsive style
- In this exercise, you will create the "your_nameResponsiveText" Custom Helper which can be used to return responsive markup for a text element. It requires two parameters, the text and the length of the string at which point the element should be hidden on small screens.
Exercise 9.1: creating the "your_nameResponsiveText" Custom Helper
- Access the hidden section where your Custom Helpers are added via the bookmark you created at the start of training.
- Click on the Add Content button to create a new Custom Helper.
- Name: Give your Custom Helper a name, "your_nameResponsiveText". (There should be no spaces in the name field, use camel case as a convention for your Custom Helpers names).
- Function Code: Complete the TODOs below to create your Custom Helper:
- Get the element using the context parameter and store it in the "elementStr" variable.
- Get the length of the string using the param method.
- Return the string as is by storing it in the "responsiveString" variable.
Click here to view the solution:
function (context, options) {
//1. TODO: Get the element using the context parameter and store it in the "elementStr" variable.
const elementStr = context;
//2. TODO: Get the length of the string using the param method.
const lengthOfString = options.param(0);
//Some hard coded default values which could be overwritten using elements in your content type)
let defaults = {
breaker: '...',
smallClass: 'show-for-small-only',
largeClass: 'show-for-large-up'
};
let separator,
shortenedString,
remainingCharacters,
responsiveString;
// if the string is shorter that the specified length, just return the element as is.
if (elementStr.length < lengthOfString) {
//3. TODO: Return the string as is by storing it in the "responsiveString" variable.
responsiveString = elementStr;
} else {
shortenedString = elementStr.substr(0,lengthOfString);
remainingCharacters = elementStr.substr(lengthOfString);
separator = (defaults.breaker === undefined) ? '' : `<span class="${defaults.smallClass}">${defaults.breaker}</span>`;
responsiveString = `${shortenedString} ${separator} <span class="${defaults.largeClass}"> ${remainingCharacters}</span>`;
}
return responsiveString;
};
function (context, options) {
//1. TODO: Get the element using the context parameter and store it in the "elementStr" variable.
const elementStr =
//2. TODO: Get the length of the string using the param method.
const lengthOfString =
//Some hard coded default values which could be overwritten using elements in your content type)
let defaults = {
breaker: '...',
smallClass: 'show-for-small-only',
largeClass: 'show-for-large-up'
};
let separator,
shortenedString,
remainingCharacters,
responsiveString;
// if the string is shorter that the specified length, just return the element as is.
if (elementStr.length < lengthOfString) {
//3. TODO: Return the string as is by storing it in the "responsiveString" variable.
responsiveString =
} else {
shortenedString = elementStr.substr(0,lengthOfString);
remainingCharacters = elementStr.substr(lengthOfString);
separator = (defaults.breaker === undefined) ? '' : `<span class="${defaults.smallClass}">${defaults.breaker}</span>`;
responsiveString = `${shortenedString} ${separator} <span class="${defaults.largeClass}"> ${remainingCharacters}</span>`;
}
return responsiveString;
};
- Click Save changes to save the changes to your Custom Helper.
- Go to Assets > Content Types.
- Click your content type name to edit it. (Use the Filter tool to search). Open the Content layouts tab.
- The Content layout tab is an area to add content layout(s) for your content type. Click into the "text/html" content layout to edit it.
- Click into the </> Content layout code tab and add a Handlebars expression that uses the "your_nameResponsiveText" Custom Helper:
{{#ifSet element="Heading"}}
<h2>{{{your_nameResponsiveText (publish element="Heading") "50"}}}</h2>
{{/ifSet}}
- Click Save changes to save your content type.
- Go into the Home section of your site structure and update your existing content by adding a heading in the "Heading" element.
- Click Save changes to save your content.
- Update your preview to check the result.
10. The IPublish API
The IPublishAPI allows you to interact with the Terminalfour platform from within Custom Helpers. It is a public facing, customer centric, read only API.
All core built-in Helpers provided by Terminalfour are implemented using the IPublishAPI. Any new Helpers that are created going forward will also be backed up by the IPublishAPI.
How to use the IPublish API
IPublishAPI Documentation:
https://docs.terminalfour.com/publishapi/8.4.2/com/terminalfour/publish/api/IPublishAPI.html
To access the IPublish API, you can make use of the apis variable. See examples below:
apis
//Examples:
apis.getPage(); //gets the current Page
apis.getSection(); //gets the current section
apis.getPage().getPageURL(); //gets the current page URL
apis.getSection().getId(); //gets the current section Id
Let's create some expressions to practice using the IPublish API:
Exercise 10.1: creating the "your_nameChannelAPI" Custom Helper
- Access the hidden section where your Custom Helpers are added via the bookmark you created at the start of training.
- Click on the Add Content button to create a new Custom Helper.
- Name: Give your Custom Helper a name, "your_nameChannelAPI". (There should be no spaces in the name field, use camel case as a convention for your Custom Helpers names).
- Function Code: Complete the TODOs below to create your Custom Helper:
- Write an expression to get the current channel's id.
- Write an expression to get the current section's name.
- Write an expression to get the current channel's description.
Click here to view the solution:
function (context, options) {
//1. TODO: Write an expression to get the current channel's id.
let channelId = apis.getChannel().getId();
//2. TODO: Write an expression to get the current channel's name.
let channelName = apis.getChannel().getName();
//3. TODO: Write an expression to get the current channel's description.
let channelDescr = apis.getChannel().getDescription();
let channelInfo = `Id: ${channelId} <br> Name: ${channelName} <br> Description: ${channelDescr} <br>`;
return channelInfo;
}
function (context, options) {
//1. TODO: Write an expression to get the current channel's id.
let channelId =
//2. TODO: Write an expression to get the current channel's name.
let channelName =
//3. TODO: Write an expression to get the current channel's description.
let channelDescr =
let channelInfo = `Id: ${channelId} <br> Name: ${channelName} <br> Description: ${channelDescr} <br>`;
return channelInfo;
}
- Click Save changes to save the changes to your Custom Helper.
- Go to Assets > Content Types.
- Click your content type name to edit it. (Use the Filter tool to search). Open the Content layouts tab.
- The Content layout tab is an area to add content layout(s) for your content type. Click into the "text/html" content layout to edit it.
- Add a Handlebars expression that uses the "your_nameChannelAPI" Custom Helper:
<p>{{{your_nameChannelAPI}}}</p>
- Click Save changes to save your content type.
- Update your preview to check the result.
Exercise 10.2: creating the "your_namePageAPI" Custom Helper
- Access the hidden section where your Custom Helpers are added via the bookmark you created at the start of training.
- Click on the Add Content button to create a new Custom Helper.
- Name: Give your Custom Helper a name, "your_namePageAPI". (There should be no spaces in the name field, use camel case as a convention for your Custom Helpers names).
- Function Code: Complete the TODOs below to create your Custom Helper:
- Write an expression to get the current page URL.
- Write an expression to get the current page preview URL.
- Write an expression to get the current page publish URL.
- Write an expression to check whether the current page is a fulltext page.
Click here to view the solution:
function (context, options) {
//1. TODO: Write an expression to get the current page URL.
let pageURL = apis.getPage().getPageURL();
//2. TODO: Write an expression to get the current page preview URL.
let previewURL = apis.getPage().getPreviewURL();
//3. TODO: Write an expression to get the current page publish URL.
let publishURL = apis.getPage().getPublishURL();
//4. TODO: Write an expression to check whether the current page is a fulltext page.
let isFullText = apis.getPage().isFulltextPage();
let pageInfo = `URL: ${pageURL} <br> Preview URL: ${previewURL} <br> publishURL: ${publishURL} <br> FullText: ${isFullText} <br>`;
return pageInfo;
}
function (context, options) {
//1. TODO: Write an expression to get the current page URL.
let pageURL =
//2. TODO: Write an expression to get the current page preview URL.
let previewURL =
//3. TODO: Write an expression to get the current page publish URL.
let publishURL =
//4. TODO: Write an expression to check whether the current page is a fulltext page.
let isFullText =
let pageInfo = `URL: ${pageURL} <br> Preview URL: ${previewURL} <br> publishURL: ${publishURL} <br> FullText: ${isFullText} <br>`;
return pageInfo;
}
- Click Save changes to save the changes to your Custom Helper.
- Go to Assets > Content Types.
- Click your content type name to edit it. (Use the Filter tool to search). Open the Content layouts tab.
- The Content layout tab is an area to add content layout(s) for your content type. Click into the "text/html" content layout to edit it.
- Add a Handlebars expression that uses the "your_namePageAPI" Custom Helper:
<p>{{{your_namePageAPI}}}</p>
- Click Save changes to save your content type.
- Update your preview to check the result.
Exercise 10.3: creating the "your_nameSectionAPI" Custom Helper
- Access the hidden section where your Custom Helpers are added via the bookmark you created at the start of training.
- Click on the Add Content button to create a new Custom Helper.
- Name: Give your Custom Helper a name, "your_nameSectionAPI". (There should be no spaces in the name field, use camel case as a convention for your Custom Helpers names).
- Function Code: Complete the TODOs below to create your Custom Helper:
- Write an expression to get the Id of the current section.
- Write an expression to get the level of the current section.
Click here to view the solution:
function (context, options) {
//1. TODO: Write an expression to get the Id of the current section.
let sectionId = apis.getSection().getId();
//2. TODO: Write an expression to get the level of the current section.
let sectionLevel = apis.getSection().getLevel();
let sectionInfo = `Section Id: ${sectionId} <br> Section Level: ${sectionLevel} <br>`;
return sectionInfo;
}
function (context, options) {
//1. TODO: Write an expression to get the Id of the current section.
let sectionId =
//2. TODO: Write an expression to get the level of the current section.
let sectionLevel =
let sectionInfo = `Section Id: ${sectionId} <br> Section Level: ${sectionLevel} <br>`;
return sectionInfo;
}
- Click Save changes to save the changes to your Custom Helper.
- Go to Assets > Content Types.
- Click your content type name to edit it. (Use the Filter tool to search). Open the Content layouts tab.
- The Content layout tab is an area to add content layout(s) for your content type. Click into the "text/html" content layout to edit it.
- Add a Handlebars expression that uses the "your_nameSectionAPI" Custom Helper:
<p>{{{your_nameSectionAPI}}}</p>
- Click Save changes to save your content type.
- Update your preview to check the result.
Exercise 10.4: creating the "your_nameElementAPI" Custom Helper
- Access the hidden section where your Custom Helpers are added via the bookmark you created at the start of training.
- Click on the Add Content button to create a new Custom Helper.
- Name: Give your Custom Helper a name, "your_nameElementAPI". (There should be no spaces in the name field, use camel case as a convention for your Custom Helpers names).
- Function Code: Complete the TODOs below to create your Custom Helper:
- Write an expression to get the value of the "Heading" element.
- Write an expression that returns whether the "Heading" element is set.
- Write an expression to get the value of the "Date" element.
- Write an expression that returns whether the "Date" element is a date element.
Click here to view the solution:
function (context, options) {
//1. TODO: Write an expression to get the value of the "Heading" element.
let heading = apis.getElement().publish('Heading');
//let heading = apis.getElement().get("Heading").toTextElement().process();
//2. TODO: Write an expression that returns whether the "Heading" element is set.
let isHeadingSet = apis.getElement().isSet("Heading");
//let isHeadingSet = apis.getElement().get("Heading").hasValue();
//3. TODO: Write an expression to get the value of the "Date" element.
let date = apis.getElement().get("Date").toDateElement().getDate();
//let date = apis.getElement().getDate("Date").toString();
//4. TODO: Write an expression that returns whether the "Date" element is a date element.
let isDate = apis.getElement().isDateElement("Date");
let elementInfo = `Heading: ${heading} <br> isHeadingSet: ${isHeadingSet} <br> Date: ${date} <br> isDate: ${isDate} <br>`;
return elementInfo;
}
function (context, options) {
//1. TODO: Write an expression to get the value of the "Heading" element.
let heading =
//2. TODO: Write an expression that returns whether the "Heading" element is set.
let isHeadingSet =
//3. TODO: Write an expression to get the value of the "Date" element.
let date =
//4. TODO: Write an expression that returns whether the "Date" element is a date element.
let isDate =
let elementInfo = `Heading: ${heading} <br> isHeadingSet: ${isHeadingSet} <br> Date: ${date} <br> isDate: ${isDate} <br>`;
return elementInfo;
}
- Click Save changes to save the changes to your Custom Helper.
- Go to Assets > Content Types.
- Click your content type name to edit it. (Use the Filter tool to search). Open the Content layouts tab.
- The Content layout tab is an area to add content layout(s) for your content type. Click into the "text/html" content layout to edit it.
- Add a Handlebars expression that uses the "your_nameElementAPI" Custom Helper:
<p>{{{your_nameElementAPI}}}</p>
- Click Save changes to save your content type.
- Update your preview to check the result.
Exercise 10.5: creating the "your_nameContentAPI" Custom Helper
- Access the hidden section where your Custom Helpers are added via the bookmark you created at the start of training.
- Click on the Add Content button to create a new Custom Helper.
- Name: Give your Custom Helper a name, "your_nameContentAPI". (There should be no spaces in the name field, use camel case as a convention for your Custom Helpers names).
- Function Code: Complete the TODOs below to create your Custom Helper:
- Write an expression to get the id of the current content item.
- Write an expression to get the publish date of the current content item.
- Write an expression to get the version of the current content item.
- Write an expression to get all the elements of the current content item.
- Write an expression to get the entries of the list element (Academic Program).
Click here to view the solution:
function (context, options) {
//1. TODO: Write an expression to get the id of the current content item.
let id = apis.getContent().getId();
//2. TODO: Write an expression to get the publish date of the current content item.
let publishDate = apis.getContent().getPublishDate();
//3. TODO: Write an expression to get the version of the current content item.
let version = apis.getContent().getVersion();
//4. TODO: Write an expression to get all the elements of the current content item.
let elements = apis.getContent().get().getElements();
//5. TODO: Write an expression to get the entries of the list element (Academic Program).
let entries = apis.getContent().get().getElement("Academic Program").toListElement().getValue().getEntries();
let contentInfo = `Id: ${id} <br> Publish Date: ${publishDate} <br> Version: ${version} <br> Elements: ${elements} <br> List Entries: ${entries} <br>`;
return contentInfo;
}
function (context, options) {
//1. TODO: Write an expression to get the id of the current content item.
let id =
//2. TODO: Write an expression to get the publish date of the current content item.
let publishDate =
//3. TODO: Write an expression to get the version of the current content item.
let version =
//4. TODO: Write an expression to get all the elements of the current content item.
let elements =
//5. TODO: Write an expression to get the entries of the list element (Academic Program).
let entries =
let contentInfo = `Id: ${id} <br> Publish Date: ${publishDate} <br> Version: ${version} <br> Elements: ${elements} <br> List Entries: ${entries} <br>`;
return contentInfo;
}
- Click Save changes to save the changes to your Custom Helper.
- Go to Assets > Content Types.
- Click your content type name to edit it. (Use the Filter tool to search). Open the Content layouts tab.
- The Content layout tab is an area to add content layout(s) for your content type. Click into the "text/html" content layout to edit it.
- Add a Handlebars expression that uses the "your_nameContentAPI" Custom Helper:
<p>{{{your_nameContentAPI}}}</p>
- Click Save changes to save your content type.
- Update your preview to check the result.
11. Generating reports from webpage content
- In the following exercise, you will create a report for the content of a specified section. You will create a Custom Helper called "your_nameContentReportBySection" and use it to return a list of the content items in a specific section determined by the section Id passed to the Custom Helper.
- This Custom Helper makes use of the "DataTables" JavaScript table library which will have to be available within your page layout.
Exercise 11.1: setting up the "DataTables" Library
The Content Report is generated using the "DataTables" Library. In order to use this library, you will need to insert the below code into the header of your page layout.
- Go to Assets > Page Layouts.
- Click your page layout name to edit it. (Use the Filter tool to search). Open the </> Footer code tab.
- Copy/paste the code below into the footer of your page layout:
<script type="text/javascript" src="https://cdn.datatables.net/1.10.12/js/jquery.dataTables.min.js"></script>
<link rel="stylesheet" type="text/css" media="all" href="https://cdn.datatables.net/1.10.12/css/jquery.dataTables.min.css" />
<script type="text/javascript">
$(document).ready(function(){
$('table').DataTable();
});
</script>
- Click Save changes to save the changes to your page layout.
Exercise 11.2: creating the "your_nameContentReportBySection" Custom Helper
- Access the hidden section where your Custom Helpers are added via the bookmark you created at the start of training.
- Click on the Add Content button to create a new Custom Helper.
- Name: Give your Custom Helper a name, "your_nameContentReportBySection". (There should be no spaces in the name field, use camel case as a convention for your Custom Helpers names).
- Function Code: Complete the TODOs below to create your Custom Helper:
- Get the content as a list by providing the section Id.
- Get the content Id.
- Get the Content Item.
- Get the Content Type Id.
- Get the expiry date.
- Get the last modified date.
- Get the publish date.
- Get the version.
- Build the report row by inserting the variables.
Click here to view the solution:
function(context, options) {
let contentReport = `<table class="table-striped">
<thead>
<tr>
<th>Content Id</th>
<th>Content Type Id</th>
<th>Expiry Date</th>
<th>Last Modified Date</th>
<th>Publish Date</th>
<th>Version</th>
</tr>
</thead>`;
//1. TODO: Get the content as a list by providing the section Id.
let contentList = apis.getSection().listContent(context);
for (let i = 0; i < contentList.length; i++) {
//2. TODO: Get the content Id.
let contentId = contentList[i].getId();
//3. TODO: Get the Content Item.
let contentItem = apis.getContent().get(contentId);
//4. TODO: Get the Content Type Id.
let contentTypeId = contentItem.getContentTypeId();
//5. TODO: Get the expiry date.
let expiryDate = contentItem.getExpiryDate();
//6. TODO: Get the last modified date.
let lastModified = contentItem.getLastModified();
//7. TODO: Get the publish date.
let publishDate = contentItem.getPublishDate();
//8. TODO: Get the version.
let version = contentItem.getVersion();
//9. TODO: Build the report row by inserting the variables.
contentReport += `<tr>
<td>${contentId}</td>
<td>${contentTypeId}</td>
<td>${expiryDate}</td>
<td>${lastModified}</td>
<td>${publishDate}</td>
<td>${version}</td>
</tr>`;
}
contentReport += `</table>`;
return contentReport;
}
function(context, options) {
let contentReport = `<table class="table-striped">
<thead>
<tr>
<th>Content Id</th>
<th>Content Type Id</th>
<th>Expiry Date</th>
<th>Last Modified Date</th>
<th>Publish Date</th>
<th>Version</th>
</tr>
</thead>`;
//1. TODO: Get the content as a list by providing the section Id.
let contentList =
for (let i = 0; i < contentList.length; i++) {
//2. TODO: Get the content Id.
let contentId =
//3. TODO: Get the Content Item.
let contentItem =
//4. TODO: Get the Content Type Id.
let contentTypeId =
//5. TODO: Get the expiry date.
let expiryDate =
//6. TODO: Get the last modified date.
let lastModified =
//7. TODO: Get the publish date.
let publishDate =
//8. TODO: Get the version.
let version =
//9. TODO: Build the report row by inserting the variables.
contentReport += `<tr>
<td></td>
<td></td>
<td></td>
<td></td>
<td></td>
<td></td>
</tr>`;
}
contentReport += `</table>`;
return contentReport;
}
- Click Save changes to save the changes to your Custom Helper.
- Go to Assets > Content Types.
- Click your content type name to edit it. (Use the Filter tool to search). Open the Content layouts tab.
- The Content layout tab is an area to add content layout(s) for your content type. Click into the "text/html" content layout to edit it.
- Add a Handlebars expression that uses the "your_nameContentReportBySection" Custom Helper. Make sure you pass a valid Content Id from your site structure.
- Complete the TODO below:
- Write a Handlebars expession that uses the "your_nameContentReportBySection" Custom Helper and passes in a Content Id from your site structure. Replace [####] with a valid Id from your site structure.
{{{your_nameContentReportBySection [####]}}}
- Click Save changes to save your content type.
- Update your preview to check the result.
Exercise 11.3: adding a content column to the report
For this next part of the exercise, you will add an additional column labeled "Content" to the report. For each content item in the section you will now add the content inside of the "Content" column.
To do this, you will make use of the IPublish API and iterate through the individual elements contained within each content item. As you iterate through the elements, you should output the name of the element followed by the value of the element in the following format:
Academic Program:
Date:
Description:
End Date:
Heading:
Main body:
Name:
Start Date:
Video:
Notice the elements are displayed in alphabetical order.
- Access the hidden section where your Custom Helpers are added via the bookmark you created at the start of training.
- Click on the "your_nameContentReportBySection" Custom Helper to edit it.
- Function Code: Complete the TODOs below to update your Custom Helper:
- Add a new column labeled "Content".
- Get the elements.
- Convert the keys of the elements to an array and store them in keys.
- Convert the values of the elements to an array and store them in values.
- Check if the element is a date element.
- Get the value of the Date element and store it in content. Use the following format: <p>Key: Value</p>.
- Check if the element is a text element.
- Get the value of the text element and store it in content. Use the following format: <p>Key: Value</p>.
- Add a new column to the report row to output the content.
Click here to view the solution:
function (context, options) {
//10. TODO: Add a new column labeled "Content".
let contentReport = `<table class="table-striped">
<thead>
<tr>
<th>Content Id</th>
<th>Content Type Id</th>
<th>Expiry Date</th>
<th>Last Modified Date</th>
<th>Publish Date</th>
<th>Version</th>
<th>Content</th>
</tr>
</thead>`;
//1. TODO: Get the content as a list by providing the section Id.
let contentList = apis.getSection().listContent(context);
for (let i = 0; i < contentList.length; i++) {
//2. TODO: Get the content Id.
let contentId = contentList[i].getId();
//3. TODO: Get the Content Item.
let contentItem = apis.getContent().get(contentId);
//4. TODO: Get the Content Type Id.
let contentTypeId = contentItem.getContentTypeId();
//5. TODO: Get the expiry date.
let expiryDate = contentItem.getExpiryDate();
//6. TODO: Get the last modified date.
let lastModified = contentItem.getLastModified();
//7. TODO: Get the publish date.
let publishDate = contentItem.getPublishDate();
//8. TODO: Get the version.
let version = contentItem.getVersion();
//11. TODO: Get the elements.
let elements = contentItem.getElements();
//12. TODO: Convert the keys of the elements to an array and store them in keys.
const keys = elements.keySet().toArray();
//13. TODO: Convert the values of the elements to an array and store them in values.
const values = elements.values().toArray();
//Variable used to store the content.
let content = '';
//Iterate through the elements.
for (let i = 0; i < keys.length; i++) {
//14. TODO: Check if the element is a date element.
if (values[i].isDateElement()) {
//15. TODO: Get the value of the Date element and store it in content. Use the following format: <p>Key: Value</p>.
content += `<p>${keys[i]}: ${values[i].toDateElement().getDate().toString()}</p>`;
}
//16. TODO: Check if the element is a text element.
else if (values[i].isTextElement()) {
//17. TODO: Get the value of the text element and store it in content. Use the following format: <p>Key: Value</p>.
content += `<p>${keys[i]}: ${values[i].toTextElement().process()}</p>`;
}
}
//18. TODO: Add a new column to the report row to output the content.
//9. TODO: Build the report row by inserting the variables.
contentReport += `<tr>
<td>${contentId}</td>
<td>${contentTypeId}</td>
<td>${expiryDate}</td>
<td>${lastModified}</td>
<td>${publishDate}</td>
<td>${version}</td>
<td>${content}</td>
</tr>`;
}
contentReport += `</table>`;
return contentReport;
}
function (context, options) {
//10. TODO: Add a new column labeled "Content".
let contentReport = `<table class="table-striped">
<thead>
<tr>
<th>Content Id</th>
<th>Content Type Id</th>
<th>Expiry Date</th>
<th>Last Modified Date</th>
<th>Publish Date</th>
<th>Version</th>
</tr>
</thead>`;
//1. TODO: Get the content as a list by providing the section Id.
let contentList = apis.getSection().listContent(context);
for (let i = 0; i < contentList.length; i++) {
//2. TODO: Get the content Id.
let contentId = contentList[i].getId();
//3. TODO: Get the Content Item.
let contentItem = apis.getContent().get(contentId);
//4. TODO: Get the Content Type Id.
let contentTypeId = contentItem.getContentTypeId();
//5. TODO: Get the expiry date.
let expiryDate = contentItem.getExpiryDate();
//6. TODO: Get the last modified date.
let lastModified = contentItem.getLastModified();
//7. TODO: Get the publish date.
let publishDate = contentItem.getPublishDate();
//8. TODO: Get the version.
let version = contentItem.getVersion();
//11. TODO: Get the elements.
let elements =
//12. TODO: Convert the keys of the elements to an array and store them in keys.
const keys =
//13. TODO: Convert the values of the elements to an array and store them in values.
const values =
//Variable used to store the content.
let content = '';
//Iterate through the elements.
for (let i = 0; i < keys.length; i++) {
//14. TODO: Check if the element is a date element.
if () {
//15. TODO: Get the value of the Date element and store it in content. Use the following format: <p>Key: Value</p>.
content +=
}
//16. TODO: Check if the element is a text element.
else if () {
//17. TODO: Get the value of the text element and store it in content. Use the following format: <p>Key: Value</p>.
content +=
}
}
//18. TODO: Add a new column to the report row to output the content.
//9. TODO: Build the report row by inserting the variables.
contentReport += `<tr>
<td>${contentId}</td>
<td>${contentTypeId}</td>
<td>${expiryDate}</td>
<td>${lastModified}</td>
<td>${publishDate}</td>
<td>${version}</td>
</tr>`;
}
contentReport += `</table>`;
return contentReport;
}
- Click Save changes to save the changes to your Custom Helper.
- Update your preview to check the result.
Exercise 11.4: handling the list element
The content type contains a list element ("Academic Program") which needs to be handled in this next part of the exercise. Similar, to what is done for the date element and other text elements, you will need to add some additional code to retrieve the selected value of the list element and then output it inside the content column of the report.
- Access the hidden section where your Custom Helpers are added via the bookmark you created at the start of training.
- Click on the "your_nameContentReportBySection" Custom Helper to edit it.
- Function Code: Complete the TODOs below to update your Custom Helper:
- Check if the element is a list element.
- Get the list entries.
- Iterate through the list entries and store the selected value in the "selected" variable.
- Get the value of the list element and store it in content. Use the following format: <p>Key: Value</p>.
Click here to view the solution:
function (context, options) {
//10. TODO: Add a new column labeled "Content".
let contentReport = `<table class="table-striped">
<thead>
<tr>
<th>Content Id</th>
<th>Content Type Id</th>
<th>Expiry Date</th>
<th>Last Modified Date</th>
<th>Publish Date</th>
<th>Version</th>
<th>Content</th>
</tr>
</thead>`;
//1. TODO: Get the content as a list by providing the section Id.
let contentList = apis.getSection().listContent(context);
for (let i = 0; i < contentList.length; i++) {
//2. TODO: Get the content Id.
let contentId = contentList[i].getId();
//3. TODO: Get the Content Item.
let contentItem = apis.getContent().get(contentId);
//4. TODO: Get the Content Type Id.
let contentTypeId = contentItem.getContentTypeId();
//5. TODO: Get the expiry date.
let expiryDate = contentItem.getExpiryDate();
//6. TODO: Get the last modified date.
let lastModified = contentItem.getLastModified();
//7. TODO: Get the publish date.
let publishDate = contentItem.getPublishDate();
//8. TODO: Get the version.
let version = contentItem.getVersion();
//11. TODO: Get the elements.
let elements = contentItem.getElements();
//12. TODO: Convert the keys of the elements to an array and store them in keys.
const keys = elements.keySet().toArray();
//13. TODO: Convert the values of the elements to an array and store them in values.
const values = elements.values().toArray();
//Variable used to store the content.
let content = '';
//Iterate through the elements.
for (let i = 0; i < keys.length; i++) {
//14. TODO: Check if the element is a date element.
if (values[i].isDateElement()) {
//15. TODO: Get the value of the Date element and store it in content. Use the following format: <p>Key: Value</p>.
content += `<p>${keys[i]}: ${values[i].toDateElement().getDate().toString()}</p>`;
}
//16. TODO: Check if the element is a text element.
else if (values[i].isTextElement()) {
//17. TODO: Get the value of the text element and store it in content. Use the following format: <p>Key: Value</p>.
content += `<p>${keys[i]}: ${values[i].toTextElement().process()}</p>`;
}
//19. TODO: Check if the element is a list element.
else if (values[i].isListElement()) {
//20. TODO: Get the list entries.
let entries = values[i].toListElement().getValue().getEntries();
//Variable used to store the selected item in the list.
let selected;
//21. TODO: Iterate through the list entries and store the selected value in the "selected" variable.
for (let i = 0; i < entries.length; i++) {
if (entries[i].isSelected()) {
selected = entries[i].getValue();
}
}
//22. TODO: Get the value of the list element and store it in content. Use the following format: <p>Key: Value</p>.
content += `<p>${keys[i]}: ${selected}</p>`;
}
}
//18. TODO: Add a new column to the report row to output the content.
//9. TODO: Build the report row by inserting the variables.
contentReport += `<tr>
<td>${contentId}</td>
<td>${contentTypeId}</td>
<td>${expiryDate}</td>
<td>${lastModified}</td>
<td>${publishDate}</td>
<td>${version}</td>
<td>${content}</td>
</tr>`;
}
contentReport += `</table>`;
return contentReport;
}
function (context, options) {
//10. TODO: Add a new column labeled "Content".
let contentReport = `<table class="table-striped">
<thead>
<tr>
<th>Content Id</th>
<th>Content Type Id</th>
<th>Expiry Date</th>
<th>Last Modified Date</th>
<th>Publish Date</th>
<th>Version</th>
<th>Content</th>
</tr>
</thead>`;
//1. TODO: Get the content as a list by providing the section Id.
let contentList = apis.getSection().listContent(context);
for (let i = 0; i < contentList.length; i++) {
//2. TODO: Get the content Id.
let contentId = contentList[i].getId();
//3. TODO: Get the Content Item.
let contentItem = apis.getContent().get(contentId);
//4. TODO: Get the Content Type Id.
let contentTypeId = contentItem.getContentTypeId();
//5. TODO: Get the expiry date.
let expiryDate = contentItem.getExpiryDate();
//6. TODO: Get the last modified date.
let lastModified = contentItem.getLastModified();
//7. TODO: Get the publish date.
let publishDate = contentItem.getPublishDate();
//8. TODO: Get the version.
let version = contentItem.getVersion();
//11. TODO: Get the elements.
let elements = contentItem.getElements();
//12. TODO: Convert the keys of the elements to an array and store them in keys.
const keys = elements.keySet().toArray();
//13. TODO: Convert the values of the elements to an array and store them in values.
const values = elements.values().toArray();
//Variable used to store the content.
let content = '';
//Iterate through the elements.
for (let i = 0; i < keys.length; i++) {
//14. TODO: Check if the element is a date element.
if (values[i].isDateElement()) {
//15. TODO: Get the value of the Date element and store it in content. Use the following format: <p>Key: Value</p>.
content += `<p>${keys[i]}: ${values[i].toDateElement().getDate().toString()}</p>`;
}
//16. TODO: Check if the element is a text element.
else if (values[i].isTextElement()) {
//17. TODO: Get the value of the text element and store it in content. Use the following format: <p>Key: Value</p>.
content += `<p>${keys[i]}: ${values[i].toTextElement().process()}</p>`;
}
//19. TODO: Check if the element is a list element.
else if () {
//20. TODO: Get the list entries.
let entries =
//Variable used to store the selected item in the list.
let selected;
//21. TODO: Iterate through the list entries and store the selected value in the "selected" variable.
for (let i = 0; i < entries.length; i++) {
if () {
selected =
}
}
//22. TODO: Get the value of the list element and store it in content. Use the following format: <p>Key: Value</p>.
content +=
}
}
//18. TODO: Add a new column to the report row to output the content.
//9. TODO: Build the report row by inserting the variables.
contentReport += `<tr>
<td>${contentId}</td>
<td>${contentTypeId}</td>
<td>${expiryDate}</td>
<td>${lastModified}</td>
<td>${publishDate}</td>
<td>${version}</td>
<td>${content}</td>
</tr>`;
}
contentReport += `</table>`;
return contentReport;
}
- Click Save changes to save the changes to your Custom Helper.
- Update your preview to check the result.
12. Check your content type from the page layout
- In this exercise, you will create the "your_nameIfContentType" Custom Helper which can be used to determine if a specific content type is being used in a section from the page layout. One useful use case for this could be determining which content type is being used and outputting appropriate JavaScript files in the page layout based on that. It will require passing in one parameter, the ContentTypeId.
Exercise 12.1: creating the "your_nameIfContentType" Custom Helper
- Access the hidden section where your Custom Helpers are added via the bookmark you created at the start of training.
- Click on the Add Content button to create a new Custom Helper.
- Name: Give your Custom Helper a name, "your_nameIfContentType". (There should be no spaces in the name field, use camel case as a convention for your Custom Helpers names).
- Function Code: Copy/Paste the code below to create your Custom Helper:
function(context, options) {
const checkForContentType = function () {
const needle = parseInt(options.hash('id', 0));
if (needle == 0) return false;
let contentList = apis.getSection().listContentByType(needle);
return !contentList.isEmpty();
}
return apis.getHandlebars().processResult(options, checkForContentType());
}
- Click Save changes to save the changes to your Custom Helper.
- Go to Assets > Page Layouts.
- Click your page layout name to edit it. (Use the Filter tool to search). Open the </>Header code tab.
- Click into the </> Header code tab and add the following Handlebars code that uses the "your_nameIfContentType" Custom Helper:
Make sure to replace the Content Type Id in the code below ("123") with one that matches a content type in the training instance.
{{#your_nameIfContentType id="123"}}
<h3>It's using the general content type.</h3>
{{else}}
<h3>It's not using the general content type.</h3>
{{/your_nameIfContentType}}
- Click Save changes to save your content type.
- Update your preview to check the result.
Feedback survey
Congratulations on completing the Terminalfour Custom Helpers training course.
Please provide feedback in our on-line survey.