
Import Content From XML
The Content Syncer doesn't just work with databases; you can use CSV and XML files as the source. XML import supports RSS and you can use CDATA too.
These are the steps to follow when creating syncing an XML file with Terminalfour.
Since Terminalfour v.8.2.1, an XML driver is included in the product so there is no need to install an additional one.
Contact support if you need advice on this.
1. Copy the XML File to the Server that Hosts the Terminalfour Application
Copy the XML File to the server that hosts the Terminalfour application, e.g.:
/web/terminalfour/xml/
If your XML is located on a different server, ensure that it is accessible by the Terminalfour application.
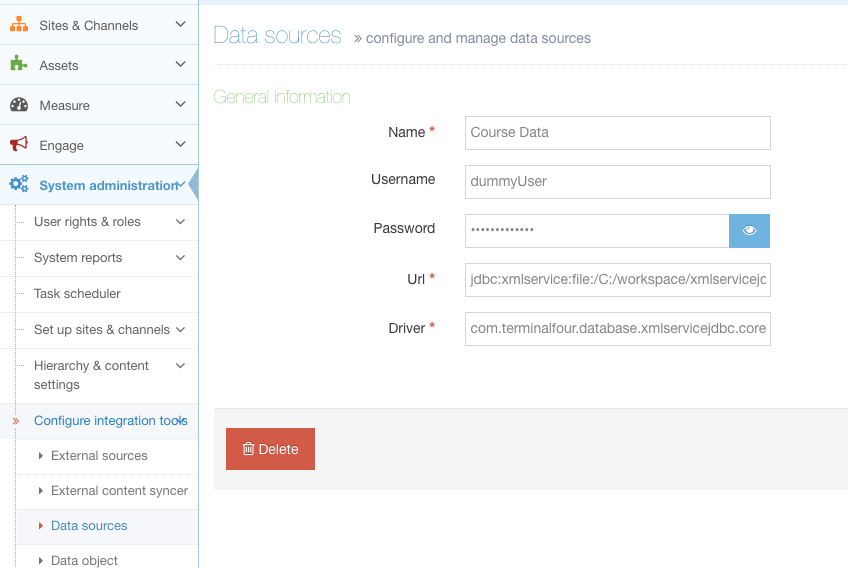
2. Configure the Data Source
To set-up the Data Source, you’ll name it and provide the file and driver locations.
Go to System Administration > Configure Integration Tools > Data Sources and populate the fields.
| Item | Description | Example |
|---|---|---|
|
Name |
A meaningful name for the Data Source. This is required. |
Staff Profile Data Store |
| Username | You can provide a username here if required. | |
| Password | You can provide a password here if required. | |
| URL |
The url encoded URI at which the XML file is accessible. This must be a location accessible by the Terminalfour application. This can either point to the file itself or to an external address at which the file can be found. The correct prefix corresponding to the XML driver must be used in front of the URI.
|
If pointing to a single file course data.xml on a Linux server: If pointing to a single file course data.xml on a Windows server: If pointing to an external XML file: |
| Driver | The name of the driver used for CSV files. This is required. | This is always:
|
3. Create a Content Type (if required)
If you haven't one created already you'll need to create a Content Type for the External Content Syncer to store the information that is currently in the XML File. For example, we could create a "Course Details" Content Type with the following elements:
| Element Name | Element Type |
|---|---|
| ID | Plain Text |
| Name | Plain Text |
| Faculty | Plain Text |
| Lecturer | Plain Text |
| Award | Plain Text |
4. Setting up the Content Sync
Once the XML has been successfully set up as a Data Source, the content is extracted with SQL (Structured Query Language). To add the SQL go to System Administration > Configure Integration Tools > External Content Syncer.
For details on External Content Syncer General Settings, refer to the page in the documentation.
Select Create New Data Store and apply the following settings :
| Item | Description |
|---|---|
| Name | Give the Data Store a meaningful name (e.g., Course Data from XML) |
| Description | Provide a description of the import |
| Data Source: | From the drop-down select the name of the XML Data Source you configured |
| Root Section | Select the Section where content will be imported to |
| Channel | Select a Channel that will publish the content |
|
|
Configure other options as appropriate (see documentation on the External Content Syncer for further information) |
|
SQL Query |
Add SQL here to select the content to sync. Before creating your SQL statements it's worth being aware of the following:
|

Using SQL
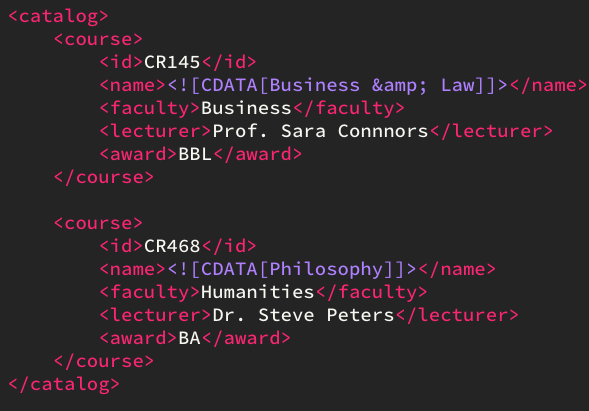
Here's a sample XML file:

SELECT * FROM coursewill return the following:
| id | name | faculty | lecturer | award |
|---|---|---|---|---|
| CR145 | Business and Law | Business | Prof. Sara Connors | BBL |
| CR468 | Philosophy | Humanities | Dr. Steve Peters | BA |
CDATA
In this example, the course names use CDATA sections to prevent parsing of entities:
To decode an HTML entity, use the custom DECODE keyword:
SELECT * FROM course DECODE name
Nested tags
Because nested tags are not supported by the XML driver, CDATA tags are required to encapsulate the nested element(s).
e.g.,
<course_details><p>This is the course detail</p></course_details>
The nested p element will require a CDATA tag for it to be parsed:
<course_details><![CDATA[<p>This is the course detail</p>]]></course_details>
Date Elements
For date elements to work in Content Syncer the dates must be in the format: yyyy-MM-dd HH:mm:ss (e.g. 2018-03-31 23:59:59)
If a column has a custom date format the driver can cater for that using the custom keywords DATE_ELEMENT and DATE_FORMAT.
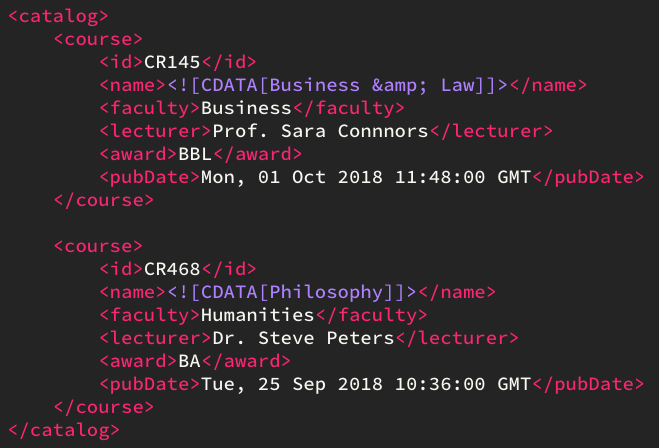
In the DATE_FORMAT enter the format of the date in the XML file (refer to our page on Date Formats for more information). For example:
SELECT pubDate FROM course DATE_ELEMENT pubDate DATE_FORMAT "EEE, dd MMM yyyy HH:mm:ss"
| pubDate |
|---|
| 2018-10-01 11:48:00 |
| 2018-09-25 10:36:00 |
Where there are multiple date elements, these should be listed in a comma-separated list. For example:
SELECT * FROM course DATE_ELEMENT pubDate, endDate DATE_FORMAT "EEE, dd MMM yyyy HH:mm:ss"
Duplicate Element Names
The following XML has two elements with the same name (x-trumba) and namespace (customfield):
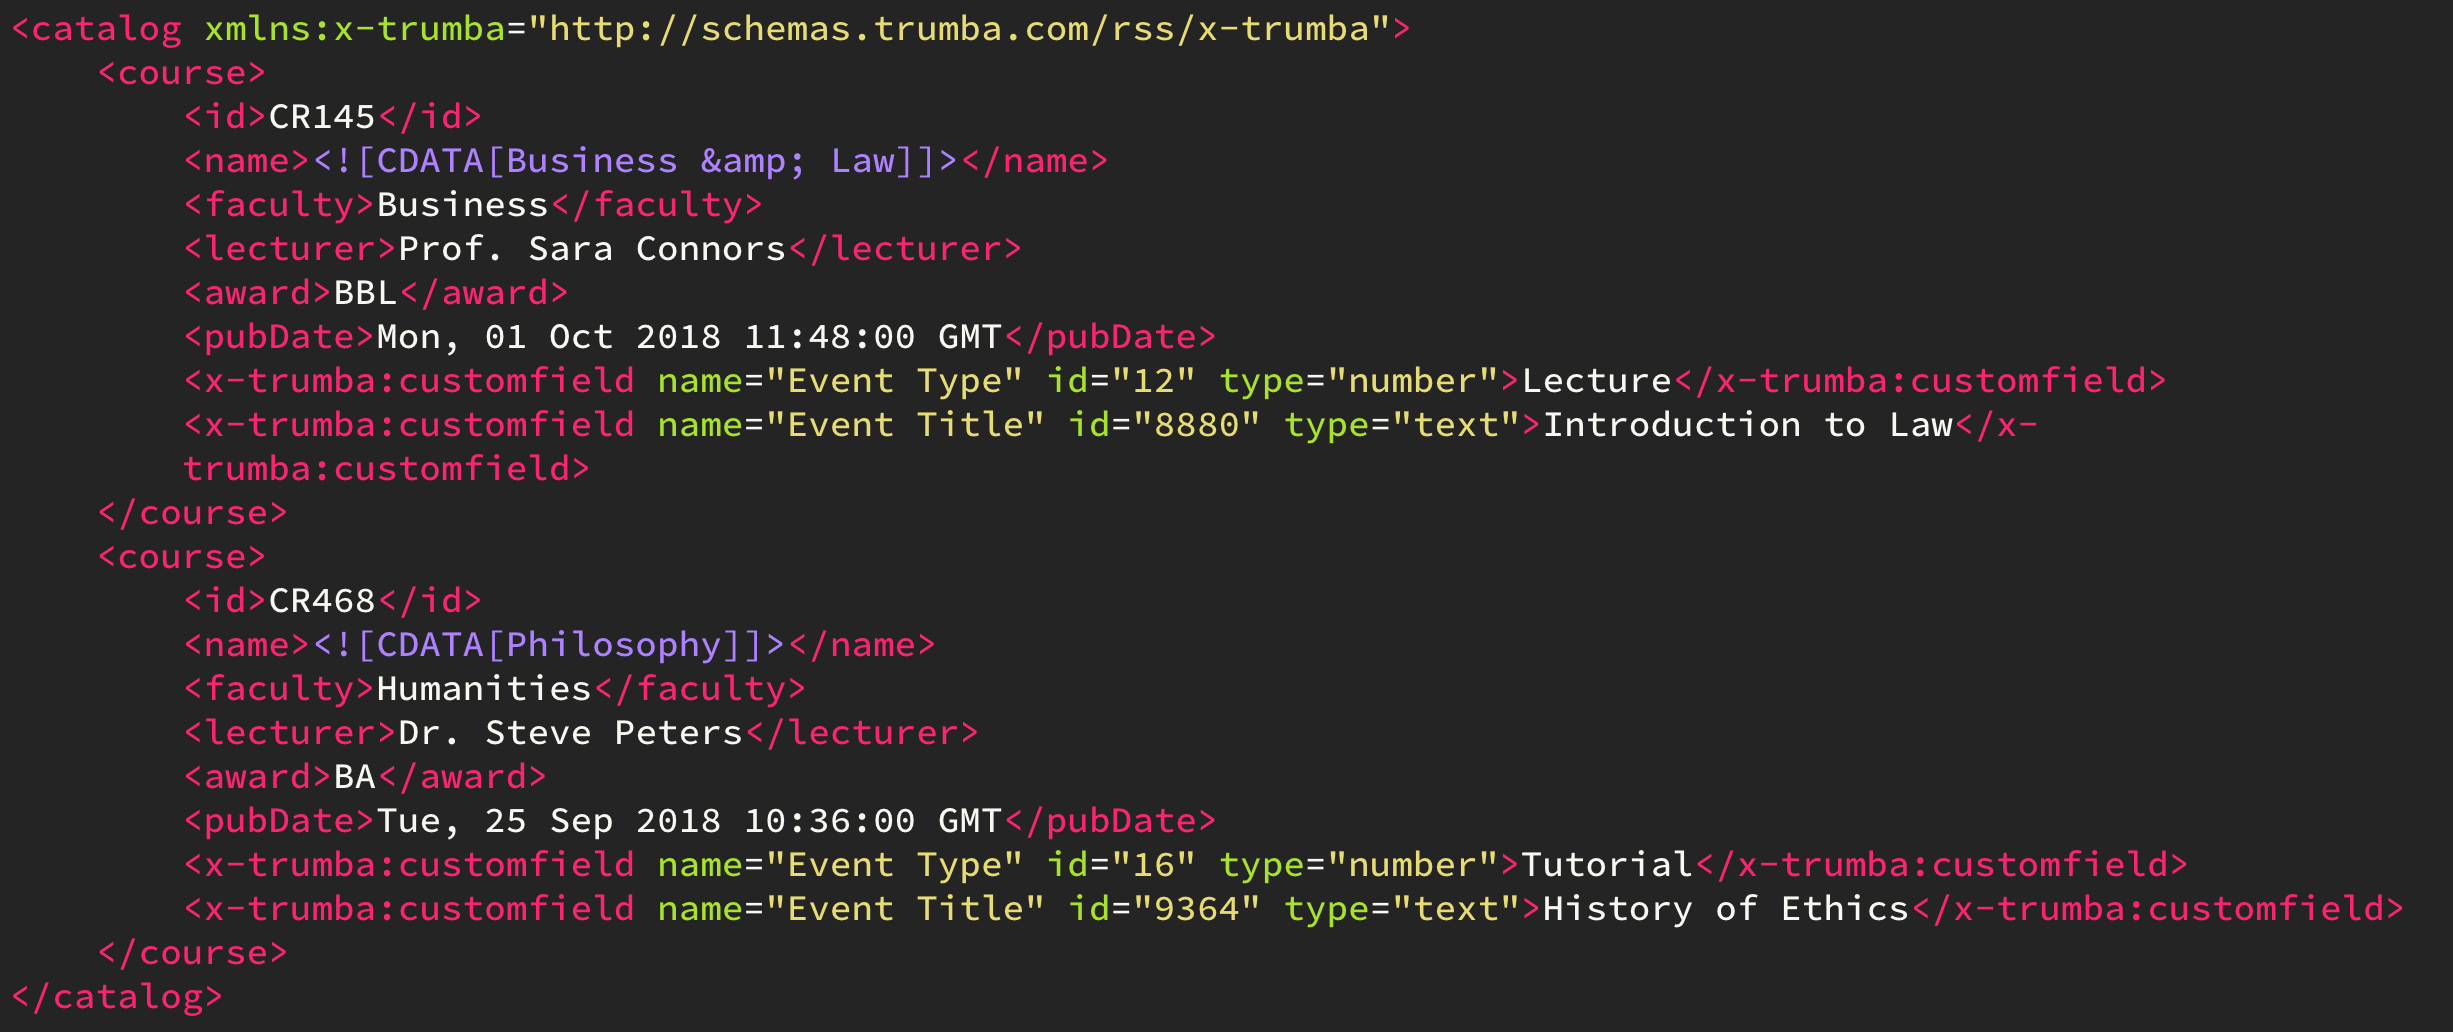
Namespaces in your XML should be declared. In this case, the elements with namespaces are generated by the Trumba event calendar software and the root element (catalog) contains a link to the XML schema. Your Data Source will not connect successfully to an XML source with namespaces that does not contain a namespace declaration. The link to the namespace schema does not have to resolve.
Since column names have to be unique, you could use the custom keyword DUPLICATE_COLUMN_IDENTIFIER to name the column with the value of a specified attribute value. In this case, it's the name attribute with a value of "Event Title":
SELECT * FROM course DUPLICATE_COLUMN_IDENTIFIER x-trumba:customfield$name = Event Type
When mapping your types, you can enter x-trumba:customfield as the Table Column Name
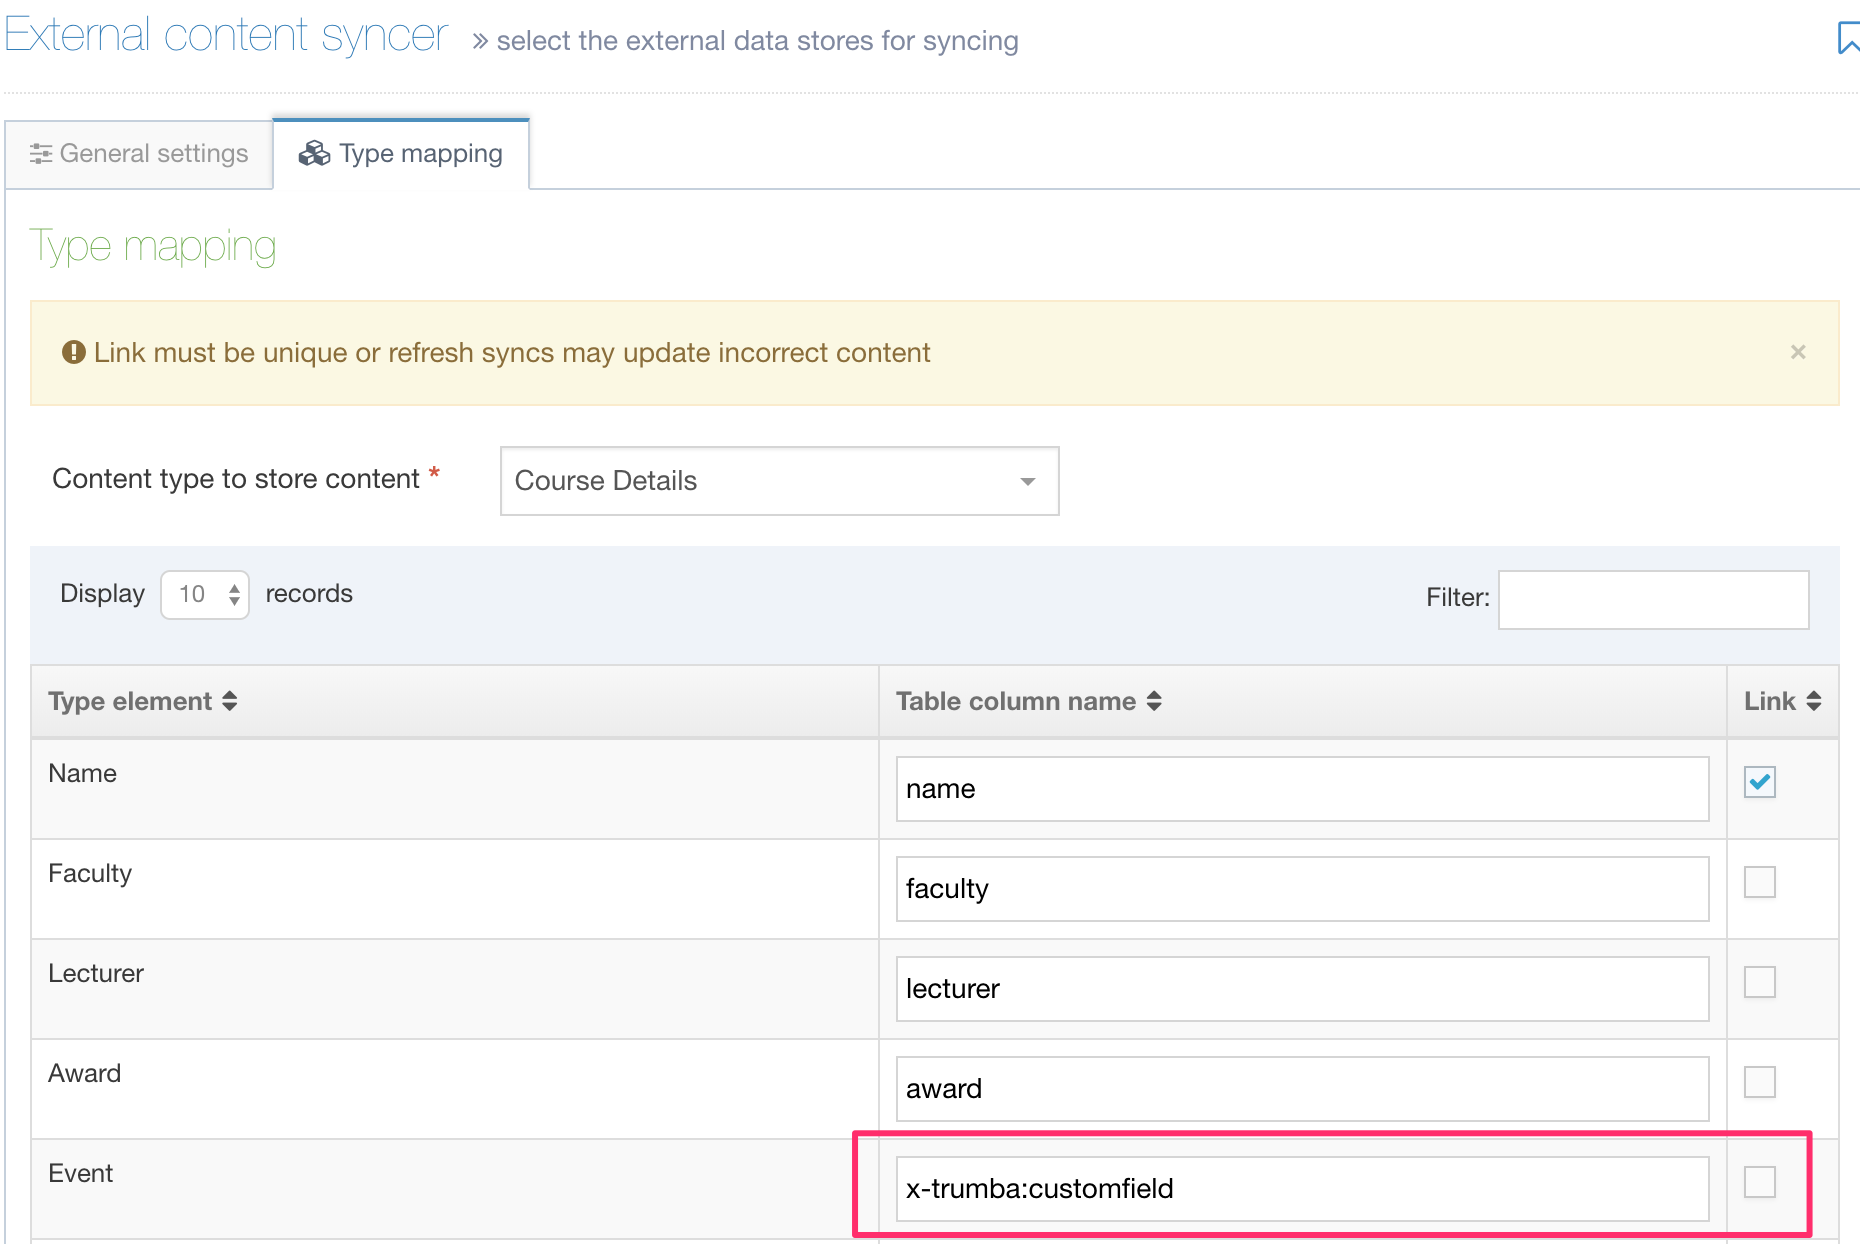
When the sync is run, the following is output:
| id | name | faculty | lecturer | award | pubDate | x-trumba:customfield |
|---|---|---|---|---|---|---|
| CR145 | Business and Law | Business | Prof. Sara Connors | BBL | 2018-10-01... | Lecture |
| CR468 | Philosophy | Humanities | Dr. Steve Peters | BA | 2018-09-25... | Tutorial |
With the DUPLICATE_COLUMN_IDENTIFIER, we can select a single element that has duplicates based on an attribute value in that element.
Duplicate Column Appender
You may want more than just one of the duplicates to be returned and in that case you can use the DUPLICATE_COLUMN_APPENDER keyword to provide more flexibility. In addition to returning the content of multiple duplicate elements we can also return the value of attributes.
If you were unsure of an attribute value but knew the position of the duplicate you wanted to use, an index is appended to the Table Column Name. Here is the SQL statement:
SELECT * FROM course DUPLICATE_COLUMN_APPENDER x-trumba:customfield
An index number is appended to the Table Column Name that can be mapped. In this instance, we are just looking for the second duplicate:
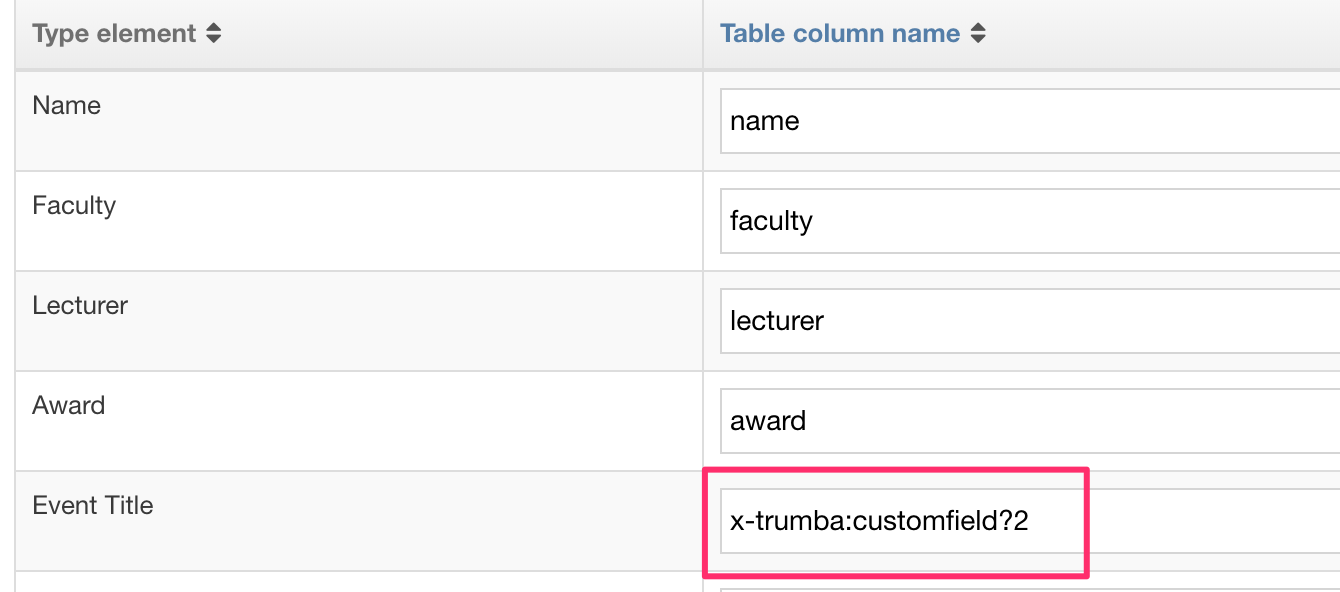
This returns the following:
| id | name | faculty | lecturer | award | pubDate | x-trumba:customfield?2 |
|---|---|---|---|---|---|---|
| CR145 | Business and Law | Business | Prof. Sara Connors | BBL | 2018-10-01... | Introduction to Law |
| CR468 | Philosophy | Humanities | Dr. Steve Peters | BA | 2018-09-25... | History Of Ethics |
So, without know the value of an attribute value we have returned element content based on its position. We're not just limited to a single Type Mapping:
| id | name | faculty | lecturer | award | pubDate | x-trumba: customfield?1 |
x-trumba: customfield?2 |
|---|---|---|---|---|---|---|---|
| CR145 | Business and Law | Business | Prof. Sara Connors | BBL | 2018-10-01 11:48:00 | Lecture | Introduction to Law |
| CR468 | Philosophy | Humanities | Dr. Steve Peters | BA | 2018-09-25 10:36:00 | Tutorial | History Of Ethics |
If you know the value of an attribute, you can change the query:
SELECT * FROM item DUPLICATE_COLUMN_APPENDER x-trumba:customfield$name| id | name | faculty | lecturer | award | pubDate | x-trumba: customfield?EventType |
|---|---|---|---|---|---|---|
| CR145 | Business and Law | Business | Prof. Sara Connors | BBL | 2018-10-01... | Lecture |
| CR468 | Philosophy | Humanities | Dr. Steve Peters | BA | 2018-09-25... | Tutorial |
You may have spotted that the space has been removed from "Event Type" in the Table Column Name. This is required for it to work.
Returning Attribute Values
You can also return the values from attributes. In this example, the index is used and a dollar sign and the attribute name are appended to the Table Column Name after using this query:
SELECT * FROM item DUPLICATE_COLUMN_APPENDER x-trumba:customfield

In this instance, the following is returned:
| id | name | faculty | lecturer | award | pubDate | x-trumba: customfield?2$id |
|---|---|---|---|---|---|---|
| CR145 | Business and Law | Business | Prof. Sara Connors | BBL | 2018-10-01... | 8880 |
| CR468 | Philosophy | Humanities | Dr. Steve Peters | BA | 2018-09-25... | 9364 |
An attribute value can also be used:
SELECT * FROM item DUPLICATE_COLUMN_APPENDER x-trumba:customfield$name| id | name | faculty | lecturer | award | pubDate | x-trumba: customfield?EventTitle$id |
|---|---|---|---|---|---|---|
| CR145 | Business and Law | Business | Prof. Sara Connors | BBL | 2018-10-01... | 8880 |
| CR468 | Philosophy | Humanities | Dr. Steve Peters | BA | 2018-09-25... | 9364 |