
Geographic Personalization
By the end of this training module you will have used Terminalfour's Personalization Engine to personalize content on a webpage determined by the visitor's country or region.
Overview and Examples

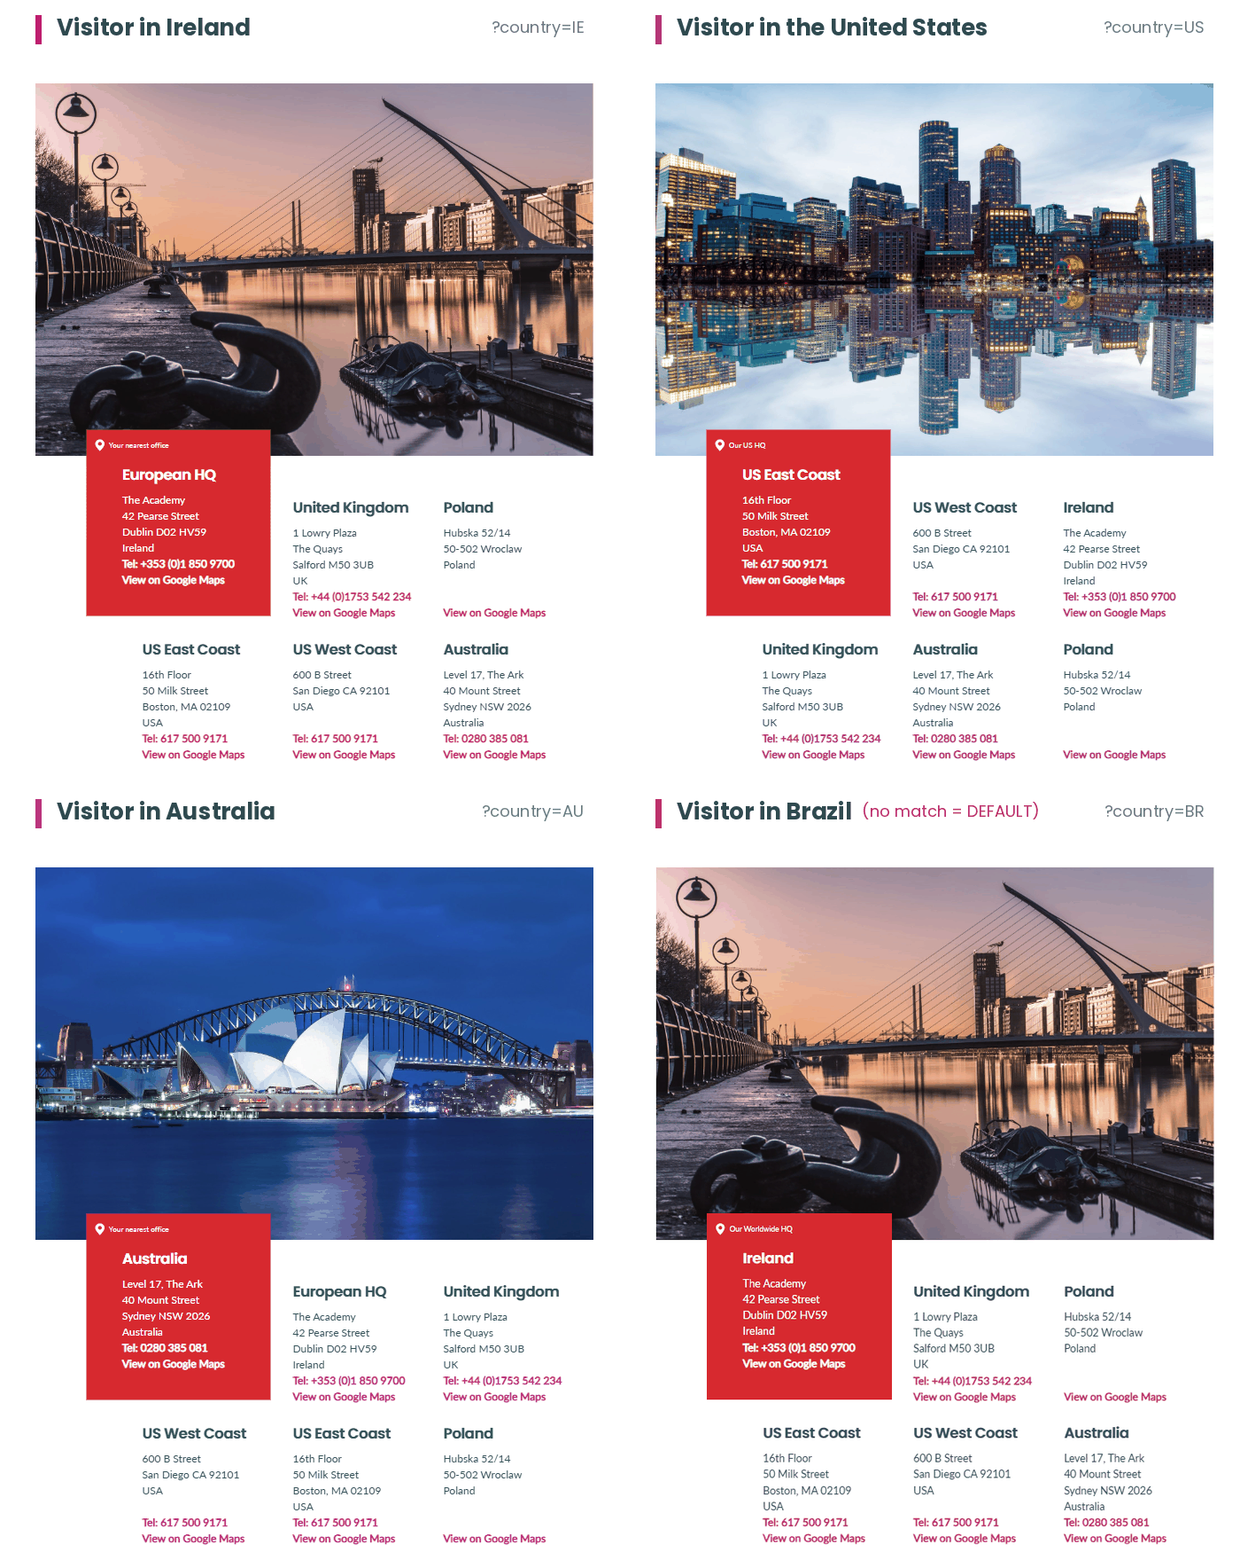
Exercise 1: Load the Engine
Add the engine script and one line of required CSS to any of your page layouts that will contain personalized content.
<style>[data-variant][hidden]{display:none !important;}</style>
<script src="https://cdn.terminalfour.com/pe/current/terminalfour-personalization-engine.min.js"></script>
Place both at the end of the <head>, without defer. The engine waits until the page has loaded before it runs.
The CSS (the style tag) isn't optional. Without it, all variants would briefly render before the engine hides the non-matching ones, which is visible on slow connections.
Tip: If you have lots of Page Layouts, consider using a Handlebars Partial to make adding the above code to every Page Layout easier.
How to load the engine to your Page Layout
- Go to Assets >> Page Layouts
- Select your page layout - your trainer may have you duplicate an existing one
Exercise 2: Understanding the markup
Every personalized region follows the same shape: a wrapper, one or more coded variants, and exactly one fallback.
It's important to understand what this markup does, and how it works so that you can effectively update your Content Layouts to output it correctly for the Personalization Engine.
<div class="home-hero" data-switcher data-query="geo">
<div data-variant="row" data-default>Worldwide content</div>
<div data-variant="ie" data-codes="IE" hidden>Ireland content</div>
<div data-variant="uk" data-codes="UK,GB" hidden>UK content</div>
</div>
| Attribute | On | Purpose |
|---|---|---|
data-switcher |
wrapper |
Marks a personalization region. I.e. inside this wrapper there are several variants for different audiences |
data-query |
wrapper |
Selects the dimension: I.e. defines what type of personalization rule will determine what gets shown
|
data-variant |
each child | Logical name of the variant |
data-codes |
non-default children | Comma-separated codes this variant matches |
data-default |
exactly one child |
The fallback. I.e. which variant should be shown if no personalization rules match |
hidden |
non-default children | Required on every non-default variant, to ensure it doesn't display temporarily while the engine determines what should be shown |
There are two different ways to mark the fallback. Which one you use is up to you and how you choose to implement. Depending on how you choose to implement, one might be easier to output than the other. You can either:
- Add the attribute
data-default - Add the term DEFAULT to the
data-codesattribute (e.g.data-codes="DEFAULT")
You don't need both. Just one or the other.
Exercise 3: Create your content types
Depending on how you want to manage your Personalization, you can simply add extra fields to your content type that will be used to output the different variants. Conditional elements can then optionally be used to hide or show elements to content editors if you only want certain members of your team to manage the different content for different audiences.
Another approach that's perhaps more flexible is to create a new Content Type that uses Repeaters to allow you to add different variants of your content for different audiences. That's the approach we'll follow in this training.
Explaining the approach
In this training we'll be using the example of a Homepage Hero Content Type. Today, users add this to the homepage manually.
What we'll introduce here is a new Content Type called "Personalized Hero". This new Content Type will allow you to define how the Homepage Hero will be personalized (i.e. which personalization dimension should be used), and also repeat the existing Homepage Hero Content Type as many times as you need for each audience.
Before we create or edit any content types, we'll first have to create some Lists in Terminalfour
Create the two lists
List 1 Personalized Dimensions
Navigate to Assets >> Lists >> +Add new list called "Personalization Dimensions".
Give it the following fields:
| List Entry Name | List Entry Value | Selected |
|---|---|---|
| Geographic | geo | No |
| Postal Code | postalcode | No |
| Persona | persona | No |
| Interest | interest | No |
| Topic | topic | No |
| Combined | combined | No |
This list can be reused by all your Content Types where you're introducing Personalization. If there are some dimensions you won't be using, you can remove them from this list to avoid confusing your content editors.
We'll start simple with Geo in this first example. Other dimensions will be covered later in the training.
List 2 Locations
Create a new List called "Locations" defining which countries you want to target different personalization rules for.
Navigate to Assets >> Lists >> +Add new list called "Locations".
| List Entry Name | List Entry Value | Selected |
|---|---|---|
| United States | US |
No |
| United Kingdom | UK,GB |
No |
| Ireland | IE |
No |
| Rest of world | DEFAULT |
No |
You can fill this list with any countries you like using the two character country code from the ISO 3166 standard.
Important: A variant wins if any of its codes equals the visitor's country code OR region code; on a tie the first in document order wins. So list region variants before country variants.
Country codes are ISO 3166-1 alpha-2 (IE, GB, US). The engine treats UK and GB as equivalent. Region codes are the ISO 3166-2 subdivision part only (i.e. L for Leinster in Ireland, not IE-L).
Be careful with codes that are both a country and a region. For example, a variant with data-codes="CA" intended for Canada will also be shown to visitors in California.
Geo groups & negation
A data-codes token can name a group of countries instead of a single code, and any code or group can be prefixed with ! to exclude it. Two groups are built in: EU (27 member states) and EEA (EU plus Iceland, Liechtenstein, Norway).
Other useful shapes: EU,!FR,!DE (EU except two countries), EU,GB,!IE (EU plus UK, minus Ireland), !EU (anyone outside the EU whose geo is known), US,!CA (USA except California).
Custom groups
You can create your own Custom groups via meta tags within the source code of the page where the personalized content appears. This may be useful if you are centrally managing meta tags and want to update those rather than manually managing your list in Terminalfour. Group names aren't case-sensitive.
For example:
<meta name="t4-geo-group-dach" content="DE,AT,CH">
<meta name="t4-geo-group-emea" content="EU,GB,CH,NO,TR">
If the above meta tags exist on that page, your list can reference them by name.
For example:
| List Entry Name | List Entry Value | Selected |
|---|---|---|
| Germany, Austria, Switzerland | dach |
No |
| EMEA Countries | emea |
No |
Create the content types
First, we'll create the content type for the Homepage Hero Banner itself. If you already have one, you can modify that instead.
Navigate to Assets > Content types and create a new Content type called "Homepage Hero Banner".
Give it the following elements:
| Name | Description | Element Type | Max Size | Required |
|---|---|---|---|---|
| Personalization Variant Name | A friendly name for this variant of a Personalized Content. Used in debugging to capture which one is active. |
Plain Text | 100 | Yes |
| Personalization Country/Region | Select which country or region this variant should be displayed to | Select Box [Locations] |
80 | Yes |
| Heading | The main heading displayed in the Hero Banner | Plain Text | 200 | Yes |
| Subheading | The subheading displayed in the Hero Banner | Plain Text | 200 | No |
| Background Image | The image that will fill the background of the hero banner | Media | 80 | Yes |
| Call to action | The link where you want the audience to go to | Section/Content Link | 80 | Yes |
Next we'll create a content layout called text/personalized-hero. You can name it anything you want but remember it, we'll need it for the next step.
<div data-variant="{{publish element="Personalization Variant Name"}}"
data-codes="{{selectedValues element="Personalization Country/Region"}}"
hidden>
<img src="{{media id=(mediaId element="Background Image") layout="path/*"}}" alt="">
<h1>{{publish element="Heading"}}</h1>
<p>{{publish element="Subheading"}}</p>
{{#link element="Call to action"}}
<a class="btn" href="{{linkUrl}}">{{linkText}}</a>
{{/link}}
</div>
The important additions here are the fact we're outputting the variant name and the country code as attributes on the main div element.
The engine always reveals the winning variant, including the fallback, so it's fine for every variant to output hidden.
Next we'll create another Content Type that will allow content editors to create multiple variants of this content type.
Create a new Content type called "Personalized Hero" and give it the following elements:
| Name | Description | Element Type | Size | Options |
|---|---|---|---|---|
| Personalize by | Choose which dimension the Personalization Engine uses to decide which hero banner to show. | Select Box [Personalization Dimensions] |
80 | |
| Hero Banner | Add one hero banner for each audience. Make sure one targets Rest of world, so there's always a fallback. | Repeater | Content type: Homepage Hero Banner Layout: text/personalized-hero Min repeats: 1 Max repeats: 4 |
Next, we'll need to create a new content layout on this content type using your channel's default layout name. Typically this is named text/html.
<div class="home-hero"
data-switcher
data-query="{{selectedValues element="Personalize by"}}"
>
{{{repeater element="Hero Banner"}}}
</div>
The important parts here are that we're adding a data-switcher attribute so that the Personalization Engine knows this is a personalized region. Then the data-query attribute to define which type of personalization we're using (we'll choose Geo for now).
Exercise 4: Create your content
Create a new Content item using your new Personalized Hero content type.
Before you can add it, enable the Personalized Hero content type on the section where you'll use it.
Select "Geo" for the Personalize by field. Then you can add several Hero Banners with different content for audiences in different countries.
The personalization is applied automatically when you preview or publish the page.
Exercise 5: Testing your variants
When viewing the published page, you will see the variant for the country you're currently in. You may want to verify what the content looks like in your other countries and you can do that by updating the URL and appending the country code in a query string.
For example, if your URL is https://example.com you can update that URL to https://example.com?geo=UK to preview the page as if you were in the UK.