
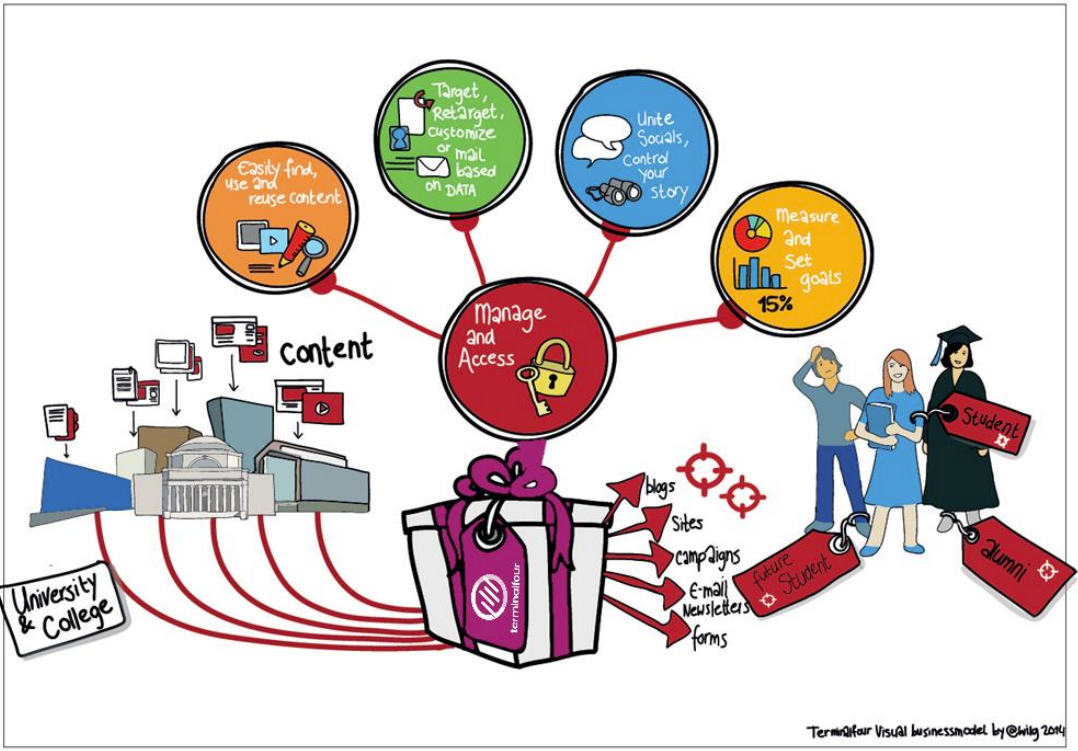
Web content management
- At a basic level, Terminalfour is used for building and maintaining large amounts of digital content.
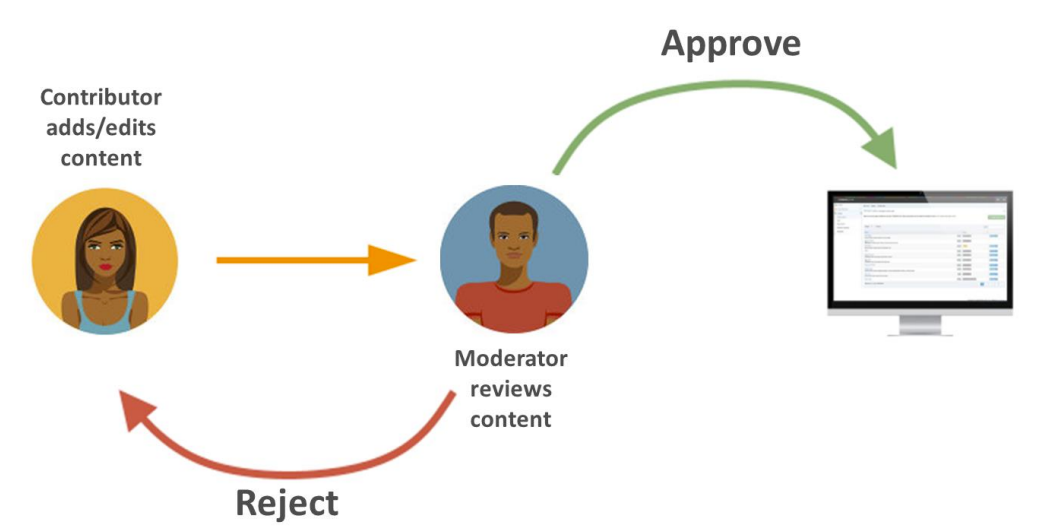
- Users at various levels can be given permission to add and modify content. All content goes through an approval cycle, at which point dedicated "approvers" review the content. In some cases, this may be the authors who wrote the content; in other cases, a more complex workflow may be used to allow several people to review the content.
- Once content has been approved, it is ready to "go live". This happens in the publishing process. Page layouts (header/footer) and content layouts are wrapped around the content to ensure the content is displayed correctly.
- One piece of content may be published to various channels. These are simply output mechanisms, like websites, mobile sites, paper publishing, etc. By applying the page layouts and content types, different displays can be achieved whilst still just producing one piece of content.
- At the publishing stage, external data can also be incorporated. This could be information from a database, website or similar.
Log in
When a new User is created, they are assigned a unique username and password within Terminalfour. Single sign-on through directory services such as LDAP, SAML, Kerberos and CAS is also supported.
- Log in to Terminalfour.
- Open your user profile by clicking on Welcome in the black bar at the top right
- To modify the profile, click Profile.
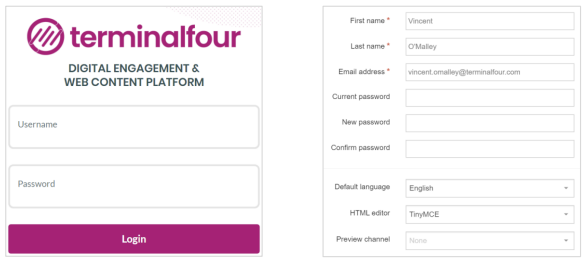
How to log in
- Open a web browser and navigate to your Terminalfour installation.
- Enter your username and password; then click Log in.
- Terminalfour opens. Click on your username in the top right corner to open your user profile:
- You can change your Password.
- If more than one Language is available, you can change the language. This will change the language of the site you work on when you log in.
- You can select your preferred User Interface Language. This is used to set the interface language of Terminalfour; menu items, site structure and user options.
- You can update your Email Address; this is used for notifications sent from Terminalfour.
- If more than one HTML Editor is available, you can change editor. The default is TinyMCE.
- If more than one Preview Channel is available, you can set a default channel. This is used when you preview your content to see how it will look on the live site.
Download training material
- Training material for this course can be downloaded from the Training area of the Terminalfour Community.
- Terminalfour Community is your source of all information about Terminalfour.
- Being part of the Terminalfour Community gives you with access to all training material, documentation about the product, and the T4 discussion forum.
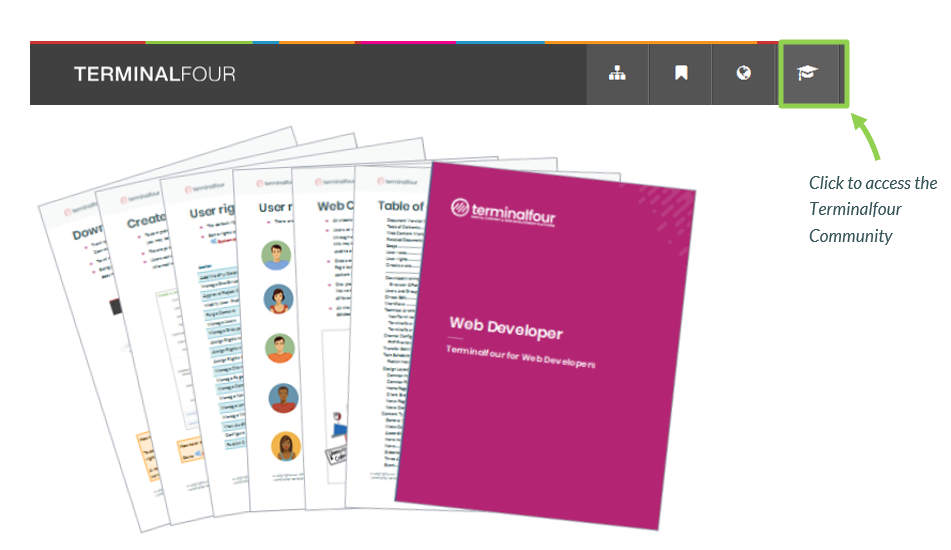
How to download training materials
- To access the community area, click the Terminalfour Community icon located towards the top right of the interface.
- A new tab opens up, if this is your first time accessing the community area you will need to agree to the terms of use. Check the box to agree to the terms and click Access community.
- Your trainer will show you where to download the materials required for this course.
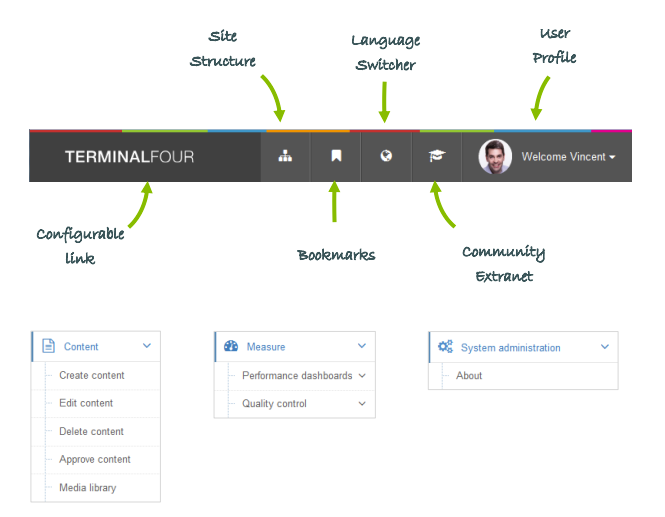
Terminalfour interface
- The Terminalfour interface has been designed to be fully responsive, which means it can be used on a desktop, laptop, tablet, and/or mobile device.
- Familiarize yourself with the interface.
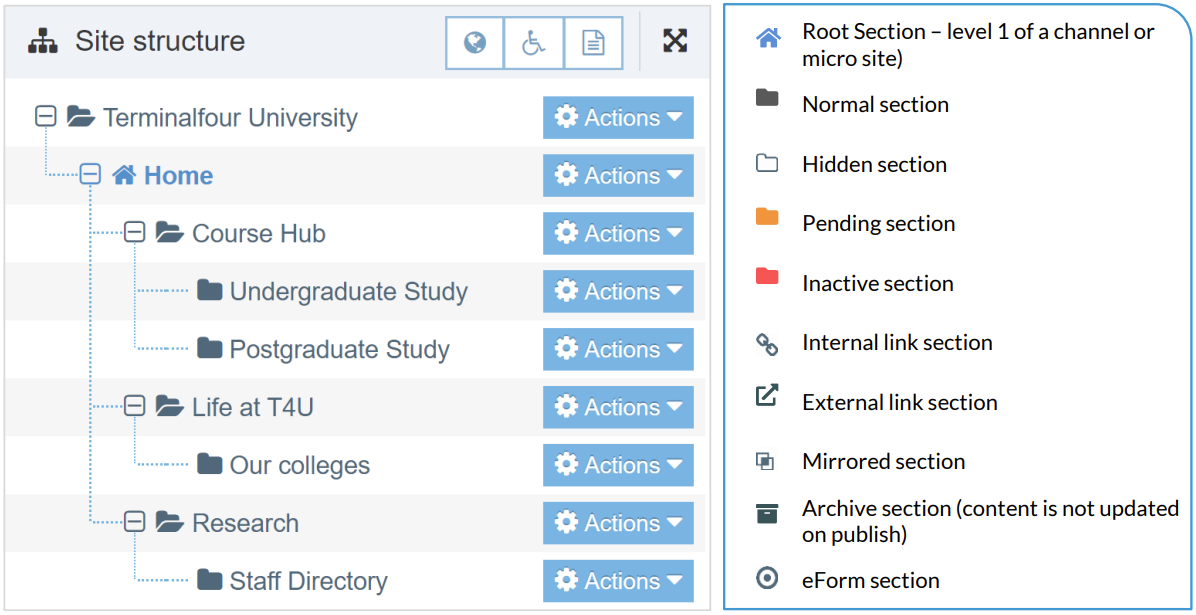
Site structure
- The first part of building a website is identifying at least the high-level architecture. In Terminalfour this involves building a site structure consisting of sections.
- There are many types of Section, and each type has an icon so you can identify it.
- Once the different options have been explained by the trainer, build a small site structure you can use as a foundation for your new website.
How to create sections
- On the Site Structure screen, locate the section under which you wish to add your first section. Click Actions > Create section.
- Enter the relevant information to create a section. As a minimum, the Name must be filled in. All other default options are explained on the next page.
- Click Save changes to save the section.
- Repeat the steps above to add additional sections. Section information can be modified at any stage.
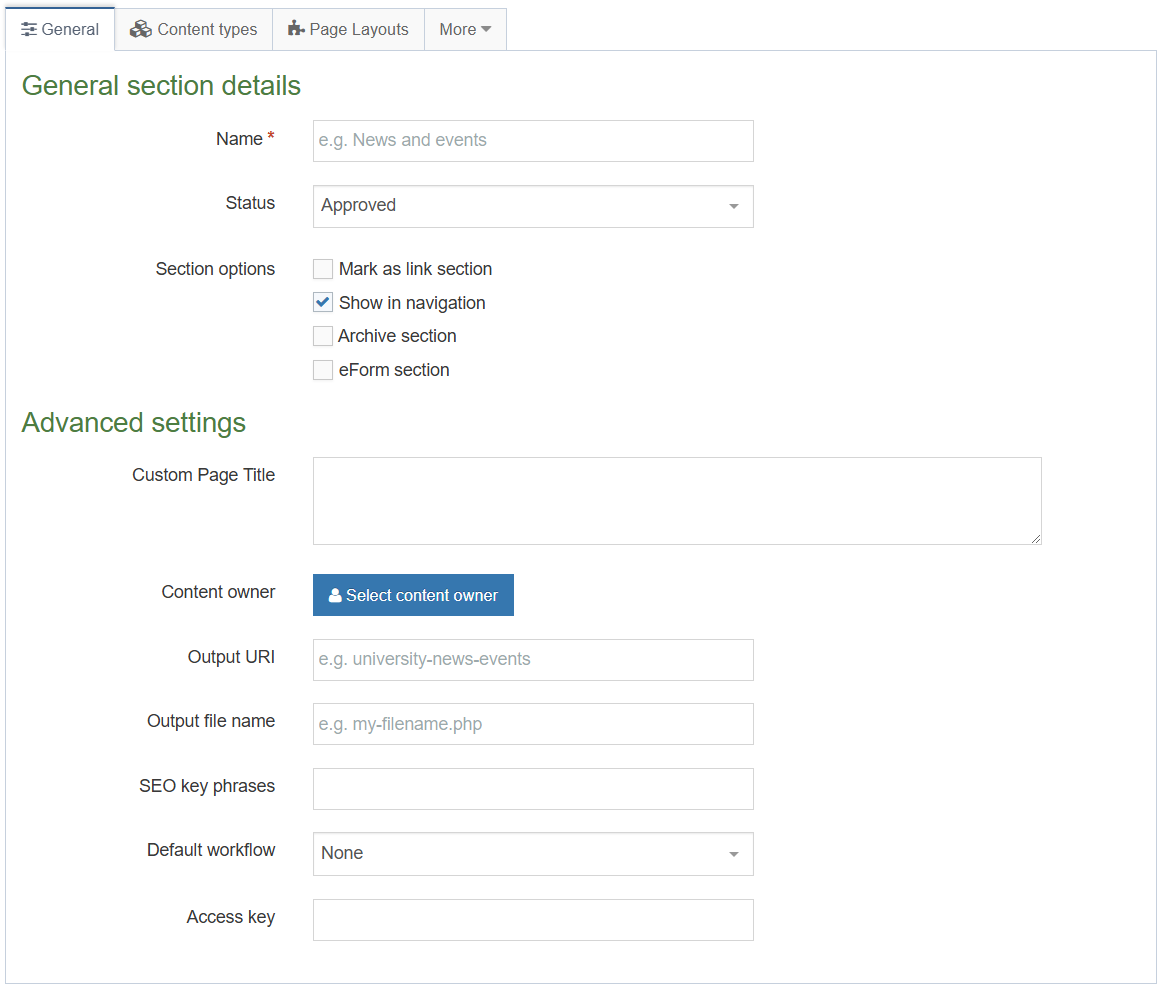
General Section Details
When creating sections, the only required element is Name. Additional elements are described below:
Name: This is the name of your section and is typically used in the menu navigation and forms the basis of the URL for the published page (if an Output URI is not specified).
Status: There are three status levels:
Approved: Sections are published when they have at least one approved Content Item.
Pending: Pending Sections will not publish, even if the content within the Section is Approved.
Inactive: Deleted Sections have an Inactive status. Sections can be restored by changing the
status to Approved.
Mark as link section: Link Sections contain no content and instead link to another Section in the Site Structure or an external URL.
eForm section: This option is used if you want to submit an eForm. Refer to the documentation for eForms for further details.
Advanced Settings
It should be noted that depending on your Section metadata content type, more fields may be available at the top of the Advanced settings. These fields are installation specific and hence not covered here.
Custom Page Title: This is an example of an installation specific element, added using the Section meta content type. This element is not used in this T201 training.
Content owner: Select the Content Owner from the list. If left blank, it will inherit from the parent section. The content owner can be used in workflows or get notified when content expires.
Output URI: Lets you specify the Uniform Resource Identifier (URI) as the destination of the new Section. Using this field improves the Search Engine Optimization (SEO) for this Section. Otherwise, with the field left blank, the Section's name is used when publishing.
Output file name: Specify the file name used for the page. When you leave this blank, the system uses the default file name configured in the Channel Settings.
Want to hide this option from your users?
Go to Administration > Hierarchy & Content Settings > Hierarchy > Enable output to filename
Default workflow: The default Workflow for this Section's content.
Access key: You can enter a single character which is used as a shortcut within a Link Menu Navigation Object.
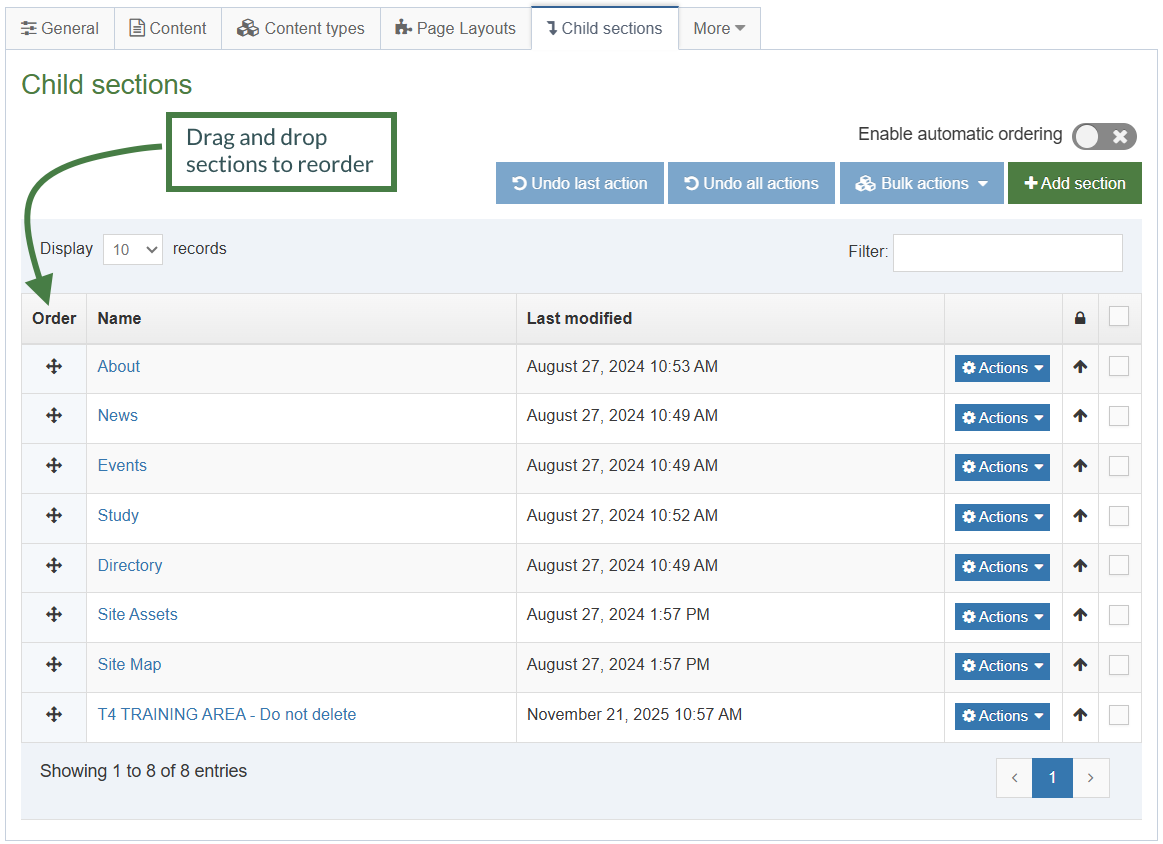
Move and reorder sections
- Sections can easily be moved, and the order in which they appear in navigation will change to reflect this.
- Move one of your sections, using the drag and drop method.
- Reorder the sub-sections you created earlier. Use either automatic ordering or move them manually.
How to move and reorder sections
- To move a section, drag it with your mouse and drop it to the new location.
- Click Confirm to save the change to the site structure.
- To reorder sections, click the Site Structure icon.
- From the Actions menu select Edit section.
- Select the Child sections tab.
- If you wish to use automatic ordering, slide the Enable automatic ordering toggle to the on position and select a method. By default, all sections are locked. Unlock the sections you wish to apply automatic ordering to. To do this, use the Unlock option in the Actions menu.
- If you wish to manually move the sections, use the Order icon to move sections around.
- Click Save changes before navigating away from this screen, as the changes will otherwise not be saved.
Bookmark sections
- The bookmark tool allows you to add your favorite sections to a bookmark list.
- Bookmark one or more of your sections.
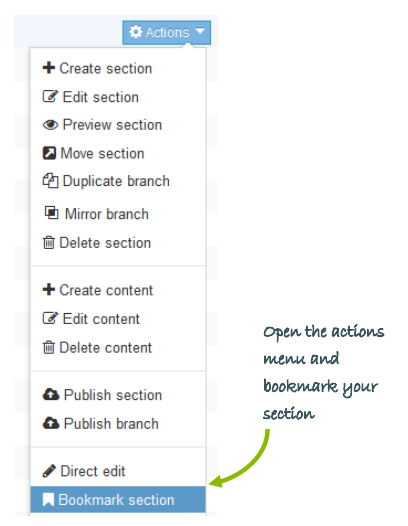
How to Bookmark Sections
- Select Bookmark section from the Actions menu beside the section you wish to bookmark.
- Check the bookmarks tool to see that your section has been added as a bookmark.
- Sections in Terminalfour can also be bookmarked, by clicking on Bookmark icon located towards the top righthand-side of the screen.
Add content
- Content is added to a section by using Content Types.
- Add content to one of your sections using the generic content type (the trainer will point out the name).
- Preview the content to ensure it looks OK.
- Add the content or save as draft.
How to add content
- Select Create content from the Actions menu beside the section you wish to add content to.
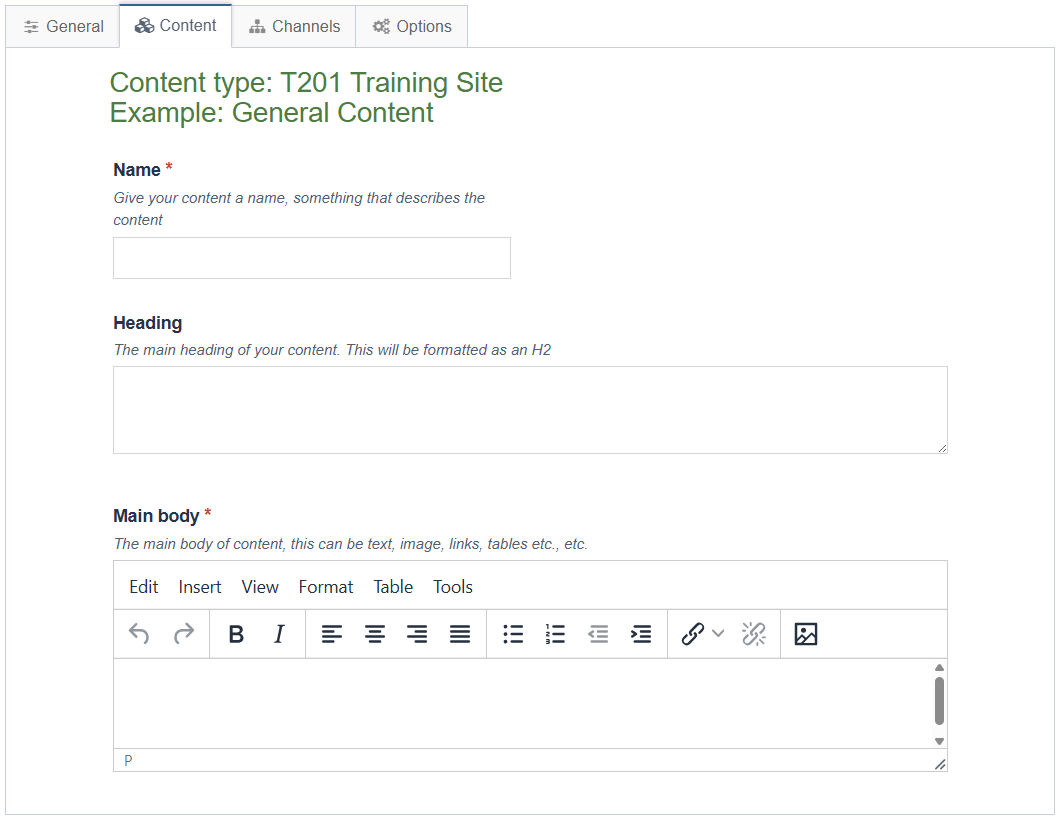
- If only one content type is enabled, this will open right away. Alternatively you need to select the content type you want to use.
- The * next to the element identifies that the element is required.
- Enter a Name for the content. This will not be displayed on the published page, but simply act as a name within Terminalfour and allows for user organization.
- Use the Word file "Writing for the Web" and create a piece of content which looks as similar as possible to the original.
- Open the Word file given to you by the trainer and copy the text.
- Paste the text into the main body of your content. Some formatting may be necessary.
- Preview to ensure you are happy with the result.
- Click Save changes to save the content once complete, or expand your options by clicking on the icon next to Save changes to reveal options such as Save & approve and Save as draft. The drop-down menu options may vary depending on configuration.
Direct edit - links
- There are numerous ways to add and modify content in Terminalfour. This time we are going to use Direct Edit to add a new piece of content, with internal and external links.
- Open Direct Edit and add a new piece of content on the same page you added the "Writing for the Web" content to.
- Include a link to an external website (e.g. http://www.terminalfour.com), a link to one of your other sections (e.g. "News") and a link to another attendee’s "Writing for the Web" content.
- Create an anchor link navigating from the bottom of the content back to the top.
How to use direct edit
- From the Site Structure screen, select Direct Edit from the Actions menu beside the section you just added content to.
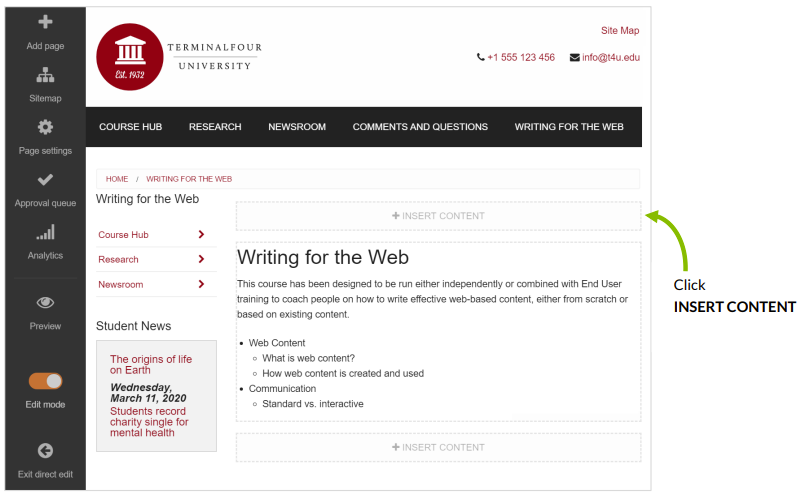
- A Direct Edit screen opens with dotted line surrounding any content for which you have editing rights and a Direct Edit menu is displayed to the left of the screen.
- Click Insert content to begin adding new content to the page.
- Select a Content Type.
- Enter a Name for your content – we will now create a number of links.
How to add links
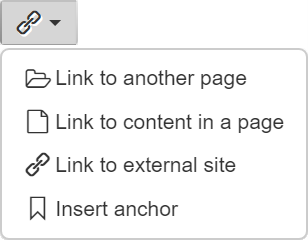
- External Link: e.g. http://www.terminalfour.com.
- Type the text you wish to use as your link text; e.g. Terminalfour.
- Highlight the text; then select Link to external site from the WYSIWYG.
- The Link to external site Window opens; complete the details as required.
- URL: enter the URL of the site you wish to link to.
- Text to display: enter the link text here.
- Title: enter information about where the link will send the user; this will aid user accessibility.
- Target: select how the link should open, e.g. within the same window or in a new window.
- Link to another page: e.g. to one of your other sections.
- Type and highlight the text you wish to use as the link text or simply place your cursor where you want the link inserted. Select Link to another page from the WYSIWYG.
- A window will pop up displaying the Site Structure; navigate to the section you wish to link to and click on it.
- Link to content in a page: e.g. to another attendee’s "Writing for the Web" content.
- Type and highlight the text you wish to use as the link text or simply place your cursor where you want the link inserted. Select Insert Content Link from the WYSIWYG.
- A window will pop up displaying the Site Structure; click on the section that contains the content you wish to link to; a list of content will be displayed.
- Click on the name of the content item you want to link to.
- Click Save changes to save the content once complete.
- Preview your content to review your links.
Tables
- Tables are sometimes used to arrange information within your content to make it easier to read.
- Create a piece of content in one of your empty sections.
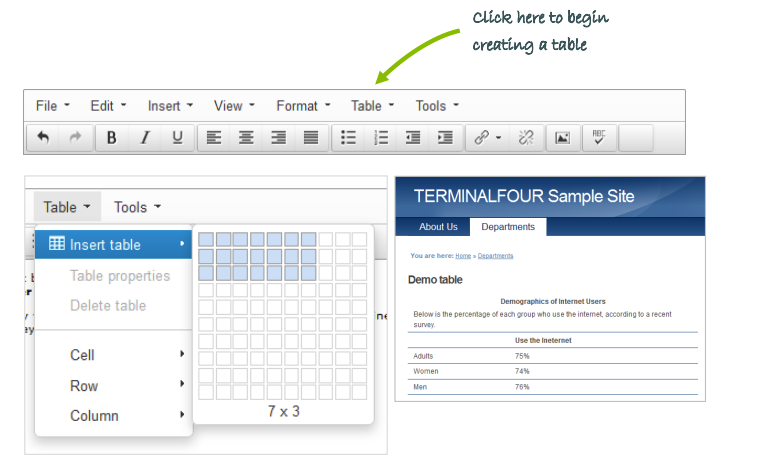
- Create a table similar to the one below.
How to add a table
- From the Site Structure screen, select Create content from the Actions menu beside the section you wish to add content to.
- If only one content type is enabled, this will open straight away. Alternatively you need to select which content type you wish to use.
- Enter a Name for the content. This will not be displayed on the published page, but simply act as a name within Terminalfour.
- In the Main body, click Table from the WYSIWYG and create a table.
- When finished, click Save changes to save your work.
History and versions
- Terminalfour allows you to see all changes made to content, compare different versions and set previous versions of the content live.
- To see how this works, modify a piece of content; then compare the two versions of the content.
- Set the original version of the content live again.

How to review history and versions
- Modify a piece of content: select Edit content from the Actions menu beside the section containing the content.
- Click the content’s name to open it or select Edit from the Actions menu.
- Make changes to the content and click Save changes.
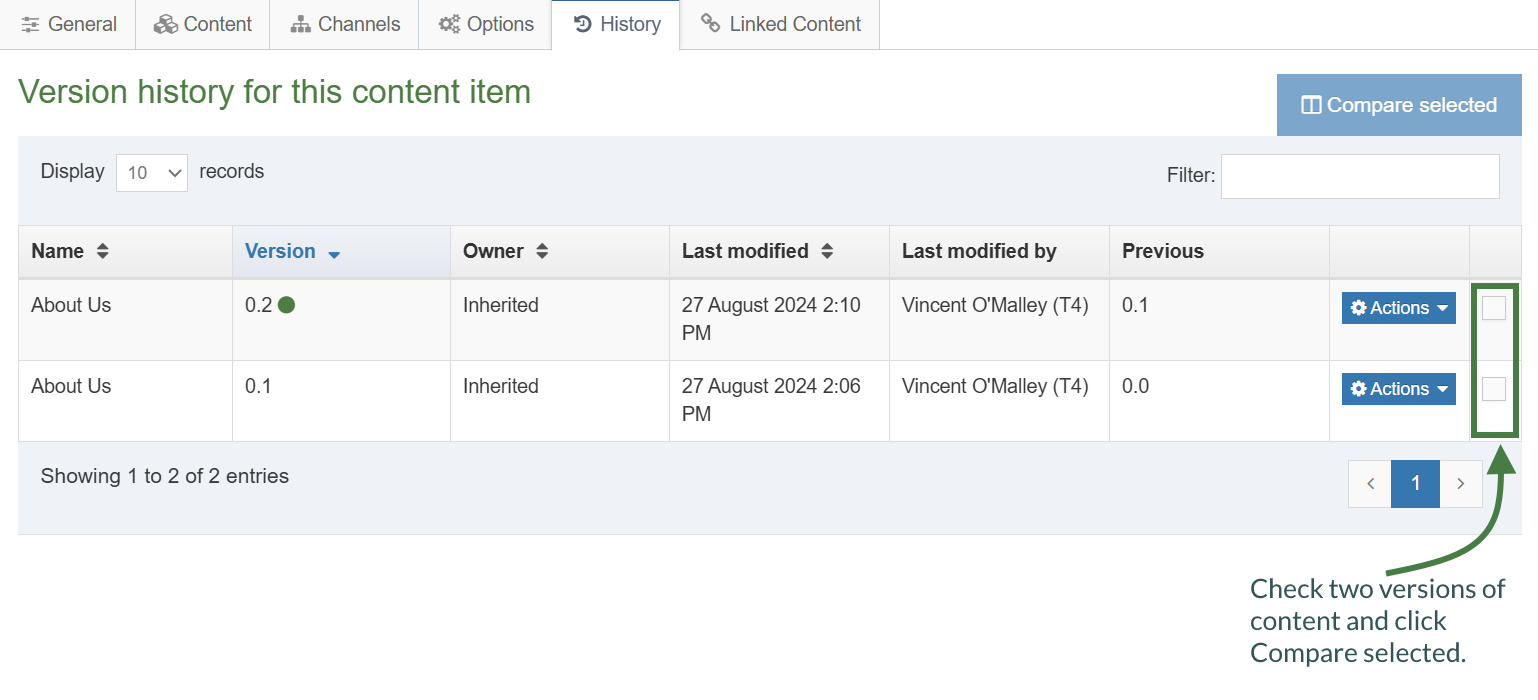
- Click back into the content and go to the History tab or select History from the Actions menu beside the content.
- Select the two versions of content you wish to compare by checking the box for each version (located in the far right column).
- Click Compare selected to display both versions of content in a side-by-side comparison; elements where changes have occurred are highlighted in yellow.
- Click Back to return to the History tab.
- You can set any version as the current version by clickingActions > Make current > Confirm.
Content options
- When adding a new piece of content or modifying an existing piece, there are additional options available to control and manage the publishing of the piece of content.
- The content options can be used to manage when the content will publish, expire, be reviewed, and archived. All the fields are optional.
Content Options
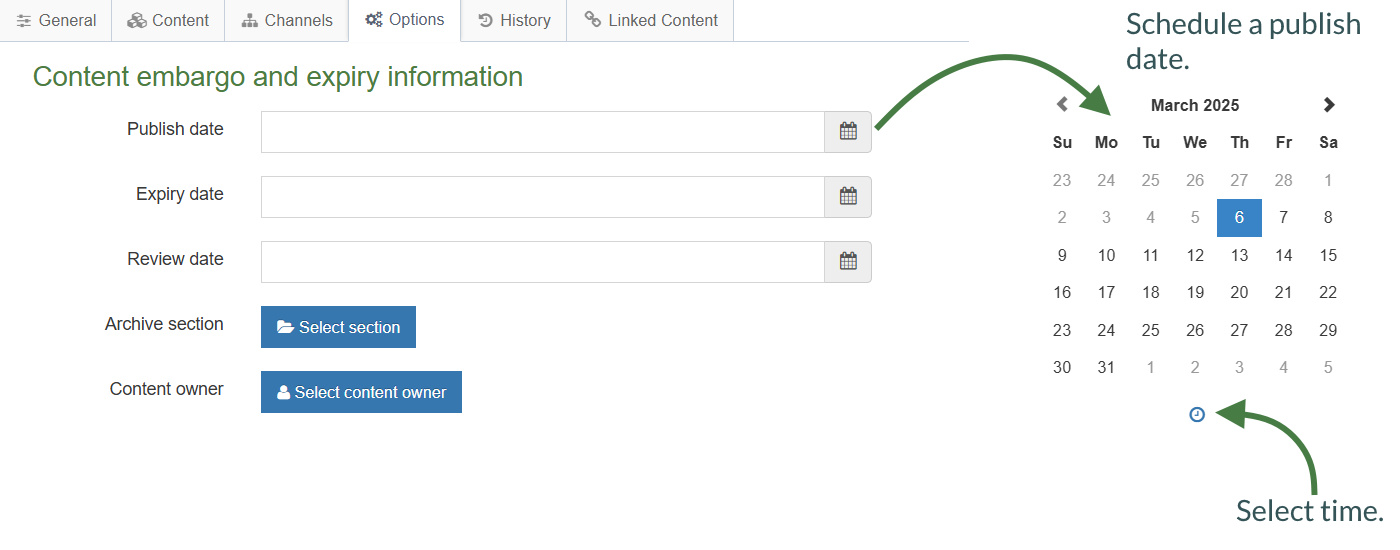
Publish date: schedules a publish date, i.e. the date the content will go live on the site. The content has to be approved before it can be published.
Expiry date: content will expire and be removed from the site.
Review date: Terminalfour will email the Content Owner on the selected date. If no owner is set, the person who last modified the content will be notified instead.
Archive section: allows you to specify a section for the content to go to once it has expired. If you are publishing lots of content, it may be a good idea to create an Archive Section to store expired content in. This way the content can be used and published again later. Click Select section and select a section; the section id is inserted as a reference.
Content owner: sets an owner to the Content Item.
How to manage content options
- To modify a piece of content, select Edit content from the Actions menu beside the section containing the content.
- Click on the content’s name to open it.
- Click the Options tab.
- Fill in the relevant fields by clicking the box to open the calendar; simply click on the date you wish to use and adjust the time by clicking the clock icon and selecting the hours and minutes. If you do not set the time, it will default to the current time.
- Click Save changes to save your work.
Media library overview
- The Media Library is used to store files of all sorts to use in content. You may not have access to uploading new files – this depends on your user credentials.
- Open the Media Library and locate the training category.
- Add a category with your own name; then upload the image you have been given by the trainer.
How to add a media category
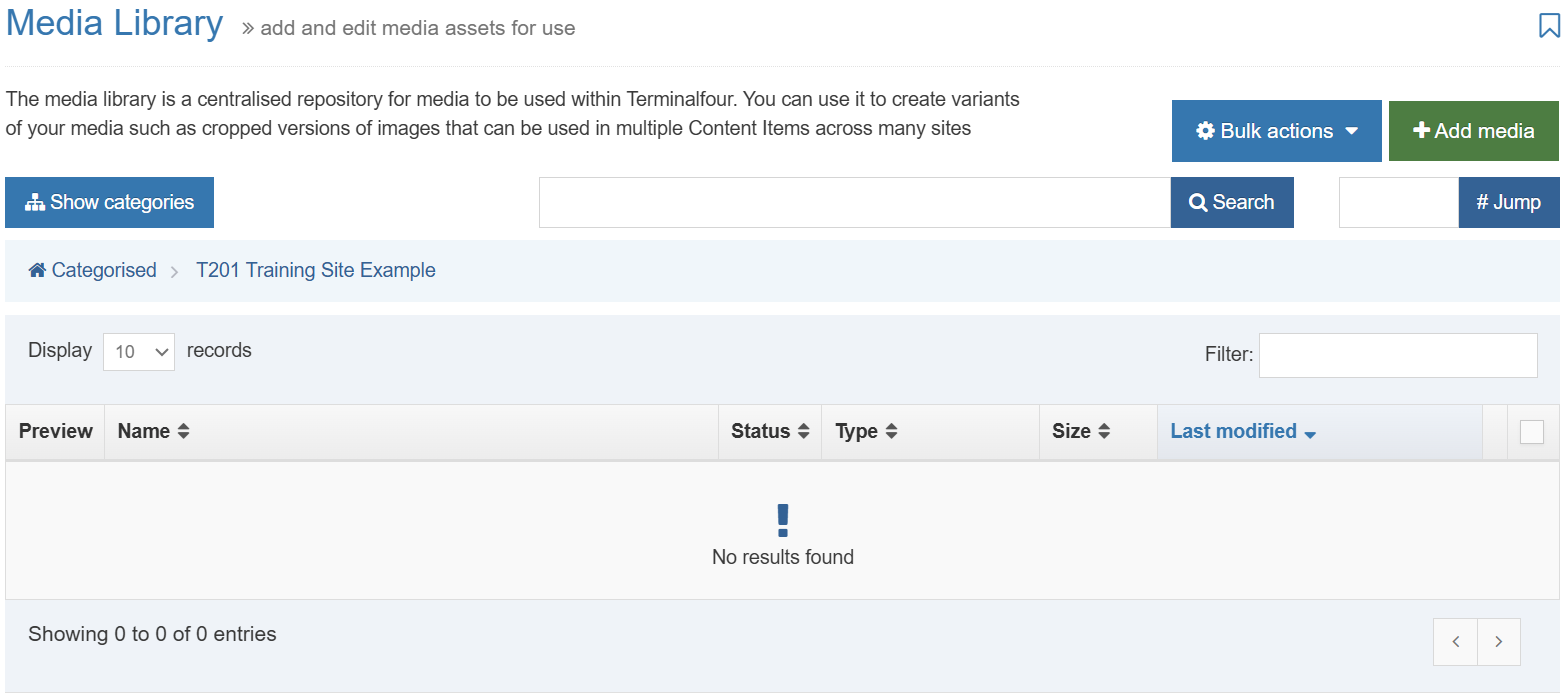
- To add a Category, go to Content and select Media library.
- The Media Library opens.
- Expand the tree structure to find the "Training" category and click on the Actions menu.
- Click Create sub-category.
- Enter your new category name and click Save changes.
- Click on your new category.
Upload and use an image
- Now that you understand how the Media content type is pieced together, you should have a better idea of how the Media Library content is used.
- Upload an image to the Media Library, create Image Variants and use the image in content.
How to upload media
- From the site structure screen, locate the section you added content to earlier.
- Go to the Actions menu and select Edit content. Click on the content you want to edit.
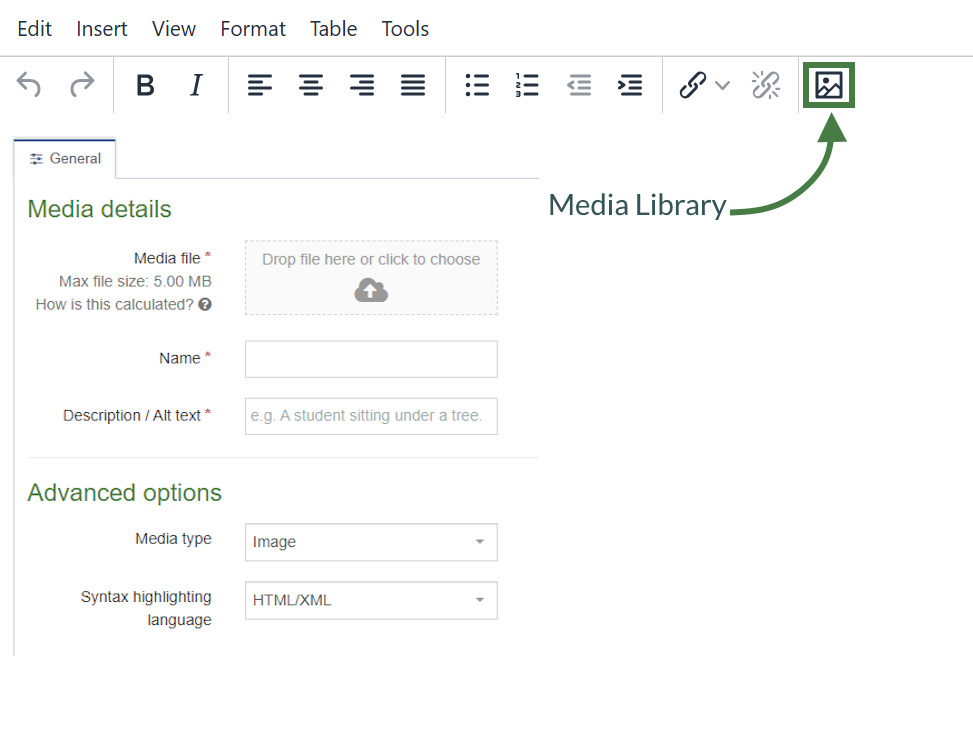
- In the main body of your content, place the mouse where you want to insert an image; click the media icon.
- The media library opens. Locate the category you wish to add the image to and click on it.
- Click +Add media (the use of Name, Description and Keywords is dependent on your media content layouts):
- Media file: drop your image file here or click to select the image from your drive.
- Name: enter a name for your Image. By default, this is not output on the site, but is used only as a name in the
Media Library to allow easy identification. - Description/Alt text: by default, this is used as the alt tag and should always be filled to describe the image.
- Media type: select Image -this is automatically detected where possible.
- Syntax highlighting language: for non-binary files you can select what syntax highlighting to use (if any).
- Media Language Dependence:
- Fully independent: the media is the same in all languages and cannot be translated.
- Independent media file: the file and thumbnail exist independent of language. Other elements can be modified based on language, such as the image description/alt text.
- Fully dependent: all elements depend on language and can be translated.
- Click Save changes to add your image.
- The image is ready to be used. Hover over it and click Select.
Image variants
- To fit an image into a piece of content, it may be necessary to resize or crop the image.
- To ensure the image is properly resized, use the Media Library’s facility to create variants.
.png)
How to create image variants
- From your content, click Insert file link or image.
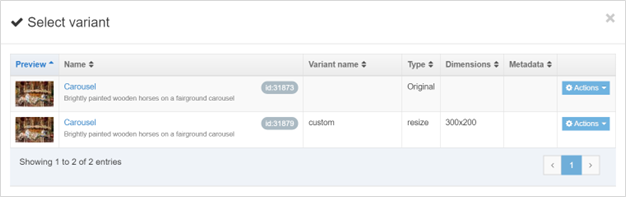
- Locate the image in the Media Library, click Actions > Variants.
- Enter a Variant name and a Description.
- From here you can either Crop or Resize the image.
- Click Save variant.
- Add additional variants if needed.
- Once you have added the necessary variants, click Cancel to exit Variants
- To use a variant in content; click on your image and any variants associated with the image will be displayed.
- Click Actions > Select media to add the image variant of your choice.
Media attributes
- Depending on how your Media Library has been configured, you might have permission to modify your images attributes. For example, you might be able to specify a margin, add a caption or float the image to the left or right.
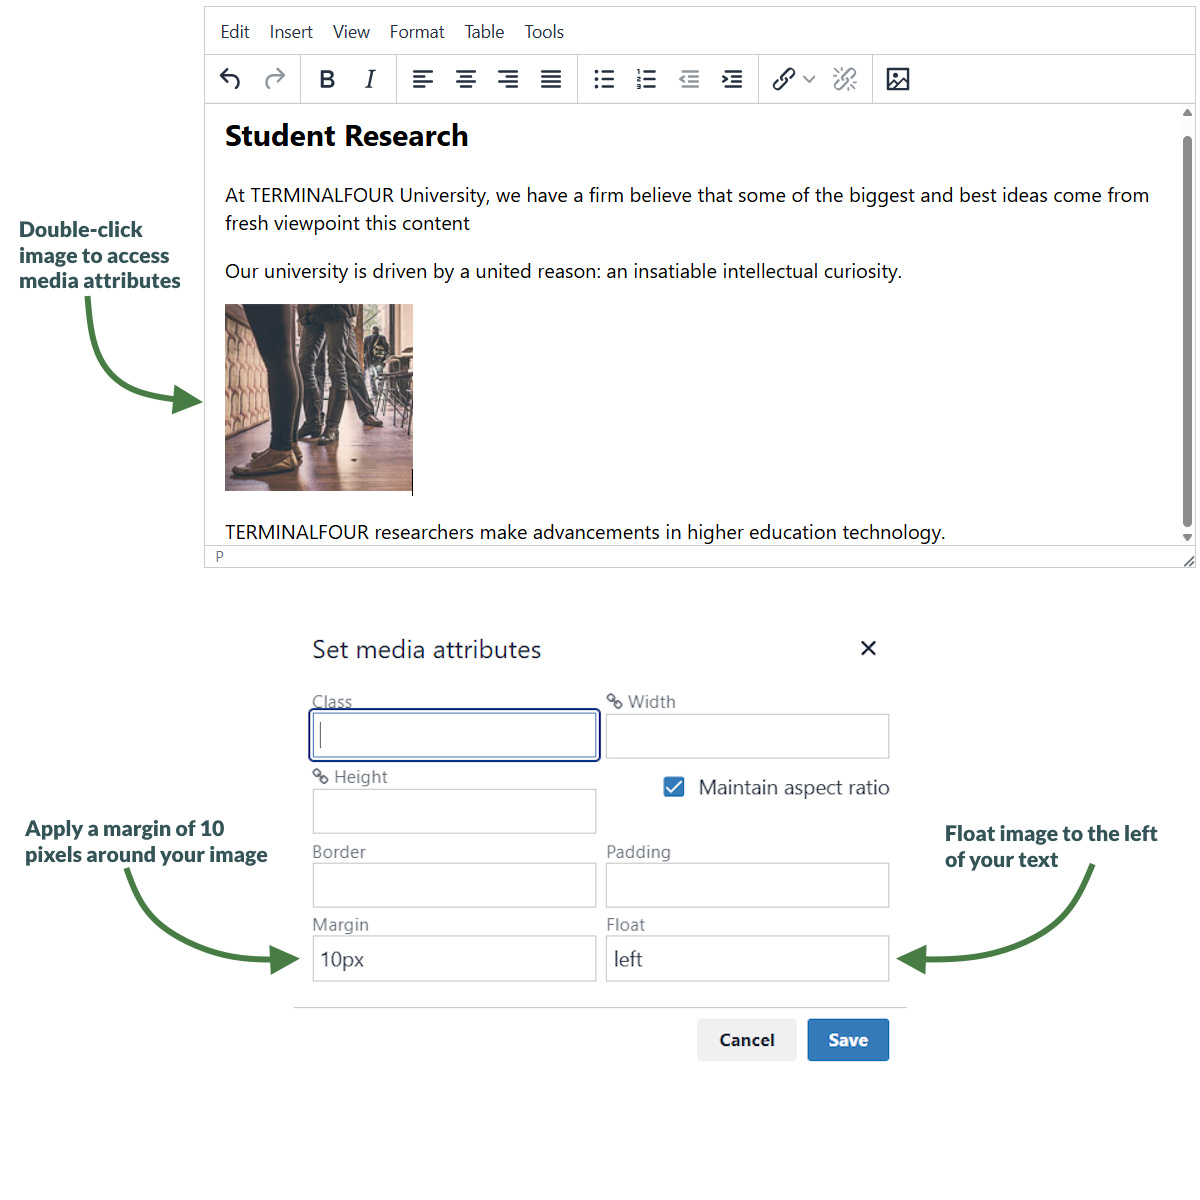
- Once the image is in the editor, double-click the image to explore what attributes are available.
How to set media attributes
The attributes available in your Terminalfour instance may differ from the ones shown here.
Double-click your image to explore what attributes are available.
- The image (or image variant) has been inserted in your content. If your Media Type Layout for images contains "style" options, you can set those from the content.
- Double-click on the image to Set Media Attributes.
- Specify the values you wish to set. In the example above, a margin of 10px has been set, and the image has been set to float left (wrapping the text around the image with the image floating to the left).
- Click OK to return to the content screen.
- Click Save changes to save the changes made to the content.
Upload and use a PDF
- You can upload a PDF to the Media Library, use it in your content and edit the Media Attributes.
- Edit your content.
- Open the Media Library and locate your category.
- Upload a PDF and add a link to it.
How to upload a PDF
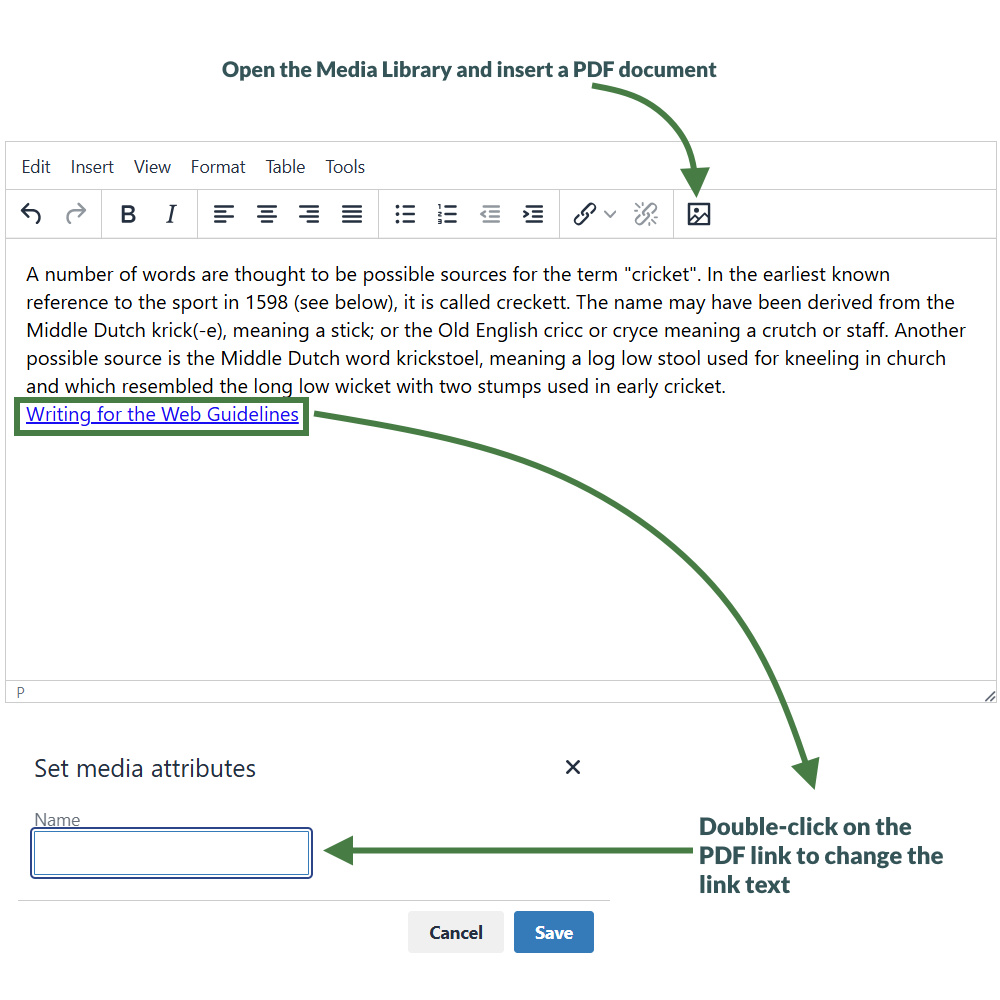
- To add a PDF link to your content, click where you want the link to be and click the Media Library icon.
- The Media Library opens. Locate the Category you wish to add the PDF to and click on it.
- Click +Add Media (the use of Name, Description and Keywords is dependent on your Media Library's configuration):
- Media file: click here and select the relevant PDF.
- Media type: this is automatically detected where possible. Alternatively, select the Media Type you want to use.
- Name: enter a name for your PDF. By default, this is used as a name in the Media Library to allow easy identification and serves as the link text in your content.
- Description: give your PDF a description; by default, the description of PDF’s is for internal use and does not appear on your webpage
- Syntax highlighting language: for non-binary files you can select what syntax highlighting to use (if any).
- Media language dependence:
- Fully independent: the media is the same in all languages and can hence not be translated.
- Independent media file: the file and thumbnail exist independent of language. Other elements can be modified based on language.
- Fully dependent: all elements depend on language and can be translated.
- Click Save changes to add your PDF document to the Media Library.
- The PDF is ready to be used. Click it to add a link to your content.
- The PDF link has been inserted into your content.
- If you do not wish to use the item’s Name as the link text, double-click on the PDF link text to open the Media attributes.
- In the empty Name element, enter the new link text.
- Click Ok to return to the content screen.
- Click Save changes to save the changes you’ve made.
Mirror and duplicate
- Branches of the Site Structure as well as individual pieces of content can be Mirrored and Duplicated.
- If you Mirror a piece of content, there is only one ID, and any changes made to the content will affect all instances of it.
Mirror Content/Sections Configuration
You can enable/disable the mirroring of sections or content by changing the settings:
Administration > Hierarchy & content settings > Hierarchy > Enable mirroring of sections
Administration > Hierarchy & content settings > Hierarchy > Allow non-mirroring of content
How to mirror/duplicate
Mirror/duplicate content
- Select Edit content from the Actions menu beside the section containing the content you wish to mirror or duplicate.
- Select Mirror or Duplicate from the Actions menu beside the content.
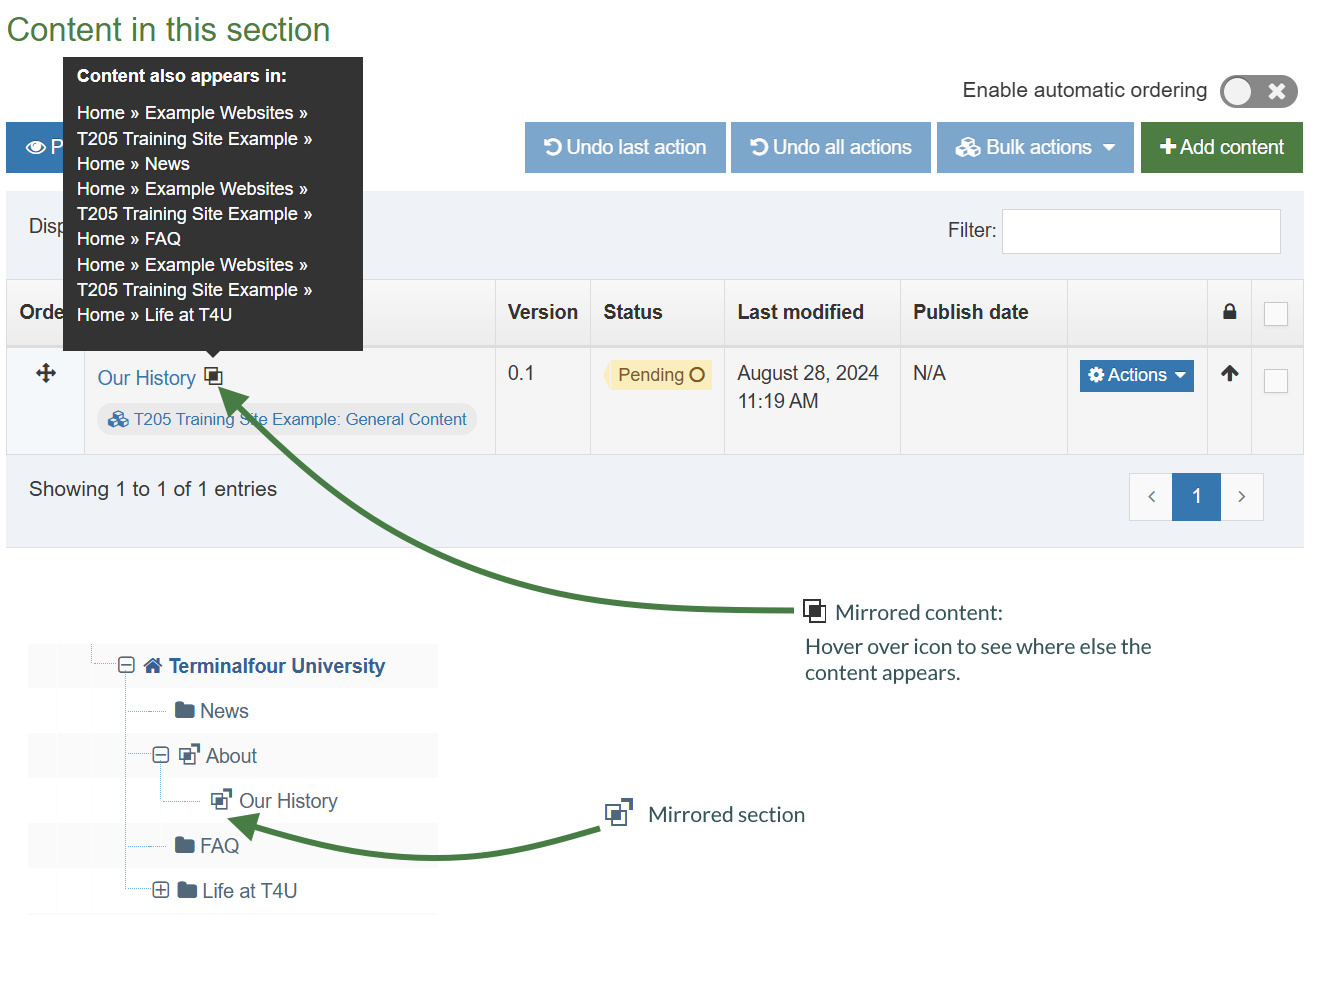
- The Site Structure opens. Click on the Section you wish the mirrored/duplicated content to appear in. A small icon appears beside the mirrored content. Hover the mouse over it to see the various locations of the content. The duplicated content, however, will appear as new content.
Mirror/duplicate branch
- Select Mirror Branch or Duplicate Branch from the Section Drop-Down Menu beside the section containing the content you wish to duplicate.
- Select the Section you wish to place the mirrored or duplicated section under.
- A mirrored section’s folder symbol will have an arrow pointing out for the original section and an arrow pointing in for the new section.
Approve content
- When content is added to Terminalfour, it needs to go through an approval process before it can be published; only published content will be visible on your website.
- The content you have created so far is all pending approval. Ensure your content is approved.
Content status color code
 Approved Content
 Pending Content
 Inactive Content
How to approve content
- To approve content, go to Content > Approve content.
- There are three tabs available to you; Pending, Inactive, and Workflow.
- The Pending tab will contain a list of content you can approve; you can sort by name, priority, or last modified. Hover your mouse over the section breadcrumb to see the exact path to the content.
- The Inactive tab will contain a list of any content which has been set as Inactive.
- The Workflow tab will list details of all content currently in a Workflow Queue.
- From within the Pending tab; click the name of a piece of content to check the details.
- Preview the content by clicking on a channel from the Published Channels list.
- Click Show History to view any previous versions of the content.
- Click Edit if you wish to make changes to the content.
- Click Approve if you are happy to approve content; otherwise, click Reject.
- When content has been rejected, a Reject Reason can be added to explain the decision.
- Once content has been approved, it will disappear from the main list.
- In the Site Structure, the approved content appears in the green column
Feedback survey
Congratulations on completing the Terminalfour for Content Editors course.
Please provide feedback in our on-line survey.