
Outputting Terminalfour Content as JSON
- Last Modified:
- 17 Aug 2026
- User Level:
- Administrator
- Complexity:
- Advanced
Preparing your content for a headless use-case
Terminalfour can be used as a headless CMS by publishing your content as structured JSON. This guide walks you through how to configure your site to be output as structured data so that it can be consumed anywhere.
The basic approach is:
- Create a Custom Handlebars Helper to produce the JSON structure you need.
- Create a Page Layout that uses the helper.
- Create a Channel configured to publish JSON.
- Publish the Channel.
- Consume the resulting JSON from your application.
The result is a published JSON endpoint that can be requested by a website, application or other digital experience.
Terminalfour Channels can publish formats including JSON, so a headless implementation does not require a separate API server simply to expose published content.
You also don't need to update all your Content Types to include a JSON layout. This guide will walk you through how to do this automatically.
This guide assumes you are comfortable working with Handlebars and JavaScript. If you're new to Handlebars, start with Getting Started with Handlebars before continuing
This guide assumes you have an existing Terminalfour Channel with content and want to also publish that same content out as structured JSON.
1. Create a Custom Handlebars Helper
Terminalfour includes a large number of built-in Handlebars Helpers. However, a custom helper allows you to define exactly how your content should be represented in JSON.
Custom Helpers are JavaScript functions that extend the functionality available to your Handlebars layouts. You can learn more about how to create Custom Helpers in our dedicated guide.
For this example, we'll create a simple helper called jsonContent.
The helper will process the content item and will output all of its elements as a JSON object. All elements will be output escaped and safe for JSON automatically. Date elements will output as ISO dates. List elements will be output as an array with an object for each selected item.
The resulting JSON object will also include the Content ID so you can use it for reference if required.
Navigate to the hidden section where Custom helpers are managed and create a new content item.
Name: jsonContent
Function Code:
function (context, options) {
try {
var contentAPI = apis.getContent();
var elementAPI = apis.getElement();
var mediaAPI = apis.getMedia();
var fileAPI = apis.getFile();
var content = contentAPI.get();
if (!content.exists()) {
log.warn("allElementsAsJson: No currently publishing Content Item found.");
return "{}";
}
// Escape a string value for safe inclusion in JSON
var StringEscapeUtils = Java.type("org.apache.commons.lang3.StringEscapeUtils");
var DateTimeFormatter = Java.type("java.time.format.DateTimeFormatter");
function jsonEscape(str) {
if (str === null || str === undefined) {
return "";
}
return StringEscapeUtils.escapeJson(str.toString());
}
// Convert a single PDElement into a JSON string value
function elementToJson(element, elementName) {
try {
if (!element || !element.exists()) {
return '""';
}
// Repeater -> JSON array of objects
if (element.isRepeaterElement()) {
var repeaterItems = elementAPI.getRepeaters(elementName);
var parts = [];
for (var i = 0; i < repeaterItems.size(); i++) {
parts.push(buildContentJson(repeaterItems.get(i)));
}
return "[" + parts.join(",") + "]";
}
// Media -> resolve using the path/* layout
if (element.isMediaElement()) {
var mediaId = element.toMediaElement().getMediaId();
var mediaVal = mediaId > 0 ? mediaAPI.process(mediaId, "path/*") : "";
return '"' + jsonEscape(mediaVal) + '"';
}
// File or Image element -> publish the file to get its path
if (element.isFileElement()) {
var filePath = fileAPI.publish(elementName);
return '"' + jsonEscape(filePath) + '"';
}
// List element -> output array of {name, value} objects
if (element.isListElement()) {
var selected = elementAPI.getSelected(elementName);
var listParts = [];
for (var li = 0; li < selected.size(); li++) {
var entry = selected.get(li);
var entryName = entry.get("name") || "";
var entryValue = entry.get("value") || "";
listParts.push('{"name":"' + jsonEscape(entryName) + '","value":"' + jsonEscape(entryValue) + '"}');
}
return "[" + listParts.join(",") + "]";
}
// Date element -> output as ISO date
if (element.isDateElement()) {
if (!element.hasValue()) {
return '""';
}
var dateVal = element.toDateElement().getDate();
var isoDate = DateTimeFormatter.ISO_DATE_TIME.format(dateVal);
return '"' + jsonEscape(isoDate) + '"';
}
// All other elements -> use elementAPI.publish() which returns a String
var published = elementAPI.publish(elementName);
return '"' + jsonEscape(published) + '"';
} catch (elErr) {
log.error("allElementsAsJson: Error processing element '" + elementName + "': " + elErr);
return '""';
}
}
// Build a JSON string for a Content Item
function buildContentJson(contentItem) {
var pairs = [];
pairs.push('"contentId":' + contentItem.getId());
var elements = contentItem.getElements();
var it = elements.entrySet().iterator();
while (it.hasNext()) {
var entry = it.next();
var name = entry.getKey();
pairs.push('"' + jsonEscape(name) + '":' + elementToJson(entry.getValue(), name));
}
return "{" + pairs.join(",") + "}";
}
return buildContentJson(content);
} catch (e) {
log.error("allElementsAsJson: Unexpected error building JSON output: " + e);
return "{}";
}
}
Save and approve the new helper.
2. Create a Page Layout
The next step is to create a Page Layout that outputs the JSON generated by your helper.
Go to Assets → Page Layouts → Add new layout
- Give the layout a descriptive name and description, such as: "Headless JSON"
- Ensure the processor is set to Handlebars Page
Now we can add some code in the "Header Code" tab that will be responsible for outputting the page details and content as JSON.
{
"sectionName": "{{{jsonString (sectionName)}}}",
"sectionId": "{{sectionId}},
"content": [
{{#each (contentInSection)~}}
{{{jsonContent}}}
{{~#not @last}},{{/not~}}
{{~/each}}
]
}
The "Footer Code" can be left blank.
Save the Page Layout.
What does this code do?
For each page that publishes using this layout, it will output a JSON object. That JSON object includes the section name (and we use the jsonString helper to ensure it's safe for json output).
We also output the section ID.
Finally we output an array of content using the contentInSection helper alongside our newly created custom helper.
The not helper ensures we don't output a trailing slash at the end of the array.
3. Create a Channel
Next up we need to create a channel that will be used to output our site using this new Page Layout. The Page Layout defines what the JSON looks like. The Channel defines where and how it gets published.
The benefit of doing this in a standalone channel is that you can schedule the publish at a different frequency to your main site publish if required.
Navigate to System Administration → Set Up Sites & Channels → Channels
Select "Create new channel"
| Option | Value |
|---|---|
| Name | <Descriptive name of your choosing> |
| Description | Outputs the main channel as structured JSON |
| Type | dev/null (ensure you add a value that doesn't exist on any of your content types) |
| Root Section | Select the same root section as your main channel |
| Content languages | Select the same values as your main channel |
| Output directory | Match the value from your main channel |
| Default filename | index.json |
| Base HREF | Match the value from your main channel |
| Site Root | Match the value from your main channel |
| Channel Publish URL | Match the value from your main channel |
| Path conversion | Match the value from your main channel. Lower case is recommended |
| Convert spaces in | Match the values from your main channel |
| File part separator | Match the value from your main channel |
| Page Layout | Select the Page Layout you created in Step 2 above |
| Inheritable Page Layout | Select the Page Layout you created in Step 2 above |
| Publish options | Ensure "Publish empty sections" is checked |
Under Fulltext details you can set the following:
| Option | Value |
|---|---|
| Type | dev/null (ensure you add a value that doesn't exist on any of your content types) |
| File extensions | json |
Under Publish options ensure the following is set
| Option | Value |
|---|---|
| Enable channel cleanup | Checked (Enabled) |
Save the newly created channel.
Reset content on the channel
Once the channel has been saved, click the "Actions" button next to your new channel and select "Reset content".
Leave all the content selected and confirm the modal with the Reset content button.
Important: Skipping this step will mean no content will be assigned to this channel and therefor won't publish.
4. Publish the channel
Once the helper, Page Layout and Channel have been configured, you're ready to publish.
The first time you publish the channel, ensure the options "Publish archive sections" and "Override publish period restriction" are both selected.
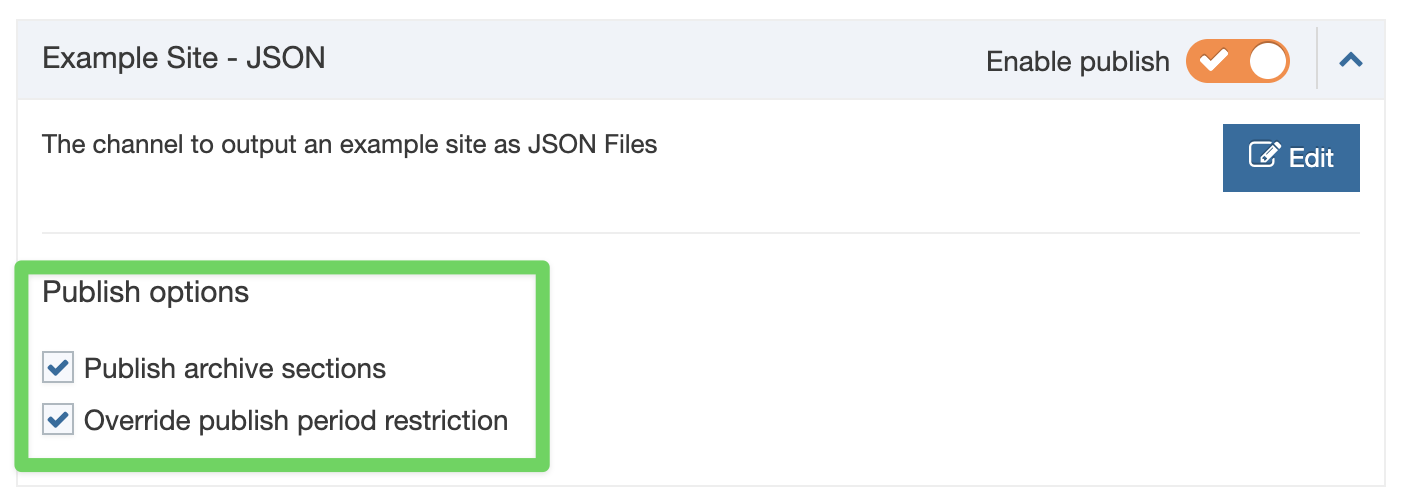
This ensures that Publish cleanup can function properly for the channel.
Once the publish completes you can visit your existing pages as normal (e.g. https://example.com) but if you add index.json to the URL, you'll get a JSON representation of that same content (e.g. https://example.com/index.json).
5. Query the published JSON
Once your JSON has been published, any application that can make an HTTP request can consume it.
For example, JavaScript could retrieve a published course:
const response = await fetch(
'https://example.com/courses/history/index.json'
);
const course = await response.json();
console.log(course.sectionName);
The application doesn't need to know anything about Terminalfour.
It simply requests JSON from a URL and receives structured content.
This is the key principle behind using Terminalfour headlessly: Terminalfour manages and publishes the content; the consuming application decides what to do with it.
Back to top