Social poster
Description
With Social Poster you can post short messages from Content Items to:
Posts usually contain a short description and a link to the page containing the Content Item.
To ensure the full use of this feature, check that the server running Terminalfour has web access. Social Poster must be able to access the live content and it needs access to Twitter and Facebook for authentication and to send the post.
- For Twitter, you'll need a Twitter account to create the Twitter app used for sending posts
- For Facebook, a Facebook account is required to create the Facebook app that is used to send posts
- For LinkedIn, a LinkedIn account is required to create the LinkedIn app that is used to send posts
Ensure you have an accurate time source on this server as access tokens are time-sensitive.
After you create an app, the API keys required by the Social Poster will be generated,
How to work with the Social Poster
When you want to publish content to be published on Facebook, Twitter, or LinkedIn, go to System Administration > Set up sites & channels > Social poster. You'll need to create the accounts.
To set up an account you should:
- Go to the Setup tab and add your API keys
- Create a new account
You can use the +Create new account to add a new account
Accounts
From this tab, you can manage accounts and review status.
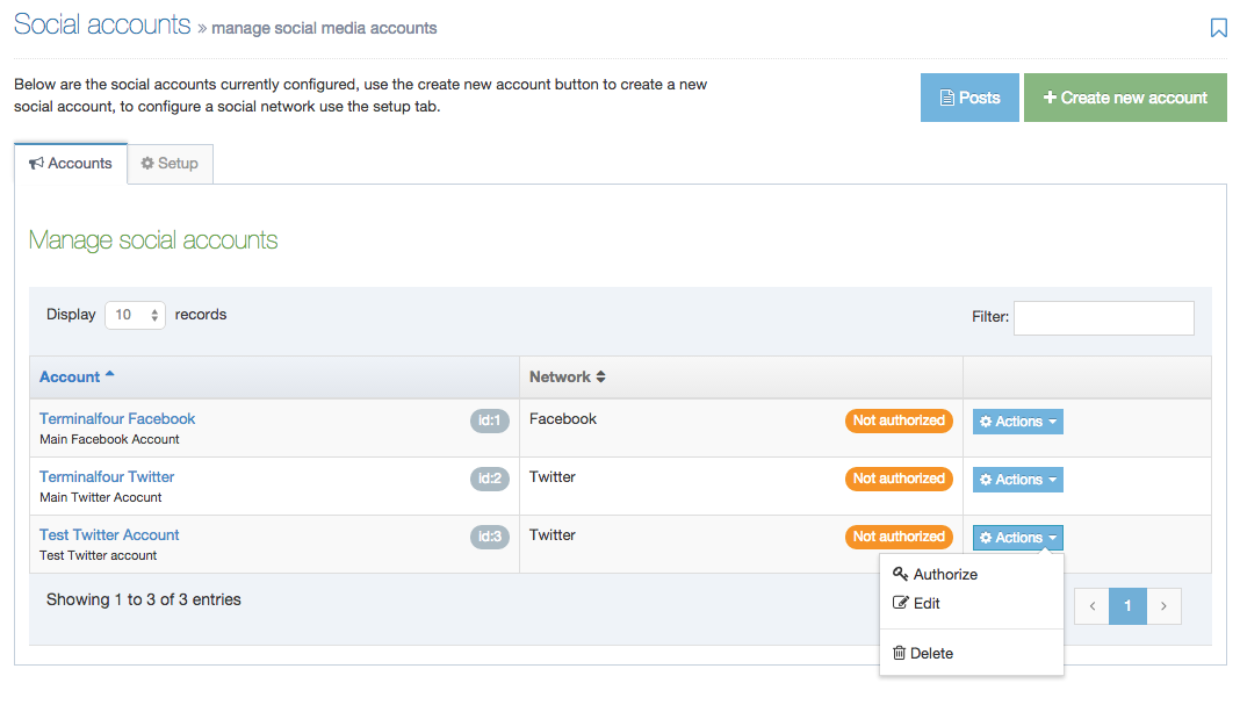
Here's an example of the screen with all three types of social network accounts configured:
In the first column of the list is Accounts. The contents of this column are the Name of the account. A brief description can be included if an entry was made. Use the arrow button in the head row to change the list displayed from an A to Z list to Z to A list. There is also an ID number. The ID is assigned when you create a new account.
Network
This is a list of associated networks used with the name of the account - they are listed as Facebook, Twitter, or LinkedIn. Each box shows the network name and the status of the post. The status can be:
| Name | Description |
|---|---|
| Not authorized | The post has been created but not authorized |
| Authorized | The post has been created and is authorized to release |
| Pending | The post has been creeated |
Use the arrow button in the head row to change the list displayed from an A to Z list to Z to A list.
Actions
In the column with Actions buttons, you can use the drop-down list to choose actions to take with the Account in the row.
- You can Authorize the release of a message from that account.
- If you click Edit, this takes you to the corresponding Account page where you can confirm or edit the fields on that page.
- You can Delete an account. If you choose to delete an Account, you are challenged with a confirmation box - see below. Confirm your selection to Cancel or Delete.
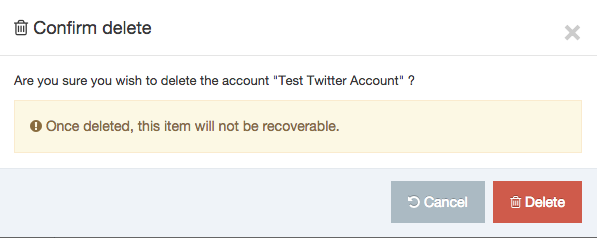
Deleted accounts are not recoverable.
Setup
Before you can authorize a network you must first add the API keys for the network(s) you'd like to add.
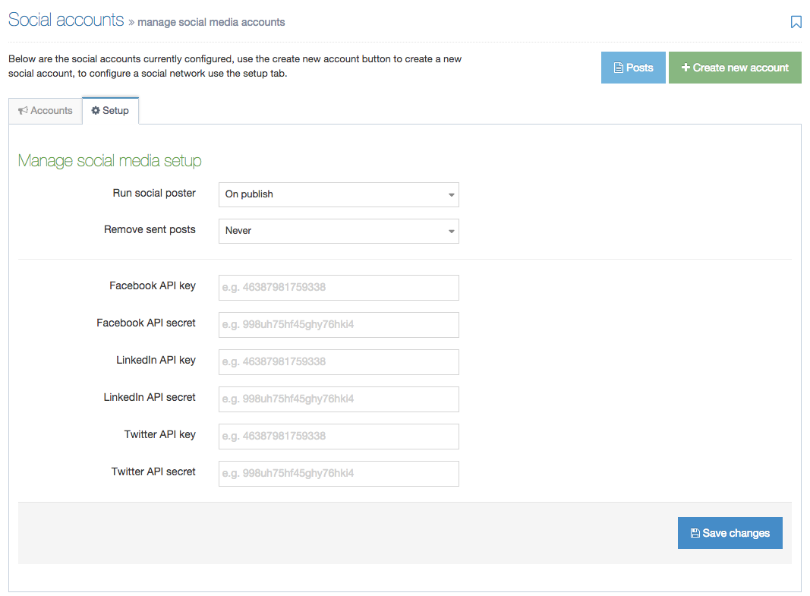 Run social poster
This dropdown allows you to set how often posts are sent to the specified social network(s). The options are:
| Name | Description |
|---|---|
| Never | Social Poster will never automatically send posts to any network. |
| On Publish | The post will be sent as soon as the content is published |
| Every # hour/minute | Social Poster will run at the specified interval minute |
Remove sent posts
This dropdown allows you to set when sent posts are removed from the system completely. The options are:
| Name | Description |
|---|---|
| Never | Always keep sent posts |
| Every day | Sent posts over one day old will be removed |
| Every 3 days | Sent posts over three days old will be removed |
| Every week | Sent posts over a week old will be removed |
Add the account key and secret
For each network, you need an account to get developer information to create an app for sending posts.
When all entries are complete, click Save changes.
+ Create new account
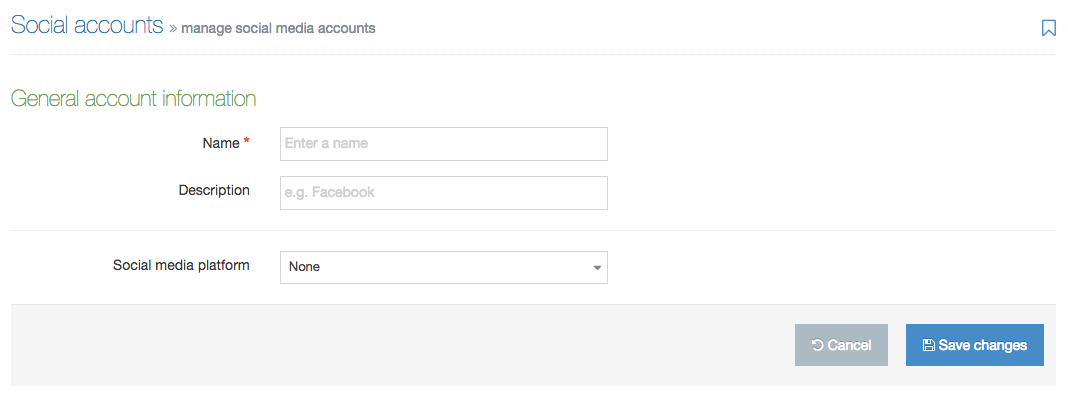
1. To create a new account, from the start page, click the green + Create new account button > General account information
2. Enter the Name of the account - each account must have a name – this is required
3. Enter a Description - you can choose to enter a description or wait till a later date when you can add or edit a description.
4. Choose from the drop-down list for a Social media platform - you can choose Facebook, LinkedIn, or Twitter.
5. If you are satisfied with your entries, click Save changes. If you click Save Changes, this returns you to the start page.
6. After the account is added, select the Authorize option from the Actions dropdown to authorize the account. This will open a prompt to login to the social media account to authorize the app created above for the account. For Facebook, you will need to log in as a user who has access to post as the page that is posting the content i.e. a user who is able to post content as the page.
The T4 Social tag
Insert the T4 Social tag into the Content Layouts of the Content Type to automatically post the content to social media.
Post information
Once posts have been sent to the Social poster, they are listed when clicking on the +Posts button (blue). The post information is shown by choosing Actions > View details or click directly on the post.
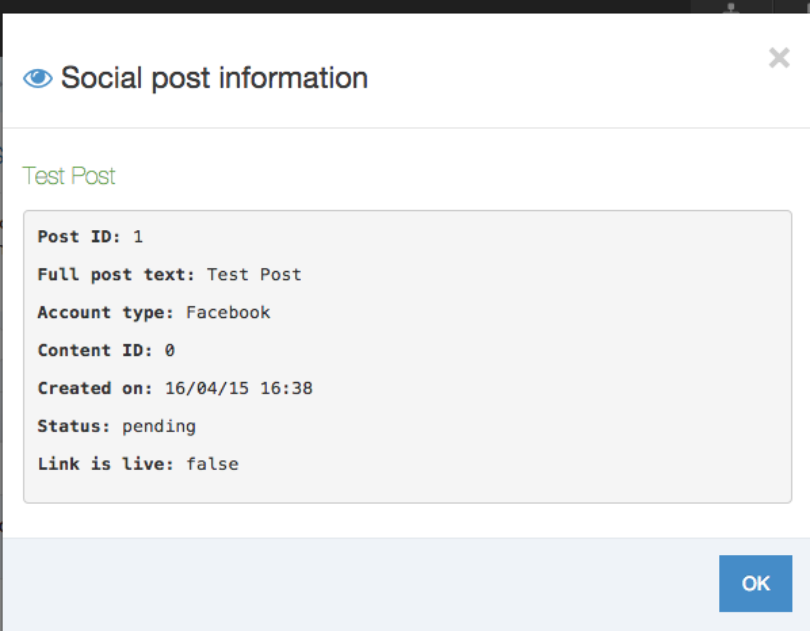
1. This page displays:
- Post ID
- Full post text
- Account type
- Content ID (from where the post was generated)
- Created on date
- Posted on date (if the post has been sent)
- Status (pending, error or sent).
2. There is a link to the post, whether the link is live or not and you can view any errors that could be associated with the sending of this post.
3. Click OK or close when finished.
Example uses
A. News content type
1. Create a new content type called News, go to Assets > Content Types > Create New.
2. Create two elements, Post text and Full article and click Add content type.
3. For the text/html layout enter the following code: (NOTE: with Twitter you have 140 characters only, so setting the length of the template to 120 would be advised.)
4. This is a link to the fulltext layout.
5. Create a new layout called text/fulltext and enter the following code:
<t4 type="social" post_element="Post Text" account_identifier="Account" base_url="http://www.baseurl.com" resource="" post_type="post" expires="1" />
<h1><t4 type="content" name="Post Text" output="normal" modifiers="" /></h1>
<t4 type="content" name="Full Article" output="normal" modifiers="" />
6. This outputs the Post text as a heading and the full version of the article underneath.
7. Update the account_identifier to match one of the added accounts.
8. Enable this Content type on a section, add some content using it and publish.
9. You should see a new post has been added as Pending.
Special Notice content type
1. Create a new content type called News, go to Assets > Content Types > Create New.
2. Create two elements, Post text and Full article and click Add content type.
3. For the text/html layout enter the following code:
<p><a href="<t4 type="content" name="Post Text" output="fulltext" modifiers="" />"><t4 type="content" name="Post Text" output="normal" modifiers="" /></a></p>
4. This is a link to the fulltext layout.
5. Create a new layout called text/fulltext and enter the following code:
<t4 type="social" post_element="Post Text" account_identifier="Twitter Account" base_url="http://www.baseurl.com" resource="" post_type="post" expires="1" />
<t4 type="social" post_element="Post Text" account_identifier="Facebook Account" base_url="http://www.baseurl.com" resource="https://graph.facebook.com/321844344589231/feed" post_type="post" expires="1" />
<h1><t4 type="content" name="Post Text" output="normal" modifiers="" /></h1>
<t4 type="content" name="Full Article" output="normal" modifiers="" />
6. This outputs the Post text as a heading and the full version of the article underneath.
7. Update the identifier to match one of the added accounts.
8. This will post to 2 accounts, you could have many accounts in one layout.
9. Enable this Content type on a section, add some content using it and publish.
10. You should see a new post has been added as Pending.

