Transfer Sites
Description
With Transfer to Live you can transfer a Channel's published output to a web server other than the server running TERMINALFOUR. Typically Transfers are used to copy a site from a staging server. For example, a Channel might first publish your site to the same server that TERMINALFOUR is hosted. Using Transfer to Live, the site can then be published, manually or at scheduled intervals, to a remote server using the common web protocols, FTP, FTPS, SFTP and SCP. Additionally, Transfer to Live can be deployed as part of your disaster recovery or load balancing strategy where a duplicate of the site is generated on a schedule.
Transfers can be scheduled using the Task Scheduler (System Administration > Task Scheduler) and you can also schedule Transfers using Transfer to Live. If a schedule has not been created for a Transfer Site or you would like to manually run a Transfer outside the scheduled interval then you can use Transfer to Live.
How it Works
To use Transfer to Live, System Transfer Settings must be configured in System Settings.
Before Transferring a site, a transfer site must be created and configured.
Getting Ready to Transfer
To use Transfer to Live, a Channel, the System Transfer settings and a Transfer Site must be configured first:
Adding a Transfer Site
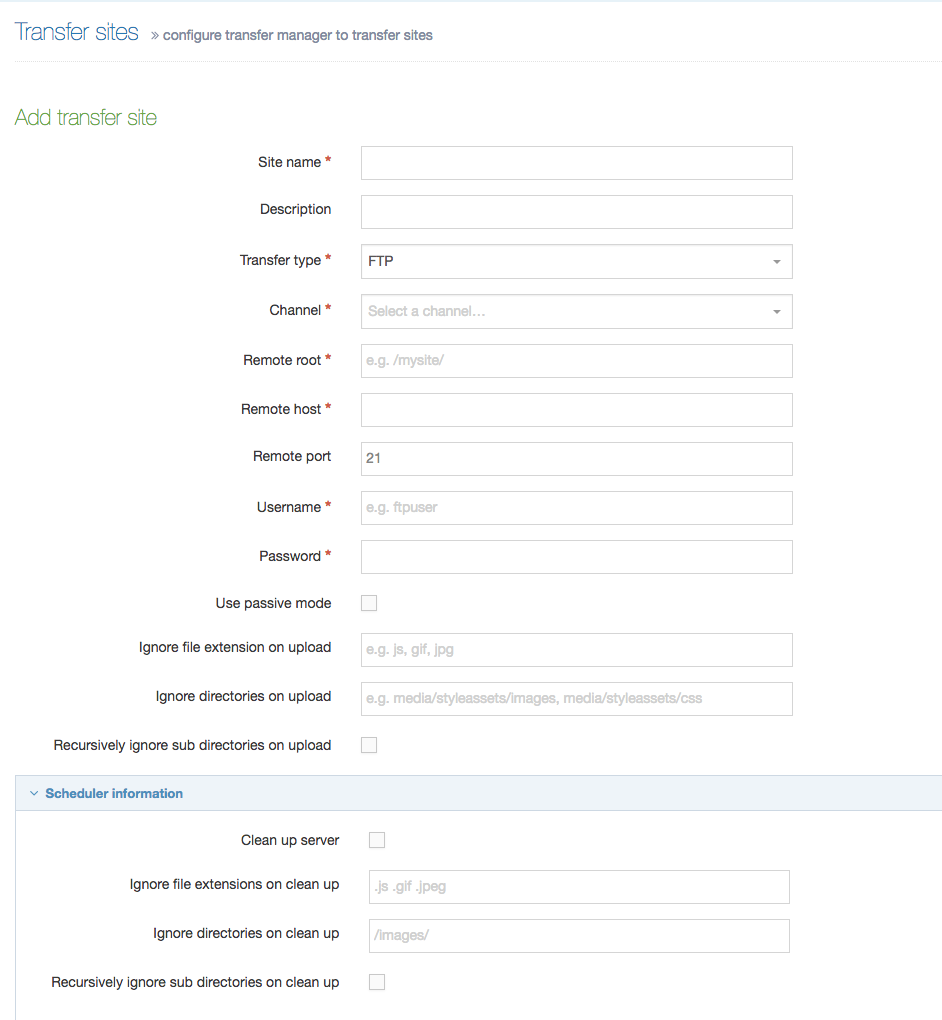
To configure a Transfer Site go to System Administration > Set Up Sites & Channels > Transfer Sites. You will provide:
| Item | Description |
|---|---|
| Site Name* | Required field. Provide a meaningful name to identify the Transfer Site when listed on the Transfer to Live screen. |
| Description | The description will accompany the name in the Transfer to Live screen. |
| Transfer Type* |
The method of transfer to use:
|
| Channel* |
Sets the publish Channel to be transferred. |
| Remote Root* | Sets the location of the site root directory on the remote server. TERMINALFOUR will not create this directory so it must be present on the server before running the Transfer. |
| Remote Host* | Specifies the hostname or IP of the remote server. |
| Remote Port | Sets the port number to use.
|
| Username | Sets the username. |
| Password | Sets the password. |
| Use Passive Mode |
Using Passive Mode is recommended. When enabled the client sends the PASV command to the server, and the server responds with an address. The client then issues a command to transfer a file or to get a directory listing and establishes a secondary connection to the address returned by the server. Using Active Mode, the client opens a socket on the local machine and tells its address to the server using the PORT command. After the client issues a command to transfer a file or listing, the server connects to the address provided by the client. |
| Ignore file extension on upload | Enter a comma-separated list of file extensions to ignore. When a sync is run, files with these file extensions will not be transferred. |
| Ignore directories on upload | Enter a comma-separated list of directories to ignore. When a sync is run, these directories are not transferred. The directory path should be the path to the specific directory, relative to the site root. |
| Recursively ignore subdirectories on upload | The subdirectories of the directories specified will not be transferred. |
| Clean Up Server | Runs the cleanup for each scheduled transfer of the site. |
| Ignore file extensions on clean up | Enter a comma-separated list of file extensions to ignore. When a sync and cleanup is run, files of these file extensions are not deleted. |
| Ignore directories on clean up | Enter a comma-separated list of directories to ignore. When a sync and cleanup is run, these directories are not deleted. |
| Recursively ignore subdirectories on clean up | Ignores the subdirectories of the directories specified. They are not deleted. |
| Backup directory |
Sets the backup directory to use on the remote server, example: /backup/. Place this outside of the Remote root and the user specified in Username must be granted access to this folder. TERMINALFOUR will not create this directory - it needs to be created on the server before running the transfer. The Backup directory option was removed in TERMINALFOUR 8.1.9.7.
|
|
Scheduler Information | |
| Clean up server | Runs the cleanup for each scheduled transfer of the site |
| Ignore file extensions on clean up | Comma-separated list of file extensions to ignore. When a sync and cleanup is run, files of these file extensions are not deleted. |
| Ignore directories on clean up | Comma-separated list of directories to ignore. When a sync and cleanup is run, these directories are not deleted. |
| Recursively ignore subdirectories on clean up |
Ignores the subdirectories of the directories specified. They are not deleted. |
The Debug transfer cleanup configuration option in Advanced Configuration can be used to assist with troubleshooting of any issues.
After your site is created, you can run a transfer of the site and/or schedule a transfer of the site.
The email addresses that will receive error and success messages are configured in the Task Scheduler, under Recipients.
Setting up Transfer to Live
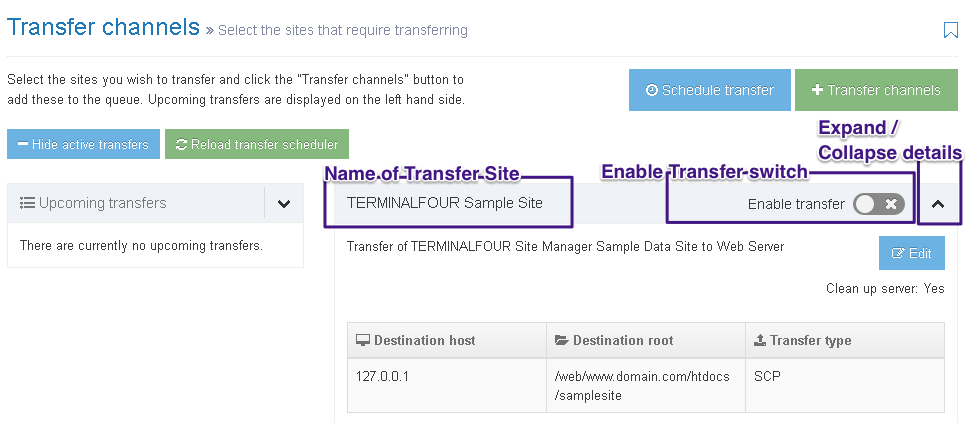
On the Transfer to Live screen (Sites & Channels > Transfer to Live), the Upcoming Transfers are listed in the box on the left. The two buttons above it are:
- Hide active transfer - toggles the visibility of the Upcoming transfers box
- Reload transfer scheduler - reloads the list of Upcoming transfers
All configured Transfer Sites are listed in the box on the right. You'll need to activate the Enable Transfer switch to schedule a transfer or initiate a transfer with the buttons above:
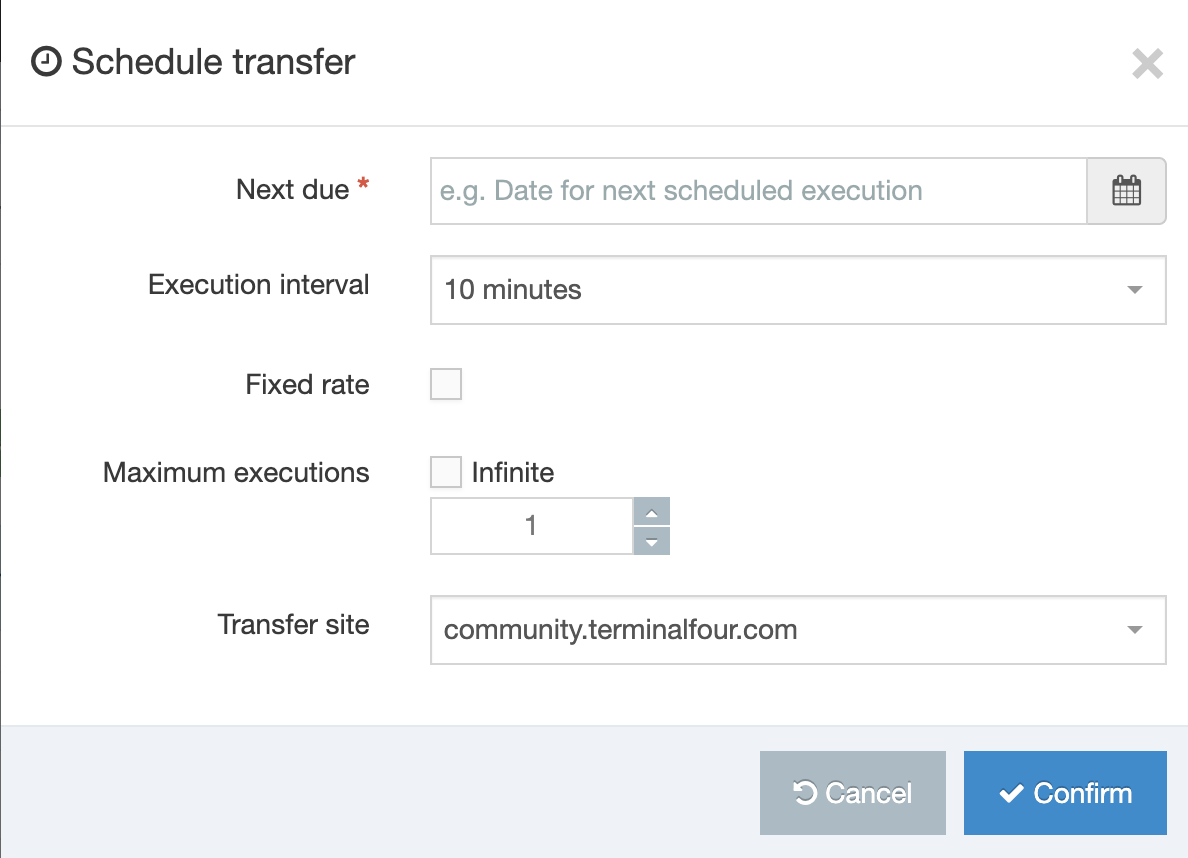
- Schedule transfer - displays a modal window where you can select the Channel that is to be transferred and the date and time that the next Transfer for that Channel occurs. A Transfer can execute just once or recur at set intervals ranging from 10 minutes to 1 week
- Transfer channels - moves queued transfers to Upcoming transfers. Only files with the Enable transfer button engaged will be moved
If you need to change any of Transfer Site settings such as server or authentication details, you can select the Edit button.
Scheduling a Transfer
When Schedule Transfer is selected the following pop up appears:

| Item | Description |
|---|---|
| Next due* | Set the date and time for the next/first execution of the task. Select the field to open the calendar/clock and make your settings. |
| Execution Interval | Select the frequency of the scheduled transfer. You can choose from the drop-down list of times (Once, minutes, hours, days, up to 1 week). |
| Transfer Site | Set the site to transfer. Choose from the drop-down list. |
When you have entered the settings, click Confirm. When successful, a green confirmation banner appears (shown below).

The Transfer Channel will be added to the schedule.
Transferring a Channel without Scheduling
Step 1
When your Channel is ready to Transfer you can choose to put it in the Transfer Queue without making a schedule.
Step 2
To do this, ensure you have enabled the Transfer button on the Channel. Remember, when enabled, the button is orange in color and displays a tick mark.
Step 3
Select Transfer Channel. When successful a green confirmation banner appears (shown below)

Step 4
The Channel being transferred now appears in the Upcoming Transfer Queue.


