Preview & Publish Settings
Description
To configure the preview and publish settings go to System administration > System settings > Preview & publish.
General settings
General publish preview
| Item | Description |
|---|---|
| Enable full filenames | To enable full filenames, enter a value of "true". when enabled, the name of the uploaded file is used as the name of the file on the published site. When not enabled, the name of the file on the published site is the file ID, example: 12344. |
| Avoid filename clashes | Renames duplicate files on publish to avoid filename clashes, e.g. myfile.pdf and myfile-1.pdf |
| Allow advanced options for scheduled publishes | Enables scheduled publishes to be run with advanced options (publish archive sections, publish microsites, publish pending version etc.) |
| Generate media categories | Publishes the media library directory structure to match the media category structure. Unchecked, all published media is published into one directory. |
| xhtml-output | Setting this value to "true" results in better adherence to XHTML standards when publishing. It changes the generated HTML to be XHTML compliant and converts a string to a HTML entitised version but it will skip any regular tags in in the code. |
| xhtml-strict-output | Setting this value to "true" results in better adherence to XHTML standards when publishing anchor tags. It changes name attributes to ID attributes for html_anchor and also meta tags (example: <a id="d.en.183"></a> instead of <a name="d.en.183"></a>) |
| Show pending sections in preview | Displays pending sections in preview |
|
When enabled, if a section has Access Control enabled, only users that have edit rights to a section can preview that section. |
|
| When enabled, all users can only preview sections if they also have edit rights to that section. | |
| Enable "Publish now" functionality | Enables users to publish the individual page. An additional button is added to the interface when creating or editing content, and when editing a section. Access to this feature can be configured at a user level. |
| Number of publish threads | Specifies the number of threads used during publish. Further information on setting the number of publish threads and file writing threads is available. |
| Number of file writing threads | Specifies the number of threads used to write the files to disk. Further information on setting the number of publish threads and file writing threads is available. |
| Maximum size of file output queue | Sets the number of files placed on the file output queue |
| Only write changed pages | Enables the publish of changed HTML files only. Unchecking this may impact performance. |
| Only write changed files | Enables the publish of changed media and files only. Unchecking this may impact performance. |
| Number of scheduled publishes available | Sets the maximum number of scheduled publishes that can be created for each channel. |
| Fulltext publish period | Sets the amount of time between fulltext content publishes. Increasing this value improves publish performance. Only use when fulltext content does not change frequently. This can also be entered for a channel. If entered on both, the channel period is used. |
| Fulltext publish period unit | Sets the unit of measurement for the fulltext publish period. |
| Media output directory | Specifies directory name for published media items. By default, this is called media in the channel root (output directory). |
| t4-cache-pre-gen-preview | Use this feature sparingly as it can cause performance issues. A publish cache is maintained in memory and rebuilt when content is added or edited, guaranteeing accuracy |
| Characters to remove from filenames |
Removes specified characters from filenames (including media) when they are published or when downloading/viewing files. The original name is stored in the database. e.g. xy-34 would remove x, y, -, 3 and 4. On new installs, the following values are added by default: <>&¢£€¥ƒ¤©®™•§-—¶«»€œ¿¡*#@=%:?!{}|^
To avoid media publishing issues, you should consider adding these values if they are not already present. Avoid adding a period (.) to this list since it will result in malformed file extensions – e.g., "myimage.jpg" will be output as "myimagejpg". |
| File part separator |
Specifies the character(s) used to separate filenames. By default, generated filenames are separated by a hyphen, e.g. "my-file.png" unless you have upgraded from version 7.4 where the default will be a comma. From version 8.4.1, you can override this setting on a per channel basis, by setting a different separator character within the channel. |
| Verify folder names | Verifies directory names in a case sensitive manner. This can increase publish time. |
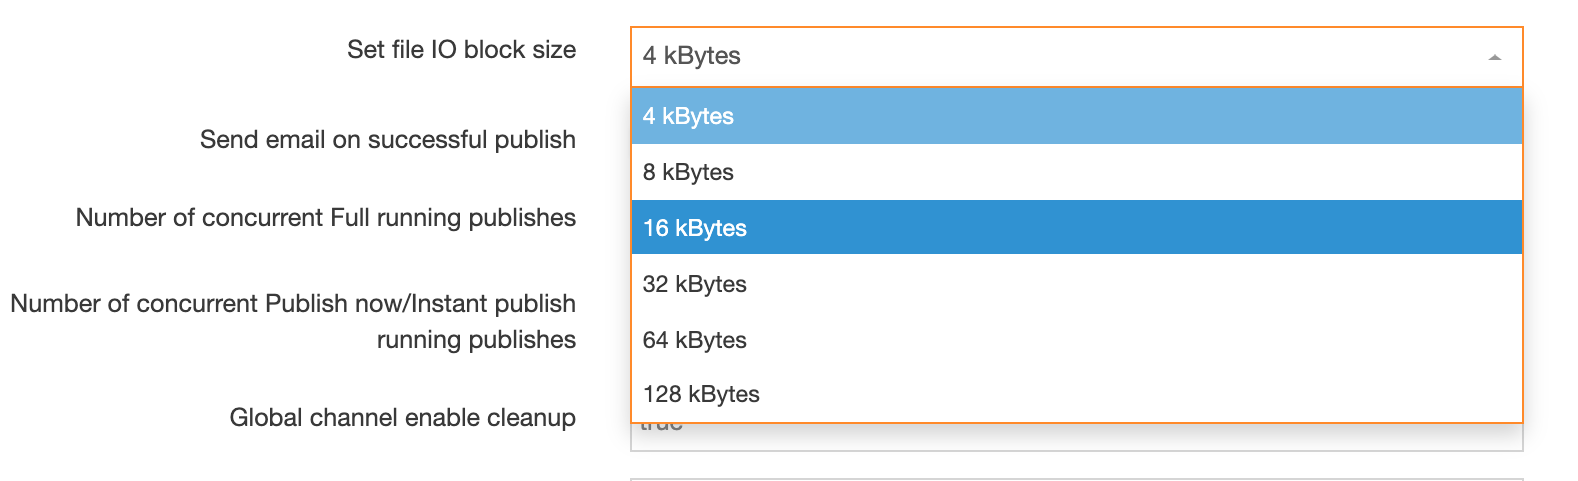
| Set file IO block size | Sets the size of the File IO Block within the application. This should only be modified if you change the System File IO Block size. Further information about determining the setting for the file IO block size is available. |
| Send email on successful publish | Sends an email to the users specified in the scheduler each time a successful scheduled publish is completed |
| Number of concurrent Full running publishes | Specifies the maximum number of full channel publishes that can run concurrently |
| Number of concurrent Publish now/Instant publish running publishes | Specify the maximum number of "Publish now" publishes that can run concurrently |
| Global channel enable cleanup | Setting this value to "true" allows cleanup on channels during publish to remove deleted and moved files. The cleanup needs to be enabled on each individual channel to run.
For this to operate properly, the channel first needs to be published once with the following two options checked. That publish is then used as the baseline for subsequent publishes.
Only files that were referenced during the baseline publish will be removed when they're no longer referenced. Any files already within the published file structure that were not referenced during the baseline publish will not be deleted. |
| Maximum fulltext filename characters | Sets the maximum number of characters for fulltext filenames, including the file extension |
| Enable output to log file during a publish | Outputs the publish logs to a designated directory |
| Log file directory | Sets the directory to output publish logs. The default is the content store directory |
| Enable programmable page layouts | From version 8.3.3 you can enable and disable Programmable Layouts for Page Layouts for all sites published by your instance of Terminalfour. |
| Enable programmable content layouts | From version 8.3.3 you can enable and disable Programmable Layouts for Content Layouts for all sites published by your instance of Terminalfour. |
Diagram explaining max Full Publish threads
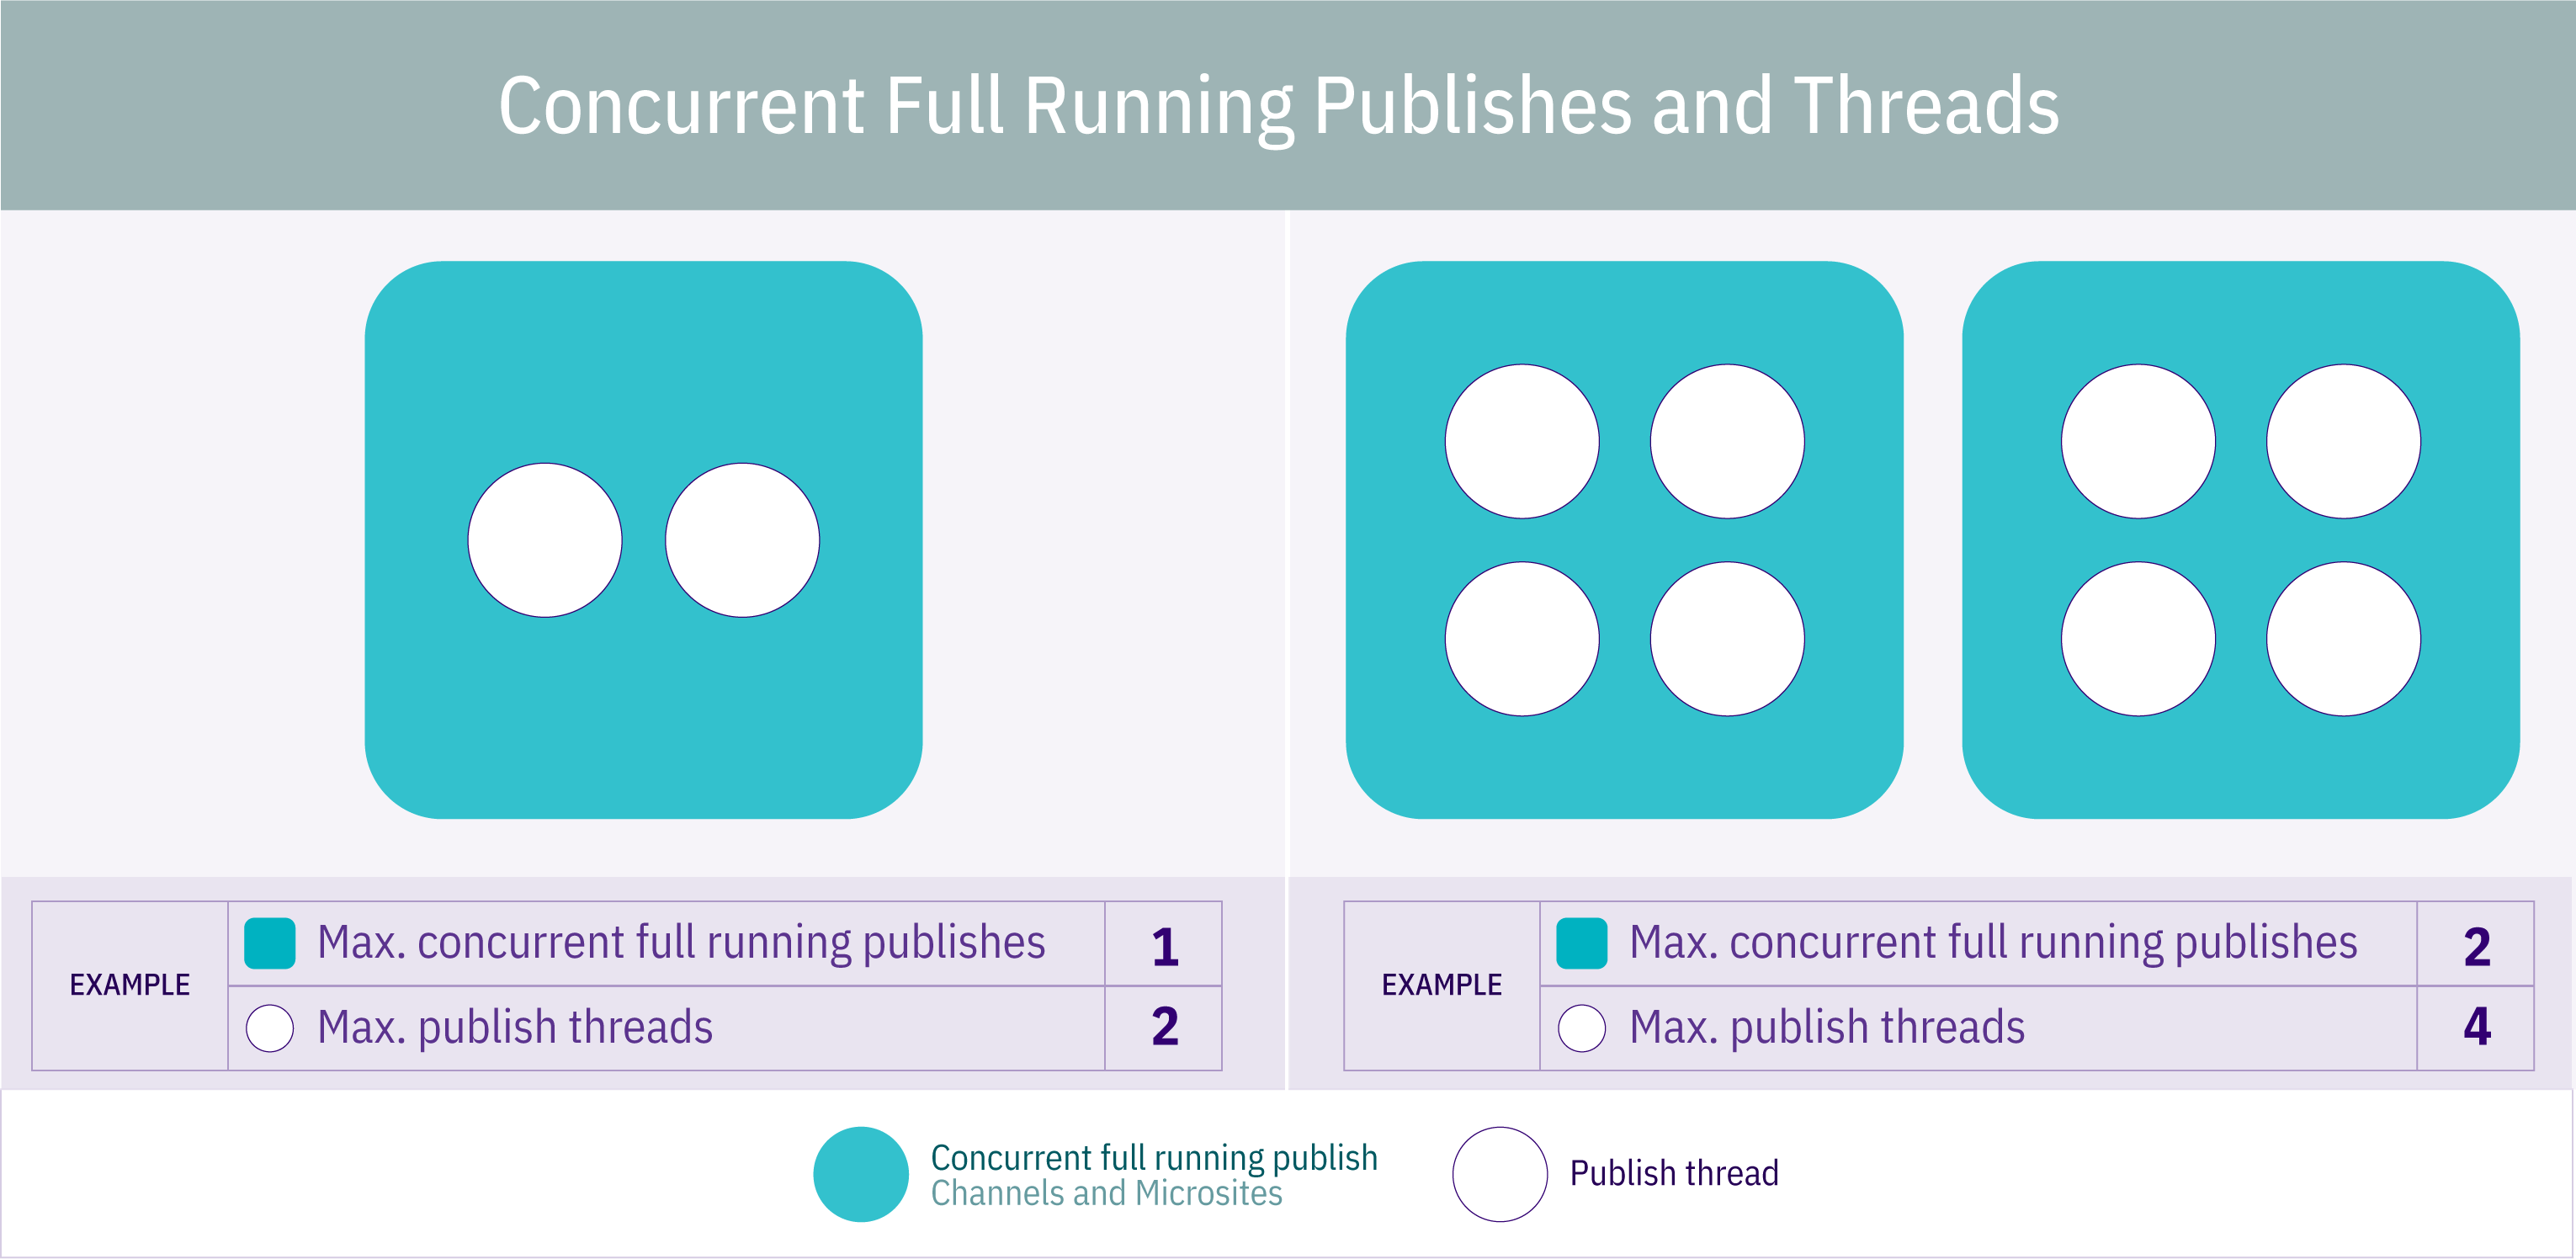
Diagram explaining max Instant Publish settings

Publish notifications
Introduced in version 8.2.9.
| Item | Description |
|---|---|
| Length of time to show publish notifications | Sets the length of time notifications will be shown once a publish finishes. The default is 30 minutes. |
| Number of publish notifications to show | Sets the maximum number of publish notifications that can be shown. The default is 10. |
Instant publish listener
The instant publish listener is event driven, so if any the following actions occur, the listener is notified and a background process is started that triggers the publish:
- Content approved
- Content marked as inactive
- Content reordered
- Content moved
- Content mirrored
- Workflow fast-tracked
| Item | Description |
|---|---|
| Enabled instant publish listener | Enables the instant publish listener and can be configured below |
| Enabled content types | Sets the Content Type(s) to publish instantly once approved. If not specified, all Content Types will be enabled. |
| Publish the section above | Publishes the parent section when the section or content is published. This can be used to update the navigation within the parent section. |
| Enabled channels | Sets the channels to publish instantly. All channels enabled if not specified. |
| Enable batching | Enables bulk processing for batch events. |
| Batch timeout | Sets the number of seconds to wait before processing the batch. |
| Maximum batch size | Sets the maximum number of Content Items/sections in a single batch. |
Ignore Section names on publish per channel
A comma-separated list of Section names that are to be to be excluded from the publish, excluding any space characters before or after the comma. The Sections need to be hidden from navigation.
This feature will not work for Section names that contain commas. It's not possible to escape commas in Section names nor is it possible to change the delimiter.
A use case for this might be that if Sections contain Content Items that are used exclusively for Related Content Navigation Objects, the Sections are likely to be hidden from the Site Structure. The Content Items published on other Sections via the Related Content Navigation Object.
The Keyword Search Content, Pagination and Publish to One File Navigation Objects will not include Content Items from Sections that are listed within this configuration option.
Preview filters
Preview filters allow you to preview code which needs to be executed by the server, e.g. PHP, ASP and JSP.
| Item | Description |
|---|---|
| Name | Give the preview filter a name. |
| File extensions | Comma separated list of file extensions to process with the filter. |
| Filter options | Enables the filter |
| Filter method |
|
| Save directory | If the Filter method is Redirect, this sets the directory where the temporary file will be saved and run from e.g. /user/local/apache/htdocs/preview/ |
| Base URL | If the Filter method is Redirect, this sets the base URL used to preview the page e.g. http://localhost/preview/ |
| Executable | If the Filter method is Pass thru, this sets the path to the file used to preview the page when the filter is enabled e.g. /user/local/php/bin/php |
| Parameter | If the Filter method is Pass thru, this specifies the parameters passed to the command you want to run. The parameters depend on the application specified in the Executable field. |
Setting the number of publish threads and file writing threads
Number of publish threads
Specifies the number of threads used during publish
Number of file writing threads
Specifies the number of threads used to write the files to disk
The default settings for both these fields are 1.
The guideline is, the more the better up to a point, as at some point code synchronization/contention will become more significant.
As an example, one client has a 32 CPU server and has 24 publish and 8 write threads.
We do not recommend having more threads than CPUs. Based on experience, the publish threads are fairly processor intensive. The file writing threads would spend much of their time waiting on disk IO.
From version 7.3, the following message will be output to the log if the publish output level is set to "High": "Wait time for: <filename> #ms"
Upon publish completion, the following will be output when standard level of publish output is set: " - Total wait time on file output queue: #s seconds"
Depending on the number of files and their size, it may be simpler to increase the maximum size of the file writing queue, as opposed to creating more threads.
If a large number of large files are written to disk at the same time and there is only contention / blocking at one point during publish, it may well be better to increase the maximum queue size, instead of adding more threads. This will use more memory temporarily, but will not generally increase the amount of strain on disks.
In general, many more publish threads should be used than file writing threads, but the "correct" number depends on installation, etc.
Determining the setting for the file IO block size
This sets the size of the File IO Block within the application and should only be modified if you know the System File IO Block size
To determine the block size on Windows:
- Run msinfo32 at the command prompt which should open a window called "System Information".
- In the left pane select "System Summary > Components > Storage > Disks".
- This should load info of all drives in the right pane.
- Find your desired drive and check the value for "Bytes/Sector".
- It should say something like "Bytes/Sector 4096".
For Unix/Linux machines run the following:
perl -e '$a=(stat ".")[11]; print $a'Convert from bytes to kilobytes and then select the relevant option in the dropdown. Faster / modern disks may be able to handle a larger block size.