
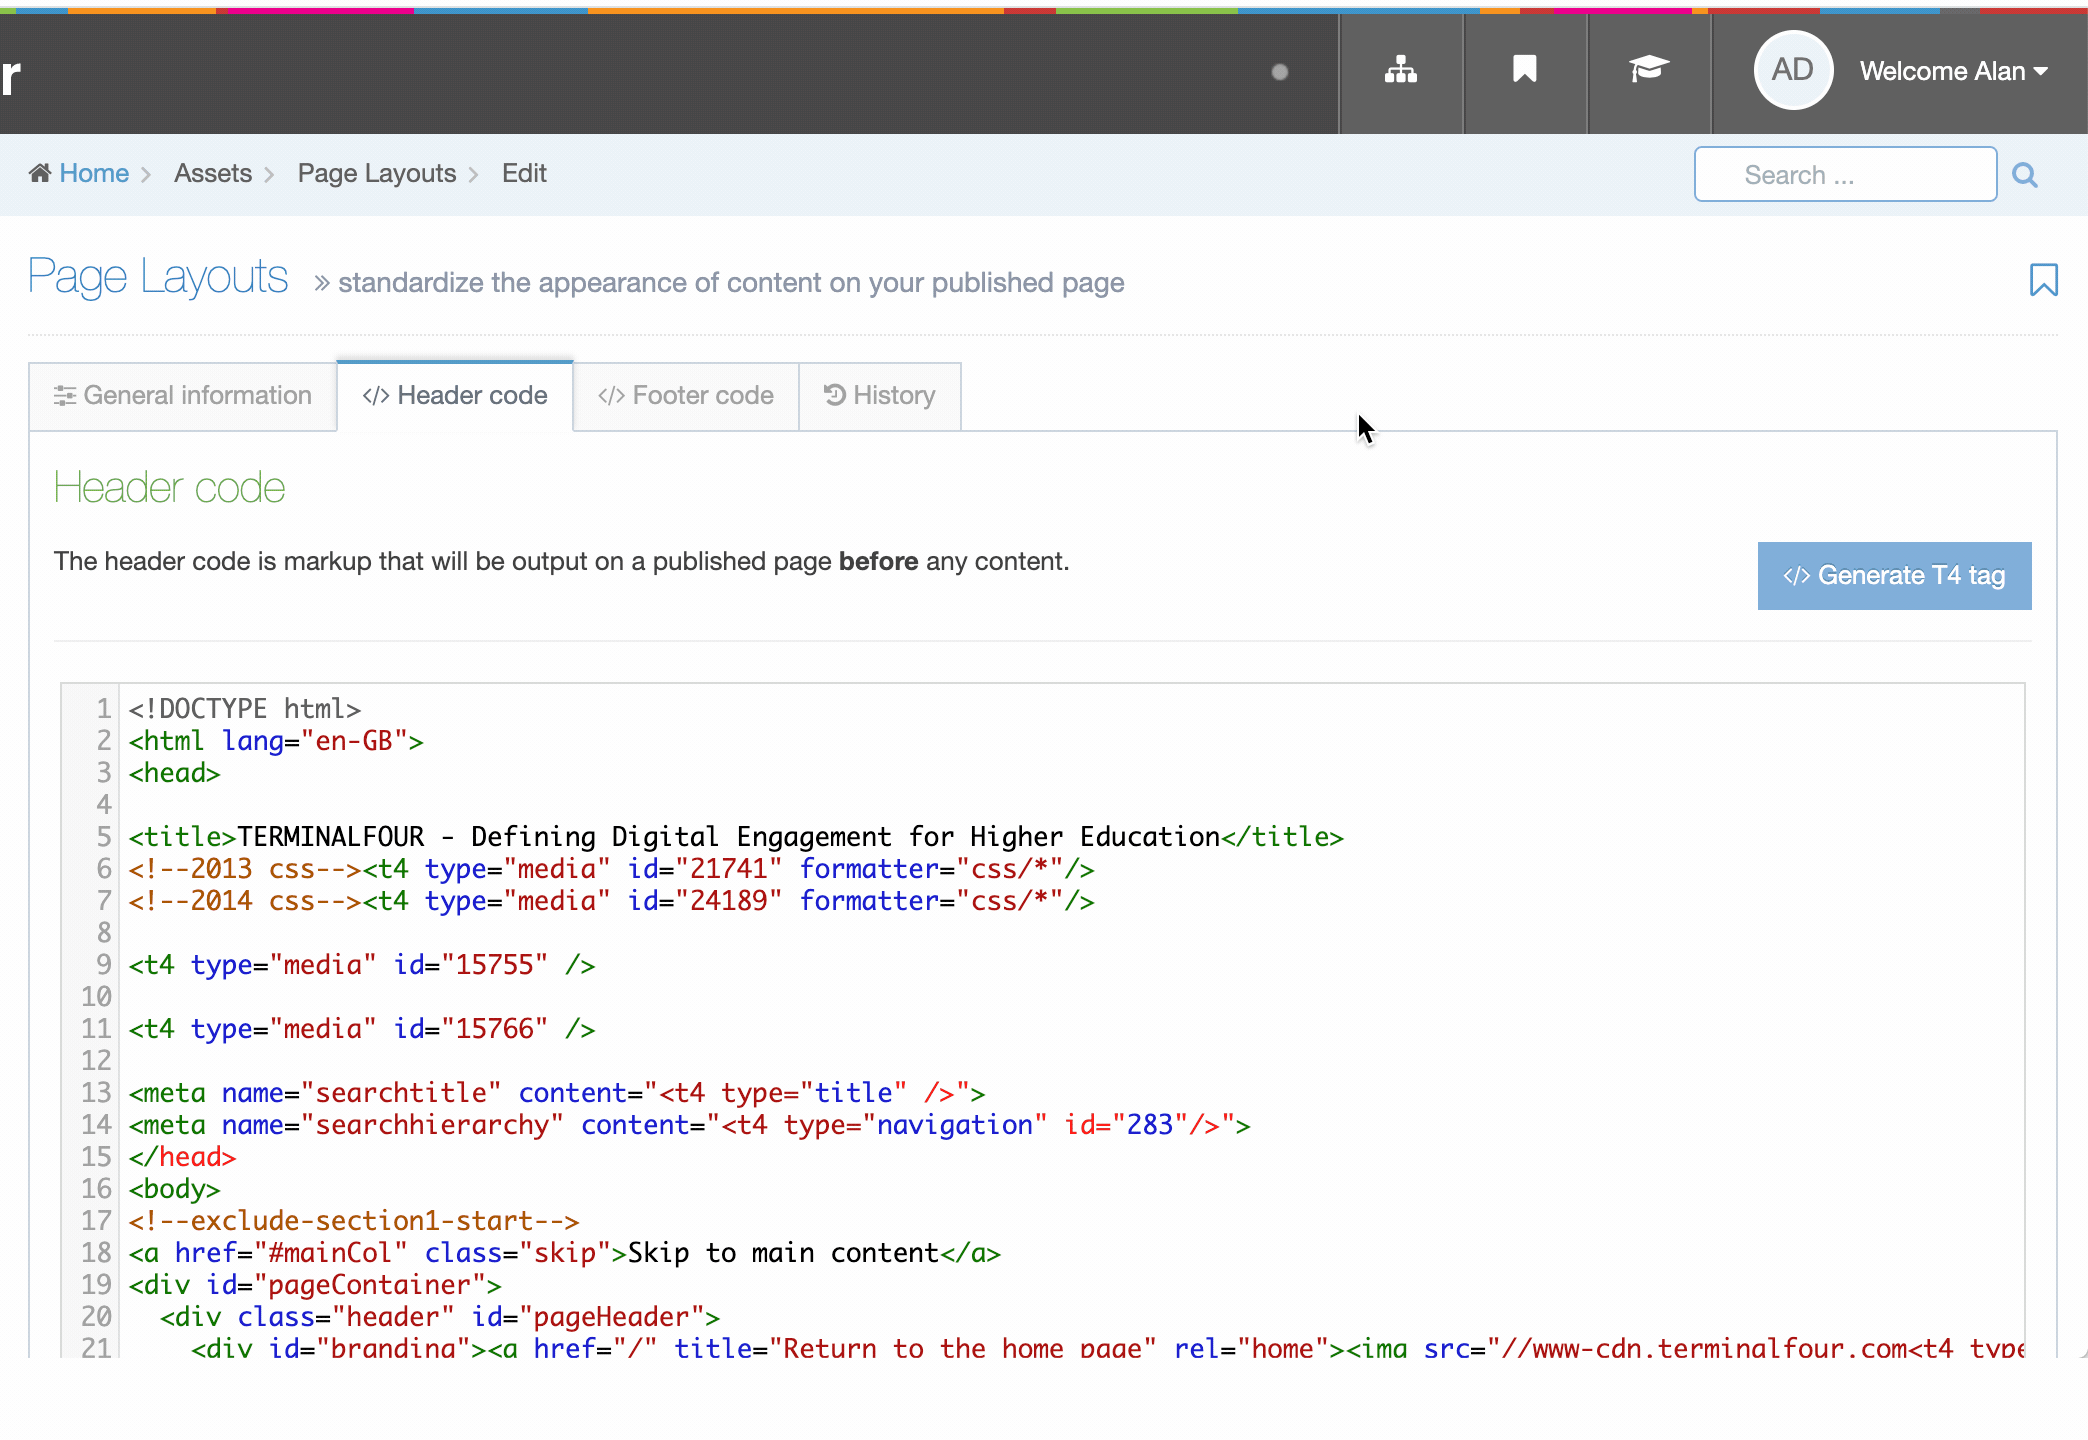
Generate T4 tags
T4 tags
Description
4 Tags are built are added to Page Layouts and Content Layouts using the Generate T4 tag button from Page Layouts and Content Types. When the button is clicked you can add and customize T4 Tags to the layout.
In this example we are adding a Nav Object T4 Tag to a Page Layout:
In addition to the Generate T4 tag builder, there are other tags that can be added to Page and Content Layouts. These are all covered below.
- Content (type="content")
- Tag output: Element
- Settings for all output methods
- Settings for normal output (inline) (output="normal")
- List elements
- Media elements
- Content owner elements
- Section/Content link elements
- Settings for selective output (output="selective-output")
- Settings for output to fulltext (output="fulltext")
- Settings for image output (output="image")
- Settings for image url output (output="imageurl")
- Settings for file output (output="file")
- Settings for download output (output="download")
- Fix URL (type="fix-url")
- Tag output: Metadata (type="meta")
- Tag output: Element
- Navigation (type="navigation")
- Media (type "media")
- Outputting content from the Media library
- Standard attributes
- Meta tags (type="meta")
- Channel (type="channel")
- Misc
- Format dates
- Other tags that can be added outside the tag builder
- Incorporate content from databases, RSS feeds and other web pages
- Access control
- Excel© to HTML (type="exceltohtml")
- Social poster
- Appendix
- Type
- Output
- Other
T4 tags: Content
Content (type="content")
Available from the Content Layout T4 tag builder.
Settings for all output methods
Output methods differ depending on the element type:
- Normal output (inline) output="normal". Outputs the element by adopting the text style of the page.
- Selective output output="selective-output". Used to only output the value of an element if the element is filled in.
- Output to fulltext output="fulltext". Outputs the element on a separate page, which can have its own layout.
- Output to image (output="image"). Outputs an image and path to the image.
- Output to image url (output="imageurl"). Outputs the path to an image.
- Output to file (output="file"). Outputs a file and path to the file.
- Output to download (output="download"). Not available on the T4 Tag builder. Outputs a file and path to the file, but any links to this Content Item link directly to the file.
Modifiers
| Name | Modifier | Description | Elements |
|---|---|---|---|
| Parse for media library t4 tags | medialibrary | Converts media library tags to media. | Plaintext, HTML, Checkbox, Select box, Multiple select, Radio button, Cascading list, Multiselect list |
| Parse for navigation t4 tags | nav_sections | Converts Section Section and content link tags into the link to the published URL. | HTML, Section/Content link |
| Strip out all HTML tags | striptags | Removes HTML tags. | Plaintext, HTML, Checkbox, Select box, Multiple select, Radio button, Cascading list, Multiselect list |
| Encode special characters to their HTML equivalent | htmlentities |
Converts un-encoded special characters to their HTML equivalent. See https://www.ascii.cl/htmlcodes.htm for more information. |
Plaintext, HTML, Checkbox, Select box, Multiple select, Radio button, Cascading list, Multiselect list |
| Change new lines to HTML line breaks | nl2br | Converts new lines (\n\n) to an HTML line break <br>. | Plaintext only |
| Convert invalid RSS characters to their XML equivalent | rssentities | Converts invalid RSS characters to an XML equivalent. Do not use this modifier in combination with Strip out all HTML tags. | Plaintext, HTML, Checkbox, Select box, Multiple select, Radio button, Cascading list, Multiselect list |
| Convert output to be suitable for use in JavaScript | js-var | Escapes single quotes, double quotes and new lines. Makes content suitable for use in JavaScript, but not necessarily JSON. | Plaintext, HTML, Checkbox, Select box, Multiple select, Radio button, Cascading list, Multiselect list |
| Encode email addresses to ASCII format | encode_emails | Converts email addresses to ASCII format. An email address posted on any website can be easily extracted with special email collection programs and used later for sending spam. This allows it to display on a web page as normal but would prevent spam activity. | Plaintext, HTML, Checkbox, Select box, Multiple select, Radio button, Cascading list, Multiselect list |
Direct edit
Disable direct edit for this element: enable-dedit="false"
This attribute can be used to prevent users from editing content in Direct Edit. This attribute is added to a T4 tag, like below:
You can edit this Content Type element
<h1>Plain text element</h1> <t4 type="content" name="Code only" output="normal" modifiers="medialibrary" enable-dedit="true" />
You cannot edit this Content Type element in direct edit:
<h1>HTML element</h1> <t4 type="content" name="HTML" output="normal" modifiers="medialibrary,nav_sections" enable-dedit="false" />
In most situations this tag enable-dedit will not exist, so its value is therefore considered null. A null value is actually considered true. Only if the value is not null and equals false, does the content element get marked as "not editable". So the below two lines would be considered the same:
<t4 type="content" name="HTML" output="normal" modifiers="medialibrary,nav_sections" /> <t4 type="content" name="HTML" output="normal" modifiers="medialibrary,nav_sections" enable-dedit="true" />
List elements
Further settings can be applied manually for lists under the tags type="content" output="normal"
List entry names, values
List entries have a name and a value and sometimes you need to specify which of these to output. To do this, add the display_field attribute to the T4 tag.
<t4 type="content" name="Element Name" output="normal" display_field="name" />
or
<t4 type="content" name="Element Name" output="normal" display_field="value" />
The use of this code effects the three different List content elements in the following way:
- Cascading list - The list entry value is displayed by default. If the attribute is missing, the value is published. An exception is when display_field="name" is added.
- Multiple select - The list entry value is displayed by default. If the attribute is missing, the value is published. An exception is when display_field="name" is added.
- Multi-select list - The list entry name is displayed by default. This is consistent with how this content element is currently published, and the default does not change for backwards compatibility reasons.
List delimiters
For Multi-select lists and Cascading list elements, the T4 tag for that list element uses a comma (,) to separate the values selected within a Content Item.
For example, if a user selects "Fruit > Apple" and "Fruit > Pear" and "Vegetable > Carrot" list values, the T4 tag outputs "Fruit, Apple, Fruit, Pear, Vegetable, Carrot".
It is possible to change the delimiters used by adding the textual-name-separator and delimiter attributes to the T4 tag.
<t4 type="content" name="Element Name" output="normal" textual-name-separator=">" delimiter="|" />
In the example above, this would output "Fruit>Apple | Fruit>Pear | Vegetable>Carrot".
For a Cascading list element, where only one item can be selected, it only uses the textual-name-separator example: "Fruit>Apple".
Media elements
Further settings can be applied manually for media under the tags type="content" output="normal".
By default, Media elements are formatted using the Media content layout on the Media Content type, but if a specific Media content layout is required, it is possible to add the formatter attribute to the T4 tag to specify the layout to use.
<t4 type="content" name="Featured image for the blog" output="normal" modifiers="" formatter="path/*" />
In the example above, the "Featured image for the blog" media element, is formatted using the "path/*" layout on the Media Content type.
Content owner elements (output="userinfo")
output="userinfo" can be used to output the details of the user.
Tag to output the username, e.g. joebloggs
<t4 type="content" name="Content Owner" output="userinfo" info="username" />
Tag to output the Full Name, e.g. Joe Bloggs
<t4 type="content" name="Content Owner" output="userinfo" info="first_last" />
Tag to output the Lastname, Firstname, e.g. Bloggs, Joe
<t4 type="content" name="Content Owner" output="userinfo" info="last_first" />
Section/Content link elements (output=linktext or output=linkurl)
Using the Tag builder, Section/Content Link elements output the full anchor tag to the selected Section Section or Content Item.
Further settings can be applied manually for section/content links under the tag type="content".
It is possible to generate the URL of the Section Section/content, or the link text for the Section Section/content by using custom T4 tags. The name is set to the name of the Section/Content link element.
The T4 tag to output the link text for the Section Section/content is:
<t4 type="content" name="element-name" output="linktext" />
The T4 tag to output the URL for the Section Section/content is:
<t4 type="content" name="element-name" output="linkurl" />
Example: Create a Content Type that has a media image with a Section Section/content link on it
This example Content type allows end users to select an image from the media library and create a link on the image:
| Name | Type | Compulsory |
|---|---|---|
| Select an Image | Media library | Yes |
| Select a Link | Section/Content Link | Yes |
<a href="<t4 type="content" name="Select a Link" output="linkurl" />"><t4 type="content" name="Select an Image" output="normal" modifiers=""/></a>
If a normal T4 tag is used to output Section/Content Link elements, ensure the Parse for Section Navigation tags modifier has been checked on the Content type element.
<t4 type="content" name="element" output="normal" modifiers="nav_sections"/>
If you have elements in a Content Type which are not required, you can ensure the element is not output if there is no content in the element.
Selective output is not available with file or image elements. For image elements, consider using the output=image option.
Attributes
| type | Always set to content | type="content" |
|---|---|---|
| name | Name of the element | name="Name" |
| process-format | Process selective output markup, true or false. Use this to process other tags within this tag. | process-format="true" |
| format | Selective output markup | format="<p>Phone: $value</p>" |
| modifiers | Modifiers | modifiers="" |
| format-modifiers | Apply different modifiers (such as, htmlentities) to the Content Type element value and the format attribute. For example, you want characters within the Content Type element value to be changed to their HTML equivalent (change & to &) - but if you have an & in the format tag, and you want it to remain as & in the output. To do this, the "process-format" attribute must be set to true and the format-modifiers attribute is specified. | format-modifiers="" |
Example of a standard tag
The Content Type has an element "Phone". We only want HTML to be output if the user has added the phone number in the element. If no content has been added to the Phone element then nothing will be published.
<t4 type="content" output="selective-output" modifiers="" name="Phone" format="<p>Phone: $value</p>" />
Example of a tag containing quotes
Quote symbols in the HTML need to be added in their Unicode equivalent.
<t4 type="content" output="selective-output" modifiers="" name="Phone" format="<p class="phone">Phone: $value</p>" />
Example of a tag containing additional t4 tags
The format attribute can contain other T4 tags such as (language variable tag). To do this, the "process-format" attribute must be set to true, and the quote symbols in the nested t4 tag must be replaced with "
<t4 type="content" output="selective-output" process-format="true" modifiers="" name="Name" format="<p><t4 type="lang-var" default-language="en" en="Name" ga="Irish Name" fr="French Name" /> : $value</p>" />
Example of a tag containing different modifiers on the element value and format attribute
You can apply different modifiers (such as, htmlentities) to the element value and the format attribute. For example, you want characters within the element value to be changed to their HTML equivalent (change & to &) and if you have an & in the format tag, you want it to remain as & in the output.
To do this, the "process-format" attribute must be set to true and the format-modifiers attribute is specified. You can specify the modifiers as follows:
<t4 type="content" output="selective-output" process-format="true" format-modifiers="" modifiers="htmlentities" name="Full Name" format="<p>First & Lastname : $value</p>" />
Fulltext formatters can be used to link from one Content layout to another.
Potential usage scenario
As an example: this can be used for news Items to display some of the elements on the main page (index) (Title, Date and Summary), and then link one of the elements (the Title) to the fulltext content layout to display the relevant elements (Title, Date and Main Story).
Example standard tag
The initial Content layout needs to include a tag to generate the fulltext content. Check the channel settings to find the Type used for the channel, the default being text/html. Use Generate T4 tag, select the output method as Output to Fulltext. You can use any element to generate the fulltext content. By default, the generated URL reflects the selected element. In this case, we have selected the Question element which generates a fulltext URL similar to /mysite/question,123,en.html.
<t4 type="content" name="Question" output="fulltext" />
A link should be provided to link to the fulltext page:
<a href="<t4 type="content" name="Question" output="fulltext" />">Link text</a>
The element referencing each layout should be unique. If the same element is referencing different fulltext layouts, they will have the same filename and overwrite each other until only the last fulltext file written will be published.
Example tag using an element to set the file name
If you want to be able to control the URL of the fulltext version of the content and make friendly URLs, you can modify the T4 Tag to use the contents of one of the elements. Specify use-element="true" and the element to be used filename-element="Title". The example below uses the Title element.
The URL for the fulltext version of the content will then contain the text entered in the title element example: "how-to-make-content,en.html".
<t4 type="content" name="Title" output="fulltext" modifiers="" use-element="true" filename-element="Title"/>
A link should be provided to link to the fulltext page:
<a href="<t4 type="content" name="Title" output="fulltext" modifiers="" use-element="true" filename-element="Title"/>">Link text</a>
Instead of using a T4 Tag, you can specify a Content Type Element to output a friendly URL by selecting the "Use as filename" option for the Content Element.
If the "Use as filename" option is selected for a Content Element, and the T4 Tag specifies a different Content Element, the Content Element set on the T4 Tag will override the Content Element that has "Use as filename" selected.
In versions earlier than 8.3, this behaves differently. Instead the Content Element with "Use as filename" is used and overrides any Content Element specified in the T4 Tag.
Example tag using a specific formatter
If you wish to specify a type formatter to use, the formatter attribute can be set. In the example below, the name of the Content layout is called text/website:
<t4 type="content" name="Question" output="fulltext" modifiers="" formatter="text/website" />
Example of tabbed Content Type using multiple formats
Example of tabbed Content Type using multiple formats
Using the fulltext tag, multiple formats can be created and linked from the one Content Item.
This example splits the content into three tabs for "Contact Info", "Biography" and "Awards".
Each tab contains some of the elements from the Content Type.
Create a Content Type with the following elements:
| NAME | TYPE | COMPULSORY | MAXIMUM SIZE |
|---|---|---|---|
| Name | Plain text | Yes | 10 words |
| Address | Plain text | Yes | 100 words |
| Phone number | Plain text | Yes | 10 words |
| Biography | HTML | Yes | 500 words |
| Research interests | Plain text | Yes | 100 words |
| Awards | Plain text | Yes | 100 words |
Create the first Content type layout, using text/html as the name.
<!-- start formatter="text/html" for Content Type -->
<p class="multiFormatter">
<a href="<t4 type="content" name="Biography" output="fulltext" modifiers="" formatter="text/biography"/>">Biography</a>
<a href="<t4 type="content" name="Awards" output="fulltext" modifiers="" formatter="text/other" />">Research and Awards</a>
<h2>Contact details</h2>
<p><strong>Name: </strong><t4 type="content" name="Name" output="normal" modifiers="" /></p>
<p><strong>Address: </strong><t4 type="content" name="Address" output="normal" modifiers="striptags,htmlentities" /></p>
<p><strong>Phone: </strong><t4 type="content" name="Phone number" output="normal" modifiers="striptags,htmlentities" /></p>
<!-- end formatter="text/html" for Content Type -->
Create the second Content type layout, using text/biography as the name.
<!-- start formatter="text/biography" for Content Type -->
<p class="multiFormatter">
<a href="<t4 type="content" name="Name" output="fulltext" modifiers="" formatter="text/html" />">Contact Details</a>
<a href="<t4 type="content" name="Awards" output="fulltext" modifiers="" formatter="text/other" />">Other</a></p>
<h2>Biography details</h2>
<p><strong>Name: </strong><t4 type="content" name="Name" output="normal" modifiers="" /></p>
<p><strong>Biography: </strong><t4 type="content" name="Biography" output="normal" modifiers="medialibrary,nav_sections" /></p>
<!-- end formatter="text/biography" for Content Type -->
Create the third Content type layout, using text/other as the name.
<!-- start formatter="text/other" for Content Type -->
<p class="multiFormatter">
<a href="<t4 type="content" name="Name" output="fulltext" modifiers="" formatter="text/html" />">Contact Details</a>
<a href="<t4 type="content" name="Biography" output="fulltext" modifiers="" formatter="text/biography" />">Biography</a>
<h2>Research & award details</h2>
<p><strong>Name: </strong><t4 type="content" name="Name" output="normal" /></p>
<p><strong>Research Interests: </strong><t4 type="content" name="Research interests" output="normal" modifiers="striptags,htmlentities" /></p>
<p><strong>Awards: </strong><t4 type="content" name="Awards" output="normal" modifiers="striptags,htmlentities" /></p>
<!-- end formatter="text/other" for Content Type -->
When the content is published, 3 files will be published
- index.html which will provide links to:
- biography-280-en.html
- awards-280-en.html
The code in the files will be in the following format
index.html (from the text/html format)
<!-- start formatter="text/html" for Content Type -->
<p class="multiFormatter">
<a href="/multi-fulltext/biography-280-en.html">Biography</a>
<a href="/multi-fulltext/awards-280-en.html">Research and Awards</a>
<h2>Contact details</h2>
<p><strong>Name: </strong>multi fulltext example</p>
<p><strong>Address: </strong>110 Amiens Street</p>
<p><strong>Phone: </strong>018509700</p>
<!-- end formatter="text/html" for Content Type -->
biography-280-en.html (from the text/biography format)
<!-- start formatter="text/biography" for Content Type -->
<p class="multiFormatter">
<a href="/multi-fulltext/name-280-en.html">Contact Details</a>
<a href="/multi-fulltext/awards-280-en.html">Other</a></p>
<h2>Biography details</h2>
<p><strong>Name: </strong>multi fulltext example</p>
<p><strong>Biography: </strong><p>All about the person.</p>
<p> </p></p>
<!-- end formatter="text/biography" for Content Type -->
awards-280-en.html (from the text/other format)
<!-- start formatter="text/other" for Content Type -->
<p class="multiFormatter">
<a href="/multi-fulltext/name-280-en.html">Contact Details</a>
<a href="/multi-fulltext/biography-280-en.html">Biography</a>
<h2>Research & award details</h2>
<p><strong>Name: </strong>multi fulltext example</p>
<p><strong>Research Interests: </strong>Higher education</p>
<p><strong>Awards: </strong>Degrees</p>
<!-- end formatter="text/other" for Content Type --></html>
Notes
If you use the T4 Title tag to create the title of the page, the T4 tag can be modified for fulltext pages to generate a unique Title tag for each fulltext page.
If your Page layout contains a Breadcrumb Navigation object, the object can be configured to include the fulltext content, instead of simply generating a path to the Section Section.
This is used in Content Layouts to format Image elements (not to be confused with Media).
Attributes
| type | Always set to content. | type="content" |
| name | Name of the image element. | name="element-name" |
| output | Always set to image. | output="image" |
| max-width | Forces a maximum width on the image. max-width="100" limits resize to a maximum width of 100 pixels. | max-width="100" |
| max-height | Forces a maximum height on the image. max-height="100" limits resize to a maximum height of 100 pixels. | max-height="100" |
| client-resize |
Specifies if the image resizing is carried out by the browser (the client) or during publish. By default, if no client-resize attribute has been added, the image is resized by Terminalfour on publish. If the attribute has a "false" value, the image is resized by Terminalfour on publish, resulting in a new image with the size added to the name. If the attribute has a "true" value, the actual image dimensions and size are not changed. The image is displayed to the specified size in the browser, so it appears re-sized. The width and height attributes and values are added based on the presence of the max-width and/or max-height values. This can impact the publish time, as new images have to be created during publish. This can impact the publish time, as new images have to be created during publish. |
client-resize="false" |
| alt | The ALT text for the image. | alt="This is a blue image" |
| alt-element | The Content type element you want to use for the ALT text. | alt-element="Description" |
| style |
CSS Style options, examples: border, margin, float and class.
|
Example
<t4 type="content" name="element-name" output="image" />
The output would be:
<img src="/mysite/name-of-image-file.jpg" />
This is used in Content type layouts to output the URL of Image elements (not to be confused with Media).
Attributes
| type | Always set to content. | type="content" |
|---|---|---|
| name | Name of the image element. | name="image-element" |
| output | Always set to imageurl. | output="imageurl" |
| max-width | Optional. Forces a maximum width on the image. max-width="55" limits resize to a maximum width of 100 pixels. | max-width="55" |
| max-height | Optional. Forces a maximum height on the image. max-height="44" limits resize to a maximum height of 100 pixels. | max-height="44" |
Example
<t4 type="content" name="the-image" output="imageurl" max-width="55" max-height="44" />
The output would be:
/mysite/name-of-image-file-55x15.jpg
Used to output a path to an Image or File element.
<t4 type="content" name="element" output="file" />
The output would be:
/mysite/name-of-file.jpg
The output of Content Links to this Content Item would be an anchor link to the Content Item on the page (as opposed to the download output that links directly to the file):
<a href="/mysite/#d.en.36301">my content link text</a>
It is not possible to create this T4 Tag through the T4 Tag Builder. To create this tag, build the tag using the file output, and manually change the output in the T4 Tag.
This is used to output the path to an Image or File element. Any links to the Content Item that contains a T4 Tag that uses output="download" will link directly to the file.
This can be useful if the Content Type is used to upload documents. Links would output the direct path to the document rather than link to the page anchor that contains the link.
<t4 type="content" name="element" output="download" />
The output would be:
/mysite/name-of-file.jpg
The output of Content Links to this Content Item would be to the file (as opposed to the file output that links to an anchor on the page):
<a href="/mysite/name-of-file.jpg">my content link text</a>
Fix URL (type="fix-url")
The Fix URL tag checks URLs within a specified Element in a Content Type and prepends http:// to it, as necessary, when published. This is used for Content Types which contain an Element for users to enter a URL.
The tag does not output the element, so you must also use the normal t4 tag to output the element.
There is a single required attribute, element, the name of the Content Type Element to be checked and updated.
Example:
<t4 type="fix-url" element="External URL" />
Tag output: Metadata (type="meta")
These meta tags are generated for the specific Content Item in the content tab of the tag builder. Please note that under the meta tags tab in the page layout tag builder, further meta tag outputs are available.
| Type of metadata | Tag | Date format | Note |
|---|---|---|---|
| HTML anchor | meta="html_anchor" | HTML anchors are required for content links to work correctly | |
| Content ID | meta="content_id" | Output the ID of the Content Item. | |
| Last modified date | meta="last_modified" | The date that the content was last modified. Format the date as required by using the format attribute. | |
| Last modified by (username) | meta="last_modified_by_username" | The username of the user who last modified the content. If this user no longer exists, nothing is output. | |
| Last modified by (full name) | meta="last_modified_by_fullname" | The full name (Firstname Lastname) of the user who last modified the content. If this user no longer exists, nothing is output. | |
| Publish date | meta="publish_date" | The date the content was published. Format the date as required by using the format attribute. This is linked to the Content Options and is only output if the options are chosen. | |
| Expiry date | meta="expiry_date" | The date the content is due to expire. Format the date as required by using the format attribute. This is linked to the Content Options and is only output if the options are chosen. | |
| Content version | meta="version" | The current version number of the content. | |
| Element size | meta="filesize" | The size of a chosen element (typically of a file or media). The output is in KB. The Element Size metadata requires the use of an Element. This will result in an additional drop-down list when building the tag to allow you to select an Element. In the T4 tag, the Element is added as a "name" parameter. | |
| Number of days since modified | meta="recently_modified" | The number of days since content was last modified.
Additional attributes for "threshold" and "text" must be added to this tag which will output the value in the "text" attribute if the content was last modified within the "threshold" days. |
<t4 type="meta" meta="recently_modified" threshold="2" text="<t4 type="media" id="5" /> NEW: " />
In the example above, where content was modified within the last 2 days (48 hours), this tag would output a media item (media id 5) and text. Notice how quote symbols within the text attribute are changed to " to escape them.
T4 tags: Media (type="media")
Available from the Content Type and Page Layout tag builder. The "media" tag type is used for outputting content from the Media library, and to add Media attributes within the Media content layout.
Outputting content from the Media Library
The tag can be used within Content Types, Page Layouts, CSS and JavaScript files.
When you use it for a Content Type, it does not allow a user to select a file from the Media Library in content, but rather insert a media file (image, file) into the Content Type Layout.
Example media tag generated from the tag builder
<t4 type="media" formatter="image/*" id="10" />
In the T4 Tag, the type is "media", the id is the media file's id and the formatter is the Media Layout to be used (a Content Type Layout on the Media Content Type).
Media attributes within the Media Content Layout
Media Attributes can be used within the Media Content Type Layout to allow an end-user to specify further information about the Media Item or override values populated within the Media Library when using Media in an HTML element.
As an example, the default alt text could be the Description from the Media Library. This would be with the option to define a different alt text for a particular instance of the Media through a Media attribute. Another example might be that the default text for linking to File Media is the Name element, but with the option to define a different link text for this particular instance of the Media through a Media attribute.
Standard attributes
There are four standard attributes used with media located in the Media library. These attributes all have a default value, defined in the Media Library and users can modify them for their particular instances of the media if they have been configured to allow it. This could be used to resize images or change the text used to link to file Media.
| Attribute | Description |
|---|---|
| name | The name of the Media Item |
| description | The description of a Media Item |
| width | Dimensions only apply to image files |
| height | Dimensions only apply to image files |
User-defined attributes
Additional Media attributes can be set by inserting the T4 tag into the Media Content layout. These Media attributes are optional for users and are blank by default.
Do not rename User Defined Media attributes after content has been added using these attributes. Renaming the attributes can cause loss of data
Attributes
The following are specified:
| Attribute | Description | Example |
|---|---|---|
| type |
This should always be media. |
type="media" |
| attribute |
Name of the attribute. |
attribute="description" |
| editable |
To determine whether or not this attribute is editable by the user. This attribute is only applicable to the four standard attributes (name, description, width and height). If not specified within the T4 tag, the default is true. Values are true or false. |
editable="false" |
| format |
Used to output text and a value for the attribute. |
format="width: $value" |
Examples
Allow users to specify a different alt text
The alt text for image media is populated with the Description from the Media library (in a standard installation). This does allow users to specify a different alt text for this instance of the media. NOTE: this does not update the Description in the Media library.
In this example, the editable attribute is not specified, and therefore the default value of true is assumed, making it editable by users.
<img src="<t4 type="content" name="Media" output="file" modifiers="" />" alt="<t4 type="media" attribute="description" />" />
Do not allow users to specify a different alt text
The alt text for image media is populated with the Description from the Media library making users unable to modify this when editing media attributes.
<img src="<t4 type="content" name="Media" output="file" modifiers="" />" alt="<t4 type="media" attribute="description" editable="false" />" />
Allow users to resize images
The width and height for image media is populated by the size of the image within the Media library. Users are able to resize the image in the editor by specifying an alternative height or width, or both.
<img src="<t4 type="content" name="Media" output="file" modifiers="" />" alt="<t4 type="media" attribute="description" />" style="height: <t4 type="media" attribute="height" editable="true" />px; width: <t4 type="media" attribute="width" editable="true" />px;" />
The following code is generated when a user enters a height of 80px and a width of 40px. As a result, file name of the image is changed because the published file is resized to different dimensions.
<img src="/media/images/myimages/myimage-40x80.jpg" alt="a resized image" style="height: 80px; width: 40px;" />
By default, the size of the published image file on the server is resized during publish and is not resized purely by the browser.
From 8.4.0 you can add the attribute client-resize="true" to File elements to ensure that the Publish engine does not resize the image and instead leaves the resizing to be done by the browser client-side.
<img src="<t4 type="content" name="Media" output="file" client-resize="true" />" alt="<t4 type="media" attribute="description" />" style="height: <t4 type="media" attribute="height" editable="true" />px; width: <t4 type="media" attribute="width" editable="true" />px;" />
Allow users to specify a class for an image
A user defined attribute can be added to allow users to specify an optional class for an image. When modifying Media attributes, users have the option for class where they can type the required class. If this is not specified, the default value would be blank.
<img src="<t4 type="content" name="Media" output="file" modifiers="" />" alt="<t4 type="media" attribute="description" />" style="height: <t4 type="media" attribute="height" editable="true" />px; width: <t4 type="media" attribute="width"editable="true"/>px;" class="<t4 type="media" attribute="class" />" />
Allow users to specify the link text used for a file
When file media (such as, PDFs and Word Documents) are inserted into the WYSIWYG, the text used to link to the file is populated by the Name in the Media library (default installation), but users can modify the link text by editing Media attributes.
<a href="<t4 type="content" name="Media" output="file" modifiers="" />"><t4 type="media" attribute="name" editable="true" /></a> (<t4 type="meta" name="Media" meta="filesize" />kB)
Allow users to output media attributes as text
A user defines the attributes which they want to be output as text, in this case, the height and width of the image. They also need to add a format tag that formats the text being output; adding $value outputs the value of the selected attribute. When there is no value for that attribute, nothing is output.
<img src="<t4 type="content" name="Media" output="file" modifiers="" />" alt="<t4 type="media" attribute="description" />" <br /> <t4 type="media" attribute="height" format="Height: $value " /> <br /> <t4 type="media" attribute="width" format="width: $value" />
T4 tags: Metadata (type="meta")
Available from the Page Layout tag builder. This creates tags based on the settings that have been configured under Assets > Metadata.
There is also a T4 Meta tag for use with Content Types.
The tag is as follows:
<t4 type="meta" id="19" />
This generates the full meta tag on the page. As an example:
<meta name="keywords" content="web content management system, cms, wcms, website content management, mobile" />
To output just the "content" of the meta tag, use a Section META Info navigation object.
List values and names
If the special Metadata Mappings are mapped to List Elements, the Meta T4 tag can specify whether to use the Value or Name of the List entry by using the display_field attribute:
<t4 type="meta" ID="5" display_field="name" />
OR
<t4 type="meta" ID="5" display_field="value" />
This effects the three separate List content elements in the following way:
- Cascading List: The list entry value is displayed by default. So if the attribute is missing, the value is published. i.e. the value is published in all cases except when display_field="name" is added.
- Multiple Select: The list entry value is displayed by default. So if the attribute is missing, the value is published. i.e. the value is published in all cases except when display_field="name" is added.
- Multi-select List: The list entry name is displayed by default. This is in keeping with how this content element is currently published, and the default does not change for backwards compatibility reasons.
Sections with Fulltext Content
Where sections contain Fulltext content, the T4 Meta tag can be configured to determine whether the Metadata entered in Fulltext content is displayed on the index page by using the output_to_index or include_content_on_index attributes. In all cases the fulltext page contains the section metadata and the metadata for this particular Content Item. The fulltext page does not include meta information added for other Content Items in the same section.
The output_to_index attribute can be added to the T4 tag with a value of either true or false. For example:
<t4 type="meta" ID="5" output_to_index="false" />
If set to false, the index page does not include any meta data tag. The fulltext page contains the section metadata and the metadata for this particular Content Item. The fulltext page does not include meta information added for other Content Items in the same section.
If set to true, or left blank, the index page includes section metadata and metadata for all content within the section. The fulltext page contains the section metadata and the metadata for this particular Content Item. The fulltext page does not include meta information added for other Content Items in the same section.
The include_content_on_index attribute can be added to the T4 tag with a value of either true or false. For example:
<t4 type="meta" ID="5" include_content_on_index="false" />
If set to false, the index page only includes section metadata and does not include any content metadata. The fulltext page contains the section metadata and the metadata for this particular Content Item. It does not include meta information added for other Content Items in the same section.
If set to true, or left blank, the index page includes section metadata and metadata for all content within the section. The fulltext page contains the section metadata and the metadata for this particular Content Item. It does not include meta information added for other Content Items in the same section.
The output_to_index overrides the include_content_on_index tag, so, if you set output_to_index to false and the include_content_on_index to true the meta tag is not generated on the index page.
T4 tags: Navigation (type="navigation")
Available from the Content Type and Page Layout tag builder this tag outputs information specified in a Navigation Object.
Navigation tags can be used in Content Layouts, Page Layouts or a Content Item (within a plain text element). Some types of Navigation Objects have restrictions around where and how they can be used, and these are detailed on each separate page about each type of Navigation Object.
Navigation Objects can also be used within List Values, allowing a content author to select an item from a List, determining which Navigation Object is output onto the page. Or, they can be used within Media Items (e.g. JSON files), if the Media Type is configured to parse for T4 tags.
While Navigation Objects work within List Values and Media, this is not intended functionality and is not routinely tested. In addition, Navigation Objects that are used within Lists or Media are not recorded in the Navigation Usage Report. While this approach can be used, it should be used with caution.
Example
<t4 type="navigation" name="A-Z Site Map" id="34" />
T4 Tags: Channel (type="channel")
Available from the Page Layout T4 Tag builder but these tags can also be used in Content Layouts.
| Item | Example | Description |
|---|---|---|
| Site Root | <t4 type="channel" output="site-root" /> | Output the Site Root of the channel |
| Description | <t4 type="channel" output="description" /> | Output the Description of the channel |
| Fav(orite) Icon | <t4 type="channel" output="fav-icon" /> | Output the favorite icon of the channel |
| Channel ID | <t4 type="channel" output="id" /> | Output the channel ID |
| Channel name | <t4 type="channel" output="name" /> | Output the channel name |
T4 tags: Access control
When implementing access control on the published site, the T4 tag that is used to output the list of groups that have access to a section is:
<t4 type="accesscontrol" output="groupnames" />
This will output a comma-separated list of the names of groups that have access to that section.
This tag only works within the access control configuration code, for Group select content elements.
T4 tags: Format dates
Format dates
You can format Meta dates and date elements in the Content Layout. With no date formatting, a default date format will be used.
To format the date of content type elements use the attribute date_format.
To format the date of meta tags use format.
When selecting dates/times in the Generate T4 Tag you can choose from the following options:
| Value | Output |
|---|---|
| MM/dd/yyyy | 09/25/1980 |
| M/d/yy | 4/5/94 |
| dd/MM/yyyy | 04/10/1970 |
| d/M/yy | 4/1/86 |
| EEE, MMM d, ''yy | Tue, Feb 3, '59 |
| EEEE, MMMM d, yyyy | Monday, December 8, 1980 |
| hh:mm a | 09:30 AM |
| h:mm a | 9:30 PM |
| HH:mm | 21:30 |
| HH:mm:ss z | 21:30:56 PDT |
| HH:mm:ss Z | 21:30:56 -0700 |
| h 'o''clock' a, zzzz | 9 o'clock PM, Pacific Daylight Time |
| MM/dd/yyyy 'at' HH:mm:ss z | 05/29/1997 at 21:30:56 PDT |
| h:mm a 'on' EEE, d MMMM | 9:30 AM on Sat, 22 November |
| yyyyMMdd'T'HHmmss'Z' | iCalendar .ics format |
| yyyy-MM-dd'T'HH:mm:ss'Z' | Google/Outlook format |
Custom formats can be created based on the following:
| Letter | Date or Time Component | Presentation | Examples |
|---|---|---|---|
| G | Era designator | Text | AD |
| y | Year | Year | 1996; 96 |
| M | Month in year | Month | July; Jul; 07 |
| w | Week in year | Number | 27 |
| W | Week in month | Number | 2 |
| D | Day in year | Number | 189 |
| d | Day in month | Number | 10 |
| F | Day of week in month | Number | 2 |
| E | Day in week | Text | Tuesday; Tue |
| a | Am/pm marker | Text | PM |
| H | Hour in day (0-23) | Number | 0 |
| k | Hour in day (1-24) | Number | 24 |
| K | Hour in am/pm (0-11) | Number | 0 |
| h | Hour in am/pm (1-12) | Number | 12 |
| m | Minute in hour | Number | 30 |
| s | Second in minute | Number | 55 |
| S | Millisecond | Number | 978 |
| z | Time zone | General time zone | Pacific Standard Time; PST; GMT-08:00 |
| Z | Time zone | RFC 822 time zone | -800 |
Examples
The date 22 January 13 or 9 January 13
<t4 date_format="d MMMM yy" type="content" name="the date" output="normal" modifiers="" />
The date 22 January 2013 or 9 January 2013
<t4 type="content" date_format="d MMMM yyyy" name="the date" output="normal" modifiers="" />
The date 22 01 2013 or 09 01 2013
<t4 type="content" date_format="d MM yy" name="the date" output="normal" modifiers="" />
The date Friday, Mar. 21. 2014:
<t4 type="content" date_format="EEEE, MMM. d. yyyy" name="the date" output="normal" modifiers="" />
The date Last Modified 22 01 2013
<t4 type="meta" format="d MM yyyy" meta="last modified" />
Dates in multiple language sites
The locale attributes must be added manually to the tags. The date_format attribute outputs the date in the relevant language so an English page uses the English month names, and for a French page it uses the French month names.
Example tag using the locale:
<t4 type="content" name="Date Released" output="normal" modifiers="" date_format="d MMMM yyyy" locale="fr" locale_es="en" />
T4 Tags: Misc
Available from the Content Type and Page Layout tag builder.
Title (type="title")
<t4 type="title" />
The T4 title tag is most frequently placed within the <title> and </title> fields in a Page Layout. When a channel is published, the tag is replaced with the name of the current section as specified within the Site Structure.
Optional attributes
There are additional attributes you can add to this T4 tag. They enable an element from within a Content Item to be appended to the page title on "fulltext" pages.
| Attribute | Example | Description |
|---|---|---|
| title | title="Sample Company Website - " | Prepends the text to the name of the current section |
| append-content | append-content="true" | Append information about the current content item (used on fulltext pages) |
| append-element | append-element="element-name" | The element to be appended (on fulltext pages) |
| separator | separator=":- " | The text to be output between the current section name and current content item text (used on fulltext pages) |
Standard example
<title>Sample Company Website - <t4 type="title" /></title>
<title><t4 type="title" title="Sample Company Website - " /></title>
If the current section name is "Services" then the output based on the previous two examples will be
<title>Sample Company Website - Services</title>
Fulltext example using optional attributes
<t4 type="title" append-content="true" append-element="Title" separator=":- " />
In the example above, "append-content" is set to true so on fulltext pages, information about the content should be appended to the page title.
The "append-element" attribute is set to "Title" so the content of the "Title" element will be output. If the "append-element" attribute is not specified, the "name" of the content is used.
Image, media, file and Section links cannot be mapped
The "separator" attribute has been set to ":- " so the standard title and the content specific information is separated by ":- ". If not specified, the default value for this attribute is ": ".
Title on index (type="title-on-index")
This is used on Page Layouts only and shows the name of the section on the index page but not on the fulltext page. This is displayed on preview and on publish.
Standard example
<t4 type="title-on-index" />
Before and after code example
<t4 type="title-on-index" before="<h2>" after="</h2>" />
Edit page (type="edit-page")
The "edit-page" T4 tag is used to create a link on a page of your site, to edit the content within TERMINALFOUR.
For the edit-page T4 tag to work, the context_url configuration option needs to be set.
Attributes
| Attribute | Example | Description |
|---|---|---|
| action | action="direct-edit" |
Determines what action is taken in TERMINALFOUR: |
| text | text="Edit this page" | Determines the text used when creating the link |
Examples
Link to create content
<t4 type="edit-page" action="add" text="add/create" />
Link to edit content
<t4 type="edit-page" action="modify" text="modify/edit" />
Link to edit content with Direct Edit
<t4 type="edit-page" action="direct-edit" text="edit with direct edit" />
Social poster
Description
The Social Poster Tag triggers TERMINALFOUR to post the content to the relevant social media account through the Social poster.
- Attributes
- Example tags
- Twitter example
- Facebook example
- LinkedIn example
The link is generated from where the tag is placed, for example if the tag is in the text/html, the link will be to the section. It is recommended to place the t4 tag in the text/fulltext content layout so the link is generated to the full content.
<t4 type ="social" post_element="Tweet" account_identifier="Twitter" base_url="http://www.mywebsite.com" resource="https://api.twitter.com/1.1/statuses/update.json" post_type="post" expires="12" />
Attributes
| Item | Description | Example |
|---|---|---|
| type | Always set to social | type ="social" |
| post_element | Name of the element containing the text to be posted to the social networks. | post_element="Tweet" |
| account_identifier | The account associated with this content. The value in here must match the value entered when adding an account in the Social poster. | account_identifier="Twitter" |
| base_url | The URL of the live website. Note: when the social poster task is scheduled it checks that the link exists on this domain before posting it to the social network | base_url="http://www.mywebsite.com" |
| resource |
The URL will depend on the type of social media being used: Facebook wall: for a user this is https://graph.facebook.com/ the username and the location of where the entry goes so if the username is terminalfour the resource is: https://graph.facebook.com/terminalfour/feed |
resource="https://api.twitter.com/1.1/statuses/update.json" |
| post_type | Always set to post | post_type="post" |
| expires |
How long the tag stays active, in hours. This needs to be large enough that the content post doesn't expire before content publishes. For example, if you set the site to publish every 3 hours, ensure that the "expires" attribute is larger than 3, otherwise post content may expire before it is published and sent to the Social Poster. |
expires="12" |
Example tags
Twitter example
<t4 type="social" post_element="Post Text" account_identifier="Twitter" base_url="http://www.baseurl.com" resource="https://api.twitter.com/1.1/statuses/update.json" post_type="post" expires="12" />
Facebook example
<t4 type="social" post_element="Post Text" account_identifier="Facebook" base_url="http://www.baseurl.com" resource="https://graph.facebook.com/321844344589231/feed" post_type="post" expires="12" />
LinkedIn example
<t4 type="social" post_element="Post Text" account_identifier="LinkedIn" base_url="http://www.baseurl.com" resource="http://api.linkedin.com/v1/people/~/shares" post_type="post" expires="12" />
T4 Tags outside the tag builder
Description
These are tags that can be used that are not available from the Content Type and Page Layout tag builder.
Language variable tag (type="lang-var")
The Language variable tag allows you to provide text for different languages within Page Layouts and Content Layouts.
Example
Use of this code results in the following output on the published site:
- On English pages output: "English String"
- On German pages output: "German String"
- On French pages output: "French String"
- On other pages so default language output is used: "English String"
<t4 type="lang-var" default-language="en" en="English String" de="German String" fr="French String" />
Example with other t4 tags
It is possible to use other T4 tags within the Language variable tag. To do this the "process-format" attribute must be set to true and the quote symbols in the nested t4 tag must be replaced with " . For example:
<t4 type="lang-var" default-language="en" process-format="true" format-modifiers="" en="<li><t4 type="navigation" id="15" /></li>" es="<li><t4 type="navigation" id="16" /></li>" ar="<li><t4 type="navigation" id="17" /></li>" />
Secondary publish (type="warning")
The tag is useful on multiple language sites and publishes a language disclaimer when Secondary Publish is in use on a Channel. In this case, a disclaimer will be generated for content that has not been translated into a secondary language.
The text for the disclaimer can be added at both the Channel and Language level. If a disclaimer for a language appears in both Channel and Language level, the Channel disclaimer is used.
The examples are based on a Channel with the following languages:
- English is set to Publish, is the Default language and Secondary Publish is active
- German is set to Publish
If content exists in English and it has not been translated in German then a T4 Tag can be used to publish the disclaimer on the German page alongside the English content. The T4 Tag can either be added to the Page Layout or to the Content Layouts. The difference between the two is the logic used to see if any output is necessary:
- T4 Tag in Page Layout: will print the disclaimer if any content in the Section is taken from the Secondary publish language.
- T4 Tag in Content Layout: will print, on a per content basis, if that Content Item is taken from the Secondary publish language (which may result in multiple disclaimers on the page, if there are multiple Content Items that are not translated).
Example tag added to a Page Layout
<t4 type="warning" output="lang_disclosure_style" />
This will be published on the German (Not translated) page, either before all content or after all content:
<p>Keine deutschsprachigen Inhalte hier</p>
Example tag added to a Content Layout
<t4 type="warning" output="lang_disclosure_template" />
This will be published on the German (Not translated) page for each Content Item using a Content Type where the tag is added to the Content Layout:
<p>Keine deutschsprachigen Inhalte hier</p>
Ancestor or Parent name (type="parentnames")
This tag can be added to a Page Layout or Content Layout and outputs the name(s) of the parent section(s). It can generate the name of one section (for example the parent section), or a breadcrumb-style format which generates the name of multiple ancestors (for example the grandparent and parent sections).
This is an extra Add On to TERMINALFOUR and hence may not be enabled in your TERMINALFOUR. Please contact Client Support to install this for you if you do not have access to your database.
Enable the Ancestor Broker
To enable the Ancestor Broker, the below sql statement will have to be entered in the database:
insert into sm_brokers values ('com.terminalfour.publish.brokers.AncestorBroker', 1);
Configure the Ancestor Broker
The following configuration options are required. For each of these, a default value is specified. If the field is not specified within the tag, or if the value entered does not match the expected value, then the default is used.
| Item | Description | Default Value |
|---|---|---|
| separator | Characters used to separate the names of the sections. Similar to the Selective output, this is parsed for t4 tags and allows " to be used for quote symbols. | |
| start-level |
Numerical value for the level at which to start generating ancestors. If this is set to 0, it will start at the current section. If set to 1, it will start at the parent section. |
The default value is 0 |
| number-of-levels | Maximum number of levels to recurse. If this is set to 2 then it will output 2 levels. If "start-level" is 0, then 2 levels will be the current level and the parent. If "start-level" is 1, then 2 levels will be the parent and the grandparent. | The default value is endless, which will output as far as the channel root |
| first-child | A value of "true" or "false". If this is set to true then it will stop recursing up the tree where a section is not the first child in the hierarchy. If false, then it will continue to recurse the tree, regardless. | The default value is "true" |
| first-content | A value of "true" or "false". If this is set to true then it will only parse the tag if it is the first Content Item in the section for that channel. If false, then it will always parse the tag. If the tag is within the page layout then first-content will not be checked. | The default value is "false" |
| empty-section |
A value of "true" or "false". If this is set to true then it will stop the search once it encounters an ancestor section that contains content and it will not output the name of the section if it contains content, i.e. it will only output the names of empty sections (and maybe the current section). |
The default value is "false" |
Examples
The following T4 tags can be added to a Page Layout or Content Layout:
Output the name of the parent section
<t4 type="parentnames" separator="" start-level="1" number-of-levels="1" first-child="false" first-content="false" empty-section="false" />
or it could be formatted without the unnecessary attributes:
<t4 type="parentnames" separator="" start-level="1" number-of-levels="1" />
Output the name of the current section
<t4 type="parentnames" separator="" start-level="0" number-of-levels="1" first-child="false" first-content="false" empty-section="false" />
or it could be formatted without the unnecessary attributes:
<t4 type="parentnames" separator="" number-of-levels="1" />
Output the name of the parent section and current section, for the first Content Item on a page
Add the following T4 tag to content layout for one or more content types:
<t4 type="parentnames" separator=" > " start-level="0" number-of-levels="2" first-child="false" first-content="true" empty-section="false" />
or it could be formatted without the unnecessary attributes:
<t4 type="parentnames" separator=" : " number-of-levels="2" first-content="true" />
This will generate an output similar to Name of Parent Section : Name of Current Section if the Content Item is the first Content Item on the page.
Output a separator text which includes a quote symbol
Similar to the selective output tag, if you need to output a quote symbol as part of the separator text, then it needs to be changed to ". For example:
<t4 type="parentnames" separator=" <span class="separator">:</span> " start-level="0" number-of-levels="2" />
This will generate an output similar to
Name of Parent Section <span class="separator">:</span> Name of Current Section
Output a different separator text in different languages
For multiple language sites, the language variable tag is used to specify different text in different languages. This can be used within the separator tag as follows:
<t4 type="parentnames" separator=" <t4 type="lang-var" default-language="en" en=" is the parent of " ga=" mar tuismitheoir do " /> " start-level="0" number-of-levels="2" />
In English this will generate an output similar to:
Name of Parent Section is the parent of Name of Current Section
In Gaeilge this will generate an output similar to:
Name of Parent Section mar tuismitheoir do Name of Current Section
Server-side Link (type="sslink")
The Server-side link tag is used for generation of section and content links and should not be changed manually.
Incorporate content from databases, RSS feeds and other web pages
Description
With Data Objects, Web Objects and the import-url tag you can use content which is maintained outside of Terminalfour in Terminalfour published pages.
Since the Data Object connects to the data source and retrieves content on each publish, you may see an increase in publish duration. Based on your requirements, you should consider the External Content Syncer or Packages when retrieving large amounts of content from external sources.
However, if your license is limited by content item number, the Content Syncer will import content items into Terminalfour which will increase your content count. The Data Object does not import content items into Terminalfour since content is retrieved and added to the page on publish and so does not add to your content count.
There's more than one way to integrate external data in Terminalfour and the method you choose can depend on the type of data and what you want to do with it.
- Database content can be included using the Data Object for databases
- RSS content can be included using the Data Object for RSS feeds
- Web content from multiple pages (http and https) can be included using the Web object
- Web content from one page (http and https) can be included using the Import URL tag
Data Object for Databases
The Data Object connects to an external database each time the site publishes. On publish, the content is pulled from the database and inserted into the HTML of the published page. The presentation of the content can be controlled within the Content Layouts.
For security reasons, the password to the external database is not configured in the Data Object tag, but rather in the Data Object configuration.
Configuration options
A Data Object T4 tag is added to a Content Layout and content is added to the site using the Content Type. The following configuration options are available on the T4 tag (a * indicates that it is required):
| Item | Description |
|---|---|
| method | This should be jdbc. |
| driver* |
Enter the driver that is used to connect to the database. Examples:
If you have not created a Data Source to connect to this type of database before, a database driver may need to be installed.
|
| db-url* |
Enter the JDBC URL used to connect to the database. This should be in the format Example for MySQL: Example for SQL Server: |
| username* | Enter the username which has access to the database. This user requires only read access. |
| table-name | Name of the database table to retrieve content from. This is required unless the sql attribute is used. If content from more than one table is required, this can be a comma-separated a list of table names. e.g. company,countries |
| column-names |
Names of the columns to be returned from the table(s) specified in table-name. If the content is from multiple tables, prefix the table name followed by a period before the column name, e.g., This is required unless the sql attribute is used. |
| where | This is an optional conditional statement for the database query and is not required if all data is required from the table selected. Placeholders can be used to replace values with the relevant Content Element. e.g., where price = $template.price$ and countries.id = company.country |
| sql | Rather than specifying the table-name, column-names and where attributes, it is possible to use the sql attribute to contain the full SQL statement. Similar to the where attribute, placeholders can be used to replace values with the relevant Content Element. |
| max-number | To restrict the number of records displayed by a Data Object, enter the number of records, or the name of the Content Element that controls the number. By default (if not specified), all records are displayed. For further information, refer to an example of the max-number attribute. |
| formatter* | The name of the Content Layout that will be used to format the data returned from the database. |
| elem-ident-char |
Enter the character that is used to wrap the database column names when creating the Content Layout for the Data Object content. By default a $ symbol is used, however, if the Content Layout for the database content already contains $ symbols (e.g., PHP code), then you can change it here. |
Example Data Object Tag
<t4 type="data-obj" method="jdbc" driver="com.mysql.jdbc.Driver" db-url="jdbc:mysql://localhost/external_db" username="dbusername" table-name="company,countries" column-names="company.id, company.name, price, email_address, department, telephone, countries.name" where="where price = $template.price$ and countries.id = company.country" formatter="text/output" />
Using a "where" Statement
The "where" option in the Data Object tag is not required and is used, as in a SQL query, to return only data that matches defined criteria.
An example would be:
where="where faculty = 'Science' and countries.id = company.country"
If you would like each Content Item using the Data Object Content Type to display different results, you can apply different criteria to the same Content Element for each Content Item.
For example, if you wanted a Content Item to display all data where the faculty is "Science". Add "Science" to the "Faculty" element in the Content Item then change the "where" option in the Data Object tag to reference the "Faculty" Content Element as $template.Faculty$. This would read as follows:
where="where faculty=$template.Faculty$"
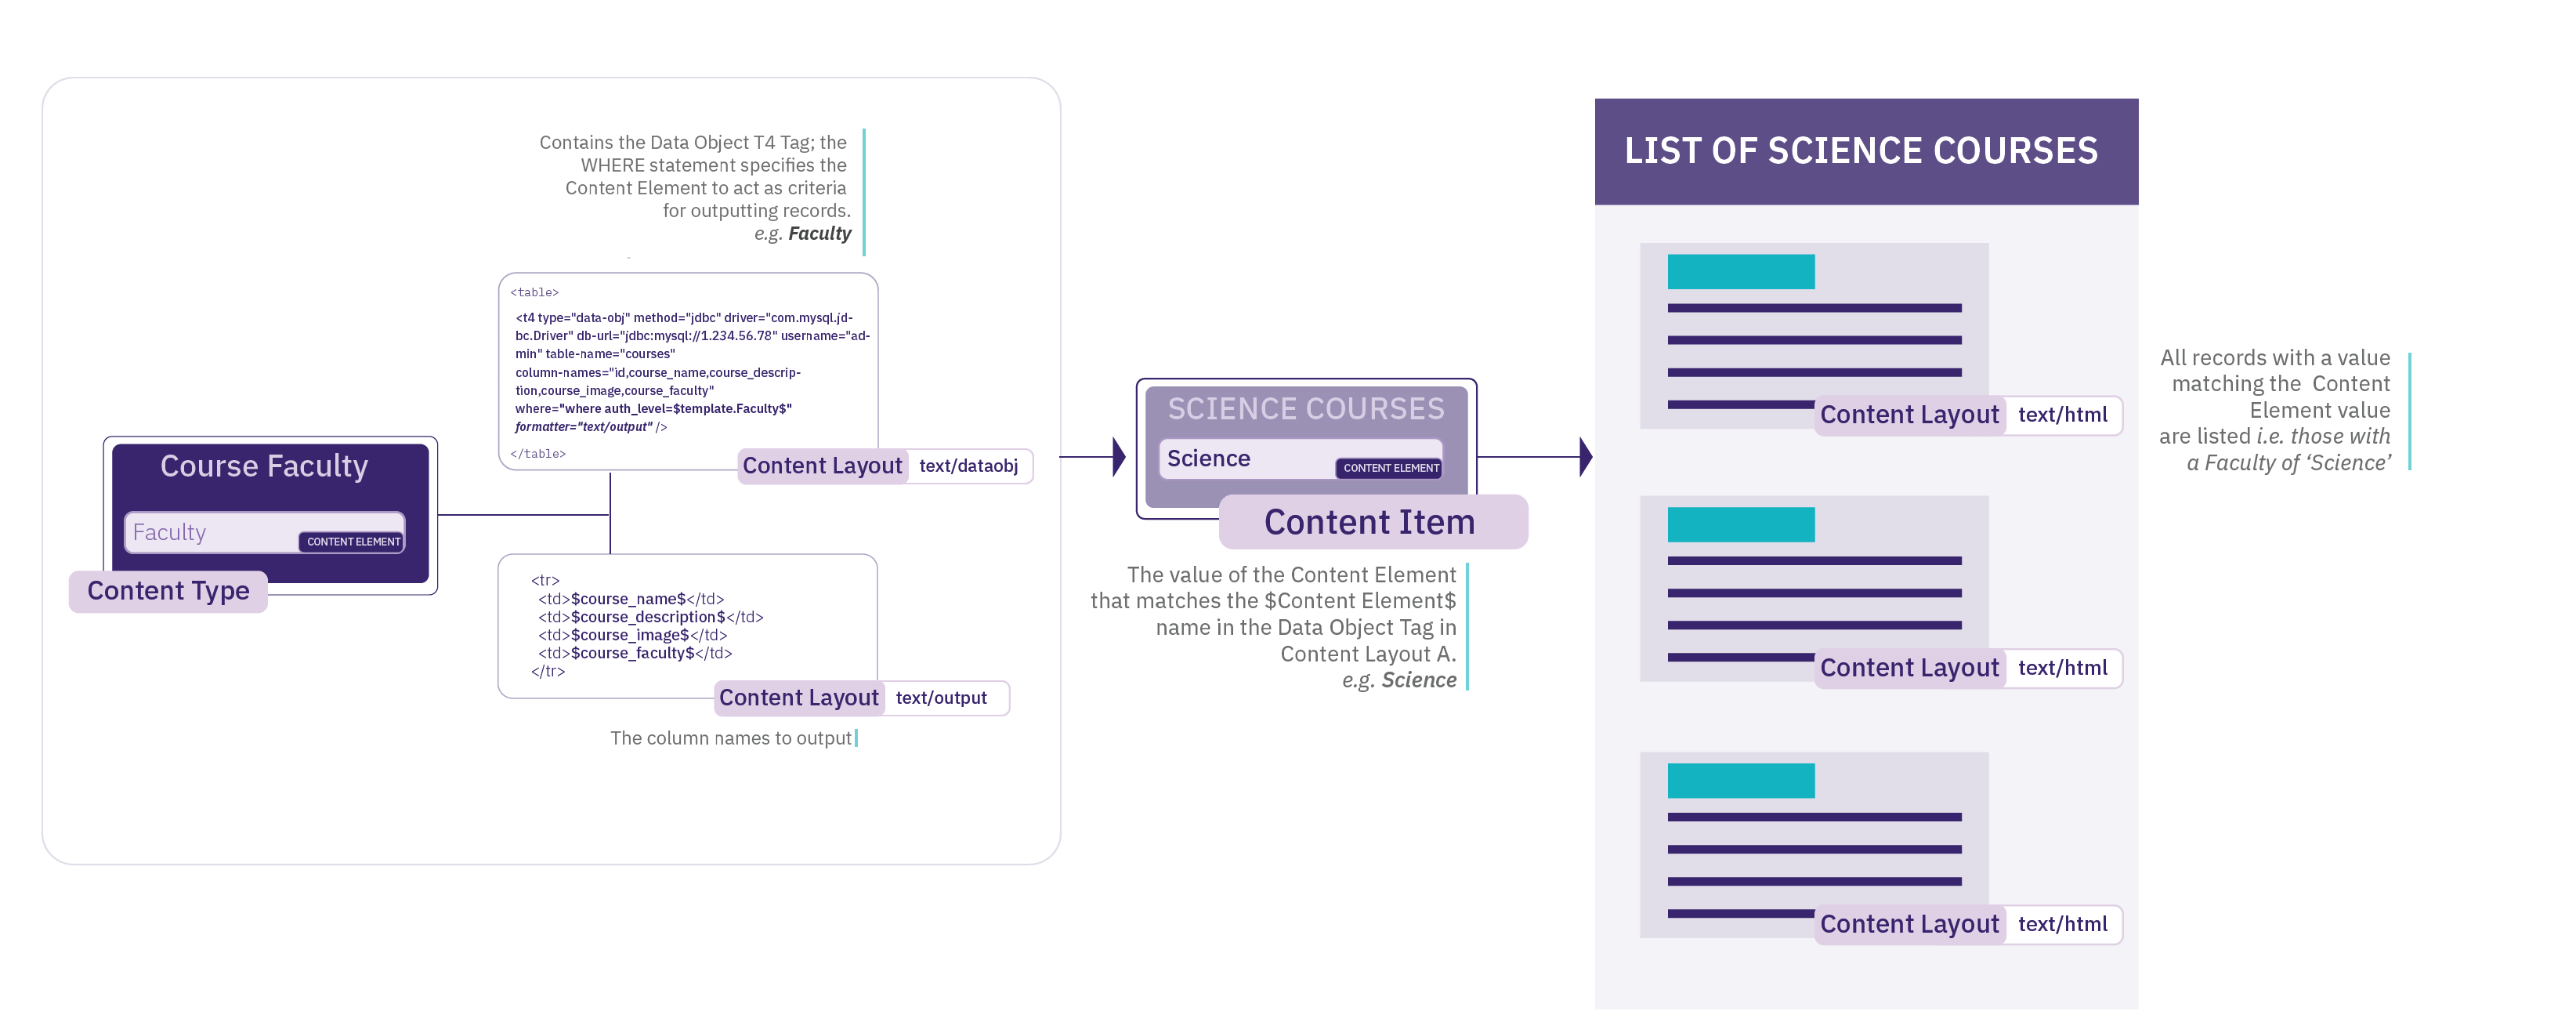
You could also use the same Content Type to publish two Content Items to output the results from both the "Science" and "Humanities" faculties by changing the value in the "Faculty" Content Element.
Using a "sql" attribute
Rather than specifying the table name, columns names and where clauses separately, it is possible to use the sql attribute to enter a full SQL statement. For example:
<t4 type="data-obj" method="jdbc" driver="com.mysql.jdbc.Driver" db-url="jdbc:mysql://localhost/external_db" username="dbusername" sql="select company.id, company.name, price, email_address, department, telephone, countries.name from company,countries where price = $template.price$ and countries.id = company.country" formatter="text/output" />If you alias columns in your query, you must use the "as" statement; not just white-space.
Creating the Content Layout
To determine the Content Layout for the database query results when the site is published, you must specify the Content Layout that will be used. In your Data Object Content Type, you create a new Content Layout called "text/output" and set the "formatter" option in the Data Object tag to this name.
In the Content Layout, add the HTML to use with the data returned from the database query. You can then call the individually returned columns by putting the column name between two $ signs. An example of this would be:
<h1>$id$</h1>
<p>Name: $example.name$ <br />Email: $email_address$ <br />Dept: $department$<br /> Tel: $telephone$ <br /> Price: $price$ <br /> Country: $countries.name$ </p>
This layout can contain other T4 Tags and HTML code. If the Content Layout for the database content contains $ symbols (e.g. PHP code) then it is possible to specify a different character to be used in order to identify the database fields in the Data Object. An example tag would be:
<t4 type="data-obj" method="jdbc" driver="com.mysql.jdbc.Driver" db-url="jdbc:mysql://localhost/external_db" username="dbusername" table-name="company,countries" column-names="company.id, company.name, price, email_address, department, telephone, countries.name" where="where price = $template.price$ and countries.id = company.country" elem-ident-char="+" formatter="text/output" />
in which case the "text/output" Content Layout would be:
<h1>+id+</h1>
<p>Name: +example.name+ <br />Email: +email_address+ <br />Dept: +department+<br /> Tel: +telephone+ <br /> Price: +price+ <br /> Country: +countries.name+ </p>
Restrict the number of items displayed
If a database query contains a number of records, and you only want to display the first few records, the Data Object tag can restrict the number of items, max-number="x"
An example tag would be:
<t4 type="data-obj" method="jdbc" driver="com.mysql.jdbc.Driver" db-url="jdbc:mysql://localhost/external_db" username="dbusername" table-name="company,countries" column-names="company.id, company.name, price, email_address, department, telephone, countries.name" where="where price = $template.price$ and countries.id = company.country" max-number="3" formatter="text/output" />
The maximum value can also come from a Content Element. An example tag, assuming a Content Element called Number, would be:
<t4 type="data-obj" method="jdbc" driver="com.mysql.jdbc.Driver" db-url="jdbc:mysql://localhost/external_db" username="dbusername" table-name="company,countries" column-names="company.id, company.name, price, email_address, department, telephone, countries.name" where="where price = $template.price$ and countries.id = company.country" max-number="$template.Number$" formatter="text/output" />
Ordering results
Results can be ordered by a column name. For example, to order by a column named "Company Name" you would add order=”Order by company.name”:
<t4 type="data-obj" method="jdbc" driver="com.mysql.jdbc.Driver" db-url="jdbc:mysql://localhost/external_db" username="dbusername" table-name="company,countries" column-names="company.id, company.name, price, email_address, department, telephone, countries.name" where="where price = $template.price$ and countries.id = company.country ORDER BY company.name" formatter="text/output" />Database Drivers
The driver for the database used by your TERMINALFOUR application (MySQL/MS SQL Server/Oracle) will already be installed. Drivers for other databases will require a separate install in order to sync with them.
To install other drivers, the driver (JAR file) should be accessible to the TERMINALFOUR application i.e., included in the TERMINALFOUR application's classpath. For example, the JAR file could be placed in the Tomcat's lib directory, or another location that is referenced by the Tomcat server.xml configuration file.
For further assistance, please discuss this with your TERMINALFOUR server administrator or contact our support team.
Data Object for RSS
The Data Object connects to an RSS feed each time the site publishes. On publish, the content is taken from the RSS feed and embedded within the HTML of the published page. The presentation of the content can be controlled within the Content Layouts.
Configuration options
A Data Object T4 tag is added to a Content Layout and then content is added to the site using the Content Type. The following configuration options are available on the T4 tag (a * indicates that it is required):
| Item | Description |
|---|---|
| method* | This should be set to a value of rss. |
| rss-url* | The URL of the RSS feed to be accessed. This can be a URL or can reference a Content Type Element where the user enters the URL e.g. $template.url$. An example of the rss-url options is available. |
| for-each* | The name of the parent tag for each set of data required. e.g., item An example of the for-each options is available. |
| formatter* | The name of the Content layout to be used to style the published page. |
| max-number | To restrict the number of records displayed by a Data Object, enter the number of records, or the name of the Content Type element that controls the number. By default (if not specified), all records are displayed. For further information, refer to an example of the max-number attribute. |
Example Data Object tag
<t4 type="data-obj" method="rss" rss-url="$template.url$" for-each="item" formatter="text/output" />
Configuring the rss-url option
The "rss-url" option should be set to the URL of the RSS feed to be accessed. This can be achieved in one of two ways.
Setting the URL in the Content Layout. This can be used if you would like each Content Item added using the Data Object Content Type to show the same RSS feed. It would look similar to the following:
rss-url="http://www.terminalfour.com/rss/news.xml"
If you would like each Content Item added using the Data Object Content Type to display a different RSS Feed, you can add an element to the Data Object Content Type called "url" and then change the rss-url option in the tag to be similar to the example below. Then when you add content to a Section, you can enter the URL of the feed into the "url" element.
rss-url="$template.url$"
Configuring the "for-each" option
The "for-each" option is related to the parent tag of the information you wish to retrieve. If you look at the following extract from an RSS feed, you can see in this case it is called "item":
<channel>
<title>TERMINALFOUR News</title>
<item>
<title>The Genie is out of the bottle, and at your service - a glimpse into the future</title>
<link>http://www.terminalfour.com/news/</link>
<description>The Genie is out of the bottle, and at your service - a glimpse into the future of student support. In a future not too far away, students are all going to have personal assistants. That's if Deakin University's Genie app is anything to go by.</description>
</item>
<item>
<title>How is Artificial Intelligence revolutionizing HigherEd digital marketing?</title>
<link>http://www.terminalfour.com/news/</link>
<description>Artificial Intelligence (AI) is the technology of the moment. And rightly so, as AI has started to sweep through industries and disrupt them. And it’s not stopping at the front gates of Universities and Colleges.</description>
</item>
</channel>
Creating the Content Layout
To determine the layout of the RSS feed information for the published site, you need to specify a Content Layout to be used. In your Data Object Content Type, create a Content Layout called "text/output" and set the formatter option in the Data Object tag to this name as in the tag example earlier. In this Content Layout, you can create the HTML code you want to wrap around the data in the RSS feed. You can then call the individual tags by putting the tag name between two $ signs. An example would be:
<h2>$title$</h2>
<p>Link: $link$</p>
<p>Description: $description$</p>
Output an attribute of a tag
If you would like to output a tag's attribute value, you write this as $nodeName.attribute[attribute_name]$ in the Content Layout, and it will output the attribute value instead of the node's text.
Example:
<entrance type="main" disabled_access="true" id="1">
<place>
<id>53.405750424917244</id>
<number>-2.9651740193367004</number>
</place>
</entrance>
So, using the example above, if $entrance.attribute[disabled_access]$ is found in the Content Layout, the value "true" will be output on publish.
Restrict the number of items displayed
If an RSS feed includes 10 items, but you only want to publish the top 3, the Data Object tag can restrict the number of items.
An example tag would be:
<t4 type="data-obj" method="rss" rss-url="$template.url$" for-each="item" max-number="3" formatter="text/output" />
The maximum value can also come from a content type element. An example tag, assuming a content type element called Number, would be:
<t4 type="data-obj" method="rss" rss-url="$template.url$" for-each="item" max-number="$template.Number$" formatter="text/output" />
Web Object
A Web Object is a broker similar to the Import URL Broker; however, the Web Object can be configured to follow links on the target URL to the linked web pages too. Each time the site publishes, the content is taken from an http or https location and embedded within the HTML of the published page.
You generate a Web Object in one of two ways:
- Using a standard URL
- the same URL is used for all instances of the Web Object
- Using a custom URL
- different URLs are used for different instances of the Web Object, depending on input from the user creating content
Configuration Options
A Web Object T4 tag is added to a Content Layout and then content is added to the site using the Content Type. The following configuration options are available on the T4 tag (a * indicates that it is required):
| Item | Description |
|---|---|
| method* | Enter a value of http. |
| start-url* | The target URL for the Web Object. This can contain a variable which looks to an element in the Content Type in order to construct all or part of the target URL. Refer to the example of the standard URL and the example of the custom URL below. |
| parse-body* | Allows a value of true or false. If set to true, the Web Object reads only the content between the body tags of the target page. If set to false, the Web Object reads the entire target page. There is also a start-tag and end-tag option below. |
| start-tag and end-tag |
Use specific tags in the code where you want to start displaying content and where you want to end. The quote characters within these values do not need to be escaped. Ensure you use a unique start tag. Including comments in your code can help when choosing a suitable place to start. |
| link-match* | If the Web Object is going to follow links on the target page and import linked pages, use this option to specify the start of the URL which the Web Object can use to match URL strings. The Web Object only imports links starting with the link-match value. If link matching is not required, enter a value of "no-link-match". e.g. link-match="/careers" |
| link-match-import-method* | Currently only allows a value of subsection. This instructs the Web Object to create sub-directories to hold the linked content. |
| max-level-site | Define how far you want to crawl within the content when using the "follow links" option. e.g. max-level-site="5" |
| use-title-attribute | When the Web Object follows links and creates sub-directories for each link, the name of the sub-directory will use the link text. Alternatively, if the url has a title attribute, you can use it by setting the use-title-attribute="true". |
| cache-expiry* | To decrease the publish time for Web Objects, caching can be enabled. If cache is enabled, the first time the Channel is published, the Web Object creates a folder within the content store to keep a copy of the content. The next time a publish is run on the same Channel, the information is pulled from the content store instead of sending a request to the URL, improving publish performance. After the cache expires, the publish connects to the URL again and restarts the process. The time is set in hours. Setting cache-expiry="0" ensures that the cache never expires as it is never refreshed. Setting cache-expiry="24" will expire the cache after 24 hours. |
| object-name | Give the Web Object a name. Each instance of the Web Object it has its own folder; as a result, it is recommended to give it a name. Failing to do so results in the Web Object using the Section ID and Content ID as a name reference. |
Use of a standard URL
Create a Content Type; it does not require any additional elements to be added, so the only element is Name. Add a Web Object tag to the Content Layout, and then add content to the site using the Content Type.
In the Content Layout, apply the following code:
<t4 type="web-obj"
method="http"
start-url="http://www.terminalfour.com"
link-match="/careers"
link-match-import-method="subsection"
parse-body="true"
/>
After the Content Type has been enabled, you can add content and publish the Channel as normal.
Use of a custom URL
The following example demonstrates a Web Object which is pointed at a person profile management system to output the person details in HTML. The individual person's details can then be published as part of the TERMINALFOUR published page.
The URL for the person profile management system contains a variable for the person's email address:
https://my.othersite.com/here/PEOPLE_SHOW.SHOW_PEOPLE?email=mary.smith@mysite.com will display the details for Mary Smith
https://my.othersite.com/here/PEOPLE_SHOW.SHOW_PEOPLE?email=john.smith@mysite.com will display the details for John Smith
The start-url requires a variable for end users to be able to specify the email address of the person when adding content using the Web object Content type.
Create a Content Type. In this example, the Content Type requires one element to store the email address, called "staffemail".
In the Content Layout, apply the following code:
<t4 type="web-obj"
method="http"
start-url="https://my.othersite.com/here/PEOPLE_SHOW.SHOW_PEOPLE?email=$template.staffemail$"
link-match="PEOPLE_SHOW.SHOW"
link-match-import-method="subsection"
parse-body="true"
/>
Add content using the new Content Type. Enter "john.smith@mysite.com" in the element "staffemail" and update the content. Then, add an additional Content Item and enter "mary.smith@mysite.com" into the element "staffemail". Publish the Channel as normal.
The above example replaces the $template.staffemail$ value with the entry in the content's "staffemail" element (mary.smith@mysite.com).
On publish, TERMINALFOUR goes to the url https://my.othersite.com/here/PEOPLE_SHOW.SHOW_PEOPLE?email=mary.smith@mysite.com and makes a copy of the content within the body tags for that page and inserts them into the TERMINALFOUR published page.
The start-url can contain T4 tags. The quote symbols in the T4 tag need to be single quotes ( ' ), as in this example:
start-url="https://my.othersite.com/here/PEOPLE_SHOW.SHOW_PEOPLE?lang=<t4 type='lang-var' default-language='en' en='en' fr='fr'/>"
Import URL
The Import URL T4 Tag allows content to be taken from a web page (http or https) and to be added to the HTML of the published page. To follow links on the specified page and import multiple pages, use a Web Object.
The Import URL tag is added to a Content Layout and then content is added to the site using the Content Type. There are two options for the configuration of the target URL:
| Item | Description |
|---|---|
| url | The URL, including http://. In this case, all instances of the Content Type use the same URL. |
| element | Name of the Content Type element to use for the URL. In this case, users enter the full URL (including the http://) when adding content using the Content Type. Each instance of the Content Type can use a different URL. |
Example Using the URL Attribute
If the following T4 Tag is inserted into a Content Layout, it connects to http://www.terminalfour.com/, reads the page content and includes it in the TERMINALFOUR published page.
<t4 type="import-url" url="http://www.terminalfour.com" />
Example Using the element Attribute
If the following T4 Tag is inserted into a Content Layout, it connects to the URL specified in the "external link" element, reads the page content and includes it in the TERMINALFOUR published page.
<t4 type="import-url" element="external link" />
Include content from a PDF file on a page
Description
This tag, type="pdfdoc" is added to a Content Layout. It takes a given file element, checks to see if it is a PDF document and uses the "output" attribute to determine how the PDF should appear on the published page.
The file name of the PDF document should not contain spaces.
Potential usage scenarios
- Display a PDF within an iframe on a Content Item.
- Allow the content of the PDF to be extracted and published on a page so that it can be used for search indexing.
Content Type
Create a content type with a file element (not a media element). Add the tag to a Content Layout. Create content using the Content Type and publish. There are three options for the tag.
Embed
The "embed" option will upload the file in the normal way, output code pointing at the uploaded file, embedding the file on the published page. The PDF file can be viewed in a PDF reader like Adobe reader. If no reader is installed in the browser, a link to the PDF will be provided instead. This publishes the PDF document in the same directory as the published page.
<t4 type="pdfdoc" output="embed" name="file-element-name" />
<iframe height="100%" width="98%" frameborder="0" src="/include-content-from-a-pdf-file/sample.pdf" align="center"><a href="/include-content-from-a-pdf-file/sample.pdf">sample.pdf</a></iframe>
Hidden - with the file
The "hidden-file" option will read the contents of the PDF document and then output it inside a hidden div on the published page. This publishes the PDF document in the same directory as the published page.
<t4 type="pdfdoc" output="hidden-file" name="file-element-name" />
<div class="hidden-div" style="display:none;">Content from PDF Document</div>
Hidden - without the file
The "hidden-no-file" option will read the contents of the PDF document and then output it inside a hidden div on the published page. This does not publish the PDF document.
<t4 type="pdfdoc" output="hidden-no-file" name="file-element-name" />
<div class="hidden-div" style="display:none;">Content from PDF Document</div>
Notes
- If the file is not a PDF document nothing will be output.
- The element referenced must be a file content element.
- The tag can only be used in Content Layout.
- If hidden-no-file is used in conjunction with either embed or hidden-file then the option will be overridden and the PDF document will be published in same directory as the published page.
- If both embed and either hidden-file or hidden-no-file are specified, the PDF will be both embedded on the page and added to a hidden div.
- If both hidden-file and hidden-no-file are specified, the PDF will be both embedded on the page and added to a hidden div.
- The iFrame created is a set width and can't be changed.
- The div created can't be changed unless css is used to set it to be displayed.
- The line breaks from PDF file are ignored when published on the page.
T4 tags: Convert Excel to HTML
Description
This tag takes an Excel spreadsheet in the Media Library and publishes the data within that file as an HTML table on the page. The Excel to HTML tag is added to a Content Layout (to create the table) and to a Page Layout (to format the table) and content is added to the site using the Content Type.
There's more than one way to integrate external data in TERMINALFOUR and the method you choose can depend on the type of data and what you want to do with it.
Content Layout tag
For the example we are using a very basic spreadsheet:
Create a Content Type with a media element. In the Content Layout, add the tag. There are two attributes for this tag:
| Item | Description |
|---|---|
| name | Name of the media element in the content type that contains the Excel file. |
| output-sheet-name | Setting this attribute to true will output the Excel sheet names. If this attribute is not included in the tag, sheet names will not be output on the page. |
Examples
<t4 type="exceltohtml" name="media-file" />
<t4 type="exceltohtml" name="media-file" output-sheet-name="true" />
The output generated would be:
<div id="excel-285-media-file">
<div id="table-285-1-media-file">
<table class="excel-285-media-t1">
<colgroup>
<col width="144">
<col width="144">
<col width="56">
</colgroup>
<tbody>
<tr class="excel-285-media-r1">
<td class="excel-285-media-c1">Fruit</td>
<td class="excel-285-media-c1">Vegetables</td>
<td class="excel-285-media-c1"> </td>
</tr>
<tr class="excel-285-media-r1">
<td>Apple</td><td>Parsnip</td>
</tr>
<tr class="excel-285-media-r1">
<td>Orange</td><td>Carrot</td>
</tr>
<tr class="excel-285-media-r1">
<td>Banana</td><td>Spinach</td>
</tr>
</tbody>
</table>
</div>
</div>
Page Layout tag
A tag is added to the header of the Page Layout within the <style type="text/css"> tag in the header.
| Item | Description |
|---|---|
| name | Name of the media element in the Content Type that contains the Excel file. |
| default-font |
If set, this allows a font-family and font-size to be configured and used for all tables in the Excel spreadsheet. |
| sheet-numbers-element | if set, this allows specific sheets in the Excel spreadsheet to be published to the page. By default, all sheets within the Excel file are published onto the page. To specify the sheets to be published, create a plain text element in the content type (for example, called "Sheet Numbers") and specify this element name in the sheet-numbers-element attribute. When adding the content using this template the ‘Sheet Numbers’ element should be populated with a comma separated list of sheet numbers example: 1,3,4, |
Example
<style type="text/css">
<t4 type="exceltohtml" name="media-file" default-font="font-family:arial;font-size:8pt;" sheet-numbers-element="Sheet Numbers" />
</style>
<style type="text/css">
.b1{white-space-collapsing:preserve;}
.excel-285-media-t1{border-collapse:collapse;border-spacing:0;}
.excel-285-media-r1{height:14.5pt;}
.excel-285-media-c1{white-space: pre-wrap; text-align: left; vertical-align: bottom; font-weight: bold; color: black; font-family:arial;font-size:8pt; }
</style>
Notes
- If a title is in one cell in the Excel file, it appears in one cell in the HTML table. If you want a title to span over more than one column in the HTML table then cells must be merged in the Excel file.
- Rows merged in an Excel file can cause problems as there is no way to merge rows in a HTML table. The formatting of these rows must be corrected before they is displayed in the HTML correctly.
T4 tags: Appendix
Appendix
This is a listing of tags and the main attributes.
Type
Output
| output |
|---|
| output="description" |
| output="fav-icon" |
| output="file" |
| output="fulltext" |
| output="id" |
| output="image" |
| output="imageurl" |
| output="lang_disclosure_style" |
| output="lang_disclosure_template" |
| output="linktext" |
| output="linkurl" |
| output="normal" |
| output="selective-output" |
| output="site-root" |
| output="userinfo" |
Other
| other |
|---|
| action="" |
| after="" |
| append-content="" |
| append-element="" |
| attribute="" |
| before="" |
| client-resize="" |
| date_format="" |
| default-language="" |
| delimiter="" |
| display_field="" |
| editable="" |
| element="" |
| empty-section="" |
| enable-dedit="" |
| filename-element="" |
| first-child="" |
| first-content="" |
| format-modifiers="" |
| format="" |
| formatter="" |
| id="" |
| info="" |
| locale="" |
| locale_es="" |
| max-height="" |
| max-width="" |
| meta="" |
| modifiers="" |
| name="" |
| number-of-levels="" |
| process-format="" |
| separator="" |
| start-level="" |
| text="" |
| textual-name-separator="" |
| threshold="" |
| use-element="" |
Data Object Connection Settings
Description
With Data Objects you can add content from external data sources to your pages simply by adding a T4 Tag to your Content Layout. External content is maintained outside of TERMINALFOUR, and can come from a variety of sources like RSS, CSV or through a JDBC database connection. While the Data Object is stored within the Content Layout, database connection settings such as authentication details are configured separately as an added security measure.
Configure the Data Object Database Connection
To create a new database connection for Data Objects, go to System Administration > Configure Integration Tools > Data Object and select the option to Create New Data Object. For each Data Object enter:
| Item | Description |
|---|---|
| Name | Give the database connection a name. |
| Username | Enter the username that is used to connect to the database. |
| Password | Enter the password that is used to connect to the database; this password will not be displayed. Clicking the associated toggle can display and hide the password. This password is encrypted when it is stored within the TERMINALFOUR database. |
| Content types | The Content Types permitted to use this database connection. These Content Types will include Content Layouts that can contain the Data Object T4 Tag. |
If you are satisfied with your inputs, then click Save Changes. Continue to configure the Data Object T4 Tag within the Content Layout.