
Content Types
Description
A Content Type is the structure of a Content Item and is made up of one or more Content Elements. You can think of Content Types as structured templates for the Content Items that you will create, edit and publish.
When we create a Content Item, we use a specific Content Type to determine the number and type of elements that can be populated with Content.
For example, a news article Content Type might comprise Title, Main Body and Image Content elements. A user will populate some or all of these elements when adding a news article to the site.

To publish content on your site, a Content Type must use a Content Layout to determine the elements that will be displayed on a page and how they will be presented. If you are publishing a webpage, inserting T4 Tags between HTML tags will act as placeholders for our content when creating a Content Layout.
Each Channel has a default Content Layout associated with it, so for your content to appear as defined in the Content Layout, the Content Layout name must match the default associated with the Channel.
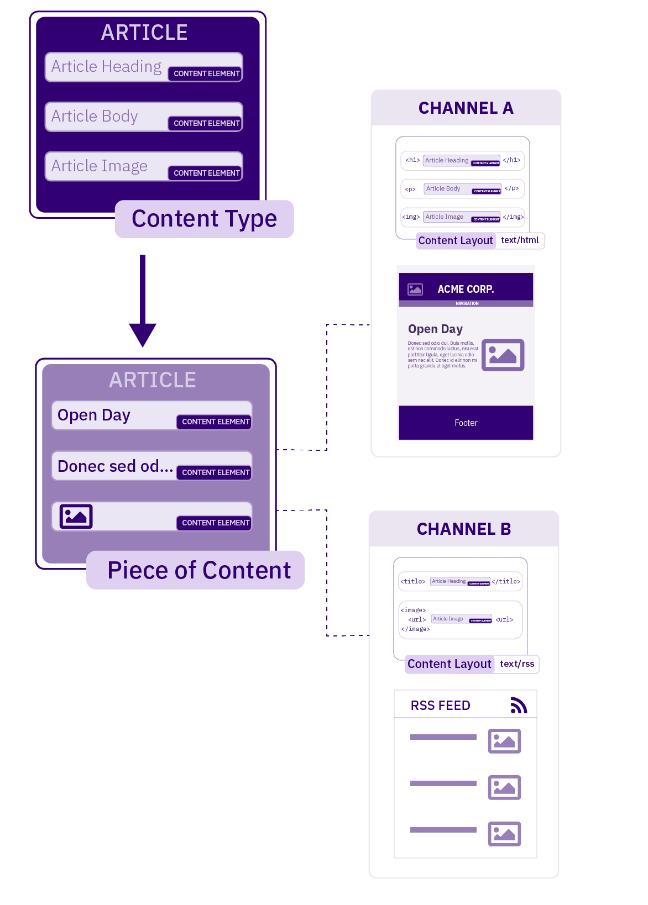
The diagram shows how a single Content Item using a Content Type can be displayed in two different ways. In this example, the Content Item uses the "Article" Content Type. This Content Type has two Content Layouts - one that is used to publish on the news webpage (text/html) and another for publishing to RSS (text/rss). Each Channel has a default Content Layout associated with it.
Who can use Content Types and where?
There are three ways that the use of Content Types can be restricted. These can be broken into two categories:
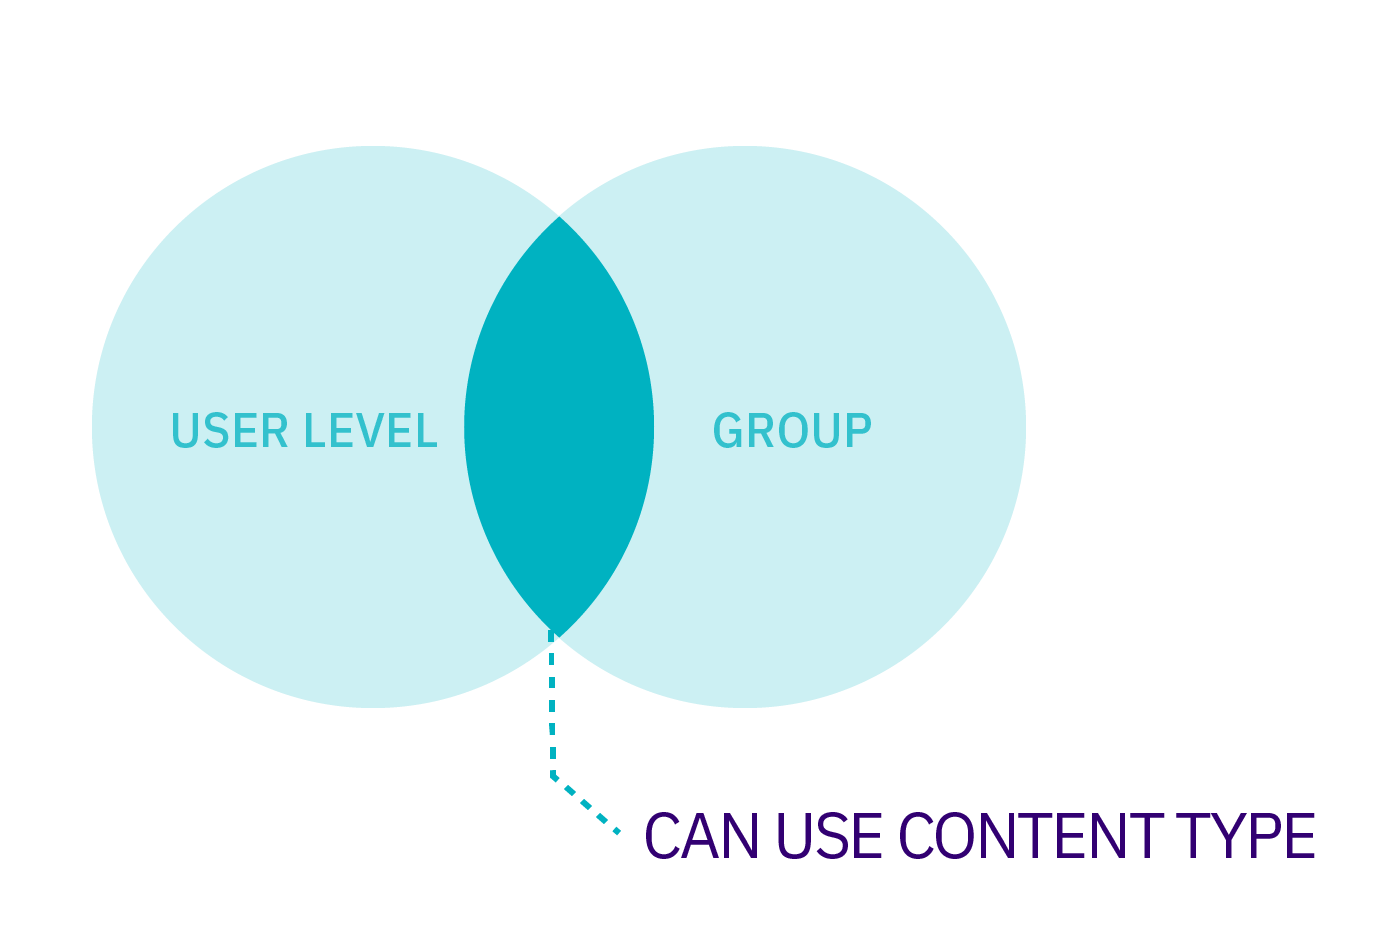
Who can use a Content Type?
- User Level: this is the Minimum User Level that can create or edit content using the Content Type
- Group Membership: even though a User may fulfill the Minimum User Level requirement, if a Group is specified, the User must also be a member of that Primary and/or Shared Group to use the Content Type.
If no Group is assigned to the Content Type, then it is labeled as Global. Assets which are labeled as Global are available to any User Level with permission to use it. How that Asset can be used is restricted by the Role Settings for that User Level. For instance, Power Users cannot edit a Global Content Type unless it is moved to a Group from which they have permission to edit from.
Permissions extend to what a User can do with a Content Type. When a Shared Group has been assigned to a Content Type, you can determine if the Users within that Group have Read Only or Full Access to the Content Type.
When Full Access is assigned, Users in that Group can create and edit content with the Content Type and Power Users in that group can edit the Content Type itself. With Read-Only, Users in that Group can only create and edit content with the Content Type.
Where Can a Content Type Be Used?
Section / Branch: a Content Type must be enabled for a Section and/or Branch for it to be used
Even though a User may have Group and User Level access to a Content Type, it cannot be used until it has been enabled for a Branch or Section. Administrators and Power Users can enable Content Types for the sections of the site to which they have been given access by editing the Section and selecting the Content Types tab.
Content Type Listing
When you go to Assets > Content Types, you will see a list of existing Content Types in the Content Types page.
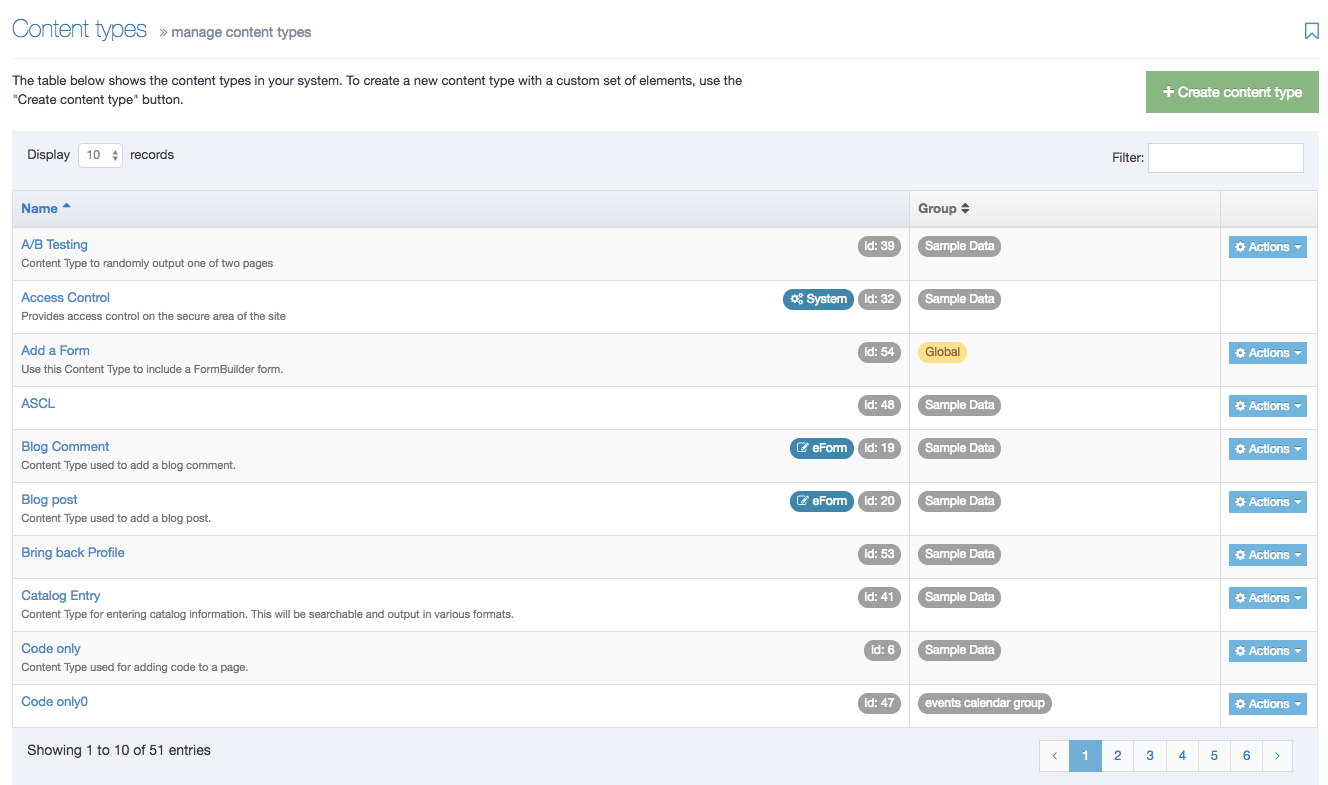
The three columns in the table are Name, Group and the Actions button:
| Item | Description |
|---|---|
| Name Column | Contains Content Type name, a brief description (if one has been provided), and the Content Type ID number. The arrow in the header row can re-order the list alphabetically |
| Group Column | Shows the Group(s) the Content Type belongs to. If the Content Type is shared with one other Group or more, you'll see a + and the number of Groups it's shared with. To see a list of those shared Groups hover over the + symbol. |
| Action Menu Button | Provides options to Share, Duplicate, Edit, and Delete |
Creating a Content Type
To create a new Content Type select Create Content Type
This screen has two tabs - General Information and Elements.
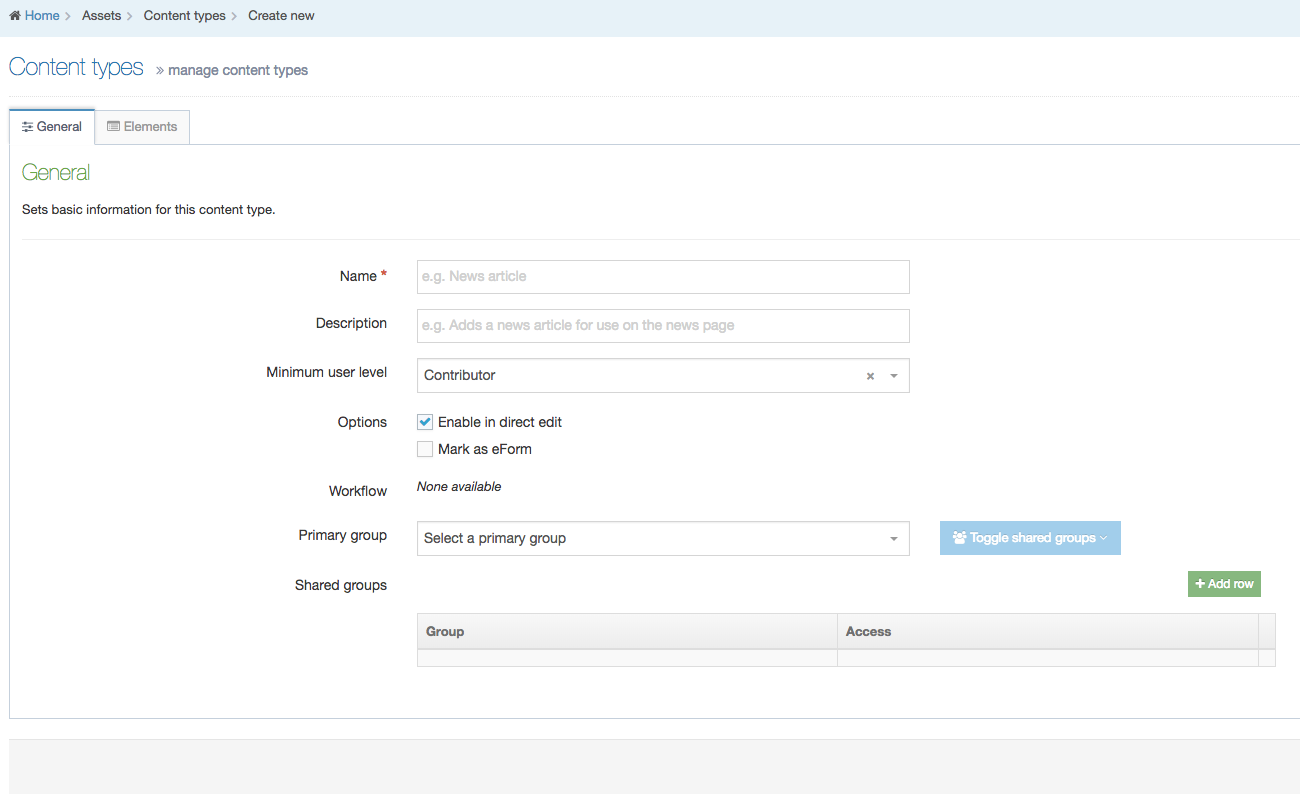
General Information
| Item | Description |
|---|---|
| Name |
A unique Name is required for each Content Type |
| Description | Can be added to provide more information about the Content Type. This text is used by the filter feature on the listing page so it's best for the text to be meaningful and descriptive |
| Minimum User Level | Determines who can use a specific Content Type to add new or modify existing content. For example, if the User Level is set to Moderators, a Contributor can't create or modify content that uses this Content Type. |
| Enable Direct Edit | When this option is selected, users can edit the content with this Content Type when working in Direct Edit. This is suitable for most content. Direct Edit may not preview code snippets, video and audio content as intended. |
| eForm | If checked, this allows your Content Type to collect eForm data. |
| Workflow | Applies an existing Workflow to the Content Type. If a Workflow is applied to a Content Type, all content using this Content Type will Workflow when created/edited. Workflows can also be applied to sections of the Site structure. When a Workflow is applied to a Section and a Content Type within a Section, the configuration settings will determine the Workflow that's used. |
| Primary Group |
Restricts access to the Content Type based on the Primary Group a User is a member of:
|
Content Elements
A Content Type is made up of Content Elements. These are the fields that will be populated to make up a Content Item.
Guidelines for using the Name Content Element
The first element of every Content Type is a plain text element called Name. This element cannot be removed or renamed and the Element Type cannot be changed. Though the Name given is not a unique identifier (since more than one Content Item can share the same name), it is used to allow users to identify content within a Section or when approving content.
It's recommended that you use the Name element for tracking the content within the system but avoid publishing it on your site. If the Name element is published on the site, you should indicate so in the description of the content element.
There are a couple of ways to use the Name element to help track your content's use:
1. Names that Describe a Content Location
Using this setup the Name element can be used to give a descriptive name to the content so it can be easily identified. Content could be added to the site on the 'Department News' section. In this case, the Name and Heading elements could be populated as follows:
- Name: Department News Articles
- Heading: News Article Heading
Using the example above, the content can be quickly identified within TERMINALFOUR as it has a descriptive name which indicates the location of the content.
2. Names that Describe a Content Type
Pages that have multiple content items can use the Name element to describe the Content Type in use. Doing so allows a user to scan the list of content and find the relevant content item to update. e.g., "right sidebar" or "left column content".
Content Element Types
Content comes in different formats and so do Content Elements. While a Media Content element is used to add items from the Media Library, a Plain Text Element is used to input plain, unformatted text.
Though most Content Types require more than one element, there are exceptions (e.g., Data and Web Objects, and others) where no additional elements may be needed.
While a page analysis process determines the types of elements, you need to create, make sure you allow for some flexibility.
Remember - each element in a Content Type must have a unique Name. It is good practice to use descriptive names which help users when adding content.
This is a list of TERMINALFOUR standard formatted elements:
| Name | Description |
|---|---|
| Cascading List | A list with one or multiple sub-lists. It works like a drop-down List with sub-lists branching off of particular options. The content layout T4 Tag permits you to output either the value or name of the list entry and lets you change the delimiter used when multiple list items are selected. |
| Check Box | Check one or more options from a List. |
| Content Owner | The user can specify the owner of the content by selecting the user's profile name from a drop-down list. When building the Content Layout, you can determine what user information is published on the site. |
| Date | The user can pick a date and time from a calendar. A date format can be applied to output a specific format e.g., dd/MM/YYYY etc. |
| Decimal Number | The user inserts a number with decimal places. The decimals can be left out, but attempting to enter anything other than a number, results in an error. |
| File | Lets a user to upload a file. The file is stored in the Content store but is not added to the Media Library and cannot be reused in other content. The File T4 Tag for the Content Layout generates a path to the file. It is possible to restrict the file types that can be uploaded in the Content Configuration Settings. |
| Group Select | You can select one or multiple groups. The purpose is to secure data when integrating Access control. |
| HTML | This gives the user an area with a WYSIWYG editor to enter text. The default editor is TinyMCE. In the HTML editor settings, you can enable custom styles and modify the options available in the editor. |
| Image | The user can upload an image but it is not added to the Media Library and cannot be reused in other content. When using an Image element, you can modify the Image T4 Tag for the Content Layout to resize the image, output alt text, and other actions. It is possible to restrict the file types that can be uploaded in the Media Library Settings. |
| Keyword Selector | Allows the user to build a list of keywords, using AND/OR logic, that is used by the Keyword Search Content Navigation Object to retrieve results. |
| Media | A user can select a file (e.g., image, pdf, video/audio file) from the Media Library. When the file is not in the Media Library already, the user can upload it (assuming write permission has been granted). The Media items are formatted according to the Content Layouts in the Media Content Type. Or, the T4 Tag for the Media element can be changed to choose the Content Layout to use. |
| Multi-Select List | A Multi-select list is similar to a Cascading list, as it lets a user select multiple items from a List. Where it differs the user is not limited to selecting items from a single list, to include from sub-lists branching off of the initial list. The list T4 Tag for the Content Layout permits you to output either the value (or name of the list entry) plus you can change the delimiter used when multiple list items are selected. |
| Multiple Select Box | Permits the user to select one or multiple options from a drop-down List. The list T4 tag for the Content Layout lets you to output either the value or name of the list entry and lets you change the delimiter used when multiple list items are selected. |
| Plain Text | Enables the user to enter text and numbers. Depending on the T4 tag output modifiers, if the user enters HTML, the tags will be removed. This is convenient when you want to lock down how titles or headings will appear on the page. |
| Radio Button | A radio button allows the user to select an option from predefined List items. |
| Repeater | Introduced in 8.4.1, A Repeater element allows you to include a different content type as a repeated set of fields. |
| Section/Content Link | A Section/Content link allows a user to create a link to a Section (page) or a Content Item. You can determine when users are permitted access to the full Site Structure or only the parts they are assigned to. With the T4 Tag for the Content Layout, you can output either: the full link, the URL, or the link text. |
| Select Box | A Select box allows a user to select one option from a predefined drop-down List. |
| Whole Number | A Whole number allows a user to insert a number with no decimal places. Attempting to enter anything else (example: text) in this element results in an error. |
Creating Content Elements
When creating or editing a Content Element you will populate rows in the Content Element table. Each row is broken up into the following columns:
| Item | Description |
|---|---|
| Order | Select and drag the move icon to change the order of individual Elements |
| Name | A name for the Element |
| Description | This appears as a tooltip when a user is creating or editing content |
| Type | Select an element type from the drop-down list |
| Required |
When creating or editing content with this Content Type, if this is checked, the element will display an asterisk beside it denoting that it is required. Content cannot be saved without populating this element. If a Plain Text element is set to Required, only entering one or more space characters as content will not be accepted. |
| Size |
Restricts the maximum amount of text that can be input or files that can be uploaded. The maximum size can be restricted for each element. Plain text and HTML elements are counted in characters. File and image elements are counted in kilobytes (Kb). All other element types use the default, so no maximum size needs to be specified. For file and image elements, if the maximum size on the element is larger than the global Max upload size, the global Max upload size will apply. |
| Use as filename |
To control the URL of fulltext pages (when creating friendly URLs), you can use one of the Content Type elements. By default, the Name element is used, but you can set another Plain Text element to use as filename instead. The filename is used for Content Types that have a fulltext layout. If the "Use as filename" option is selected for a Content Element, and the T4 Tag specifies a different Content Element, the Content Element set on the T4 Tag will override the Content Element that has "Use as filename" selected. |
| Show |
From 8.3.17 it's now possible to hide elements from the content editing view. This may be useful for old content types where the element may not be used, or for elements populated by the External Content Sync tool that you do not want to allow content editors to modify. |
| Remove | Selecting this will remove the Element. Removal does not occur unless you also click Save changes. If you navigate away without saving the Element will remain in place. |
Conditional Logic
Conditional Elements (Introduced in 8.4.0) allows Admins and Power Users to customize the Content Editing Experience by conditionally displaying elements based on specific criteria.
This feature helps simplify and streamline the content creation process by showing only relevant fields to Content Editors.
Learn more about Conditional Elements.
When the General Information and Elements tabs have been populated and saved, the Content Layout tab appears. You can proceed to build a Content Layout.
Content Layouts
A Content Type can have one or multiple Content Layouts, these can either be linked together or used individually.
About Fulltext
When Content Layouts are linked together, an element in the Content Layout needs to link to the next Content Layout. This uses a feature called "fulltext".
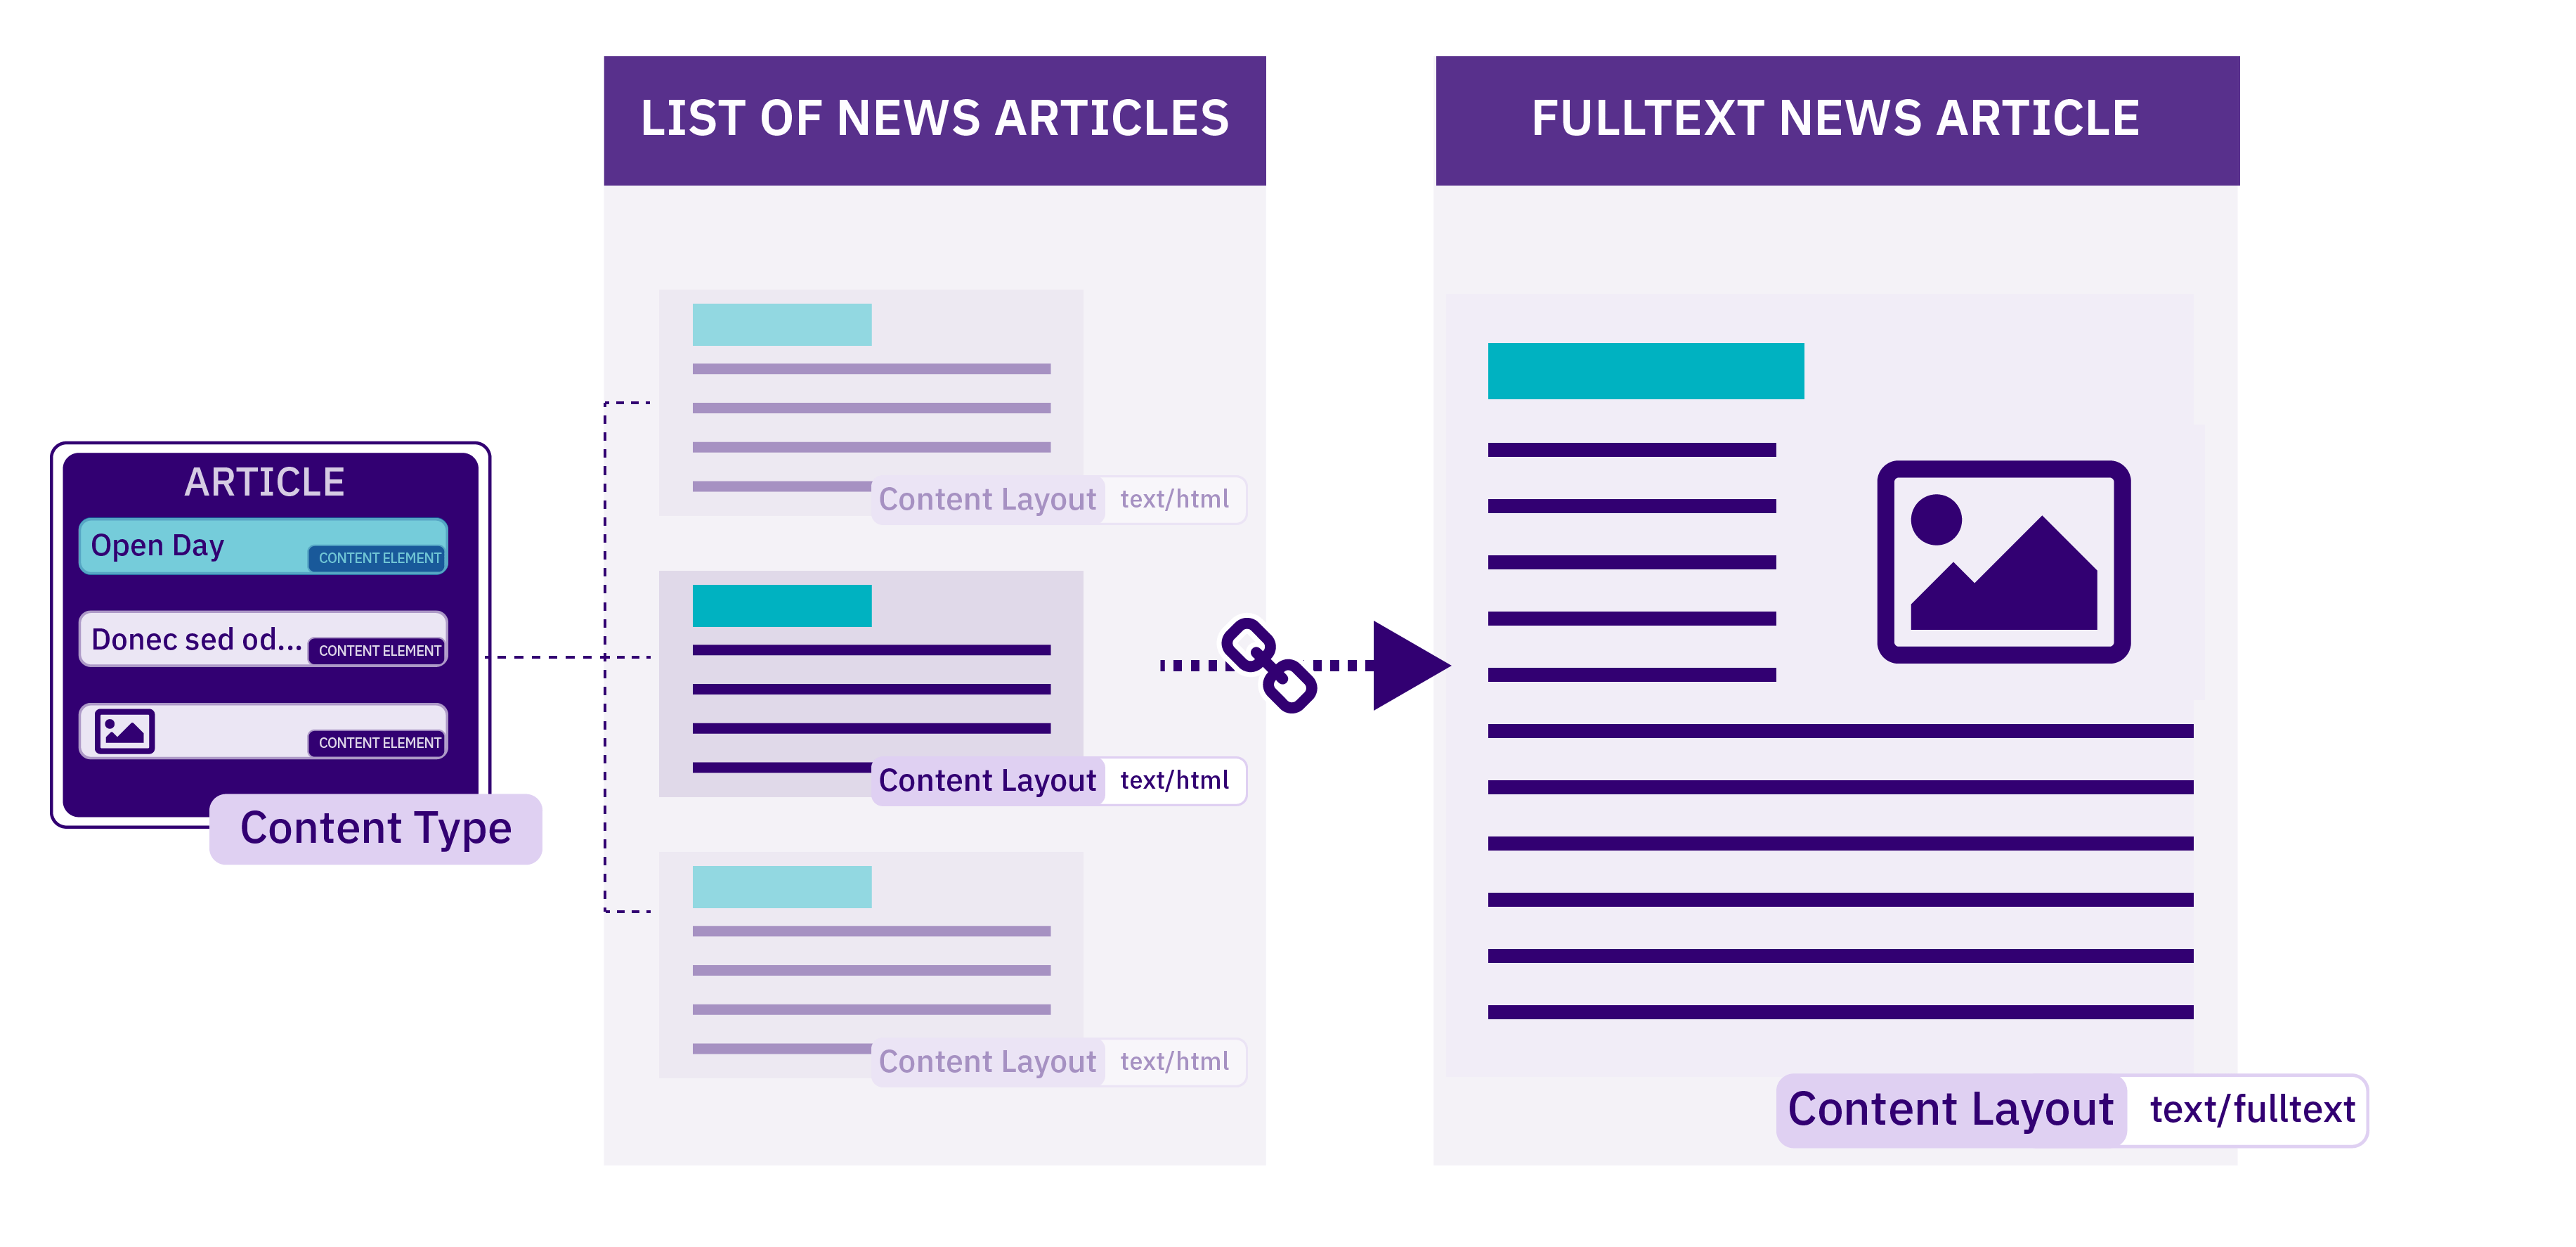
In this case, we might have a listing page where each item links to a more detailed page. For example, a list of news articles will each feature the headline and an abbreviated version of the article. Each headline links to the full version of the related news story. Both versions use the same Content Type with different Content Layouts. There is an explanation of this within the documentation of the T4 Tag for Fulltext.
Create a Content Layout
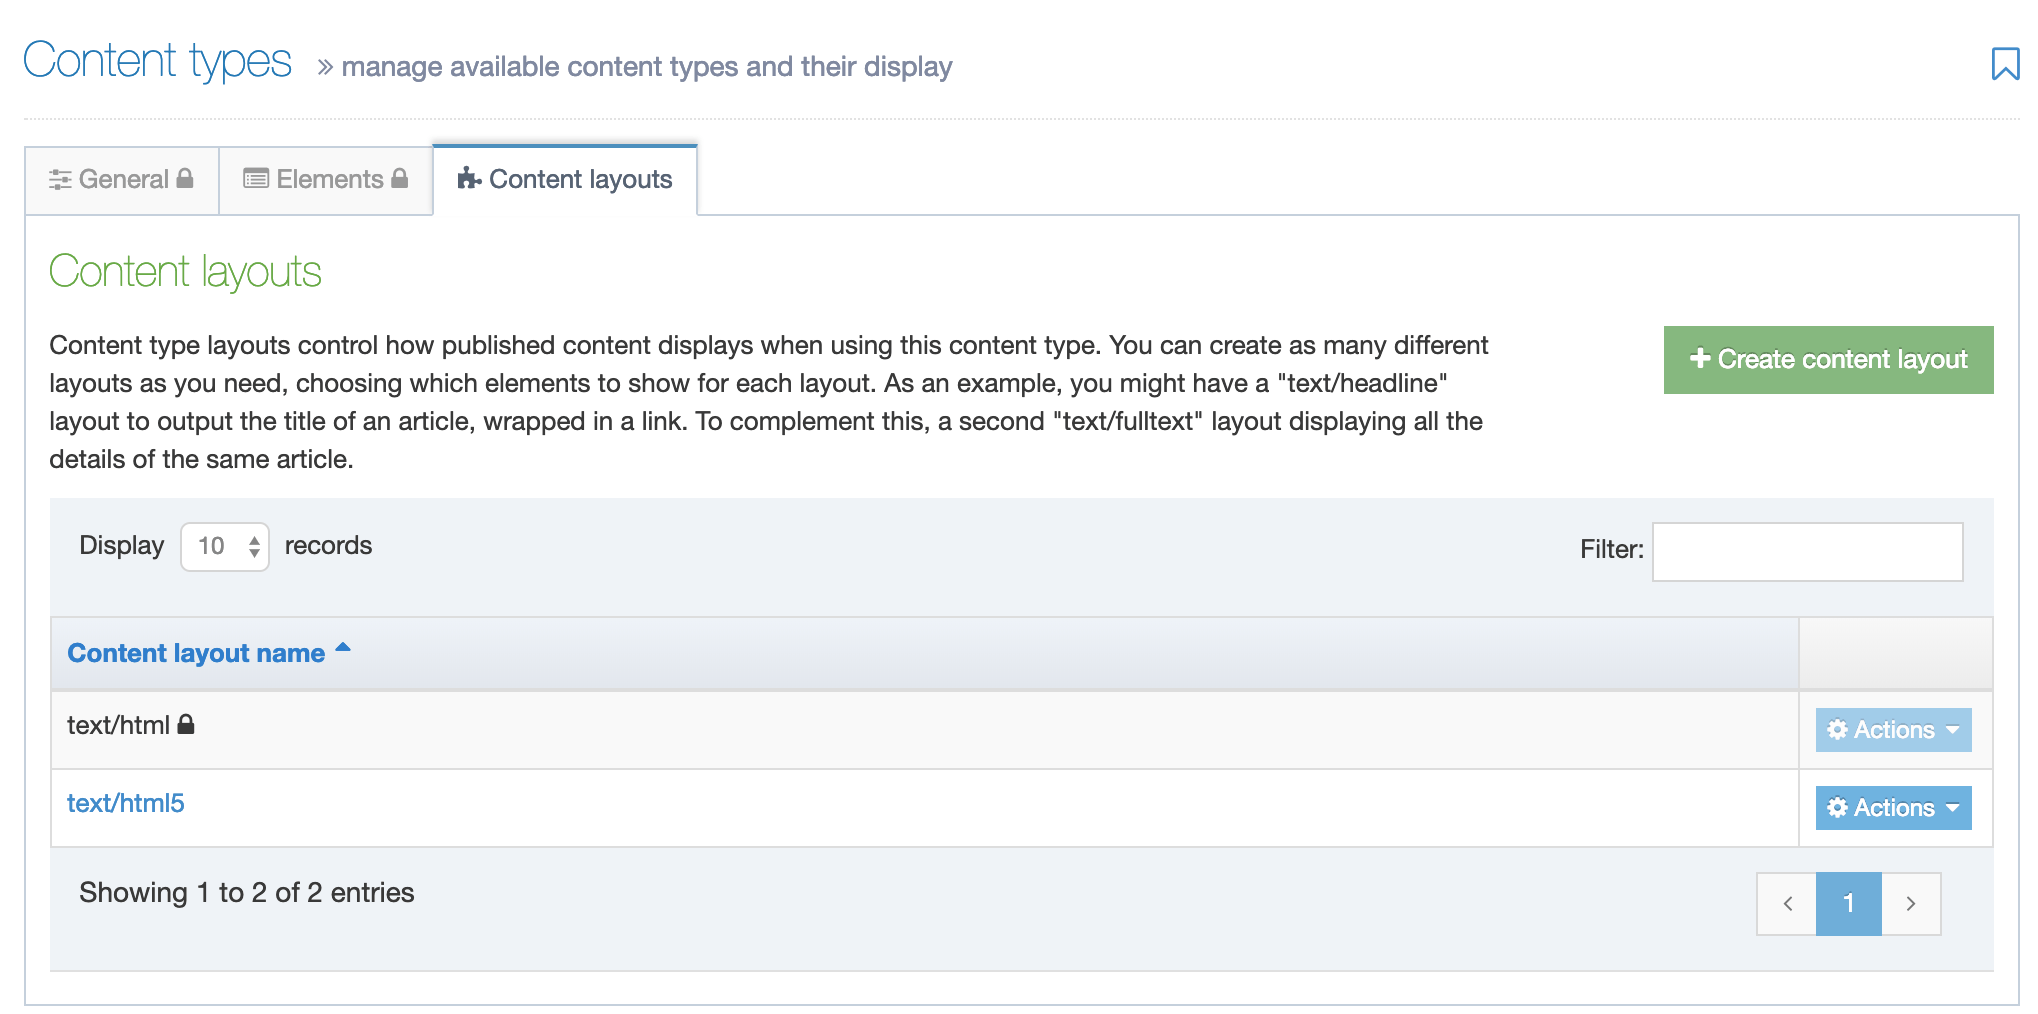
To access Content Layouts, go to the Content Type listing page at Assets > Content Types and identify the Content Type you need. Select the Content Type name or select the Actions button and select Edit. From the Content Type page select the Content Layout tab. You'll see a list of all existing Content Layouts. You can filter the list by name. The number of results listed can be modified via the drop-down list on the top left. If there are no existing Content Layouts, the list will be empty:
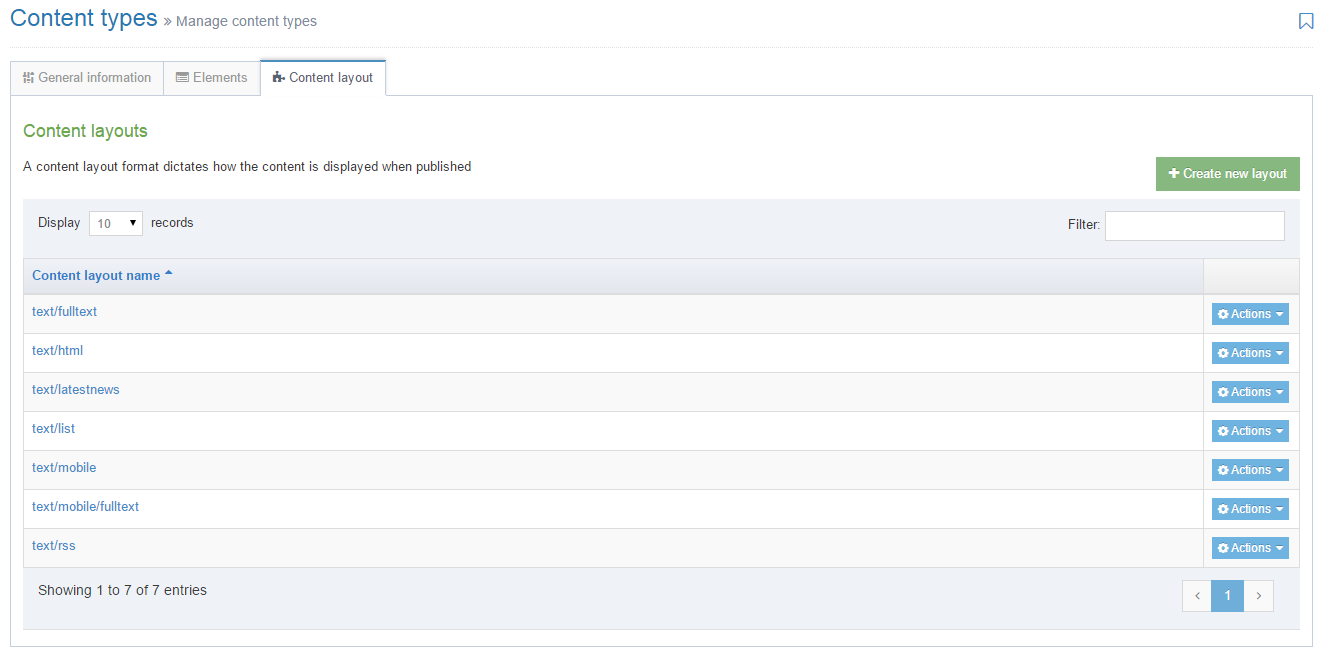
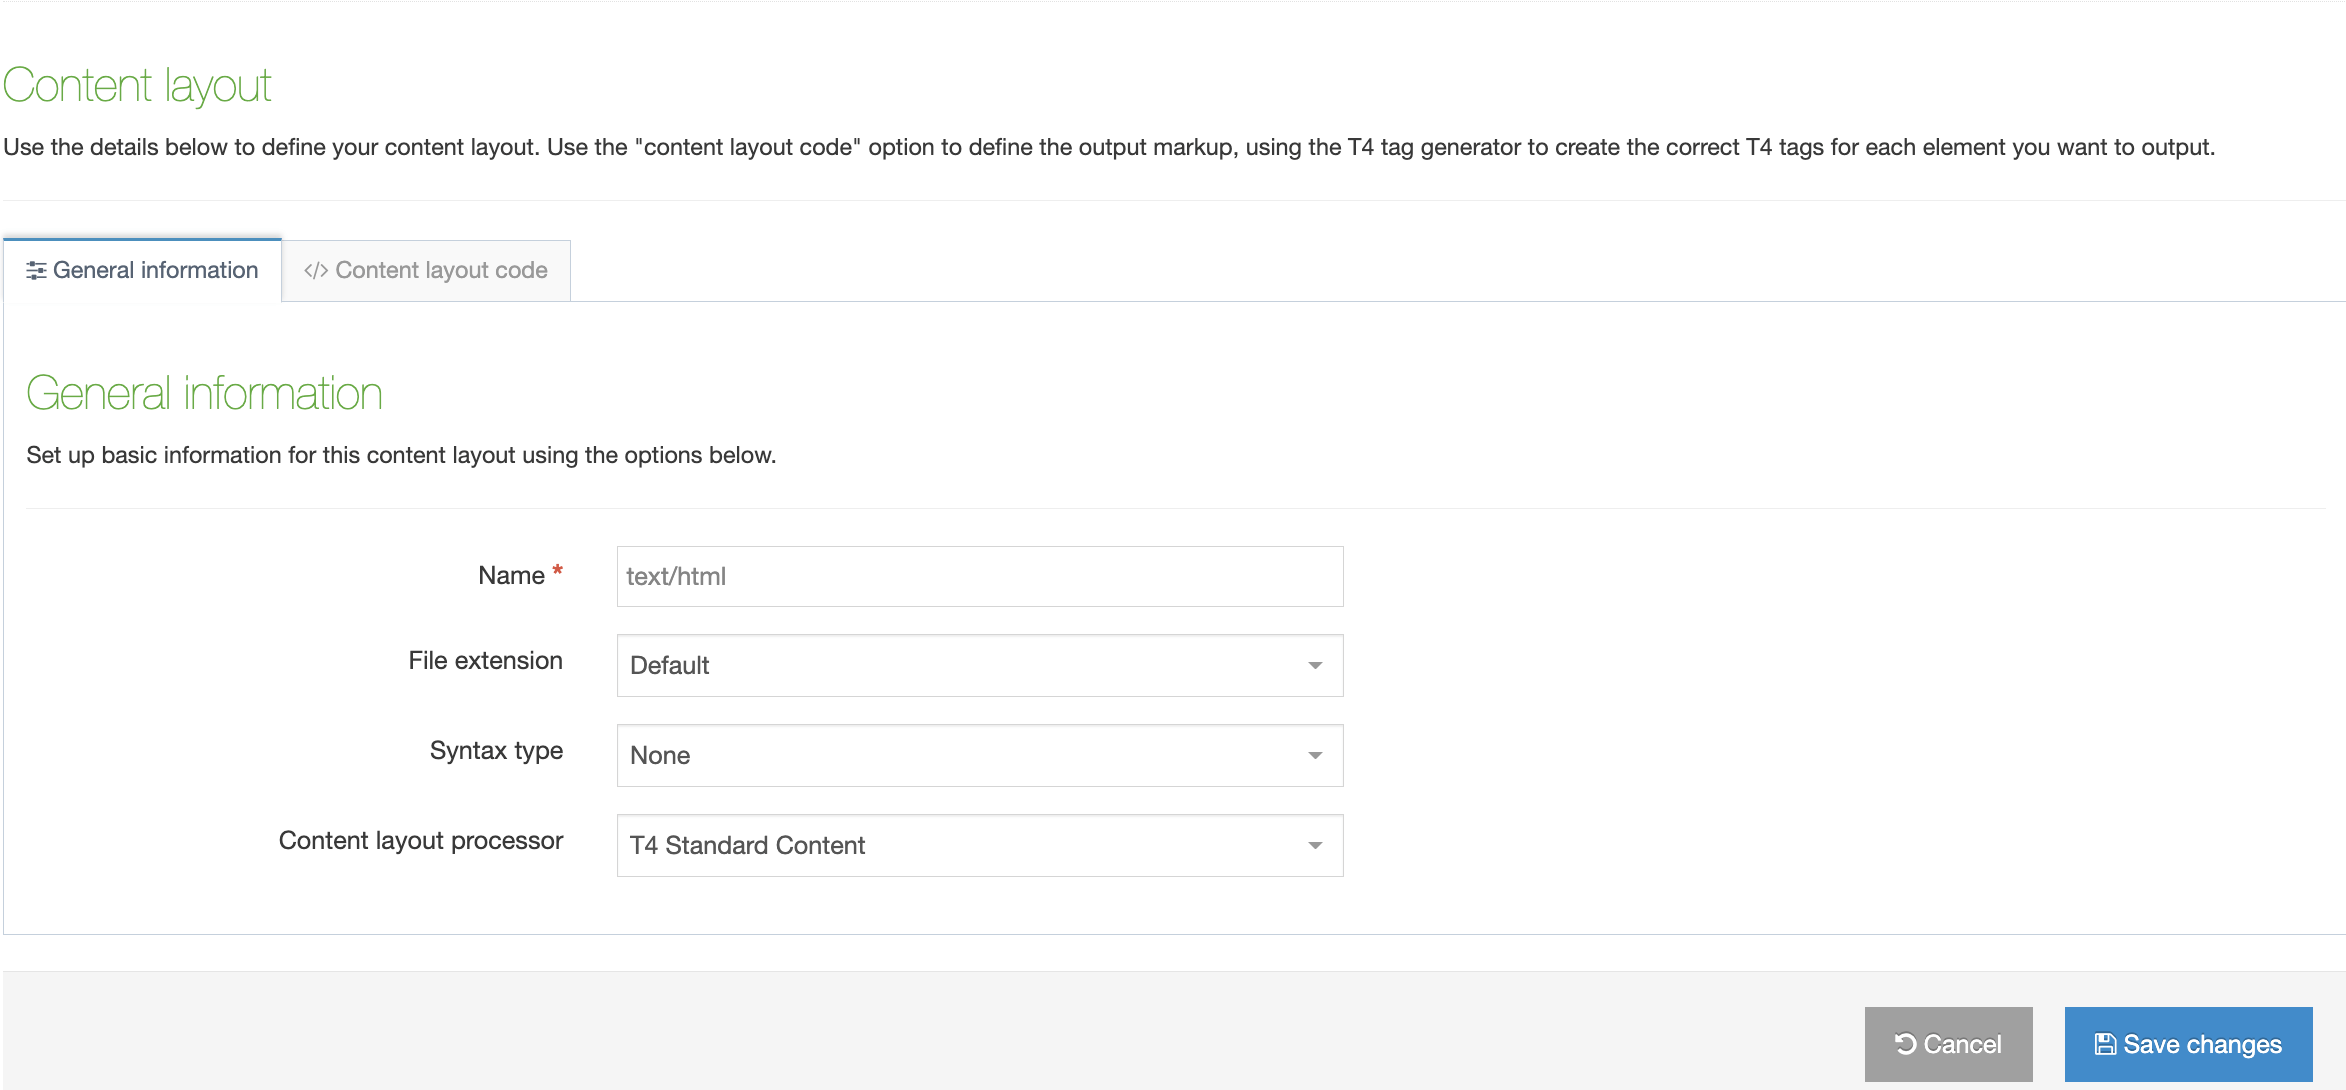
Selecting Create New Layout will open a new screen:
| Item | Description |
|---|---|
| Name | Each Content Layout requires a unique Name (e.g. text/html) which should match the Channel's default that is defined in the Channel settings or that referenced via a fulltext output or Navigation Object. |
| File extension |
The Default setting will use the Channel's default extension. A different extension must be specified in the The extension must be permitted in the Channel Settings under Available file extensions. After a Content Type has been in use, changing the extension can impact the content and result in content no longer being published. The Channel associated with the Section containing the content must have the same extension defined. |
| Select a Syntax type |
Used for syntax highlighting when editing the code of the Content Layout. There is syntax highlighting for Javascript, CSS, HTML/XML, PHP and Java. |
| Content Layout Processor |
There are two options that determine how your Layout is processed
|
You can add code in the "Content layout code" tab:
| Content Layout Code |
This determines what is output and how it is displayed. Depending on the Content Layout Processor selected, T4 Tags or Handlebars Expressions are used to output the content entered in your Content type elements. |
|---|---|
| Syntax Highlighting |
Choose whether you want Syntax Highlighting. This must be in the enabled position for highlighting to happen. |
Processing T4 Tags and Handlebars Expressions in Content
Some users like to create a "Code Only" Content type that can be used by admins or advanced users. This content type is generally made up of a Plain text element where users can enter code that will be rendered as-is on the page.
If you're creating a Code Only content type and you want users to be able to add T4 Tags or Handlebars Expressions it's important that the Content Layout Processor is set appropriately on this Content Type.
For example: A Code Only Content Type that is using the "T4 Tag content" layout processor will be able to parse and output T4 tags added by content editors but not Handlebars expressions. And similarly, a Code Only Content Type that is using the "Handlebars content" layout processor will be able to parse and output Handlebars expressions added by content editors but not T4 tags.
Content Layout Versioning
From version 8.3.13 you can manage versions of Content Layouts by selecting the History tab. From here you'll see a list of all versions of the current Content Layout.
The name of the current version is bolded and you'll see a "Current" label.
To compare two versions side by side, just check the checkboxes and click "Compare Selected".
To make a version "Current" click "Make Current" in the comparison screen or the version listing screen.
Share a Content Type
Global Content Types can be used by any user (for areas of the site where they are enabled) but can only be edited by Administrators. Power Users and Administrators can create Content Types within groups or share Content Types with other groups. The Content Types can either be shared with Read-only or Full access:
- Read-only access: Power Users within the group can view the Content Type but cannot edit it
- Full access: Power Users within the group can view and edit the Content Type
Regardless of how the Content Type is shared, all users within the group can use the Content Type, if it is enabled on the section, and they meet the Minimum User Level.
Duplicate a Content Type
You can duplicate a Content Type. Do this either into a new Group or the same Group or with other Groups. A duplicate Content Type creates a copy of the original and the two Content Types are not linked to each other.
Delete a Content Type
If you are unsure whether or not a Content Type is in use, check the Content Type Usage Reporting first. In the row of the corresponding Content Type, open the Actions drop-down list and select Delete.
A confirmation pop-up window appears and you can confirm your choice and Delete, or Cancel the action. Upon successful deletion, a green banner appears confirming the deletion, and the Content Type is removed from the list.
System Content Types
System Content Types are Global Content types that are used by Terminalfour, to store special types of content that are used in various parts of the system. When viewing the Content Type Listing, System Content Types are represented with a System badge. System Content Types cannot be edited, but it is possible to create/edit Content Layouts on them.
There are eight possible System Content Types in Terminalfour:
| Content Type | Description |
|---|---|
| Access Control | System Content Type used to provide access control on a secure area of a site. |
| Content Layout | System Content Type for storing User defined Content Layouts. |
| Extended User Details Content Type | System Content Type for adding elements to the User Profile. |
| Media | System Content Type for storing uploaded Media Library items. |
| Migration Tool Configuration | System Content Type for storing predefined migration configurations. |
| Page Layout | System Content Type for storing User defined Page Layouts. |
| Section Meta Description | System Content Type to be used to add a custom fields to a section. |
| Handlebars Helpers | System Content Type used for storing Custom Handlebars Helpers |
| Handlebars Partials | System Content Type used for storing Handlebars Partials created by Admins |
| Widget | System Content Type for Widgets (historic and not used in v8+). |
Content Type Locking
From version 8.2.18, Content Type Locking will help you and other users see which Content Types and Layouts are locked and cannot be edited.
An asset is locked while another user makes changes to it and is unlocked when the user Saves Changes, clicks on the Cancel button or navigates away from the Edit page to another screen in TERMINALFOUR.
If the browser window or tab is closed or the Edit screen is left open indefinitely, the lock will expire after the duration configured under Content Lock Timeout in System Administration > Hierarchy & Content Settings > Content.
A user who is editing a Content Type or Content Layout when a lock expires will receive an onscreen notification in which they can renew the lock.
When a Content Type is locked you will see a padlock icon beside the name of the Content Type which signifies that this Content Type is being edited by another user. You can see the name of the user who is editing the Content Type by hovering over it. Locked Content Types also have less options available from the Actions menu:
When a locked Content Type is selected, the fields in the General and Element tabs are grayed out:
If a user has already saved the Content Type, it may be locked while it is being processed. In this case, in addition to the padlock icon, you will see a cog icon. Hovering over this will inform you that updates to the Content Type are being applied. The tooltip will show the name of the user whose updates are currently being applied. You will also be able to see this from elsewhere in the product via the Notifications in the Header:
Content Layout Locking
Content Layouts that are not currently being edited by other users can be edited. If a Content Layout is being edited by another user it will be locked and will not be clickable. The Actions menu will also be grayed out:
Just as in the Content Type lock, to see who is editing it, just hover over the padlock icon.
Hiding a Content Element
From version 8.3.17 Administrators can hide Content Elements from content editors. This is especially useful for older Content Items where there may be redundant Content Elements that you are reluctant to delete.
Administrators will now see an additional column named "Show" when editing a Content Element. To hide a Content Element, uncheck the box for the Content Element you want to hide.
When "Show" is unchecked for a Content Element, it will not be displayed when editing the Content Item.
 Hidden Content Elements are only hidden when editing a Content Item but are still visible when previewing and publishing content.
"Required" Elements cannot be hidden.