LDAP Settings
Description
Kerberos support has been deprecated and will be removed in version 8.3.16.
TERMINALFOUR can integrate with your directory service (e.g.: Microsoft Active Directory) using LDAP(S).
LDAP settings permit the user login request to be authenticated against the directory service rather than against TERMINALFOUR's internal user database. This streamlines the user provisioning and authentication processes for your users and you.
While you can choose to use either directory based authentication or TERMINALFOUR authentication, you can also use a combination of both.
After configuring a connection to the directory service, each user record matching set criteria are imported into TERMINALFOUR's user list. For a minimum setup, you'll need the following user information from your directory service:
- first name attribute
- last name attribute
- username / user ID attribute
- email address attribute
User passwords are never imported; authentication always takes place against the directory server.
Before you start
There are important things to know before you can use LDAP authentication with TERMINALFOUR:
- TERMINALFOUR can integrate with a single directory service only
- TERMINALFOUR does not support Continuation References in your directory structure
- When configuring the link between TERMINALFOUR and your directory service ensure you have an LDAP or Active Directory administrator present to assist as they'll be the most familiar with the structure of your directory tree.
- TERMINALFOUR can only deal with user records when reading your directory. For this reason, it must be set to look at your user containers (OUs) rather than the groups you may have defined
- Treat all attributes and values as being case sensitive whether your underlying directory service is case sensitive or not
- Many LDAP browsers (such as Microsoft Active Directory Browser) allow renaming of names and values into a more human-readable format, however, TERMINALFOUR reads the actual names and values for attributes on a user record
- TERMINALFOUR suggests you use the Java-based browser JXplorer to verify the names and values in your directory. TERMINALFOUR expects to find exactly what is specified in JXplorer.
- When connecting using LDAPS you must import the SSL certificate for your directory server into a Java Keystore and have your application server (Tomcat, etc.) read this keystore when starting.
- As of version 8.2.3, you must import the SSL certificate into the TERMINALFOUR keystore as per the documentation on Keystore Configuration
You must always maintain one non-directory account (local user) for use with TERMINALFOUR administration should there ever be a problem connecting to your directory service. This account is also required when upgrading TERMINALFOUR.
LDAP management
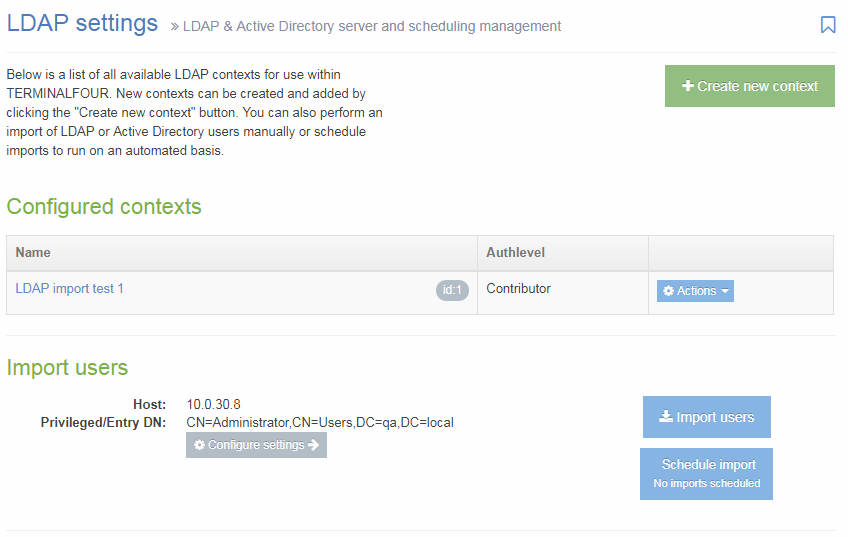
To manage your LDAP settings, go to System Administration > User Rights & Roles > LDAP Settings. The starting page is shown below:

From this point, you can manage your LDAP settings. In the center of the page is a table displaying Configured contexts. From the Actions button, you can either edit or delete an entry. From this page, there are options to:
- Create new context
- Configure settings
- Import users
- Schedule import: The button has a sub-text which displays the next scheduled import.
Create new context
Consider an LDAP context in TERMINALFOUR to be a collection of rules which are used when searching for users to import.
Each context should refer to an Organizational Unit (OU) in your directory which contains users records. As an example: ou=Development, ou=Staff, dc=terminalfour, dc=com
In addition to specifying the target for the context, you can also specify some filters which are used to exclude or include users based on particular attributes and values.
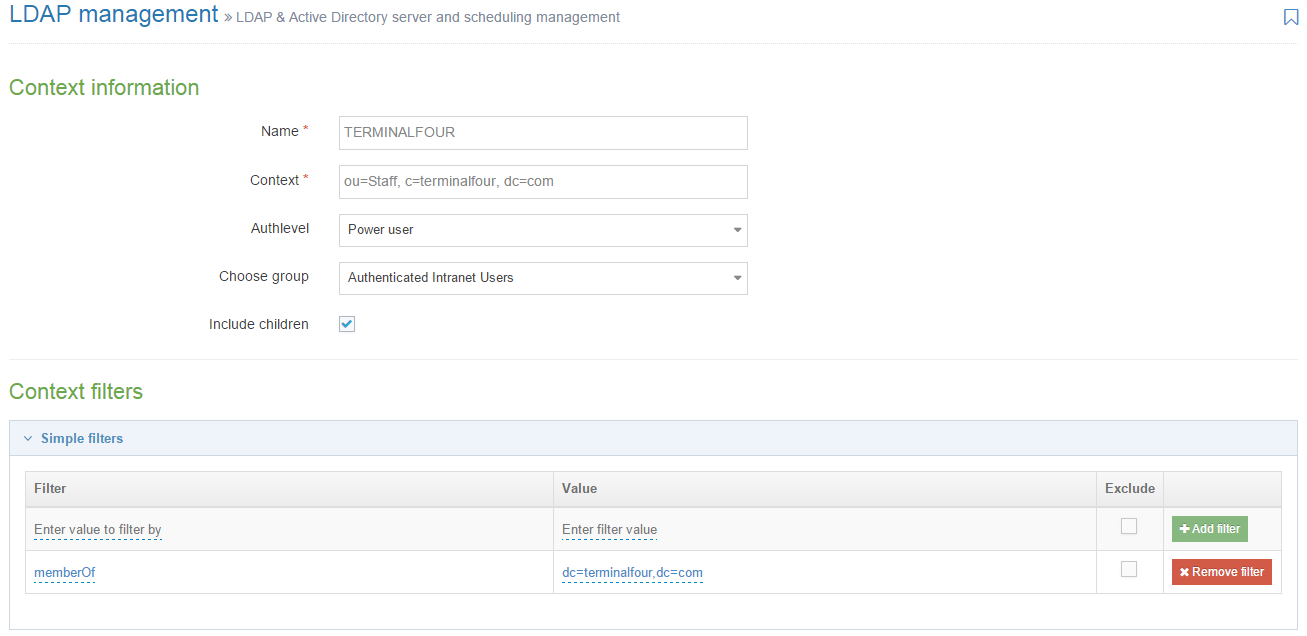
When you click Create New Context, this screen opens:
Configure the following options:
| Item | Description |
|---|---|
| Name | This is the name you assign to this import configuration. Example values include "Marketing Team", "IT Dept", "Full Time Staff", and others associated with the organization. |
| Context |
Specify the LDAP context associated with the group of users for import. This is the full DN of the OU containing user records. This is a case-sensitive value (regardless of whether your directory service is case sensitive or not.) Examples: ou=Staff, c=terminalfour, dc=com Do not use a group definition as the target for the context. TERMINALFOUR only reads user records, it does not read a group to determine the users who are members of it. |
| Authlevel | Sets the user level assigned to users created during an import of this context. For further information on the user types, refer to the documentation on User rights & roles. |
| Default authentication method | Sets the default authentication method for new users imported by this LDAP context. |
| Choose group | Sets the group that users are assigned to when created during an import of this context. |
| Include children | Sets whether or not sub-containers are included during an import. |
Context filters
You can add multiple filters (both Simple and Advanced) to each context. If there are multiple filters, by default a user record must fulfill all filters to be imported into the context, but an OR logic can be created with Advanced filters.
Simple filters
Simple filters can be used to target certain users in a given OU. They represent a pairing of attributes and values. Both the attribute and the value specified here is case sensitive (regardless of your directories case sensitivity). These filters are mostly used to import users of certain groups from the directory.
| Item | Description |
|---|---|
| Filter |
Choose an attribute from your directory which specifies group membership is When targeting groups you must enter exactly what appears on the user record to indicate the group membership. |
| Value | Enter the intended attribute value. |
| Exclude | Check this box to exclude users matching this filter instead of including just users who match it. |
Advanced filters
Advanced filters are similar to Simple filters but allow you to write LDAP queries to match multiple names or values and does not restrict the filter to using attribute values. To create an Advanced Filter, Enter the Filter query and click Add filter.
Processing Simple and Advanced Filters
When processing simple and advanced filters within a context, by default, AND logic is used. Advanced filters need to be used to use OR logic. To use OR operators, a '|' symbol is used.
The example below outlines an advanced filter that will import multiple users based on their sAMAccountName. The '|' is added to the beginning of the filter and then each attribute/value pair that you want to use within the filter is encapsulated individually.
(|(sAMAccountName=CiaraF)(sAMAccountName=VincentO)(sAMAccountName=KevinW))
For each filter that is added, it will also process this with AND logic. If you have a simple filter and then an advanced filter that uses OR logic, the LDAP context will query the active directory for users/objects that match the values in both queries.
You can learn more about LDAP filters here.
Once complete, click Save changes to save the context.
Import users
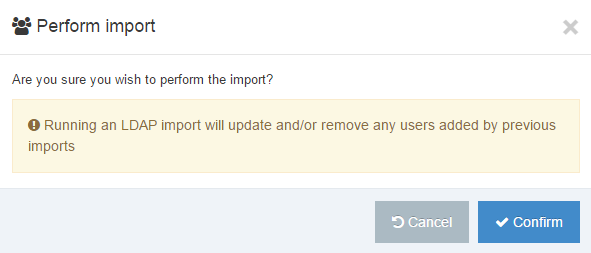
To import users, you need to be on the LDAP settings page. Click the Import users button. The popup window, shown below, appears. If you want to continue, click the Confirm button.
If the import is successful this popup window appears:

Schedule imports
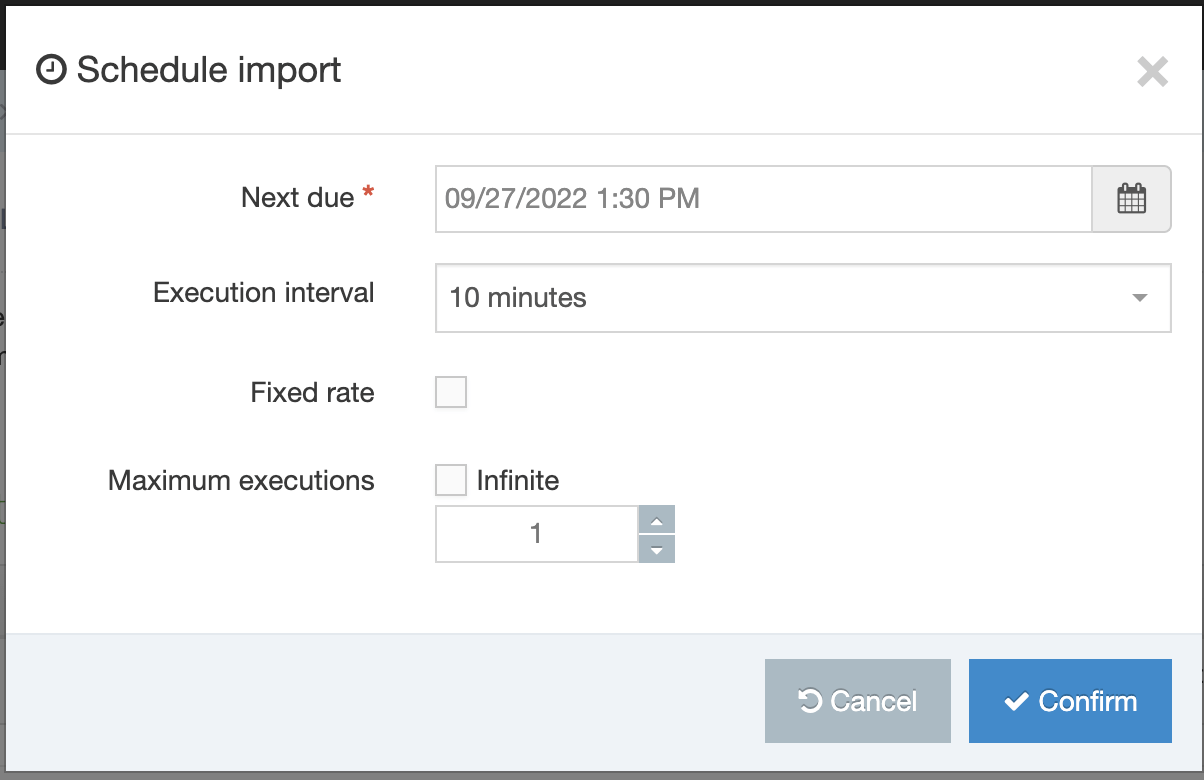
To schedule an import, you need to be on the LDAP settings page. Click the Schedule import button. A popup window appears, shown below.
| Item | Description |
|---|---|
| Next due | Set the date and time for the next (or first) execution of this task. |
| Execution interval | The execution interval of the task e.g. 1 hour, 1 day, 10 minutes, Once |
| Fixed rate | Sets if the task to add/update should run on a fixed rate. |
| Infinite | Check here to continue imports indefinitely. If you do not check this box, then set a number of repetitions in the field below. |
| Maximum executions | Set the maximum number of times this task should run. |
When your entries are complete, click Confirm. This adds the import to the Task Scheduler.


