
Create section
- Last Modified:
- 22 Jul 2025
- User Level:
- Moderator
Description
What is a Section?
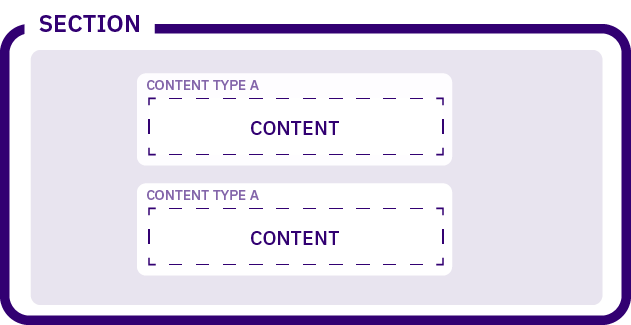
When viewing the Site Structure, you'll see that it is made up of folders and subfolders. These are the Sections of your site(s) and they are the containers for your content. We can also assign a Page Layout or Page Layouts that the Section will use on Publish.
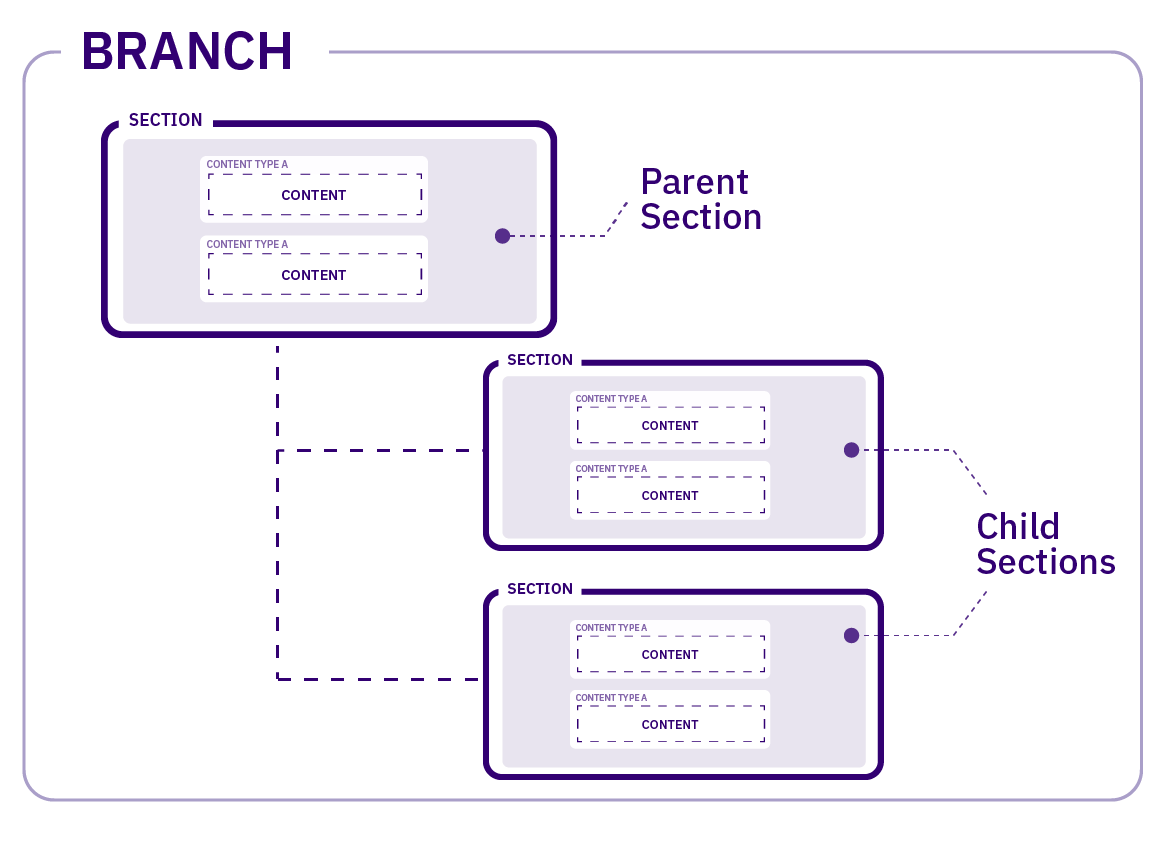
A Section containing Subsections is called a Branch:
Who can Create a Section?
The default minimum access level required to create, edit and delete Sections is Moderator though this is configurable in Role Customization and can include Contributors. More advanced Section editing such as setting Output URIs is restricted to Moderators and up.
Roles can also be customized to only show the Sections to a user that they have been granted edit rights to. Showing only those Sections makes content editing even easier especially for those who are editing content in just a small amount of Sections.
How is a Section created?
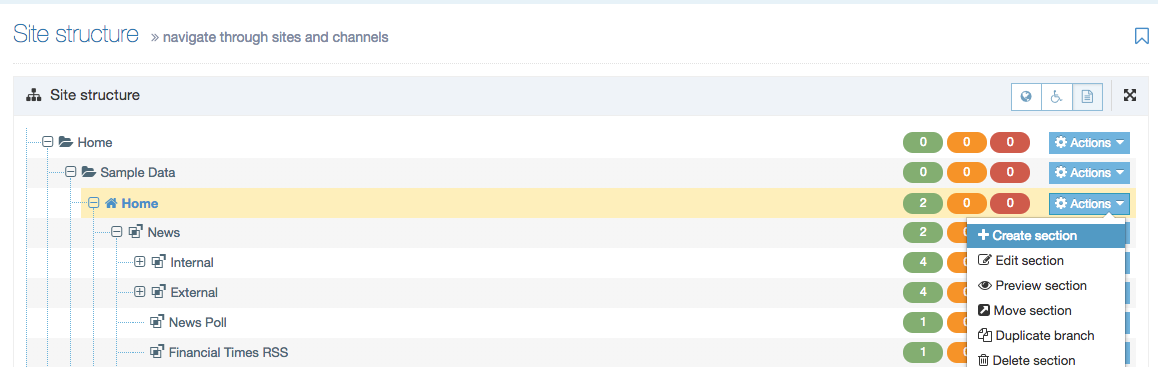
In the Site Structure, pick the location of your new Section, go to the Section Action Menu and select Create New Section. In this example, a Subsection will be created within the Home Section:
The Section configuration screen will appear. Most of the settings entered can be changed later if needed.
General
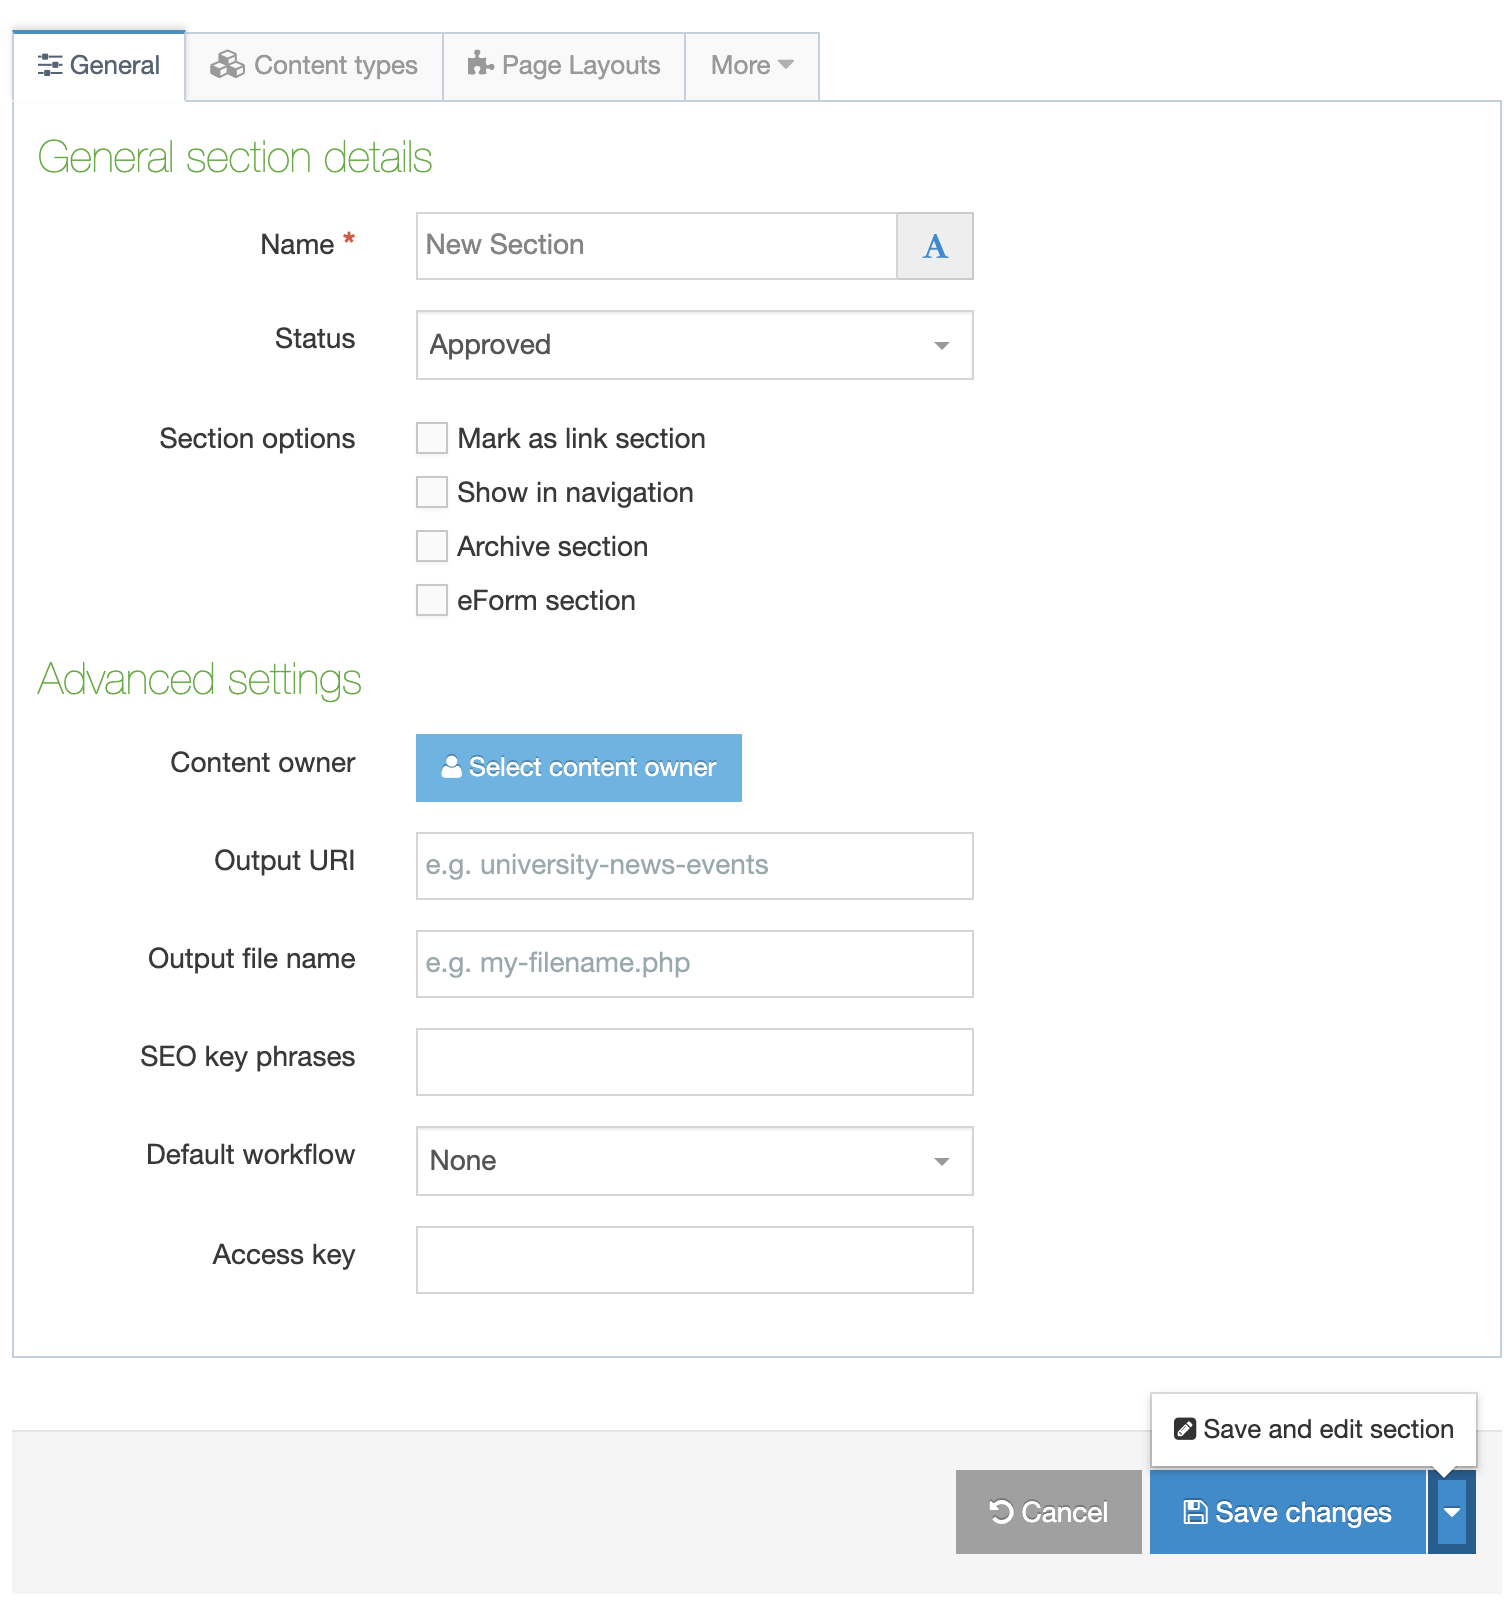
The General tab of the Section configuration screen is split into General Section details and Advanced settings.
When you first create a Section you can select Save changes which will take you back to the Site Structure or choose Save and edit section which will save the changes and reload the Section screen.
General section settings
| Item | Description |
|---|---|
| Name |
The Section name should give a clear indication of the page's content. It's better to use whole words instead of abbreviations. For example, use "Web training" as opposed to "web-tng". This helps when you are searching for the Section. Because the name of the Section is used as the basis for the URL for the published page (if an Output URI is not specified) any spaces will be replaced by a character when the URL is output (e.g., News and Events could be changed to news-and-events if the character to replace is -). |
| Status |
There are three status levels: Approved: Sections are published when they have at least one approved Content Item. Sections cannot be published without approved content in them. This is to avoid pages looking empty or half done. Pending: Pending Sections will not publish, even if the content within the Section is Approved. The status can be changed to Approved, once all content is ready to be published, and the Section will publish. Inactive: Deleted Sections have an Inactive status. Sections can be restored by changing the status to Approved or by restoring the section through the Recycle menu option. Inactive Sections cannot be published to a live site. |
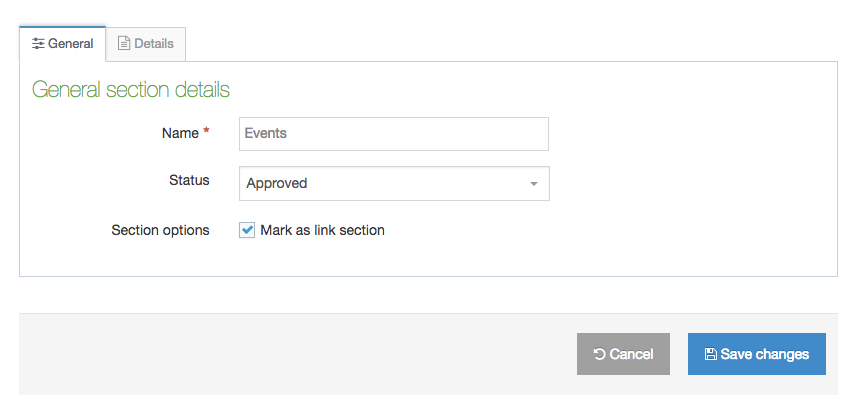
| Mark as Link Section |
Link Sections contain no content and instead link to another Section in the Site Structure or an external URL. Learn about creating a Link Section here. You might notice that existing Sections do not display this option. That's because Sections that can contain content cannot be converted into Link Sections |
| Show in Navigation | When this box is checked, the Section appears in the navigation. Unchecked the Section is hidden from navigation. This is useful for Sections that you might want to publish but not link to from your main site e.g., a landing page. |
| Archive Section |
By default, Archive Sections are not published when a site is published. An Archive Section can be used for areas of the site where publishing is not required each time a site is published, e.g., Sections where content may not change frequently. This can greatly reduce publish time especially for Sections with a lot of Content. It still is possible to include them in a publish by using the Advanced Publish options in the Task Scheduler. Archive Sections will also be published if the Publish Branch or Publish Section options are used. When selected, Child Sections automatically inherit that status as well. |
| eForm Section |
This option is used if you want to submit an eForm. Refer to the documentation for eForms for further details. When you mark a section as an eForm section, the entire branch accepts eForm content. |
Advanced settings
It should be noted that depending on your Section metadata content type, more fields may be available at the top of the Advanced settings. These fields are installation specific and hence not covered here.
| Item | Description |
|---|---|
| Content Owner | Select the Content Owner from the list. If left blank, it will inherit from the parent section. The content owner can be used in workflows or get notified when content expires. A Content Owner Report is available to report on and manage owners. |
| Output URI |
Lets you specify the Uniform Resource Identifier (URI) as the destination of the new Section. Using this field improves Search Engine Optimization (SEO) for this Section. Otherwise, with the field left blank, the Section's name is used when publishing. Have a look at this article on the importance of URIs/URLs for SEO. An Output URI is used for a short or friendly URL. You might have created a Section with the name "News & Events". To get a shorter URL, set the Output URI to simply "News". If the URL needs to be more specific (perhaps for SEO purposes), you can expand it to "TERMINALFOUR News and Events". You can also convert spaces to a default character if this is set in the Channel. The Output URI can either be used on its own or as a path. An Output URI Path is used to shorten a URL. You might set an Output URI of /news, which brings it up to the root level without moving the Section. As there is a risk of conflicting Output URI paths, '/', '\' and '..' characters are reserved for users with permission to "Set a path as an output URI". |
| Output filename |
Specify the file name used for the page. When you leave this blank, the system uses the default file name configured in the Channel Settings. For example, if:
then here are a few examples of how the Output URI and Output file work together to create the URL:
|
| SEO key phrases |
To run an SEO report for a Channel, at least one SEO keyphrase should be added to the Root Section. If nothing is entered for Subsections, the SEO key phrases for parent sections are used. For more information regarding how to choose the phrases, see Google AdWords. SEO key phrases are used for SEO reporting only and are not published on the site. |
| Default workflow | The default Workflow for this Section's content. |
| Access key |
The "Access key" feature entered a deprecation phase from 8.3.13. It will be removed entirely in a future release of Terminalfour. You can enter a single character, which can be used as a shortcut within a Link menu Navigation Object and the Breadcrumbs Navigation Object. |
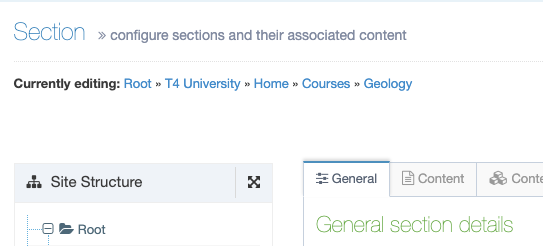
Navigating to parent Sections
From version 8.3.6 you can navigate to a parent Section using the "Currently editing" breadcrumb links:
Link Sections
Link Sections do not contain content but can instead act as pointers to other Sections or external URLs. This is useful if you want to add a Section from another part of the Site Structure to a Navigation Object Link Menu generated from a Branch. Similarly, an External Link Section can add a link to a Navigation Object from an external source, this could be a subdomain such as shop.mysite.com.
To create a Link Section, create a Section and, in the General Settings screen, select Mark as Link Section from the Section Options. When this option is selected, the other Section Options are hidden.
In the Details tab, select the Link Type:
- Section will link to another Section in the Site Structure. Depending on your Hierarchy Configuration, editors may either have access to link to the sections to which they have been granted access, or they may have access to link to the any section (regardless of whether they have edit rights to that section).
- External URL will link to a URL
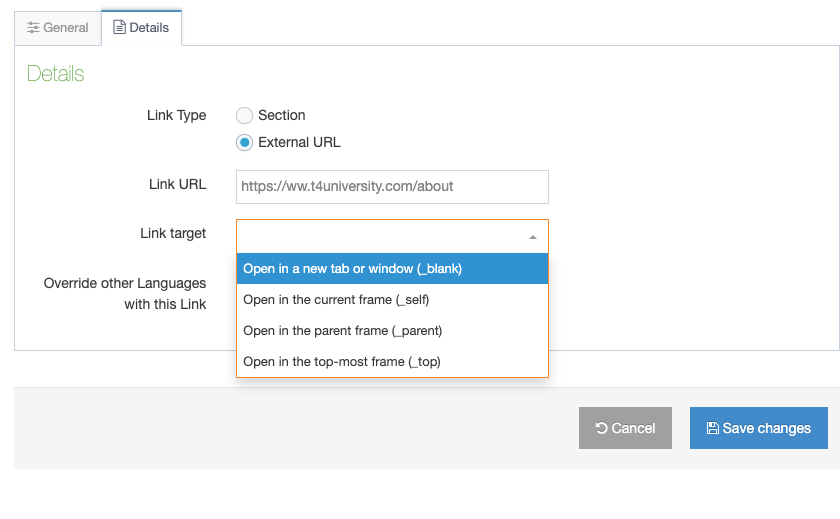
The Link Target determines whether the link will open in
- Open in a new tab or window (_blank)
- Open in the current frame (_self)
- Open in the parent frame (_parent)
- Open in the top-most frame (_top)
There's a description of the difference between the other options here.
When Override other Languages with this link is checked, all languages will use this Link Section/URL otherwise other languages can use specific links.
Content Types
Before adding content, you have to assign one or more Content type to the Section. There are a few things to bear in mind when using Content Types:
- Only those Content Types assigned to the Section can be used
- You can only use a Content Type when you are a member of the Group within which it was created (unless it is a Global Content Type).
- Your User Level must equal or exceed the minimum user level requirement specified in the Content Type itself.
1. Click the tab marked Content types. This opens the screen shown below:
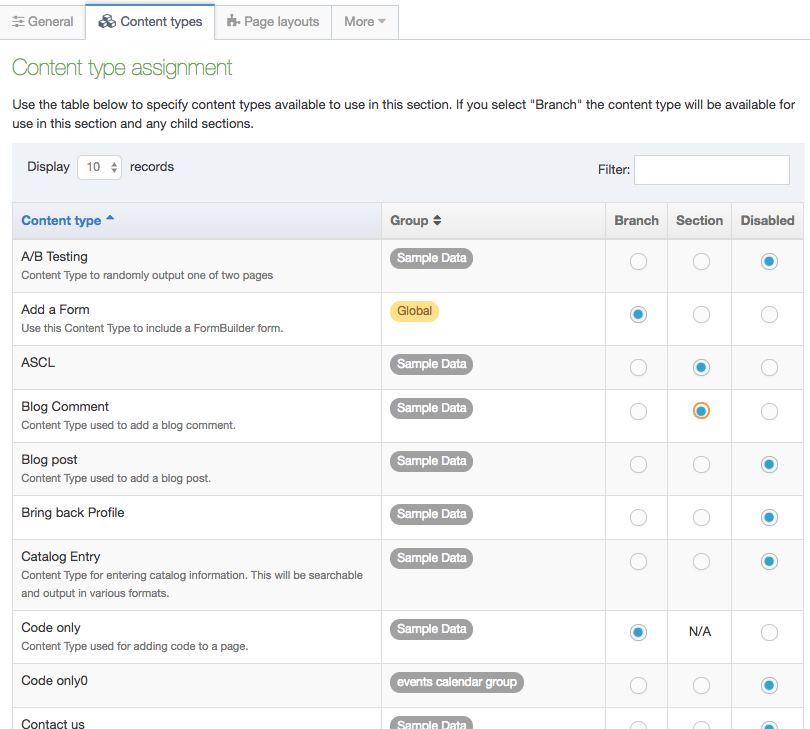
2. There are five columns to this table: Content type, Group, Enabled (branch), Enabled (section), and Disabled.
- The list is ordered alphabetically and grouped by the owning group. If you enable a Content Type for a Branch, it can be used in the current Section, the Section's Subsections or children (for the Branch).
- Select the corresponding radio button in the row for the Enabled (Branch) (it can be used in the current Section and the Section's Subsections) or Enabled (Section) (it can be used in the current Section, but not in any Subsections) for the Content Type you want to assign.
3. When you have completed your selections, review for accuracy, and then click Save changes.
Page Layouts
Users with Moderator access and above can assign a Page Layout to a Section. Moderators and Power Users can only use the Page Layouts in the Groups that they are members of or Global Page Layouts. Administrators can use any Page Layouts.
A Page Layout can either be assigned when adding a Section or when modifying a Section.

1. Select the Page Layout you want to use from the drop-down menu for the relevant Channel. The selected layout is used for the Section it is assigned to as well as any Subsections (children) for which no Page Layout has been specified.
2. Selecting an Inheritable Page Layout will apply this Page Layout to Subsections. If left as None, the main Page Layout is used for any Subsections for which no Page Layout has been specified.
3. Review your selections, and click Save changes.
Metadata
From the More tab, select Metadata. Metadata can be added at various levels, such as, for a specific Content Item, for a section or to a Page Layout. The metadata options available depend on how you configure Meta Tags.
By default, the metadata described below can be added to a Section.
For sites that publish in multiple languages, the language dependence of Meta Tags can be configured on each tag. Depending on the configuration, Metadata may need to be entered in both languages, or may only be entered in one language.
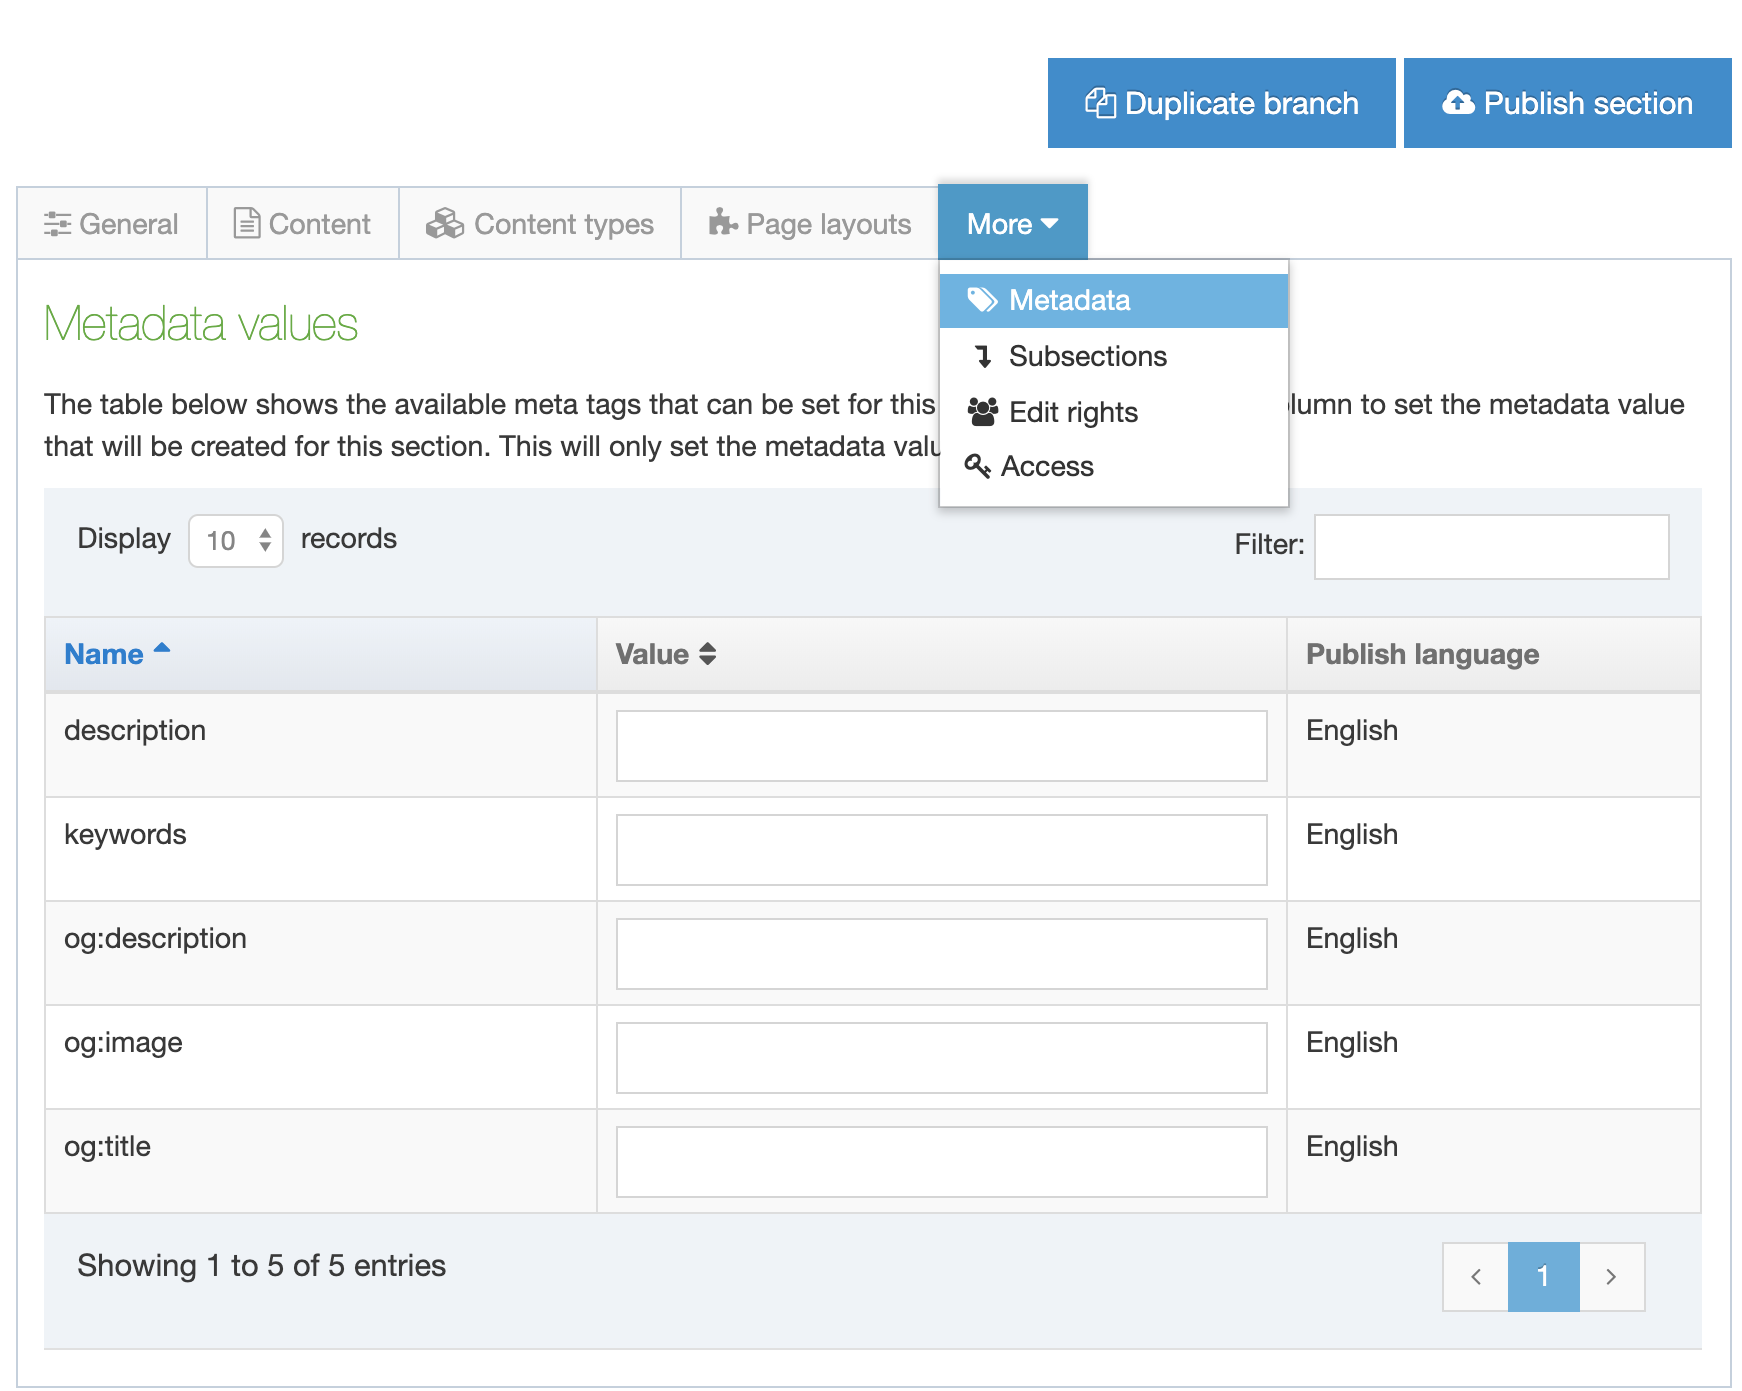
It is optional whether you enter some or all of the metadata values for a Section.
Edit Rights
To assign Edit Rights to the Section, select Edit rights from the drop-down list (Note: you may have to check inside the "More" tab depending on your screen width and Terminalfour version). This opens the screen below.
In addition to Administrators, who have full rights to the entire Site Structure, other users can be assigned Edit Rights to this Section. You can specify the Edit Rights as you create a new Section.
Edit Rights are automatically inherited by the new Section's Subsections.
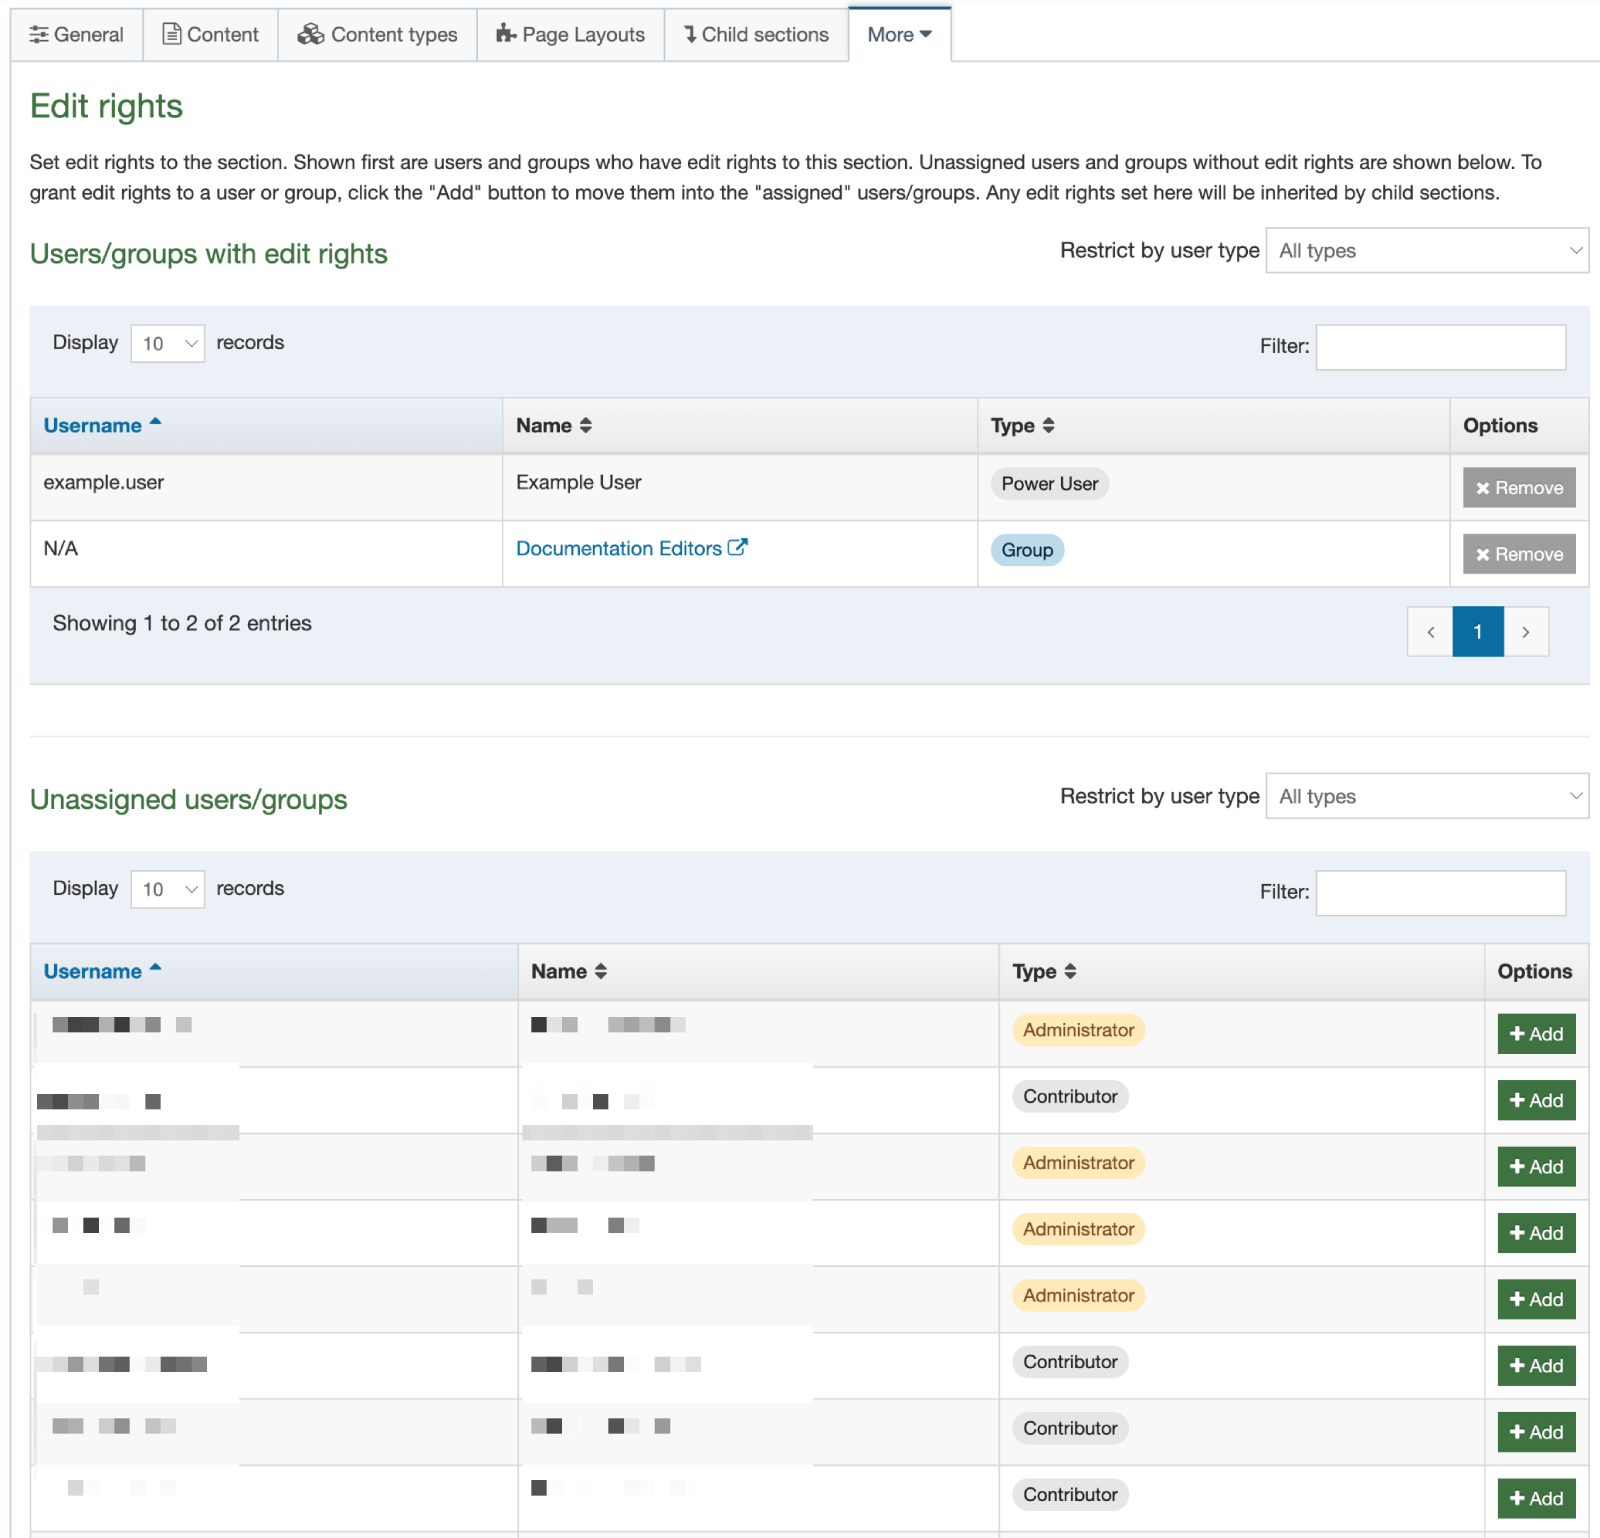
You can click on a Group's Name to open that group in a new browser tab. This allows you to quickly check what users are in that group.
The table on the bottom shows the Unassigned Users/Groups
To move a user to the Edit Rights list select Add.
To remove a user from the current list select Remove.
Remember to Save Changes.
Access
The Access tab enables you to restrict access to the published section. Depending on your system configuration, this tab could be blank unless you have Access control set up. The options available on the Access tab will differ, depending on the configuration of the Access Control Content Type.