
Edit content
Description
Editing Content is just as easy as creating it in the first place. You can start from the Menu bar on the left or from the Section Action Menu in the Site Structure.
You can choose to create content from the Content menu item in the Menu or select a Section from the Site Structure and create content from there.
Edit content from the menu
Go to Content > Edit Content:

You will then be asked to select the Section that contains the Content you want to edit:
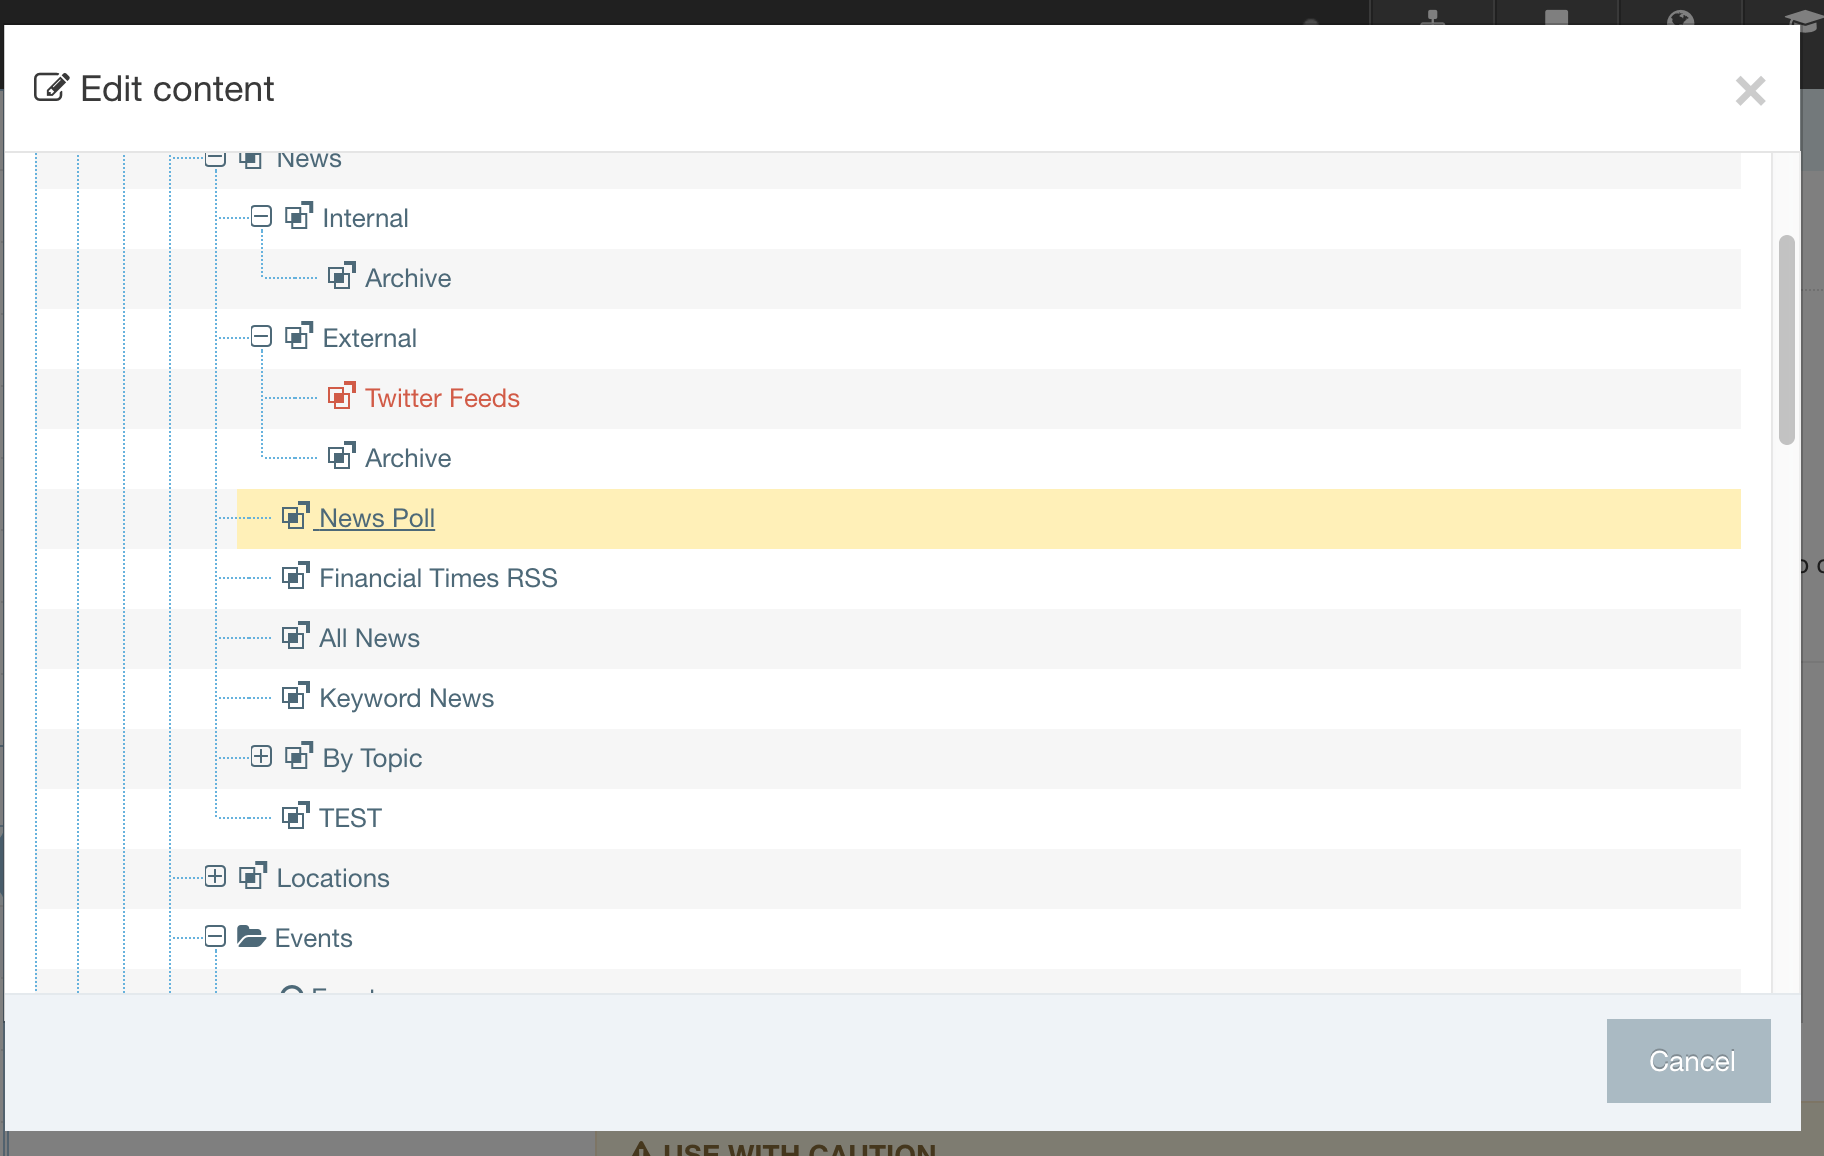
Once the Section has been selected, you can then select the Content Item that you want to edit:

Edit Content from Site Structure
In the Site Structure, select the Section with the content you want to edit. From the Section Action Menu select Edit Content:
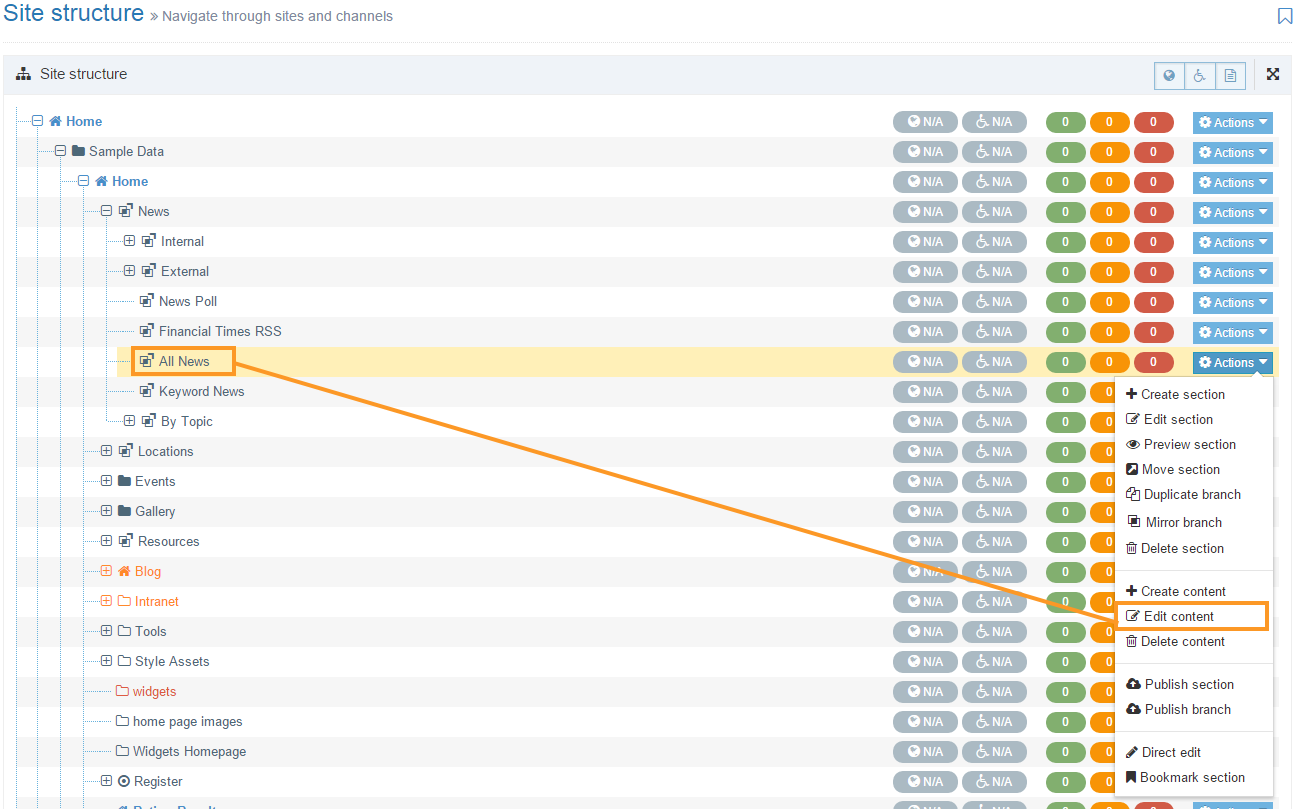
This will open the Content tab in the selected Section screen. From here, you can choose the Content Item you intend to edit:
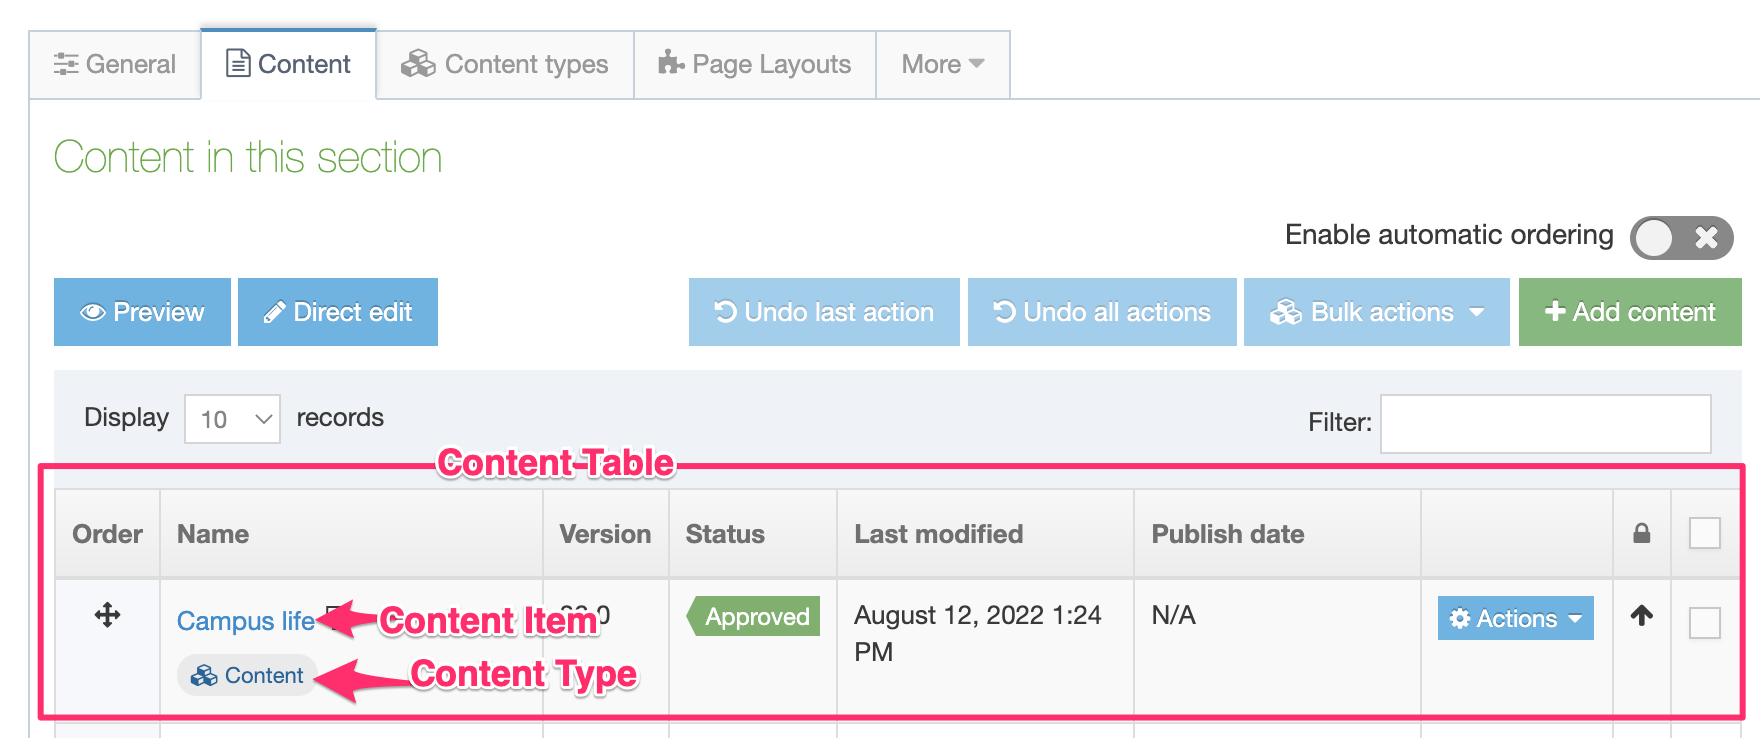
The buttons at the top and bottom of the Content Table are:
| Item | Description |
|---|---|
| Above Content Table | |
| Preview | Preview the Content Items in the Section |
| Direct Edit | Open the Section in Direct Edit* *This will option will only display when Direct Edit is enabled |
| Undo last action | Undo the last re-ordering action |
| Undo all actions | Undo all content re-ordering actions |
| Bulk actions |
This is a drop-down menu of options which can be applied only if multiple Content Items are selected. These options are:
|
| Create Content | Create a content item. When you select this, you will be asked to choose a Content Type to add the content to. See this article on creating Content for more detail on this. |
| Below Content Table | |
| Delete | Delete the current Section |
| Cancel | Return to Site Structure without saving changes. Changes to ordering are saved as they are made. |
| Save Changes | Save changes and return to Site Structure. |
Content Table
The Content Table features the following column names:
| Item | Description |
|---|---|
| Order | Dragging the cross icon will change the order of a Content Item. This icon is not displayed for content that is automatically ordered, except for content that is locked to the top or bottom. |
| Name | The name of the Content Item |
| Version | The version number of the Content Item. Each time you make and save an edit to a Content Item a version is created. This allows you to view and compare older versions of Content Items. |
| Status |
|
| Last modified | The date on which the Content Item was last modified. |
| Publish date | If a publish date is set for the Content Item it is displayed. |
| Lock status | Locks a Content Item's order, preventing it from being reordered. The position of each Content Item in the ordering is either locked or unlocked, determined by whether or not Automatic Ordering is enabled for the Section. |
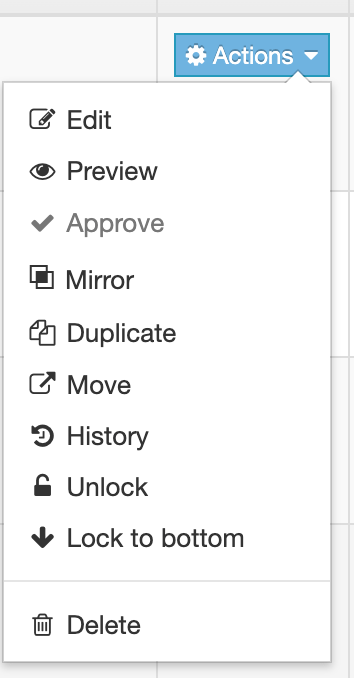
To edit a Content Item select the name or select the Actions Menu and choose Edit.
Other options on the Actions list are covered below.
Depending on the User Level of the editor, changes made to existing content might require approval before publishing on the live site. When published the changes appear on the live site.
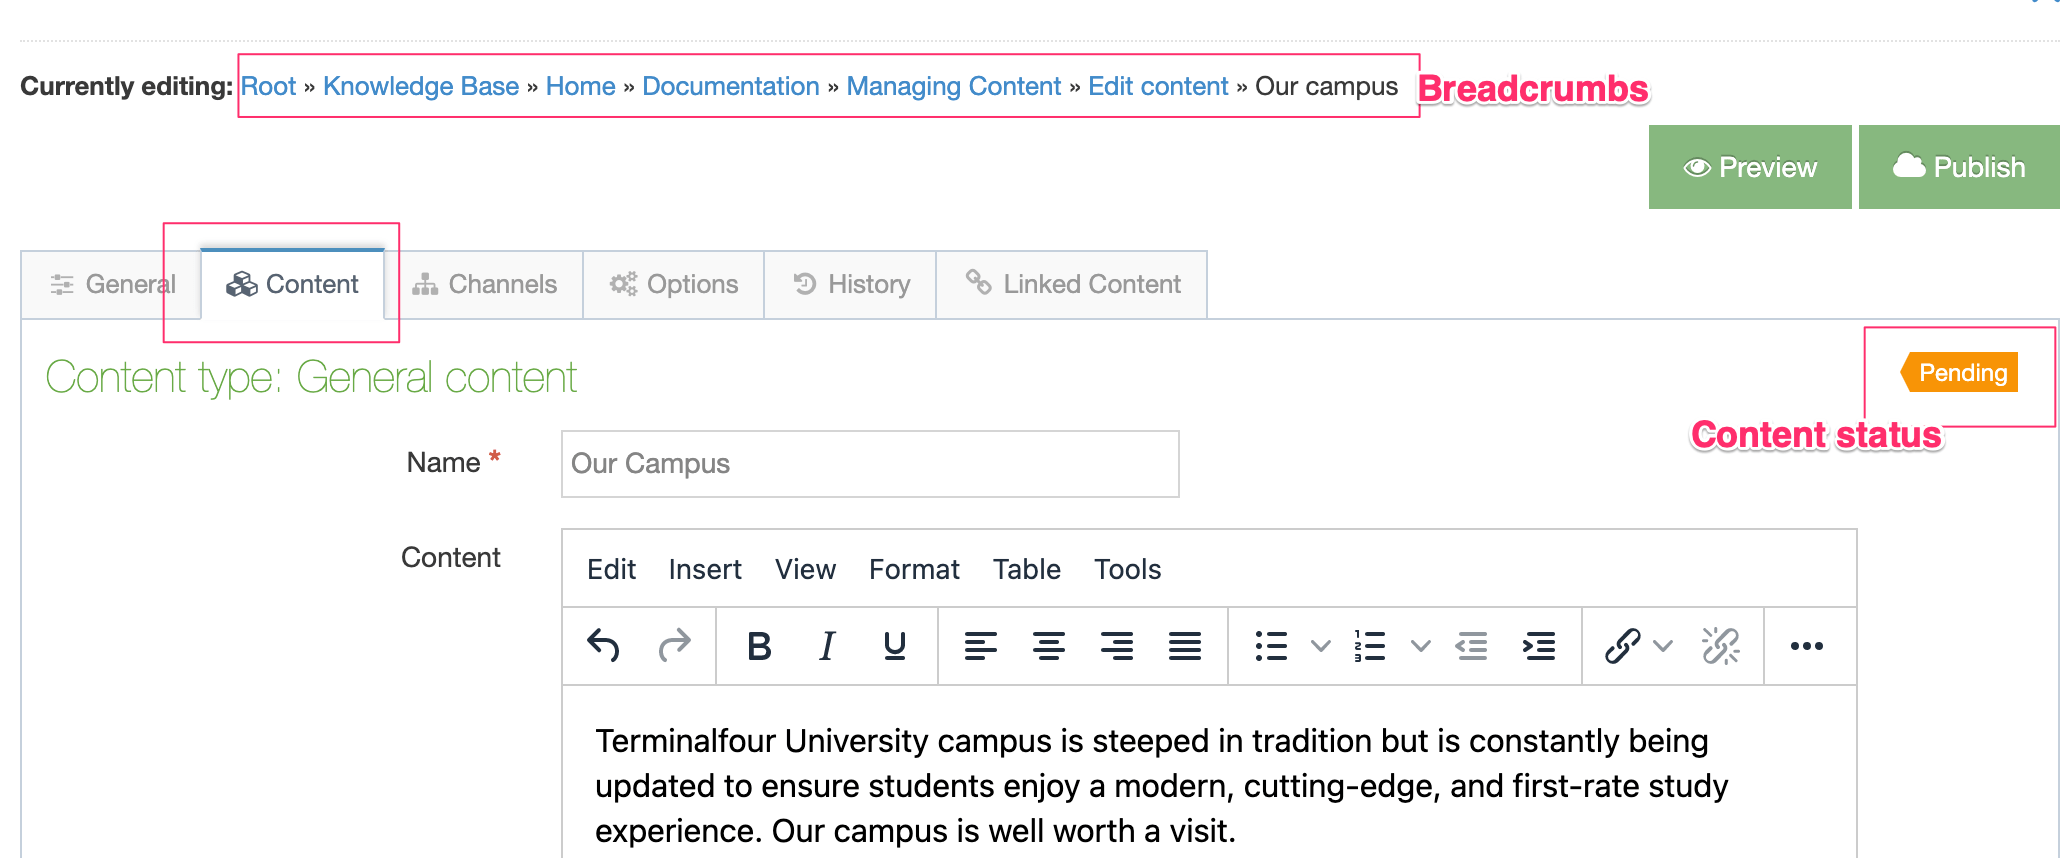
After you have selected the Content Item to edit, the Content tab on the Content Item screen will be displayed:
In this example, the Content Type that this Content Item uses has three Content Elements:
- Name: a plain text element
- Content: an HTML element in which text can be formatted using TinyMCE
Text can be edited in both fields. You can navigate to the Section containing the Content Item using the "Currently Editing" breadcrumb above the table.
You can also see the current status of the Content Item on the upper right of the Content tab.
If you are satisfied with your changes, click the appropriate Save Changes option. There are four options you can choose from when you have made your content edits. There's a description of the save options here.
When your changes have been successfully saved you will see a Content Updated alert:

The Section screen will load with the Content tab active.
Content Lock
While you are editing or adding content, the Content Item is locked to prevent other users from making edits to it until you are finished with it or when your lock has expired. The content lock timeout duration can be set at System Administration > Hierarchy & Content Settings > Content.
There are three ways this lock expires:
- When you have saved the Content Item
- When you have Cancelled out of the Content Item
- Leaving your session idle for the duration that has been set by your Administrator at System Administration > Hierarchy & Content Settings > Content; the default is 30 mins), then your lock expires.
Depending on the expiration setting this request box appears to ask if you want to renew the lock:
Choose Renew to ensure that the Content Item remains locked or Cancel to remove the lock.
Content Actions
Preview
To Preview your content on the site before it has been published ensures that your page and content looks as intended.
Previewing is possible only when the Content Type uses the same Content Layout name that is specified by the Channel (e.g., text/html). A Preview opens in a new tab or window (depending on your browser). This shows the content as it would appear when it is published.
The Preview window is only as current as the last Preview. Subsequent changes are not 'automatically' updated to an existing Preview. You must repeat a Preview to see the latest version.
From the Content Action drop-down menu - select Preview.
If there is more than one Channel associated with the Section you must select a Channel to view the content. This screen opens with your Channel selections:

The available Channels are listed by Name and Description - with a corresponding radio button to check. Select one, and click Preview.

In this example, a page from the Sample Site is previewed. After you review the content, close the window and repeat as needed.
A Pending section can only be shown when Preview is enabled via Preview & Publish.
You cannot preview Content that has future publish dates (even when it is Approved).
Approve
Pending Content Items can be approved by selecting the "Approve" option from the Actions dropdown:

The Approve option will be disabled when the Content Item is:
- already approved
- locked
- in a Workflow
- Inactive
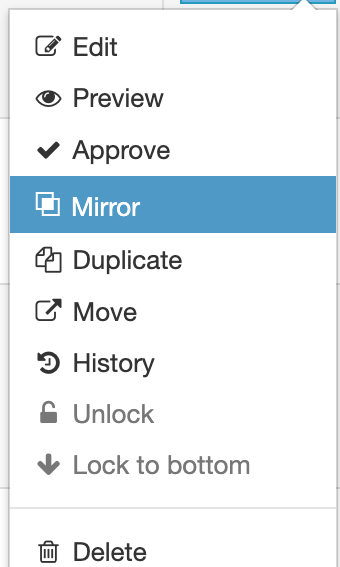
Mirror
Unlike duplication of content, mirroring ensures that when the original content is updated, the changes are also reflected in the mirrored content. When you duplicate content – a change made in the original has no effect on the duplicate.
This feature is useful for content that is shared between multiple pages. Examples are office opening hours, contact details, or event information, or any information which users may want to share across functional units or departments.
To begin, select Mirror from the Content drop-down menu and this popup screen appears to select a destination location:
From this modal window, you can see the Site Structure. Select the destination for the content. The selection is highlighted, and in the lower left corner the destination section is shown by Mirror to:. Alternatively - you can click the Search tab and make an entry to the Search box. After locating the destination, click your selection. The destination is shown in Mirror to:.
Select Mirror selected content to complete the task.
It is also possible to Bulk Mirror multiple Content Items.
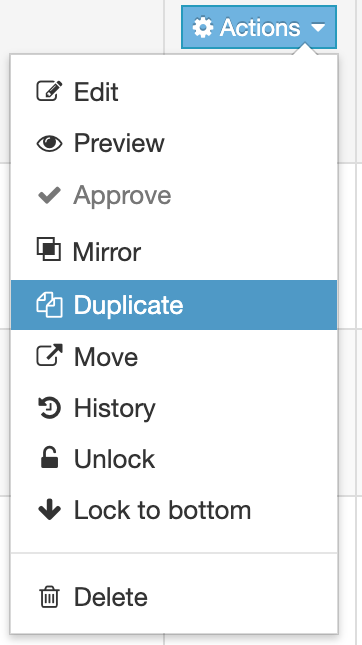
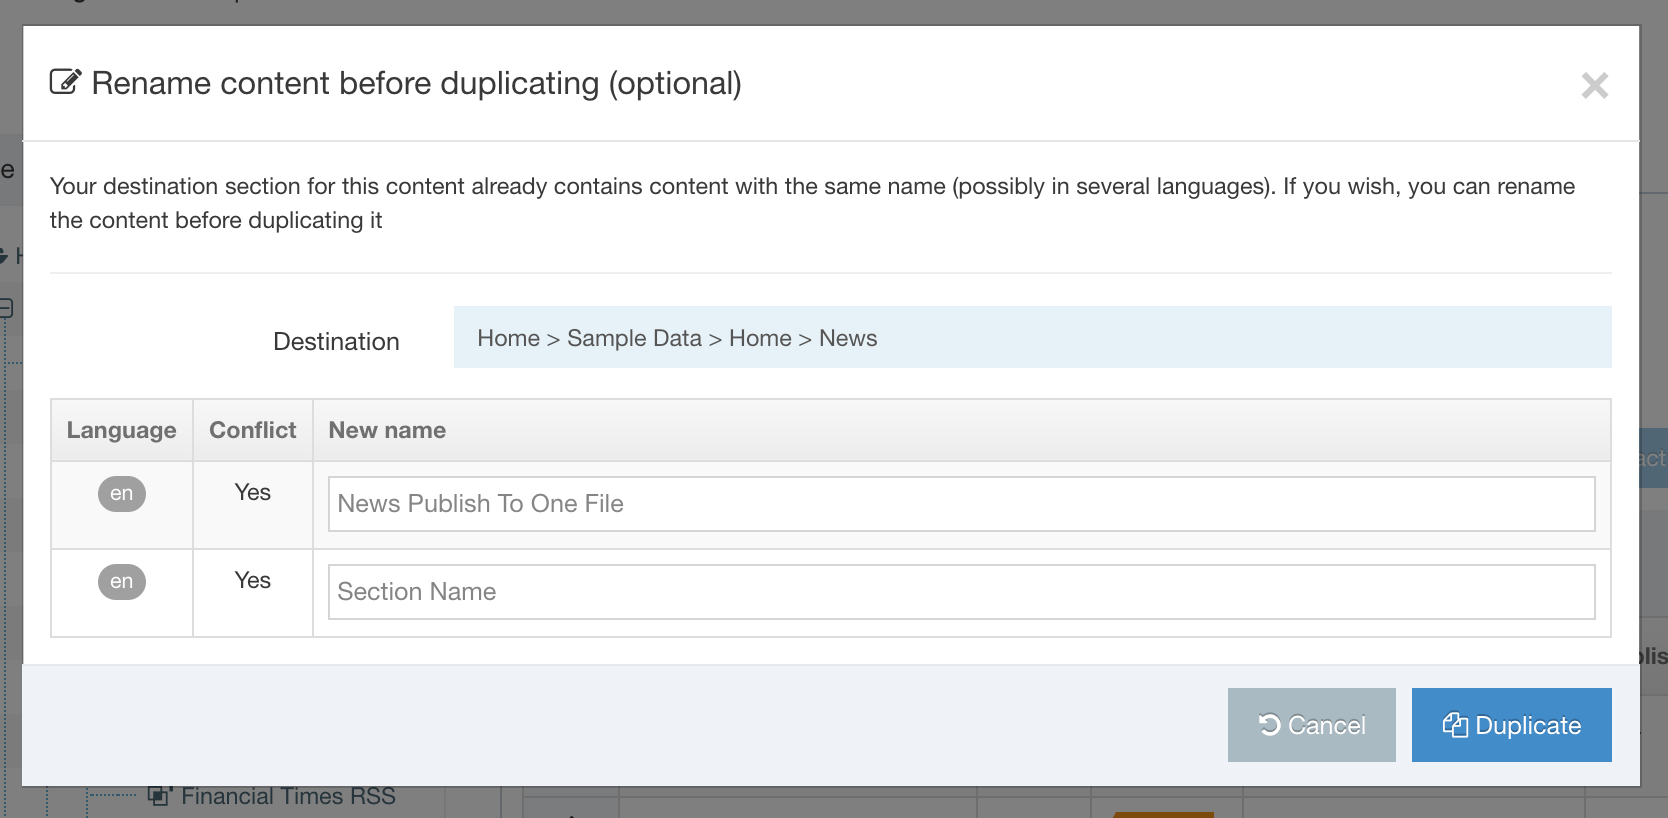
Duplicate
When duplicating content a copy of the content is added to in another Section. A change to the original content has no effect on the other's content.
To begin, select Duplicate from the drop-down menu and this popup screen appear to select a destination location:
From this popup window, you can see the Site Structure. Select the destination for the duplicated content. The selection is highlighted, and in the lower left corner the destination section is shown by Duplicate to:. Alternatively, you can click the Search tab and make an entry to the Search box. After locating the destination, click your selection. The destination is shown in Duplicate to:.
Click Duplicate selected content to complete the task.
It is also possible to Bulk Duplicate multiple Content Items.
Move content
To Move content, click the departing content Actions button, scroll to Move and select. As with other transfers, a modal appears:
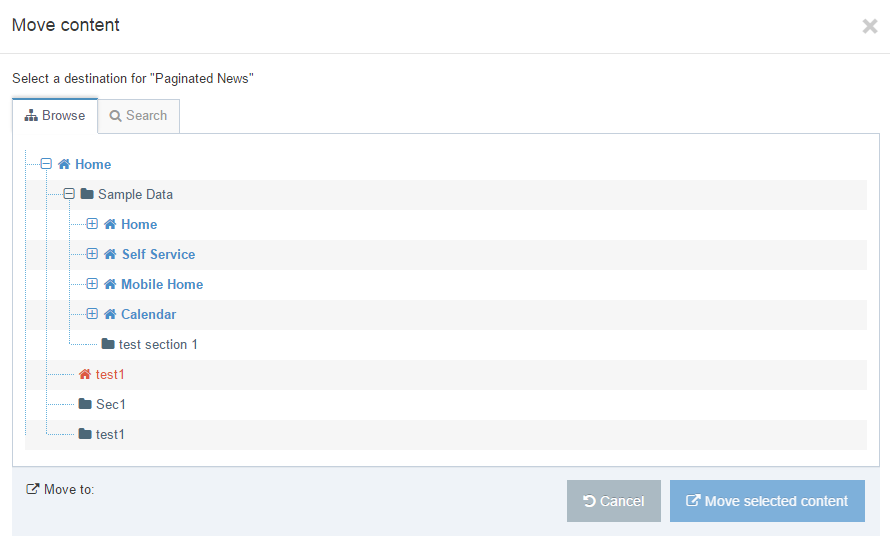
After you select the destination for the content, select Move selected content.
It is also possible to Bulk Move multiple Content Items.
History
TERMINALFOUR keeps a history of all versions of content created. This enables you to view all items saved in History, compare versions, and revert to a previous version at any stage if needed.
Select the History tab from the Content Item screen. This screen then appears:
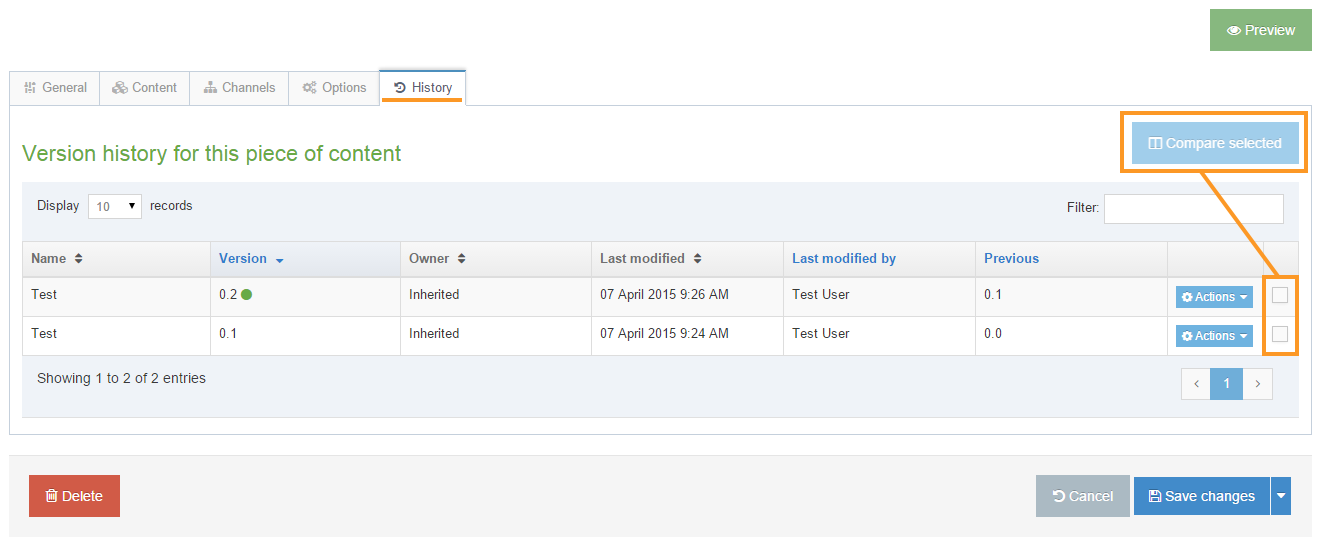
The columns are assigned as:
| Item | Description |
|---|---|
| Name | Content Item name. This may have changed between versions. |
| Version | The version number of the Content Item. The green dot indicates this is the current "Approved" content. You can click the column name to reverse the order and show the oldest version on top. |
| Owner | The User/Group who is the owner of the Content Item. This can also display "Inherited". |
| Last modified | Timestamp of the last edit |
| Last modified by | User who made the last edit |
| Previous | Previous version |
| Actions Menu |
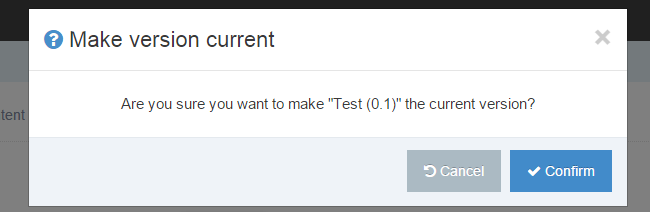
This does not delete the current or previous versions. A green dot will appear to the right of the now version number to denote that this is the current version. |
Comparing Content
In the last column are checkboxes (these are highlighted above). To compare content select two checkboxes Check these when you want to make use of the Compare function - when two or more versions are checked the Compare Selected button is activated. To compare, select the versions, click Compare selected. This screen appears:
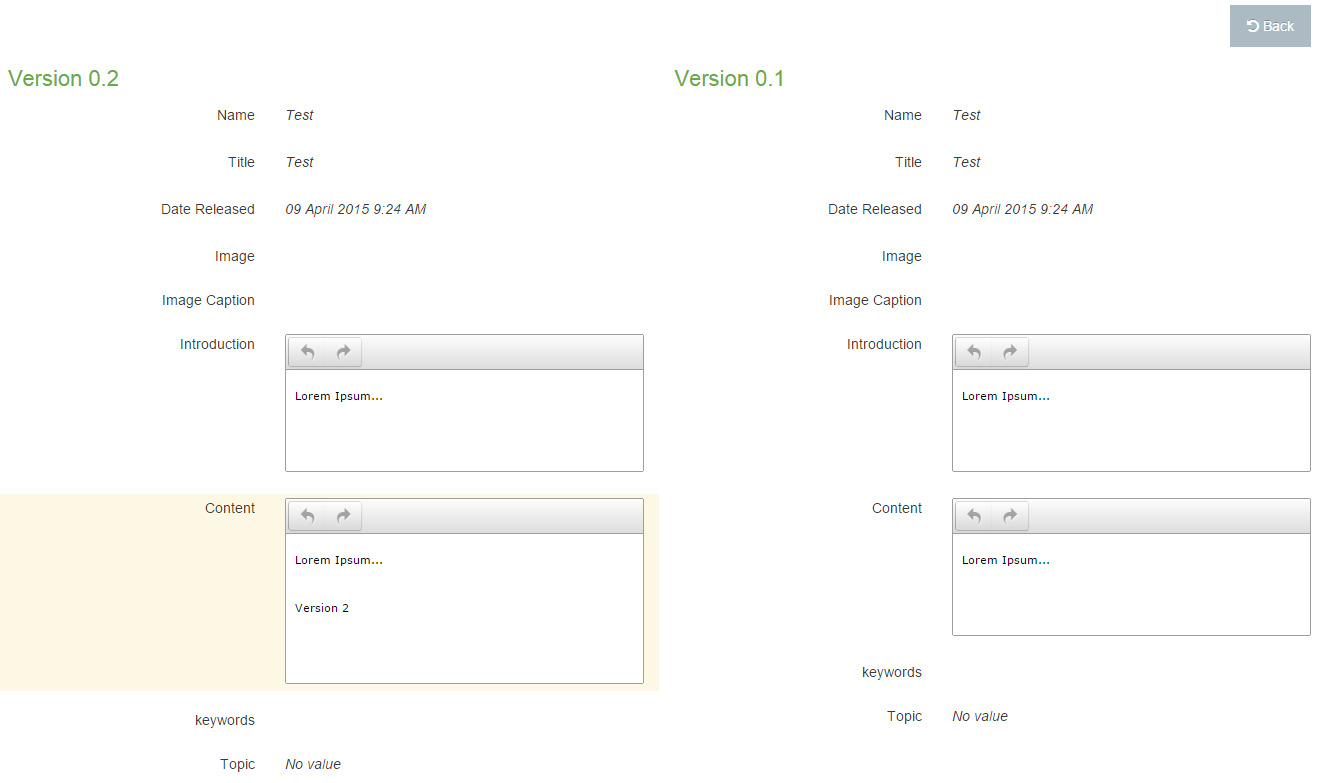
This feature is useful when you are approving content and want an overview of the modifications made to a Content Item You can only compare two items of content at a time.
After you compare content, click the Back button to return to the History tab.
Ordering Content Items
Each Content Item's ordering in a Section is either locked or unlocked. This order can be changed manually by clicking and dragging the cross icon in the Order column on the left. When enabled, Automatic Ordering will lock the order of the Content Items by one of the following criteria:
- Alphabetical (A-Z)
- Alphabetical (Z-A)
- Last updated (newest)
- Last updated (oldest)
- Publish date (newest)
- Publish date (oldest)
Only unlocked Content Items will be automatically ordered so you may need to manually unlock Content Items if they are not ordering:
Unlock
To Unlock content, go to the Actions button corresponding to the Content Item and select Unlock. This unlocks the Content Item and places it at the bottom of the list. The arrows (in the up position) indicate the content is locked to the top. When you unlock content the arrow disappears.
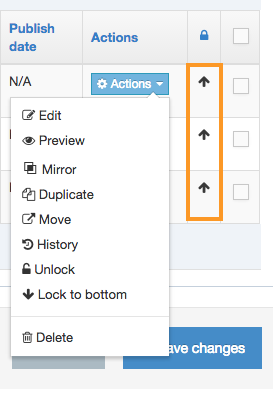
Lock to top or bottom
To Lock the content to the top or bottom, go to the Actions button corresponding to the Content Item. Select Lock to the top (or bottom):
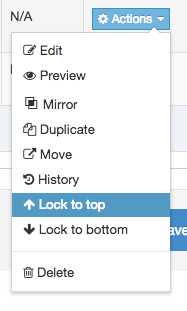
The Content Item is then locked in the position you want, and the arrow (pointing up or down) appears.
It is also possible to Bulk Lock and Unlock multiple Content Items.
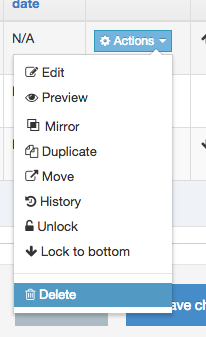
Delete
To Delete content, go to the Actions button corresponding to the content. Scroll down to Delete and click.
Deleted content can be recovered or purged in the Inactive and Orphaned tab of the Recycle Content screen (Content > Recycle Content). For further information refer to our page about deleting content.
It is also possible to Bulk Delete multiple Content Items.
Bulk Actions
You can perform the same action (mirror, duplicate, move, lock and delete) with two or more Content Items using the Bulk actions menu found on the Section Content tab.
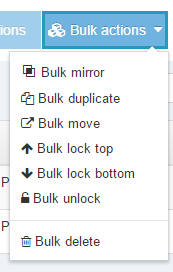
Select which function you want to perform. For transferring content via Mirror, Duplicate, or Move - the actions are similar:
- Select multiple Content Items by selecting the corresponding checkboxes in the rightmost column of the Content Table
- Select the Bulk actions blue button, scroll down and select the action you want
- This opens the Site Structure in a modal window where you select the content's destination
- If the destination contains a Content Item with the same name as the content you are transferring, a naming conflict prompt will appear in which you can rename the content:
For the items Bulk lock top, Bulk lock bottom, and Bulk unlock the method in step 1 is repeated (refer to additional information on Lock features).