Events Calendar Installation Guide
The Events Calendar Module is an application that lists and displays calendar events from Terminalfour, Google calendar, or iCal (feed or file). Features include event listings, categories, search, recurring events, and multi-day events.
You can see an example of the Events Calendar on the Terminalfour Sample Site.
A zip of the required application files is available here.
(Community Site log-in required)
Installation steps
This article deals with v2.4 and v3 of the Events Calendar.
Check out the Release Notes to see what's changed.
Let's get started with the installation.
The implementation and configuration of the Events Calendar module requires a strong working knowledge of Terminalfour Content Types and Navigation Objects. It is aimed at developers who are comfortable in JavaScript and some basic PHP.
The following instructions are broken up into these steps:
- Overview
- Architecture diagram - how all the assets you'll create fit together
- Event sources - the event sources that are supported by the Events Calendar Module
- Required Content Types - a description of the Content Types required by the Events Calendar Module
- Setting up event sources
- this will guide you through setting up the calendar events that you can use with the Events Calendar Module
- if you're using a Terminalfour Events Content Type as the source, you can check that you've carried out the steps correctly with a verification check at the end
- Configuring the Event Calendar Module
- configure the Events Calendar Module
- when you've followed along with this step you can verify it's working
- Displaying the Event Calendar
- now it's configured, set up the Events Calendar Module to display the events
- when you've followed along with this step you can verify it's working
- Finishing up
- set up the JS for the ajax functionality, add the content in the sidebar and the canonical links
- Final Verification
Overview
Architecture
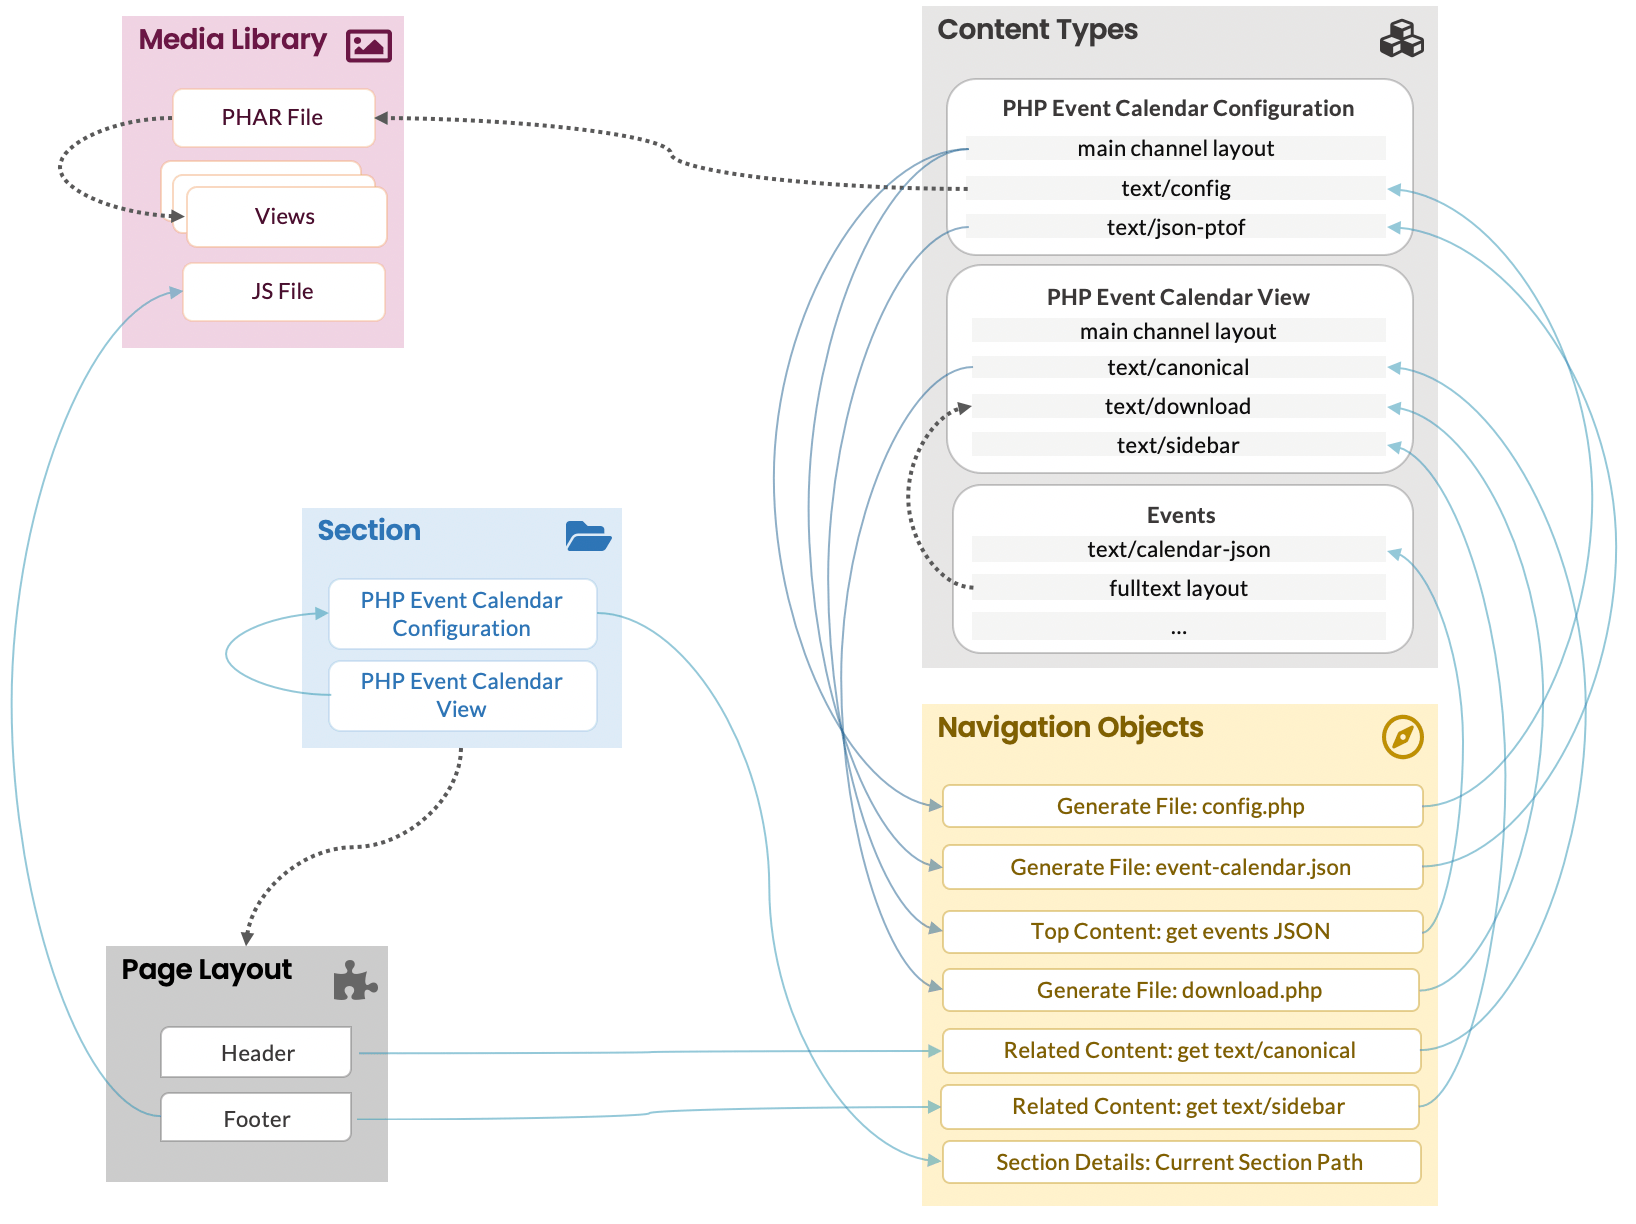
How all the assets you'll create fit together is best explained with this diagram:
Event sources
The Events Calendar Module can display calendar events in the following formats:
- Terminalfour Content Items
- if events are added as Content Items in Terminalfour they can be published as a JSON file which is used by the Events Calendar as a source of data.
- Google Calendar
- for events that originate in Google Calendar, the Events Calendar Module is provided with the credentials for that calendar in order to retrieve and display the events.
- iCal URL
- if events are available in an iCal feed, the Events Calendar Module is provided with the URL to the feed to retrieve and display the events.
- iCal File
- if the events are contained in an iCal file, the file is uploaded to the Media Library and referenced by the Events Calendar Module to display the events from that file.
PHP
The PHAR file, a PHP Main Library archive, and the list of views are managed within the Media Library.
Server Requirements
The Events Calendar requires PHP to be installed on the webserver that will host the site, and on the staging server (if this is a separate server). v2.4 of the calendar supports PHP 5.5, 5.6, 7.0, 7.1, 7.2, 7.3 or 7.4, and v3 of the calendar requires between 7.4 and 8.2. Please refer to our Release Notes for further information.
The following extensions should also be enabled:
To prevent users from viewing or downloading the PHAR file via the browser, add the following lines to the httpd.conf file or wherever your server configuration is handled.
Order allow,deny
Deny from all
Required Content Types
The Event Calendar Module uses three Content Types:
- Event
- add an event to the calendar
- Events Calendar Configuration
- identify the main settings of the events calendar
- one Content Item using this Content Type for each calendar
- Events Calendar Views
- displays a view of the calendar
- multiple Content Items using this Content Type for each calendar
Content Types for Main Calendar Page
The main calendar page is made up of the following Content Items, using these different Content Types:
- Event Calendar View (c)
- Content Layout: text/canonical
- placed in the header of the Page Layout
- shows the canonical, prev and next link
- generates download.php
- Content Layout: text/canonical
- Event Calendar Configuration (b)
- Content Layout: text/html
- generates config.php and event-calendar.json
- Content Layout: text/html
- Event Calendar View x 2 (c)
- Content Layouts: text/html or text/sidebar
- used to display a single view
- Content Layouts: text/html or text/sidebar
Content Types for Event Details pages
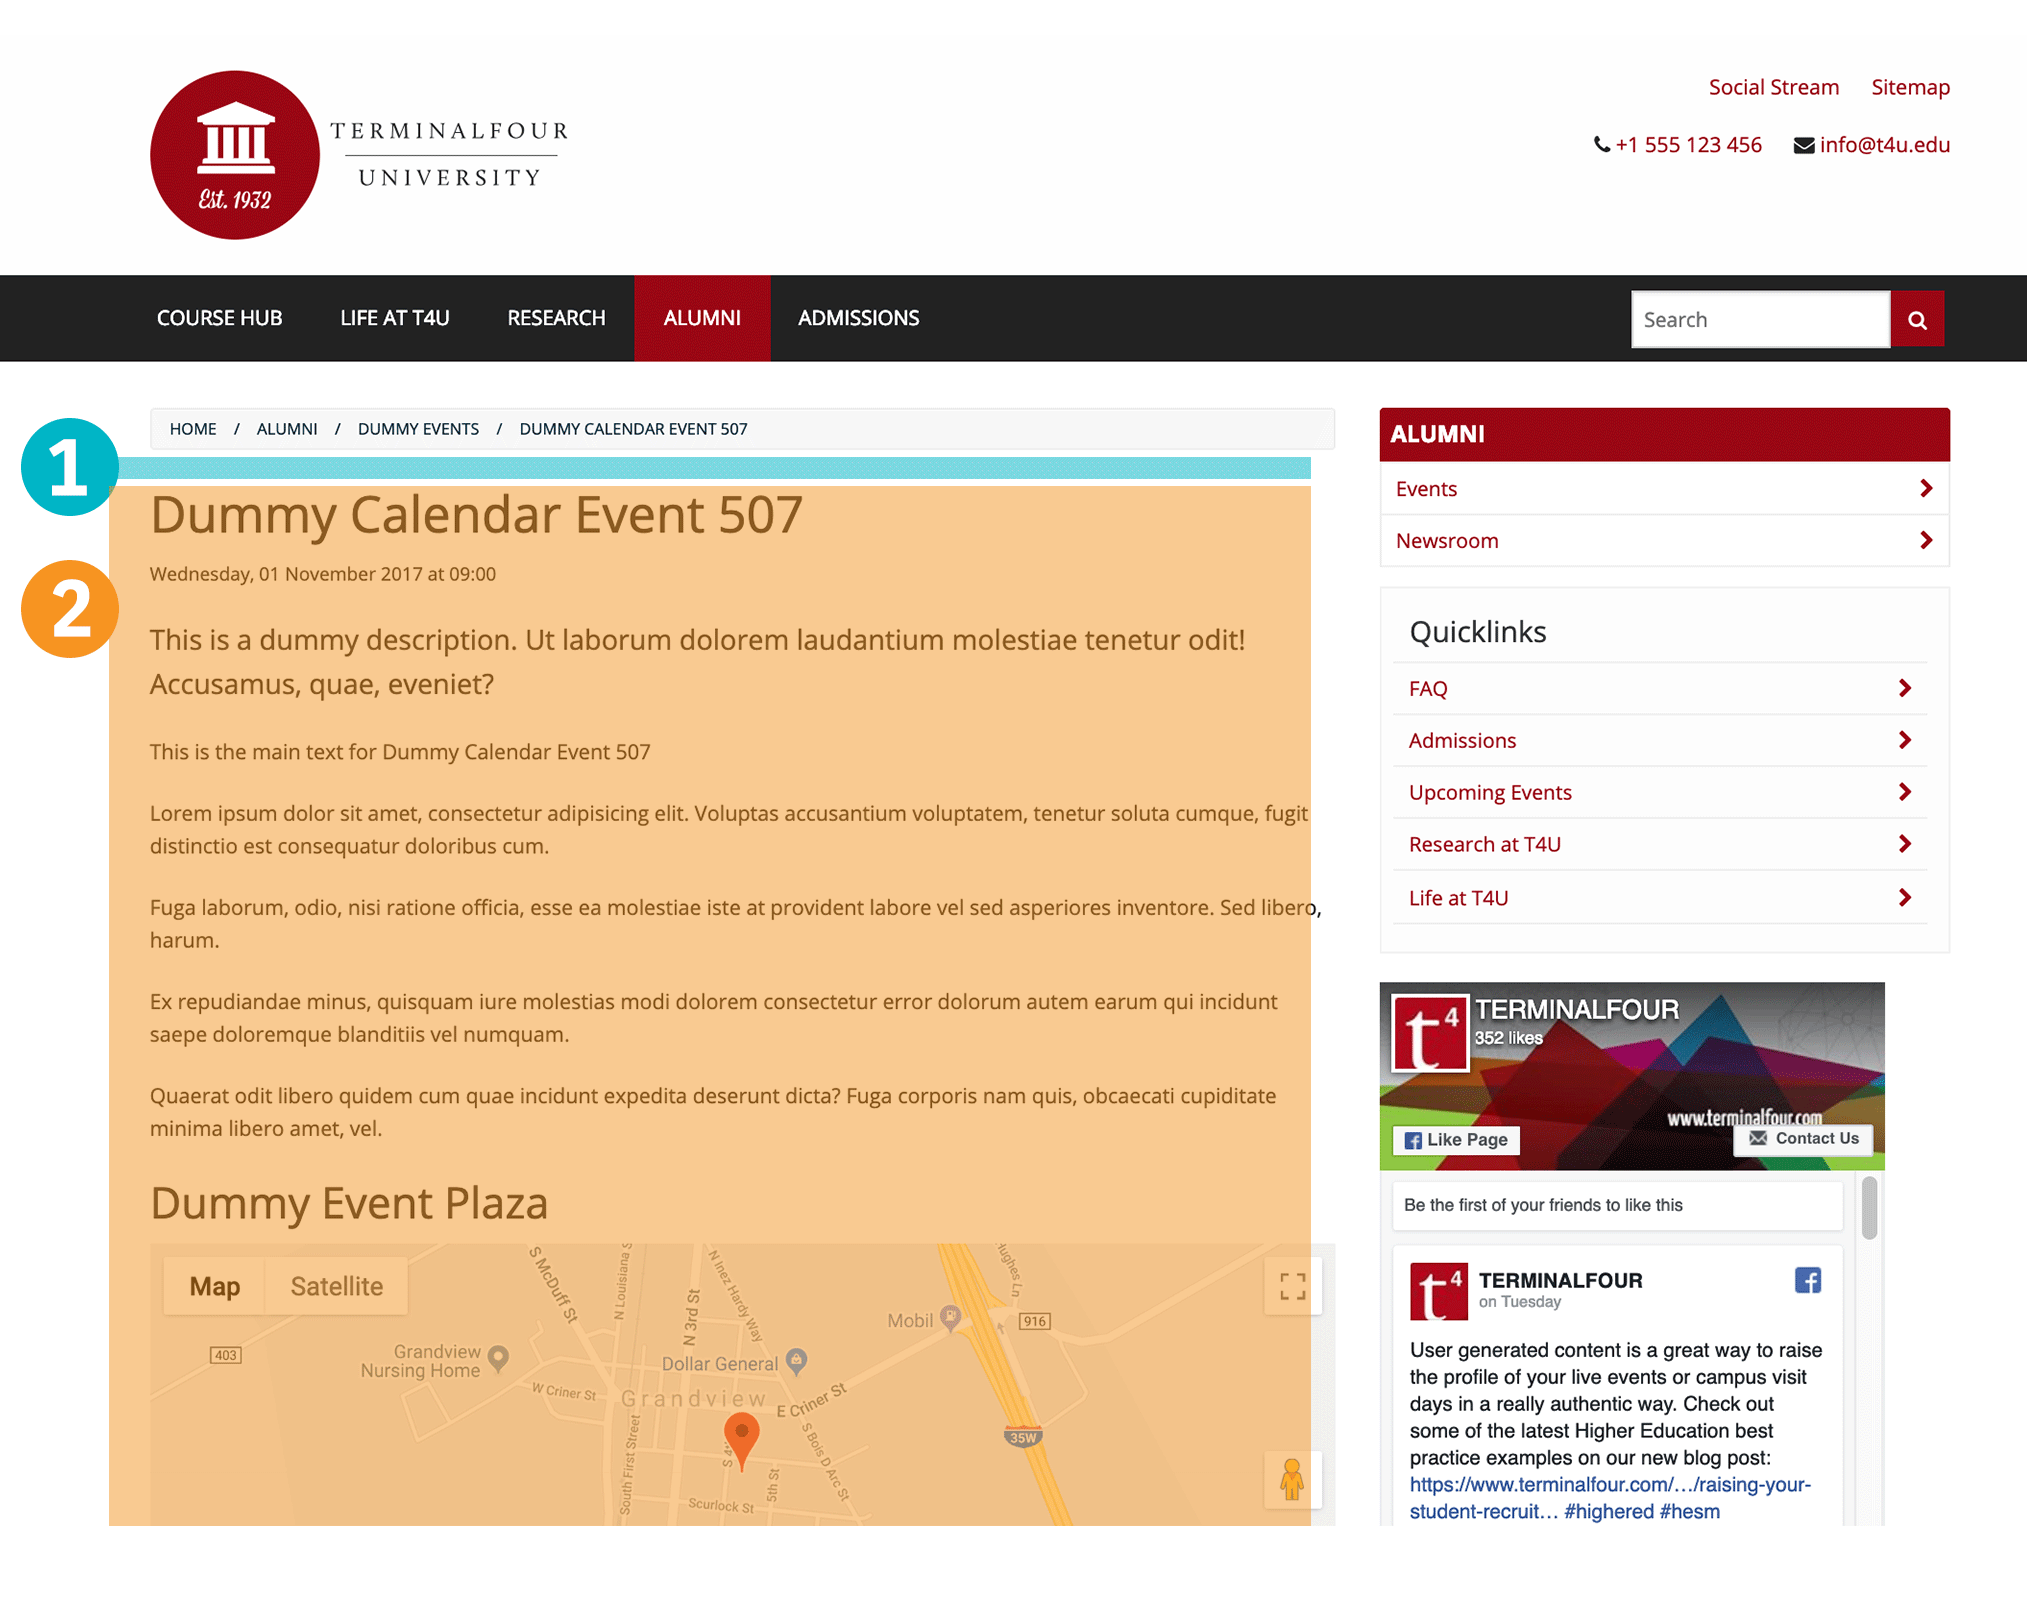
You can also link from an event listing to an event details page using fulltext. To do this, add the code to the text/fulltext Content Layout of the Event Content Type, and include the Events Calendar View content to pass the Event Calendar settings.
- Event Calendar View (c)
- Content Layout: text/html
- Events (a)
- Content Layout: text/fulltext
- the fulltext page contains the code that is used in Events Calendar View to display the dates correctly
- Content Layout: text/fulltext
Setting up the event sources
A calendar needs events so let's start by setting up the event sources. The Events Calendar Module supports events as Terminalfour Content Items and iCal and Google Calendar Events. Once we have a source ready we'll tackle the module installation itself, starting with its configuration and then the design.
Event source types
1. Terminalfour Events
The Event Calendar can handle Terminalfour Events, using a specific Content Type to provide the events displayed in the module.
In the following installation guide, we are going to create an Event Content Type from scratch but if you already have an Event Content Type, you can update the Content Elements as below to preserve functionality.
File Extensions: PHP
To display the event calendar, your Channel or Microsite must publish PHP files. Therefore if you haven't already, set up PHP as a file extension and enable the extension on your Channel.
List: Event Category
This is used by the Event Content Type and it will contain all of your main event category types, examples are shown below, though anything may be used:
| Name | Value | Selected | Sublist |
|---|---|---|---|
| ... | ... | ... | |
| Category 1 | Category 1 | Events Subcategory (optional) Each category can have an associated Sublist. |
List: Recurs Every
This is used by the Event Content Type and it will contain some or all of the following values:
| Name | Value | Selected | Sublist |
|---|---|---|---|
| Daily | 1 day | ||
| Weekly | 1 week | ||
| Every 2 weeks | 2 weeks | ||
| Monthly | 1 month | ||
| Every 2 months | 2 months | ||
| Every weekday | 1 weekday | ||
| Every Wednesday | next Wednesday | ||
| First Monday of each month | first Monday | ||
| Never | Never | Yes | |
| Ad-Hoc | Ad-Hoc |
Never and Ad-hoc are required values; all other values are optional.
Single events that recur on multiple days in recurring intervals are not supported (e.g. an event that takes place each Monday, Wednesday, Friday). To do this, you will need to create three different events with three different recursive intervals.
List: Yes
This is a List with a single list entry named "Yes". This is used by the Event Content Type to configure whether an Event is an all-day event or not. An existing (matching) list can be re-used if preferred.
| Name | Value | Selected | Sublist |
|---|---|---|---|
| Yes | Yes |
Content Type: Event
Create an "Event" Content Type using the following General options (anything not mentioned may be left at default):
| Name | Description |
|---|---|
| Event | Use this to add an event to an Events Calendar |
| Name | Description | Type | Max Size | Use as filename | Required |
|---|---|---|---|---|---|
|
Title |
Enter the Title for the Event. This will be used to search for events |
Plain Text | 200 | Yes | |
| Category | Select Categories from the List. This element will be used to show the Category facet in the search |
Multi-select List (Event Category List) | Default | Yes | |
| Start Date and Time | Select the Start date & time for the Event. Used to determine the first start date and time for the single event. If it is a recurring event it will use as the first recurring date |
Date | Default | Yes | |
| End Date and Time | Select the End date & time for the Event. Used to determine the first end date and time for the single event. If it is a recurring event it will use as the first recurring date |
Date | Default | Yes | |
| All Day Event? | Check if this is an all-day event. This option will define if the Event is a full-day event, and in this way will ignore the time defined in Start Date and Time and End Date and Time |
CheckBox (Yes List) | Default | ||
| Recurs Every | Select recurring state from the list. It needs to be always selected and it should be Never by default. If Ad-hoc please provide the specific dates in Ad-hoc Recurrence Events 1/2/3. |
Select Box (Recurs Every List) |
Default |
Yes | |
|
Recurrence End Date |
Enter when the recurring finishes. Allowed when "Recurs Every" is different from Never. Specifies the final date of the final recurrence date of the event. |
Date |
Default |
||
|
Ad-hoc Recurrence 1 |
Select custom recurring date only if the "Recurs Every" element is selected "Ad-hoc" |
Date |
Default |
||
|
Ad-hoc Recurrence 2 |
Select custom recurring date only if the "Recurs Every" element is selected "Ad-hoc" |
Date |
Default |
||
|
Ad-hoc Recurrence 3 |
Select custom recurring date only if the "Recurs Every" element is selected "Ad-hoc" |
Date |
Default |
||
|
Brief Description |
Enter a small description used to display in the full list and when it searches for Event. |
Plain Text |
1000 |
||
|
Main Text |
Enter long description used in the Fulltext page as the main description in the Event. |
HTML |
10000 |
Yes | |
|
Venue |
Enter the location for the Event. This is an optional element visible in the Fulltext. |
Plain Text |
200 |
||
| Location Latitude | Enter the coordinate for the map. This is an optional element visible in the Fulltext. |
Plain Text | 80 | ||
| Location Longitude | Enter the coordinate for the map. This is an optional element visible in the Fulltext. |
Plain Text | 80 | ||
| Image | Enter the image of the Event. This is an optional element visible in the Fulltext. |
Media | n/a |
Content Layouts
| Name | Default Channel layout e.g. (text/html) |
|---|---|
| File extension | (Default) |
| Syntax Type | HTML/XML |
| Content Layout Processor | T4 Standard Content |
| Content Layout Code |
|
Events Section
Once the Event Content Type is created, add a Section for your events' content. This may be anywhere in your Site Structure but is most commonly below the Calendar Section that will contain the Event Calendar Module.
Create an "Events" Section as follows:
This Section will contain all your Event Content Items
| Name | Events |
|---|---|
| Show in navigation | No |
| Page Layout | Inherited, or select the Page Layout created for the calendar page |
Enable the following Content Types (either on the Branch or the Section, depending on your requirements):
| Content Type | Group | Branch | Section | Disabled |
|---|---|---|---|---|
| Event | No | [X] Yes | No |
Event Contents
Once the "Events" Section is created add some content to test the functionality. Test functionality should include examples of events in the past, and some in the future for testing purpose.
Navigation Object: Events Calendar: get JSON version from Event - Past Events
When Content Items are added that use the Event Content Type, we will need a Navigation Object to output the JSON version of those events just created using the Top Content Navigation Object.
Set up options are in the table below. Unlisted options should be left at their default values:
| Name |
Events Calendar: get JSON version from Event - Past Events |
|---|---|
| Fetch Method | Use Branch |
| Select Section | Select your Events Section in the Site Structure. |
| Content Type Names | The Calendar Event Content Type from above or All Content Types if there is more than one |
| Channel | Select the Channel/s where the Event Calendar is/are publishing. |
| Content dates | Use current content |
| Date element | Start Date and Time |
| Ignore date ordering | Leave this option unchecked |
| Number of pieces of content to display | 99999 |
| Which piece of content to start at? | 0 |
| Content Layouts? | Use alternate content layout [x]: check this option |
| Alternate Content Layout | text/calendar-json |
| Before HTML | |
| After HTML |
Copy the T4 tag. You're going to need it later.
Navigation Object: Events Calendar: get JSON version from Event - Upcoming Events
This uses the Top Content Navigation Object. Set it up using the options in the table below. Unlisted options should be left at their default values.
| Name |
Events Calendar: get JSON version from Event - Upcoming Events |
|---|---|
| Fetch Method | Use Branch |
| Select Section | Select your Events Section in the Site Structure. |
| Content Type Names | The Calendar Event Content Type from above or All Content Types if there is more than one |
| Channel | Select the Channel/s where the Event Calendar is/are publishing. |
| Content dates | Use upcoming or future content |
| Date element | Start Date and Time |
| Ignore date ordering | Leave this option unchecked |
| Number of pieces of content to display | 99999 |
| Which piece of content to start at? | 0 |
| Content Layouts? | Use alternate content layout [x]: check this option |
| Alternate Content Layout | text/calendar-json |
| Before HTML | |
| After HTML |
Copy the T4 tag. You're going to need it later.
Verifying the Event Content Type
So far, we've created an Event Content Type with two Navigation Objects that output the JSON file with all event Content Items.
This is a good point to test what we've done so far. To verify the steps above in a hidden Section, or in the Event Section just created, add the following code in a Code Content Type:
{"events": {"event": [<t4 type="navigation" name="Events Calendar: get JSON version from Event - Past Events" id="x" /><t4 type="navigation" name="Events Calendar: get JSON version from Event - Upcoming Events" id="x" />]}}
If a Code Content Type can't be added, you can add the above to a Page Layout. Be careful to use a Page Layout that won't affect live pages on your site.
If the Event Content Type is working, a Section that contains the above code will output something like the following:
{
"events": {
"event": [{
"recurs": "1 Week",
"content_id": "4147",
"imagePath": "",
"recursend": "31/07/18 13:12",
"startdate": "02/07/16 18:00",
"ad_hoc_dates": [],
"url": "/alumni/dummy-events/dummy-calendar-event-19.php",
"enddate": "02/07/16 20:00",
"main_desc": "<p>This is the main text for Dummy Calendar Event 19<\/p>\n<p>Lorem ipsum dolor sit amet, consectetur adipisicing elit. Quos, laboriosam modi nostrum ipsam excepturi quae soluta aliquid impedit atque obcaecati!<\/p>\n<p>Quibusdam placeat delectus magnam quam expedita, corporis excepturi esse culpa, odio autem alias, mollitia eaque voluptas id accusantium incidunt deleniti!<\/p>\n<p>Aliquam nihil magni quibusdam voluptatibus dolorum dolore corporis ipsa, impedit hic, deleniti eligendi est laboriosam illo qui fuga beatae eos.<\/p>\n<p>Ipsam dolorem quasi sunt ullam consectetur veritatis tempora perferendis laborum deserunt quis velit ipsum, excepturi perspiciatis sapiente quaerat consequuntur quibusdam.<\/p>",
"name": "Dummy Calendar Event 19",
"all_day": "",
"location": "Dummy Event Plaza",
"categories": "Student Events",
"short_desc": "This is a dummy description. Ad earum necessitatibus itaque, architecto consequatur expedita aliquid reprehenderit mollitia."
}, {
"recurs": "Never",
"content_id": "4031",
"imagePath": "",
"recursend": "01/06/20 23:59",
"startdate": "15/05/17 14:00",
"ad_hoc_dates": [],
"url": "/alumni/dummy-events/dummy-calendar-event-190.php",
"enddate": "15/05/17 15:00",
"main_desc": "<p>This is the main text for Dummy Calendar Event 190<\/p> \n<p>Lorem ipsum dolor sit amet, consectetur adipisicing elit. Laudantium porro quae veniam possimus, ipsa aliquid, consequatur commodi quisquam provident et.<\/p> \n<p>Dolorem est repellat officiis, voluptatum, atque vel amet veniam optio, eaque itaque tempore iure? Consequatur sequi saepe, deleniti nostrum quasi.<\/p> \n<p>Facere et reiciendis nam quisquam, blanditiis cupiditate! Architecto at maxime, possimus eligendi quas sapiente. Quia alias facilis dignissimos maxime vitae?<\/p> \n<p>Nam possimus velit, quaerat esse nihil, architecto officiis aperiam laborum. Commodi optio iste sint id laborum, voluptatibus officiis ex earum.<\/p>",
"name": "Dummy Calendar Event 190",
"all_day": "",
"location": "Dummy Event Plaza",
"categories": "Uni Events",
"short_desc": "This is a dummy description. Facere ut, magnam distinctio soluta similique doloribus necessitatibus iste accusantium."
}, ]
}
}
Before continuing the installation ensure that:
- all Event Content Items are present in the JSON File, for both past events, and future events (check that both Navigation Objects are displaying correctly)
- all nodes contain the following attribute: content_id, startdate, enddate, all_day, recurs, recursend, ad_hoc_dates, shor_desc, main_desc, categories, url.
If it's not working re-check the above steps to identify the problem.
If you see no output from the Navigation Object and it looks right, check the Programmable Layout.
Once you've verified the JSON is outputting correctly, delete the code Content Item or remove the code from the Page Layout. This was added only for testing purposes. When we create the Event Calendar Configuration Content Type we will place the piece of code in the Event Calendar Configuration Content Type.
2. Google Calendar Events
The following steps are used only if the Event Calendar displayed Event using a Google Calendar.
The Event Calendar can only use one Google Account. To set Google Calendar API and get Google API Token and Google Calendar IDs follow these instructions.
Ensure to have the following information:
- Google Email: Google API Account Email
- Google API Token: Google API JSON Token File.
- Google Calendar IDs: Multiple Google Calendar IDs they should look like:
xxxxxxxxxxxxxxxxxxx@group.calendar.google.com
The API Token is a JSON file that contains the credential to access the Google Calendar account, so you should put this file in a safe location that only you can access, i.e., not in the Media Library.
3. iCal Events
The following steps are used only if the Event Calendar displayed iCal Events.
If the iCal source is a URL, ensure you have a list of the URLs that are publicly accessible from your live website.
If the iCal source is a local file, add it to the Media Library in any Media Category.
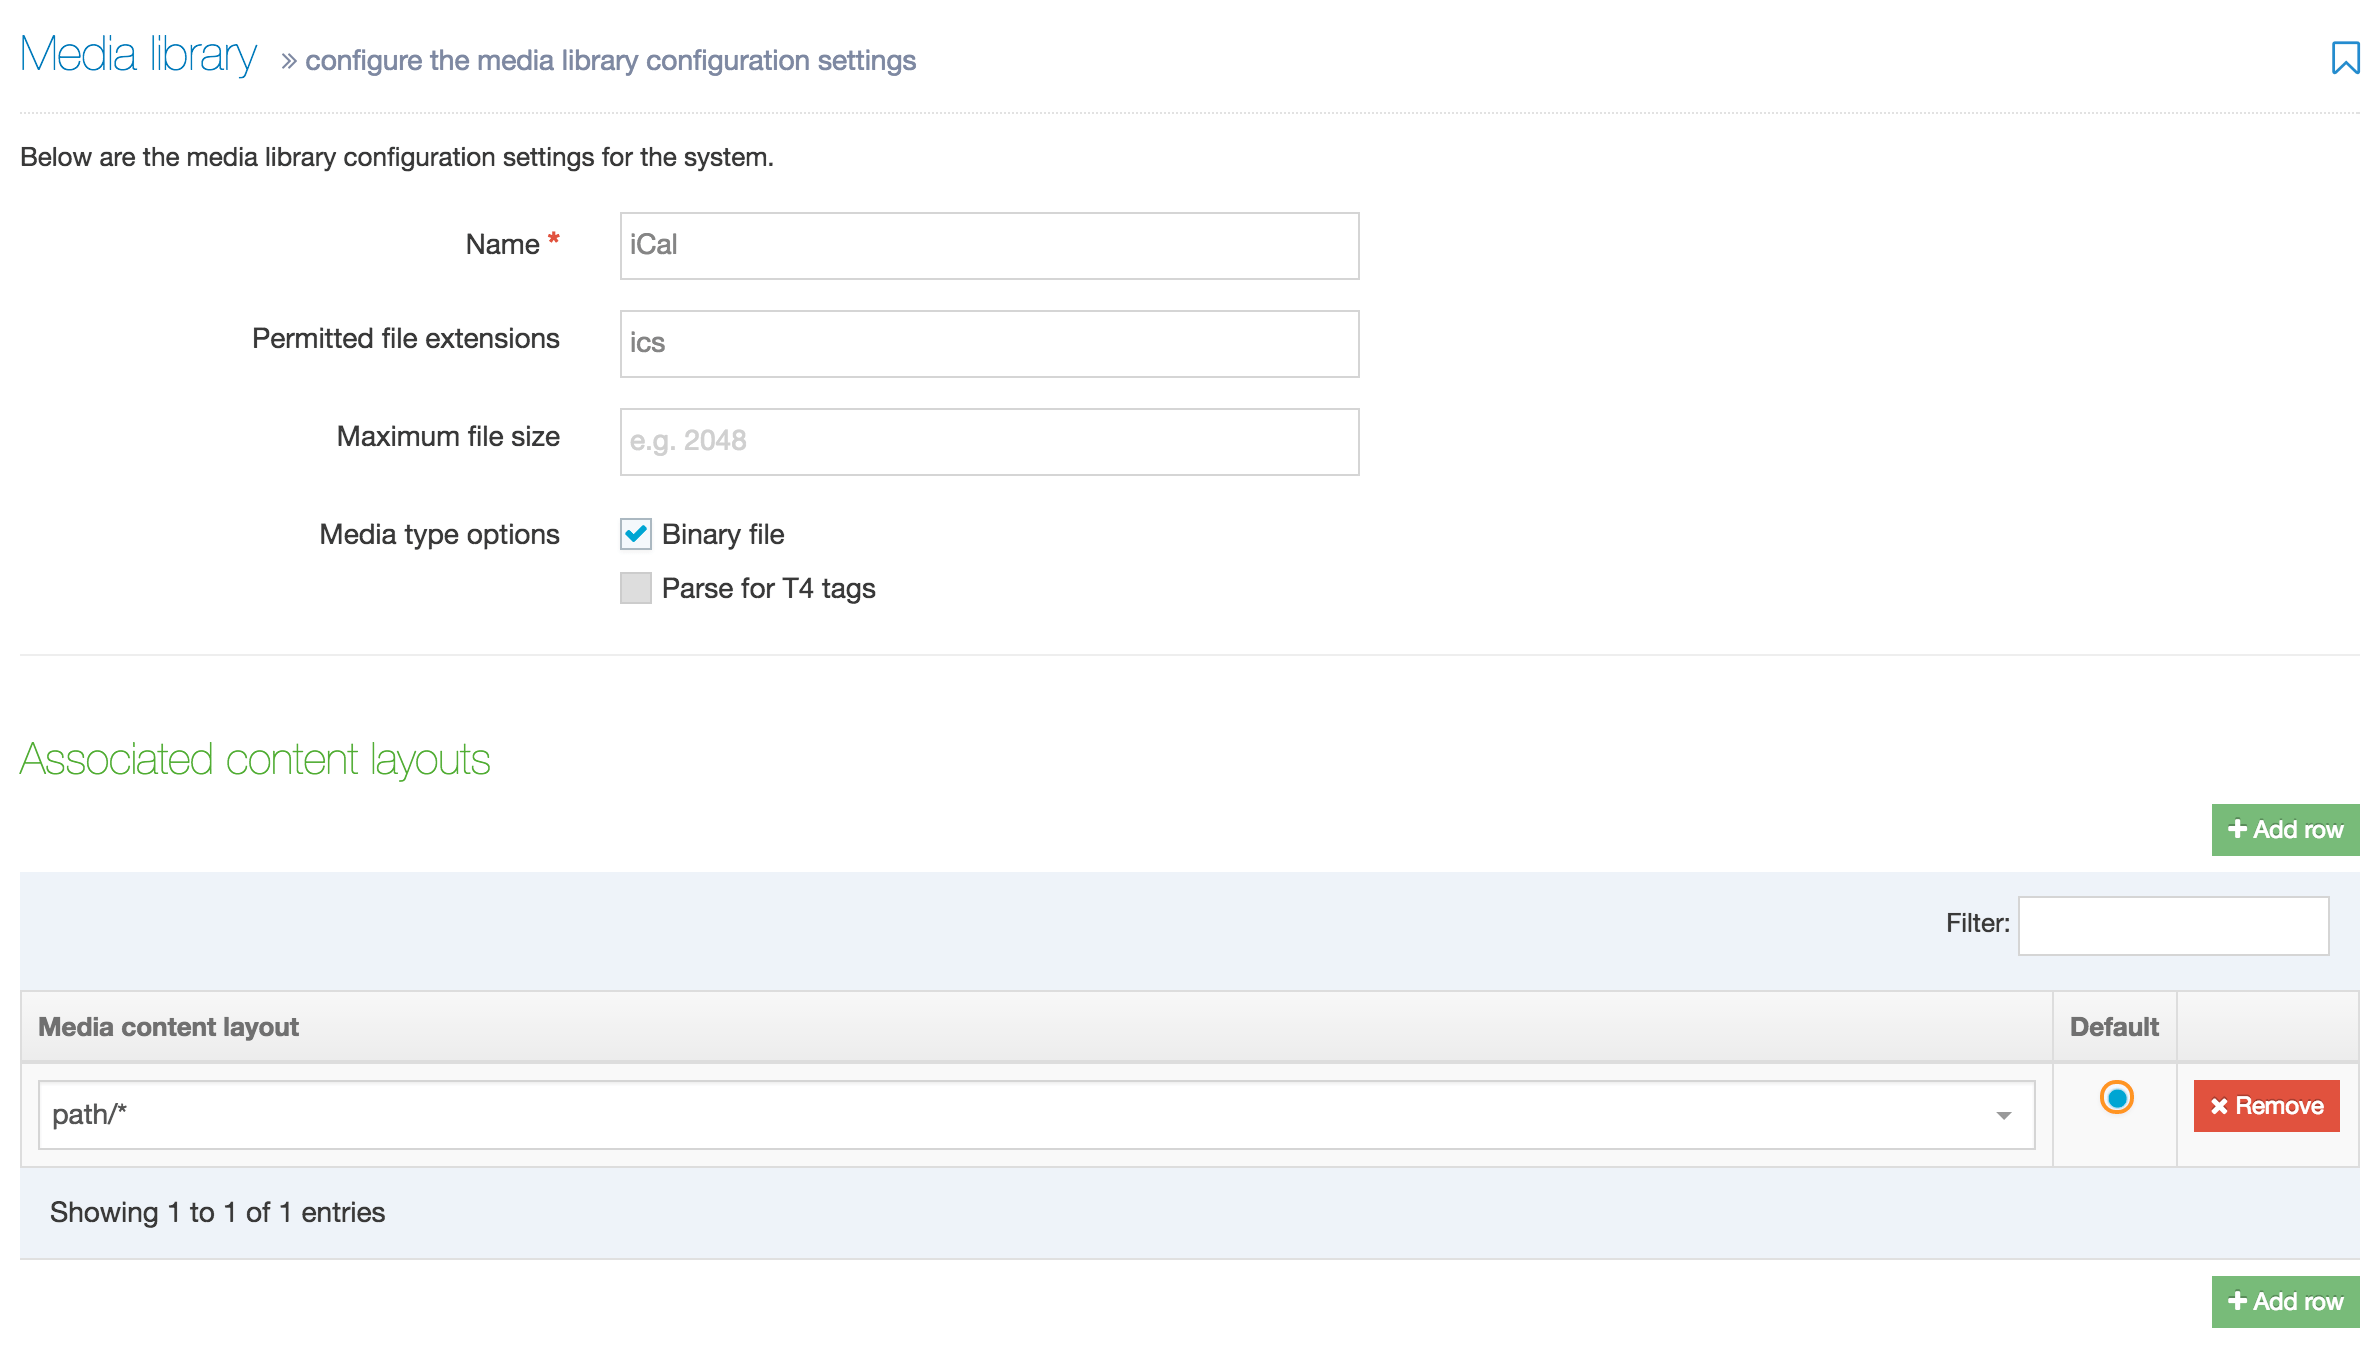
To output the path for the Events Calendar Module you'll need to set up the following Media Type:
Media Type: Cal File
Not required if you have an external iCal URL.
Create an iCal Media Type and associate the "path/*" Content Layout with it:
Media File: iCal
Not required if you have an external iCal URL.
If you intend to use the iCal source, you must load your .ics file here. This file can be added to any Media Category. Select iCal as the Media Type. Note where it's located in the Media Library.
Configuring the Event Calendar Module
Once you've set up the calendar sources, the next step is to display them.
The Event Calendar module uses two different Content Types – one that's used to display the single part, called views, and one that it is used to define the basic configuration that the views will use.
Configuration Content Type
In this part we are going to set up the Configuration Content Type, will all necessary settings and assets in order to make it work.
File Extensions: PHP
You can skip this step if you've already done this.
In order to display the Events Calendar, your Channel or Microsite must publish PHP files. If you haven't already, enable the extension.
Media Layout: path/*
The Event Calendar Module must output the file path to files like the PHAR File (PHP Archive). To do this, create a Media Layout for the Media Content Type.
Go to Assets > Content Types and search for the Media System Content Type. If it does not already exist, add a Content Layout named "path/*". In the Content Layout code field add the following:
<t4 type="content" name="Media" output="file" /> Media Type: PHAR File
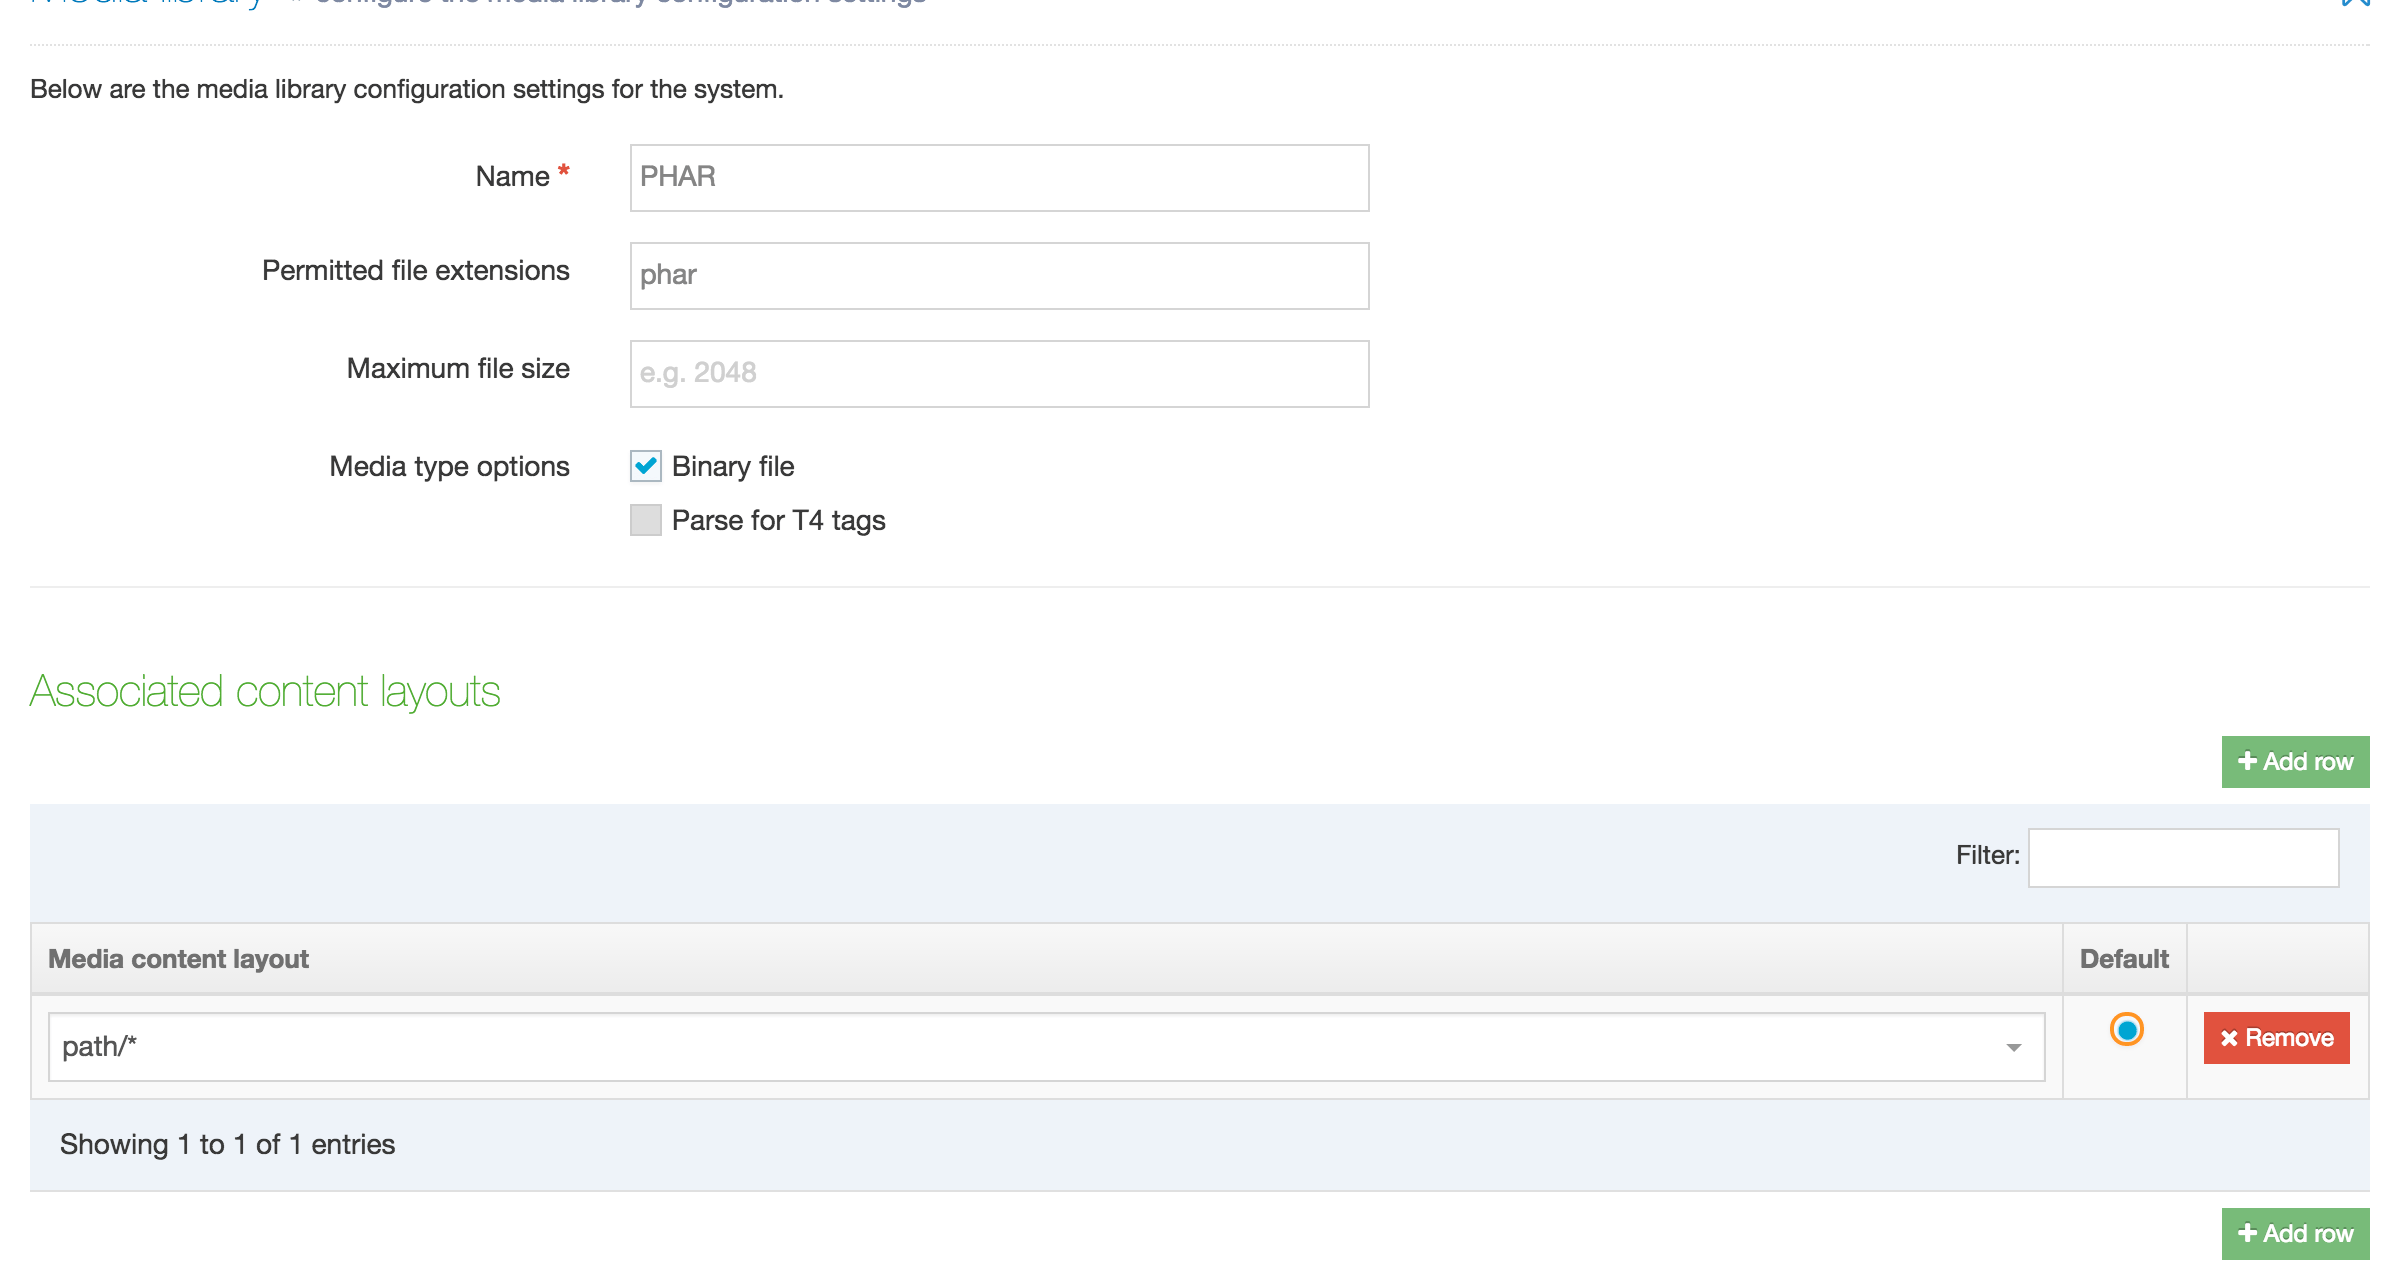
Create a Media Type to upload the PHAR file to the Media Library.
Create a PHAR Media Type and associate the "path/*" Content Layout with it:
PHAR File
The Event Calendar uses a PHP library in the PHAR file. The PHAR file contains all the PHP code necessary to make the Event Calendar work.
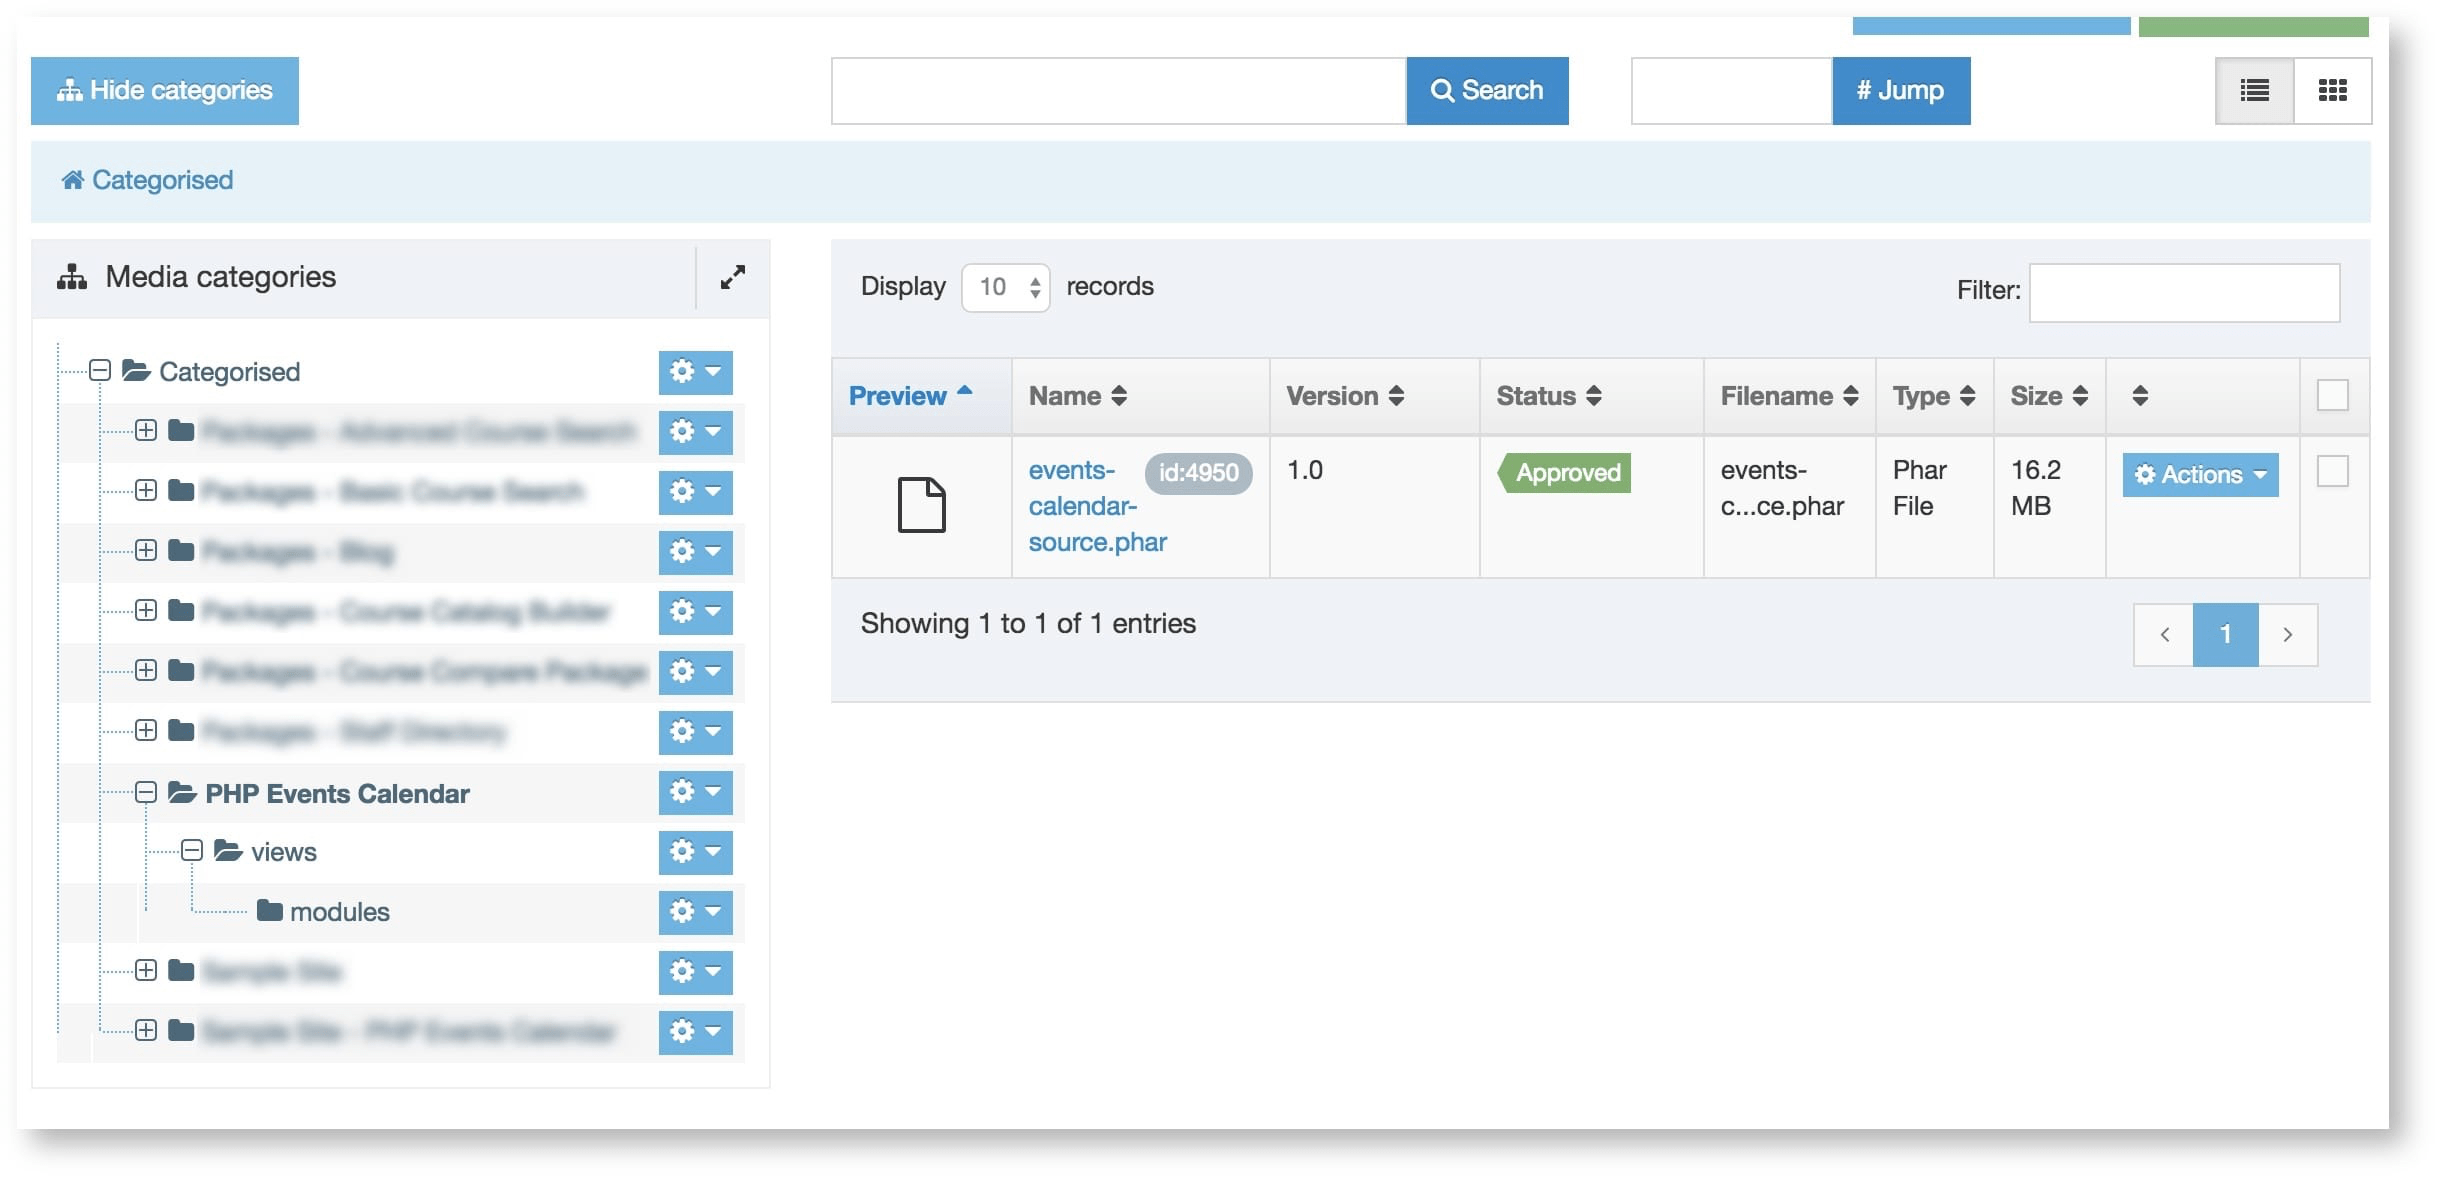
Upload the "events-calendar-source.phar" file to the "Events Calendar" Category and select PHAR as the Media Type:
List: Events Calendar Sources
After setting up the Channel for the Event Calendar Configuration, we'll create the List and then the Content Type.
This List is the source List for the Events Calendar Configuration Content Type:
| Name | Value | Selected | Sublist |
|---|---|---|---|
| T4 Events | TerminalFourEvents | ||
| Google Calendar Events | GoogleCalendarEvents | ||
| iCal Events | IcalEvents |
Content Type: Events Calendar Configuration
| Name | Description |
|---|---|
| Events Calendar Configuration | The Content Type used to configure the Events Calendar |
The Main View Section element refers to the Section where the Main View of Events Calendar Views is located. (see Views to understand which type of view is the Main View).
The Main View Section is where a Search will change the results (in a General Page or a Month View) and where the events links in a Mini Calendar is displayed.
CheckBox(Events Calendar Sources)
| Name | Description | Type | Max size | Use as filename | Required |
|---|---|---|---|---|---|
| PHAR File | Link to the PHAR File | Media | Default | Yes | |
| Sources | Multi Check to choose which Source load | Check Box (Events Calendar Sources) | Default | Yes | |
| Events JSON or XML Source | The Navigation Object that returns the URL of the JSON or XML events source file (the one created with text/calendar-json) | Plain Text | 200 | ||
| Max Events per Page | Max elements in a page | Whole Number | 10 | Yes | |
| Main View Section | This variable set where the single link inside the view needs to redirect. | Section/Content Link | Default | ||
| Google API Token | For Google Calendar Events - Google API JSON Token file | Plain Text | 256 | ||
| Google Calendar IDs | For Google Calendar Events - Calendar IDs (Multiple file spit by |, to specify the Category: Category 1=Calendar ID 1|Category 2=Calendar ID 2) | Plain Text | 5000 | ||
| Google Email | For Google Calendar Email - Google API Account Email | Plain Text | 256 | ||
| iCal Sources | For iCal Events - iCal .ics source file or iCal URLs (Multiple file split by new line) | Plain Text | 5000 | ||
| Timezone | Timezone (if it's not set, it is Europe/Dublin - see this guide to timezones for the available ones) | Plain Text | 80 | ||
| Options | Optional Settings | Plain Text | 5000 |
Content Layouts
| Name | text/html (must match the Type set on the Channel) |
|---|---|
| File extension | PHP (.php) |
| Syntax type | PHP |
| Content Layout Code | In "Events Calendar.zip", use the code in "content-types/php-events-calendar-configuration/html.php" |
This Content Layout contains two Navigation Objects. We'll modify these later.
| Name | text/config |
|---|---|
| File extension | PHP (.php) |
| Syntax type | PHP |
| Content Layout Code | In "Events Calendar.zip",use the code in "content-types/php-events-calendar-configuration/config.php" |
| Note |
If the module is implemented on a microsite and the microsite has a Base HREF set in the channel settings then the Base HREF will be prepended to paths output by media/content T4 tags. Since the paths to the PHAR file and the content JSON need to be relative, the Base HREF will have to be removed by wrapping the T4 tag in a str_replace function like this:
str_replace('REPLACE WITH BASE HREF', '', '<t4 type="content" name="PHAR File" output="normal" formatter="path/*" />'); |
| Name | text/json-ptof |
|---|---|
| File extension | Default |
| Syntax type | HTML/XML |
| Content Layout code |
Use the code that we used to verify that the JSON file was installed correctly |
{"events": {"event": [<t4 type="navigation" name="Events Calendar: get JSON version from Event - Past Events" id="x" /><t4 type="navigation" name="Events Calendar: get JSON version from Event - Upcoming Events" id="x" />]}}
Navigation Object: Events Calendar: create event-calendar.json
In this step, we'll update the above Content Layout with the correct Navigation Objects.
The first one is the Navigation Object responsible to generate the JSON File that displays Terminalfour Events called "event-calendar.json"
This Navigation Object will be created only if Terminalfour Events are used, otherwise it's optional.
A Generate File Navigation Object is used to create the file to display the Events Calendar: get JSON version from Event content.
| Name | Events Calendar: create event-calendar.json |
|---|---|
| File name | event-calendar |
| File extension | json |
| Output directory | Use the current directory |
| Content Layout | text/json-ptof |
Go to Events Calendar Configuration > text/html layout and change the ID in the T4 Tag to be the ID for this Navigation Object.
Navigation Object: Events Calendar: create config.php
The Event Calendar Configuration generates a "config.php" file that is called in each Event Calendar View and defines the settings in the Content Type.
A Generate File Navigation Object is used to create the file that has the Event Calendar Configuration script
| Name | Events Calendar: create config.php |
|---|---|
| File name | config |
| File extension | php |
| Output directory | Use the current directory |
| Content Layout | text/config |
Go to Events Calendar Configuration > text/html layout and change the ID in the T4 Tag to the ID for this Navigation Object.
Navigation Object: Current Section Path
This retrieves the current Section path to specify where the JSON file is located.
If it doesn't already exist, create a Section Details Navigation Object to get the current Section path (used to get the full event-calendar.json path).
| Name | Current Section Path |
|---|---|
| Details method | Current Section |
| Output detail | Section path |
Make a note of the T4 tag for this Navigation Object. It will be placed in the "Events JSON or XML Source" element of the Events Calendar Configuration Content Type when creating a Content Item using this Content Type (e.g. event-calendar.json)
Site Structure: Calendar Section
After creating the Content Type we'll add the single Sections.
Create a Section in the Site Structure that will contain the Calendar. This Section outputs the general List to show all searched events or just a monthly view. Depending on how your page is configured to retrieve page elements, e.g., the sidebar, it may require additional Sub-Sections to be created.
| Name | Calendar |
|---|---|
| Show in navigation | [X] Yes (it can be no as well) |
| Page Layout | Inherited, or select the Page Layout created for the calendar page |
Enable the following Events Calendar Configuration Content Type for the section where your calendar will be:
| Content Type | Group | Branch | Section | Disabled |
|---|---|---|---|---|
| Events Calendar Configuration | No | [X] Yes | No |
Site Structure: Content Items
Add Content Items to configure the calendar:
| Content Type | Events Calendar Configuration |
|---|---|
| Name | Calendar Configuration |
| PHAR File | Select the PHAR file in the Media Library |
| Sources | Check sources being used |
| Events JSON or XML Source | Update the T4 Tag in the following code with the ID of the Current Section Path Navigation Object |
<t4 type="navigation" name="Current Section Path" id="x" />event-calendar.json| Max Events per Page: | The number of events to list per page (e.g. 10) |
|---|---|
| Main View Section | A link to the Calendar Section (current Section, in this case) |
| Google Email | If you are displaying events from a Google Calendar, enter the Google API Account Email |
| Google API Token | If displaying events from a Google Calendar, enter the absolute path to the Google API JSON Token File. Refer to separate documentation on Google Calendar Events. |
| Google Calendar IDs |
Multiple Google Calendar IDs, split by | to specify categories: Title Calendar 1=xxxxxxxxxxxxxxxxxxx@group.calendar.google.com|Title Calendar 2=xxxxxxxxxxxxxxxxxxx@group.calendar.google.com |
| iCal Sources |
You can add more than one iCal Source and add each to a new line. The title specified is read-only if the iCal does not have its own. iCal Sources can be Media Files or URLs.
The Events Calendar accepts http:// and https:// protocols, not webcal://. Check if the webcal:// protocol can be replaced by http:// or https://
|
| Timezone |
Timezone (if it's not set, it is Europe/Dublin) |
| Options |
See Events Calendar Options for more information |
Verifying the steps so far
Publish the Calendar Section you've just created to verify that:
- The Section is published as a PHP file
- The Section contains a config.php file that it is blank
- The Section contains an "event-calendar.json" that contains the JSON file created for the Events (This is only if Terminalfour Events were created)
- In the Media Library, ensure the PHAR File is correctly published
If one of the above items is missing go back and check the steps so far
Displaying the Event Calendar
After creating the Event Calendar Configuration, we will need to create the Content Type that displays the module called Event Calendar View.
Media Type: PHP File
The Event Calendar uses the PHP file that contains the view. These files are added to the Media Library. First, check that you have a Media Type PHP.
Go to System Administration > System Settings > Media Library and, in the Media Types tab, add the following Media Type a Media Path.
Create a PHP Media Type and associate the "path/*" Content Layout with it:
Configure the Media Publish on the Channel
Once the Media Type is created, we have to ensure that the Channel always will publish the file by going to System administration > Setup sites & Channels > Channels, edit the Channel settings and go to Publish Options:

Views Files
In the unzipped "Events Calendar.zip," the "Media Library" directory contains the following files that will be uploaded to the Media Library.
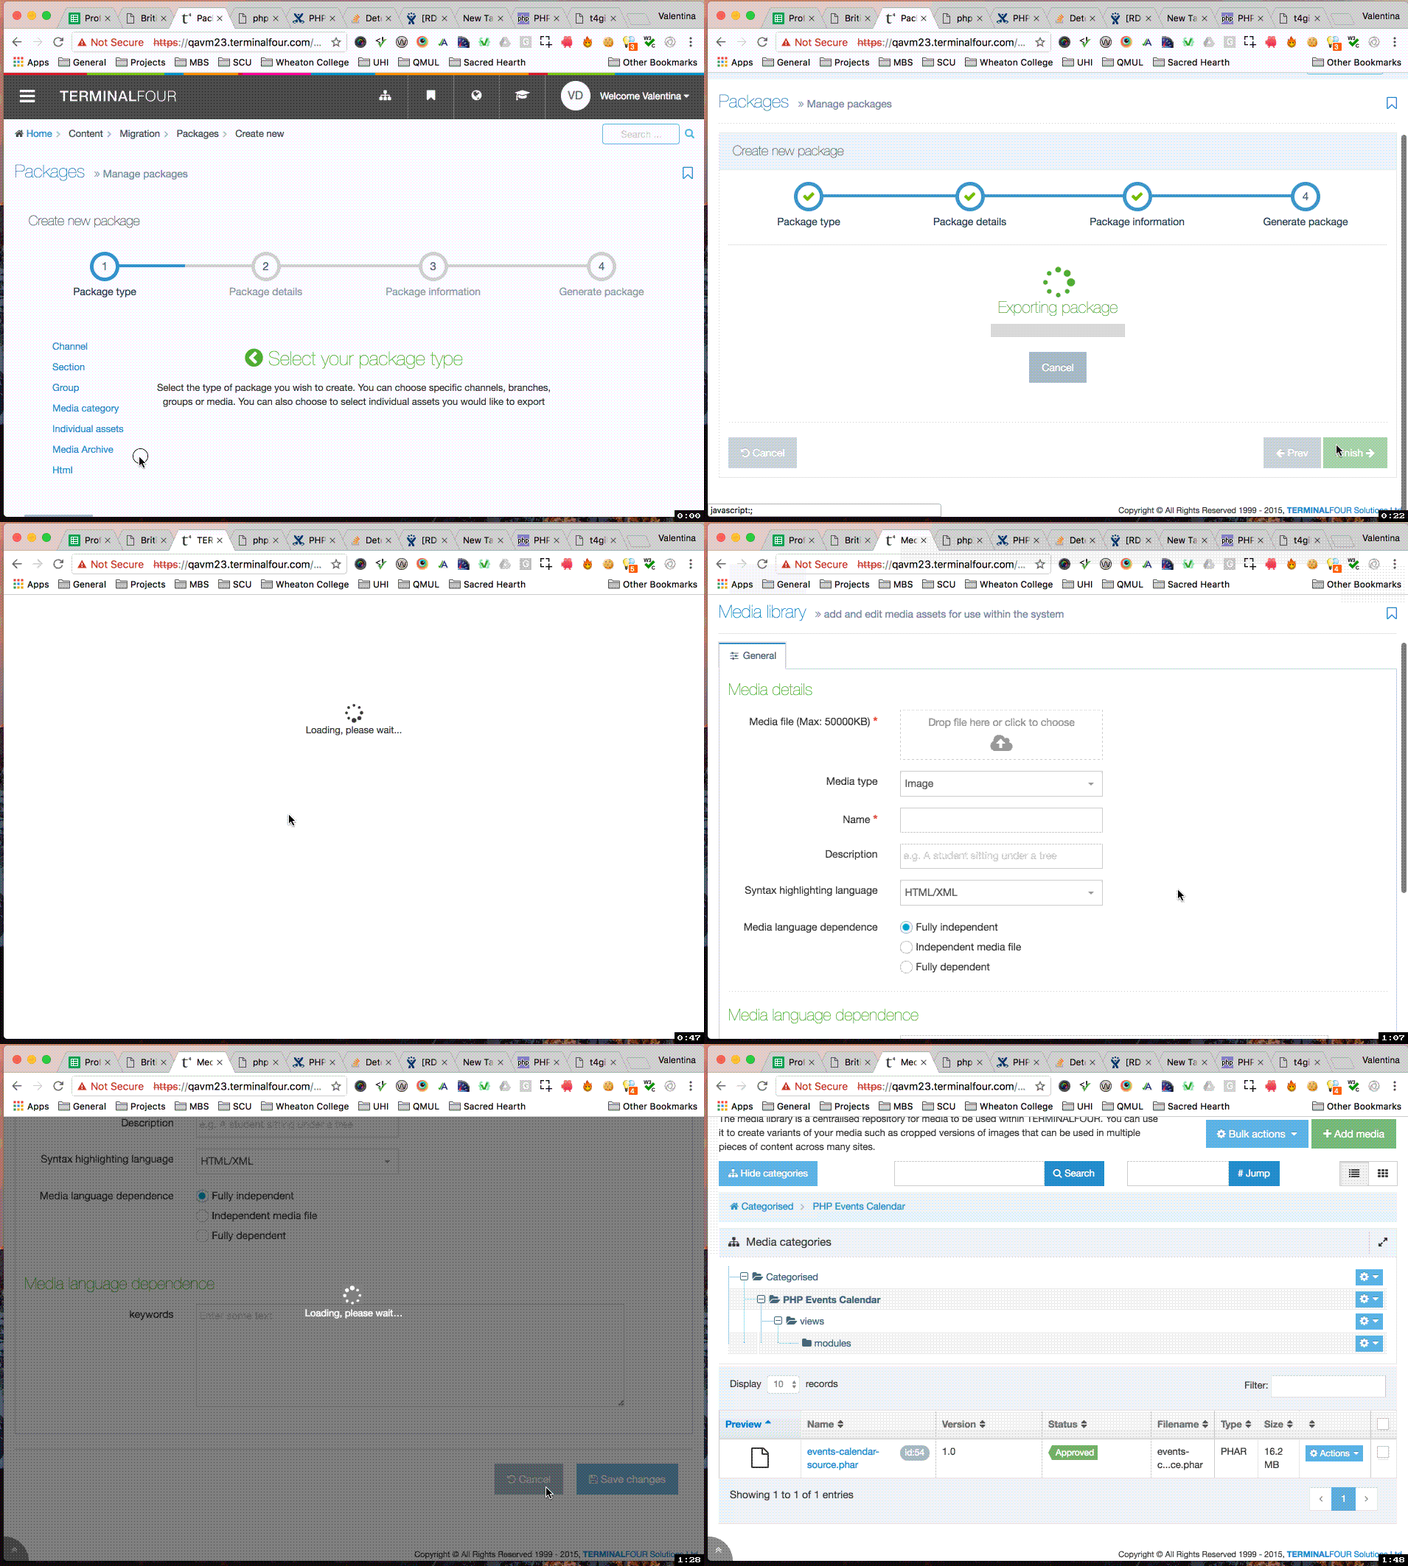
The "views.zip" file is not a Terminalfour Package so you must create one with it. To do this go to Content > Content Migration > Packages, select Create New Package and then select Media Archive. Select PHP as the Media Type and Import:
List: Events Calendar View Positions
This List is used by the Events Calendar Views Content Type and defines where the view will appear in the Page Layout. In the sample site, the General View uses the default Content Layout (text/html) and the calendar in the sidebar uses another (text/sidebar).
Your List name and values should refer to the Content Layouts included on your page.
The default value is the main Channel Content Layout (e.g. text/html).
| Name | Value | Selected | Sublist |
|---|---|---|---|
| Default | text/html | Yes | |
| Sidebar | text/sidebar |
List: Events Calendar Views
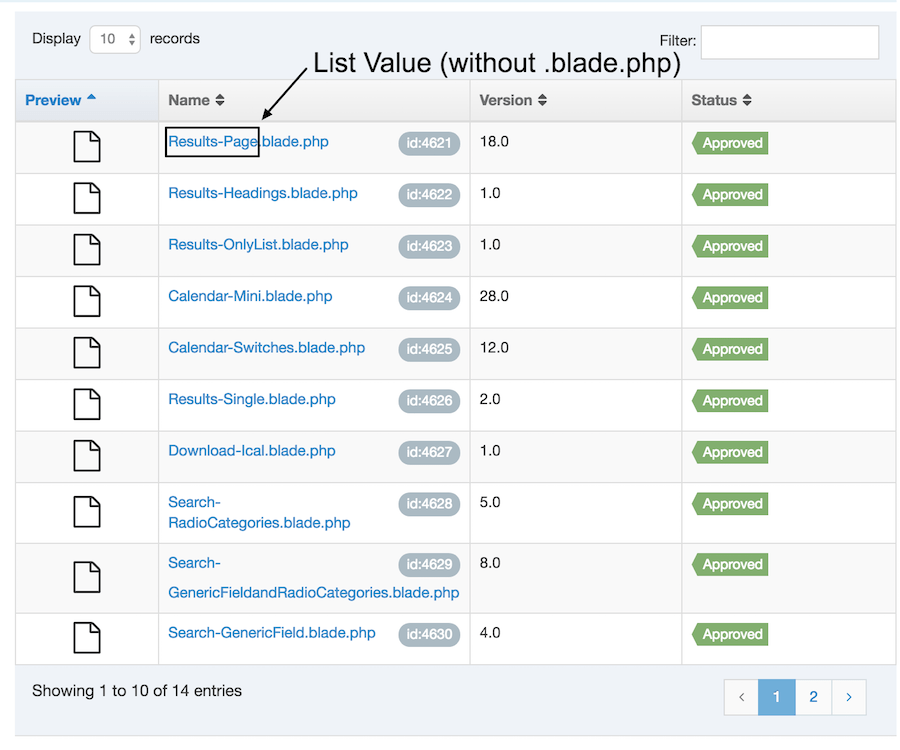
This List is used by the Events Calendar Views Content Type and is a List of the required modules for the Events Calendar. The list values should contain all the Views/Modules names without the "blade.php" suffix.
Content Type: Events Calendar Views
| Name | Description |
|---|---|
| Events Calendar Views | Events Calendar Views to show only the modules you need |
See Views to understand the View Content Type.
| Name | Description | Type | Max size | Use as filename | Required |
|---|---|---|---|---|---|
| Events Calendar Config Link | Events Calendar Section Link | Section/Content Link | Default | Yes | |
| View | View that you want to see | Select Box (Events Calendar Views) | Default | Yes | |
| Position in the page | Select where the view will appear in the Page Layout | Select Box (Events Calendar View Positions) | Default | Yes | |
| Main View Section | Use when you load the module in a different page | Section/Content Link | Default | ||
| Options | Optional Settings | Plain text | 5000 |
Content Layouts
| Name | text/canonical |
|---|---|
| File extension | PHP (.php) |
| Syntax type | PHP |
| Content Layout code | In "Events Calendar.zip", use the code in "content-types/php-events-calendar-view/canonical.php" |
| Name | text/download |
|---|---|
| File extension | PHP (.php) |
| Syntax type | PHP |
| Content Layout code | In "Events Calendar.zip", use the code in "content-types/php-events-calendar-view/download.php" |
You can add any additional Content Layouts that are listed in the Events Calendar View Position List so you could add this additional one as well:
| Name | text/sidebar (example of secondary position) |
|---|---|
| File extension | PHP (.php) |
| Syntax type | PHP |
| Content Layout code: |
In "Events Calendar.zip", use the code in "content-types/php-events-calendar-view/html.php" Enure the following variable is updated to reflect the current Content Layout name (so replace 'text/html' with the name of the current Content Layout): |
Navigation Object: Events Calendar: create download.php
A Generate File Navigation Object is used to create the file that has the Event Calendar Configuration script:
| Name | Events Calendar: create download.php |
|---|---|
| File name | download |
| File extension | php |
| Output directory | Use the current directory |
| Content Layout | text/download |
Go to Events Calendar Views > text/canonical layout and change the ID in the T4 Tag to be the ID for this Navigation Object. Move the navigation tag out of the PHP code and uncomment e.g.:<t4 type="navigation" name="Events Calendar: create download.php" id="218" /> <!-- generate download.php --><?php
Navigation Object: Events Calendar: get Canonical Links
This is used to get the canonical links code in Events Calendar View
| Name | Events Calendar: get Canonical Links |
|---|---|
| Fetch method | Use current |
| Content Layouts | Use alternate Content Layout |
| Content Layout | text/canonical |
Go to your Page Layout and add the Navigation Object in the header, within the <head> tag.
Updating the Section
After the Navigation Object, you will need to update the Calendar Section created when the Section was created and allowed the "Events Calendar Views" Content Types in that Section.
| Content Type | Group | Branch | Section | Disabled |
|---|---|---|---|---|
| Events Calendar Views | [X] Yes | No | No |
Adding the contents
Add a Content Item to configure the events listing:
| Element | Value |
|---|---|
| Content Type | Events Calendar Views |
| Name | Event Listing |
| Events Calendar Config Link | Link to the Calendar Section (current Section, in this case) |
| View | General Page (Heading + List) |
| Position in the page | Default |
| Main View Section | Link to the Calendar Section (current Section, in this case) (It overwrites Main View Section element of Calendar Configuration) |
| Options |
See Events Calendar Configurable Options for more information (It overwrites the Options element of Calendar Configuration) |
Verifying the steps so far
If you've followed along so far you should:
- See the list of Events in the Calendar Section
- In the Section you should see a "download.php" file that it is blank.
Finishing up
When the Event Calendar module is working, we need to set up the JS for the ajax functionality, add the content in the sidebar and the canonical links.
The first step is to add the JS File for the ajax functionality:
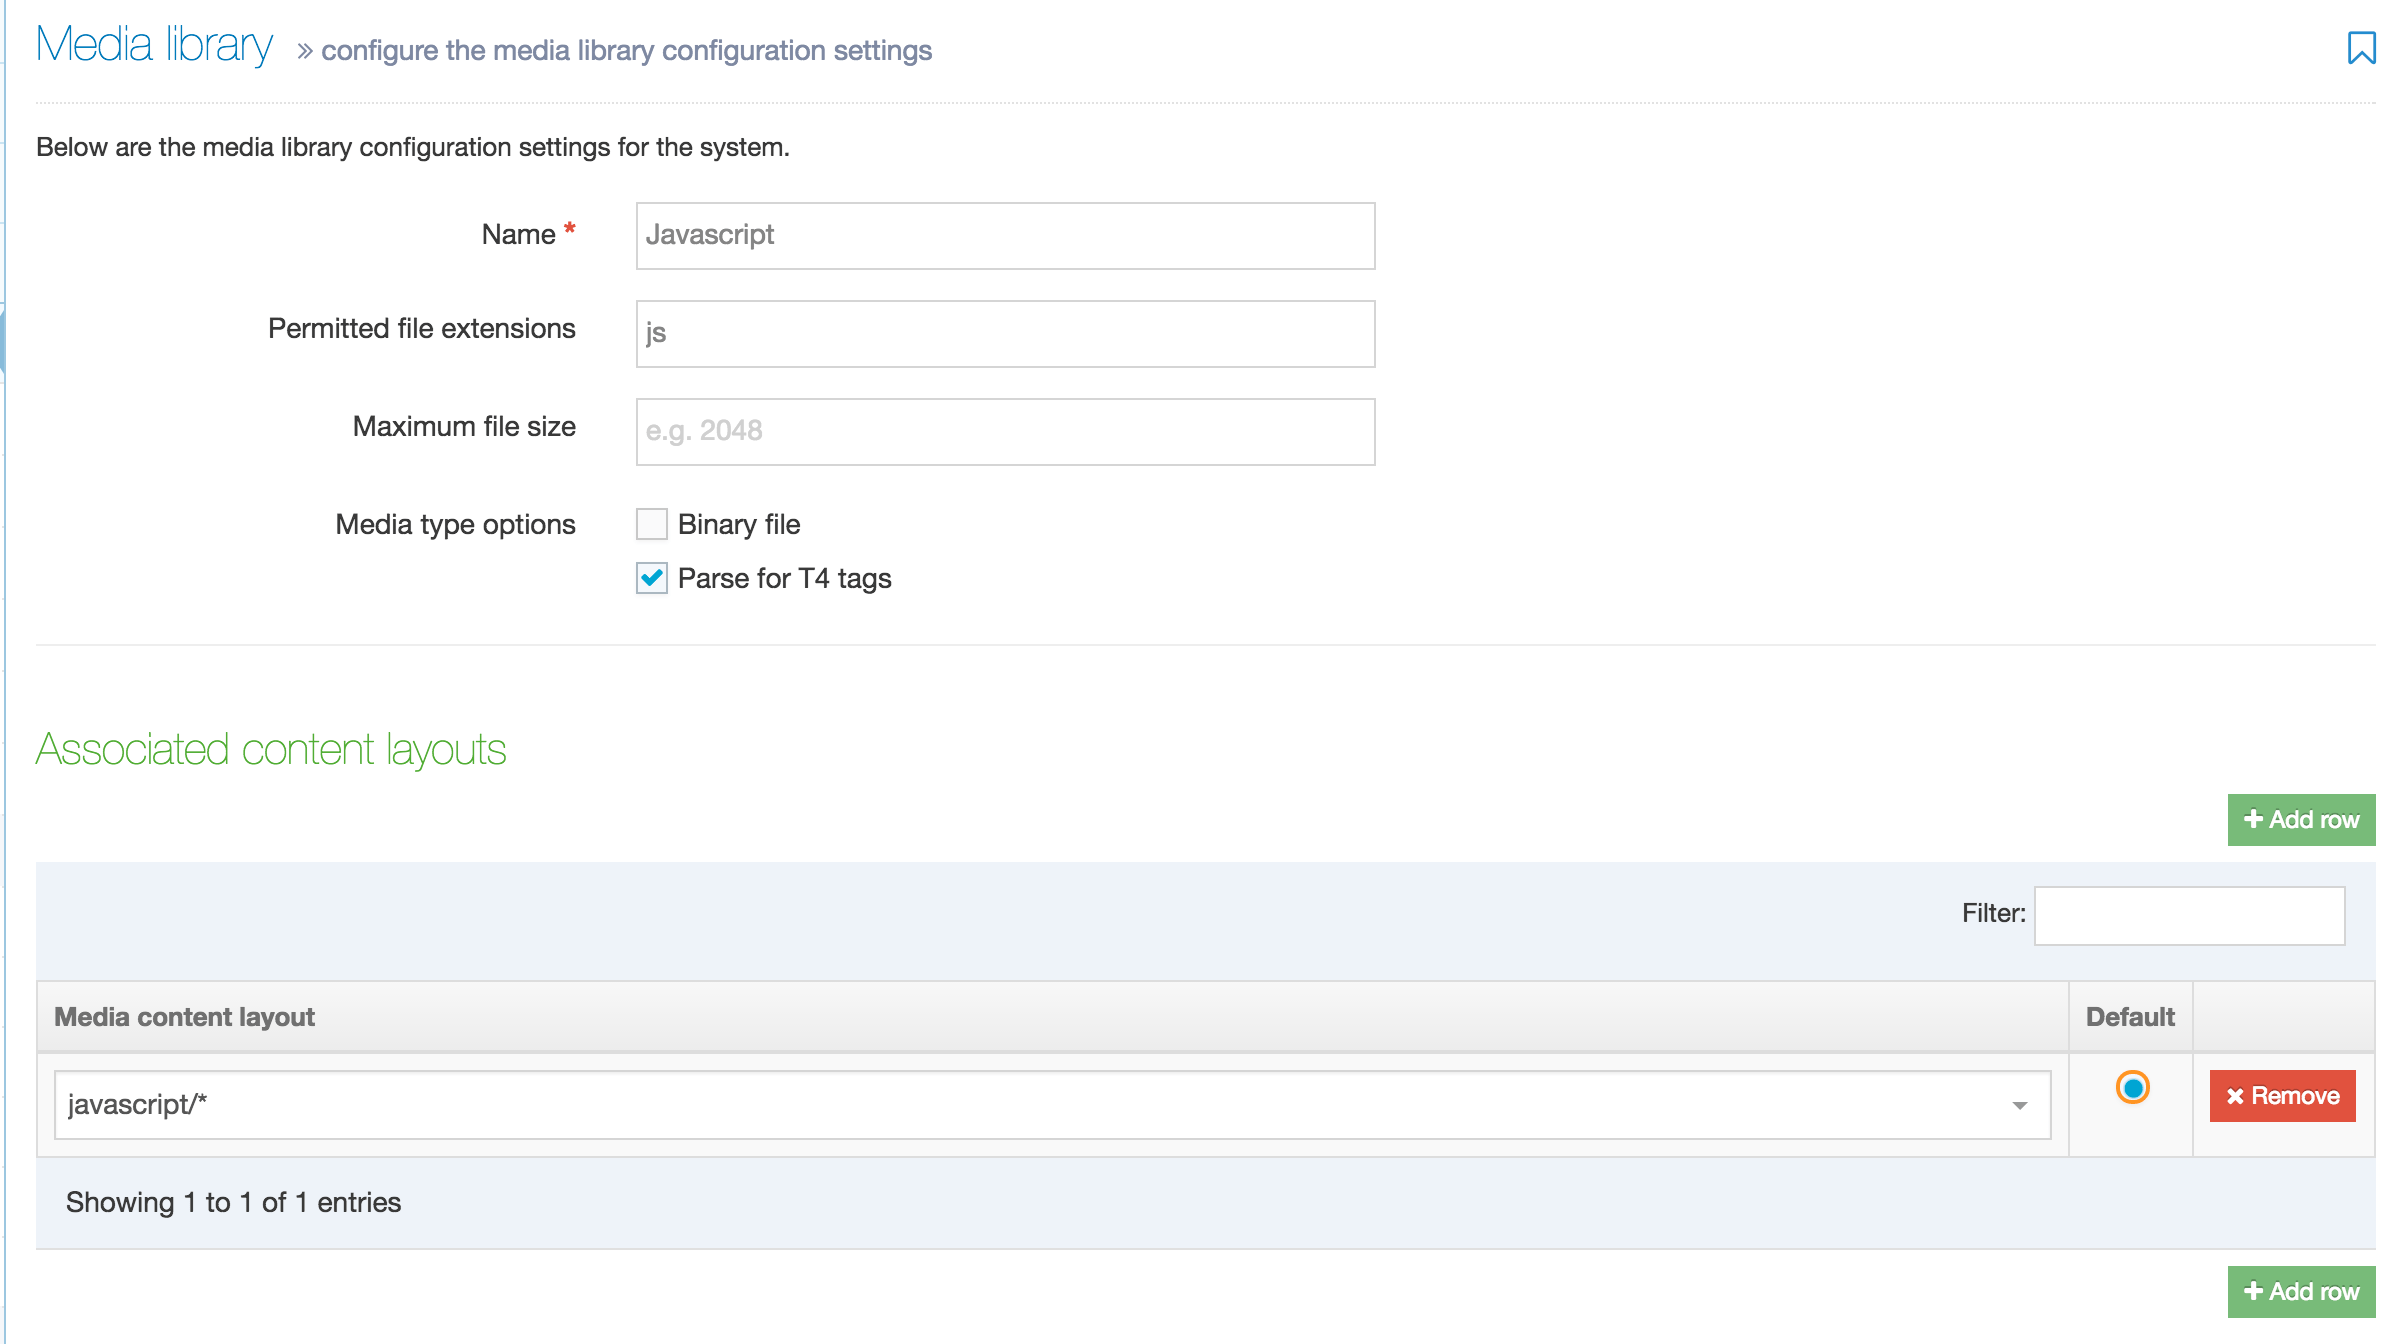
Media Type: JavaScript
If a JavaScript Media Type doesn't exist, create one and associate the "javascript/*" Content Layout with it:
Media Layout: JavaScript Content Layout
If it does not already exist, add another Content Layout to the Media System Content Type named "javascript/*". In the Content Layout code field add the following:
<script type="text/javascript" src="<t4 type="content" name="Media" output="file" />"></script>JavaScript File
The "php-events-calendar.js" file can be uploaded to any Media Category. Select JavaScript as the Media Type.
Navigation Object: Events Calendar: get Sidebar
A Related Content Navigation Object is used to get the canonical links code in Events Calendar View
| Name | Events Calendar: get Sidebar |
|---|---|
| Fetch method | Use current |
| Content Layouts | Use alternate Content Layout |
| Content Layout | text/sidebar |
Page Layout
Any Page Layout can use the Event Calendar. In the one used in the Calendar Section add the following:
- the Navigation Object for text/canonical
- the Navigation Object for the text/sidebar (it is possible to reuse one that is already inside your existing site Page Layouts to retrieve the information)
- the script tag for the JavaScript events
Site Structure: Adding content in the Calendar Section
In the Calendar Section add the following Event Calendar Views and
Add a Content Item as below:
| Element | Value |
|---|---|
| Content Type | Events Calendar Views |
| Name | Event Calendar: General Field |
| Events Calendar Config Link | link to the Calendar Section |
| View | Search > General Field |
| Position in the Page | Default (Placed the content before the Generic View) |
| Main View Section | link to the Calendar Section (It overwrites Main View Section element of Calendar Configuration) |
| Options | see Events Calendar Configurable Options for more information (It overwrites the Options element of Calendar Configuration) |
| Content Type | Events Calendar Views |
|---|---|
| Name | Calendar Switcher |
| Events Calendar Config Link | link to the Calendar Section |
| View | Calendar Switcher |
| Position in the Page | Sidebar |
| Main View Section | Link to the Calendar Section (It overwrites Main View Section element of Calendar Configuration) |
| Options | see for more information (It overwrites the Options element of Calendar Configuration) |
| Content Type | Events Calendar Views |
|---|---|
| Name | Event Calendar: Categories |
| Events Calendar Config Link | link to the Calendar Section |
| View | Search > Categories |
| Position in the Page | Sidebar |
| Main View Section | Link to the Calendar Section (It overwrites Main View Section element of Calendar Configuration) |
| Options | see for more information (It overwrites the Options element of Calendar Configuration) |
Add Content Items for each individual event using the Event Content Type.
Site Structure: Updating the Items Section (or Events Section)
After creating the Event Calendar Views in the Calendar Section, you must add them to all Sections that are added to the Event Content Type, since the fulltext page is using the Event Calendar Module to correctly display dates.
Make sure you enable the ability to add Event Calendar View in each Events Section.
Site Structure: Adding the Event Calendar View in the Items Section (or Events Section)
Add the following Content Type in each Section that contains the events Content Type (it can be mirrored):
| Content Type | Events Calendar Views |
|---|---|
| Name | Event Calendar: Fulltext configuration |
| Events Calendar Config Link | Link to the Calendar Section |
| View | Event Fulltext setting |
| Position in the Page | Default |
| Main View Section | Link to the Calendar Section (It overwrites Main View Section element of Calendar Configuration) |
| Options | See for more information (It overwrites the Options element of Calendar Configuration) |
Add the download iCal Version link
To provide a link to the iCal of an event, use the following code in the fulltext layout of the Event Content Type:
<?php echo $t4_module['allevents']; ?>download.php?event_id=<t4 type="meta" meta="content_id" />If you want to add this to a different view you will need to change:
<?php echo $t4_module['allevents']; ?> to include a Section Details Navigation Object pointing to the Calendar Section.
Publishing the iCal as a URL
You can also publish the iCal as a URL that can be used as a Calendar feed to sync events with Google Calendar or Outlook by showing all past and future events. Use the following code in the fulltext layout of the Event Content Type:
<?php echo $t4_module['allevents']; ?>download.php?search=all&past=1&paginate=999999
If you want to add this to a different view you will need to change:
<?php echo $t4_module['allevents']; ?> to include a Section Details Navigation Object pointing to the Calendar Section.
Final verification
Once you have followed the whole installation guide you should have now the Event Calendar Module installed with the following features:
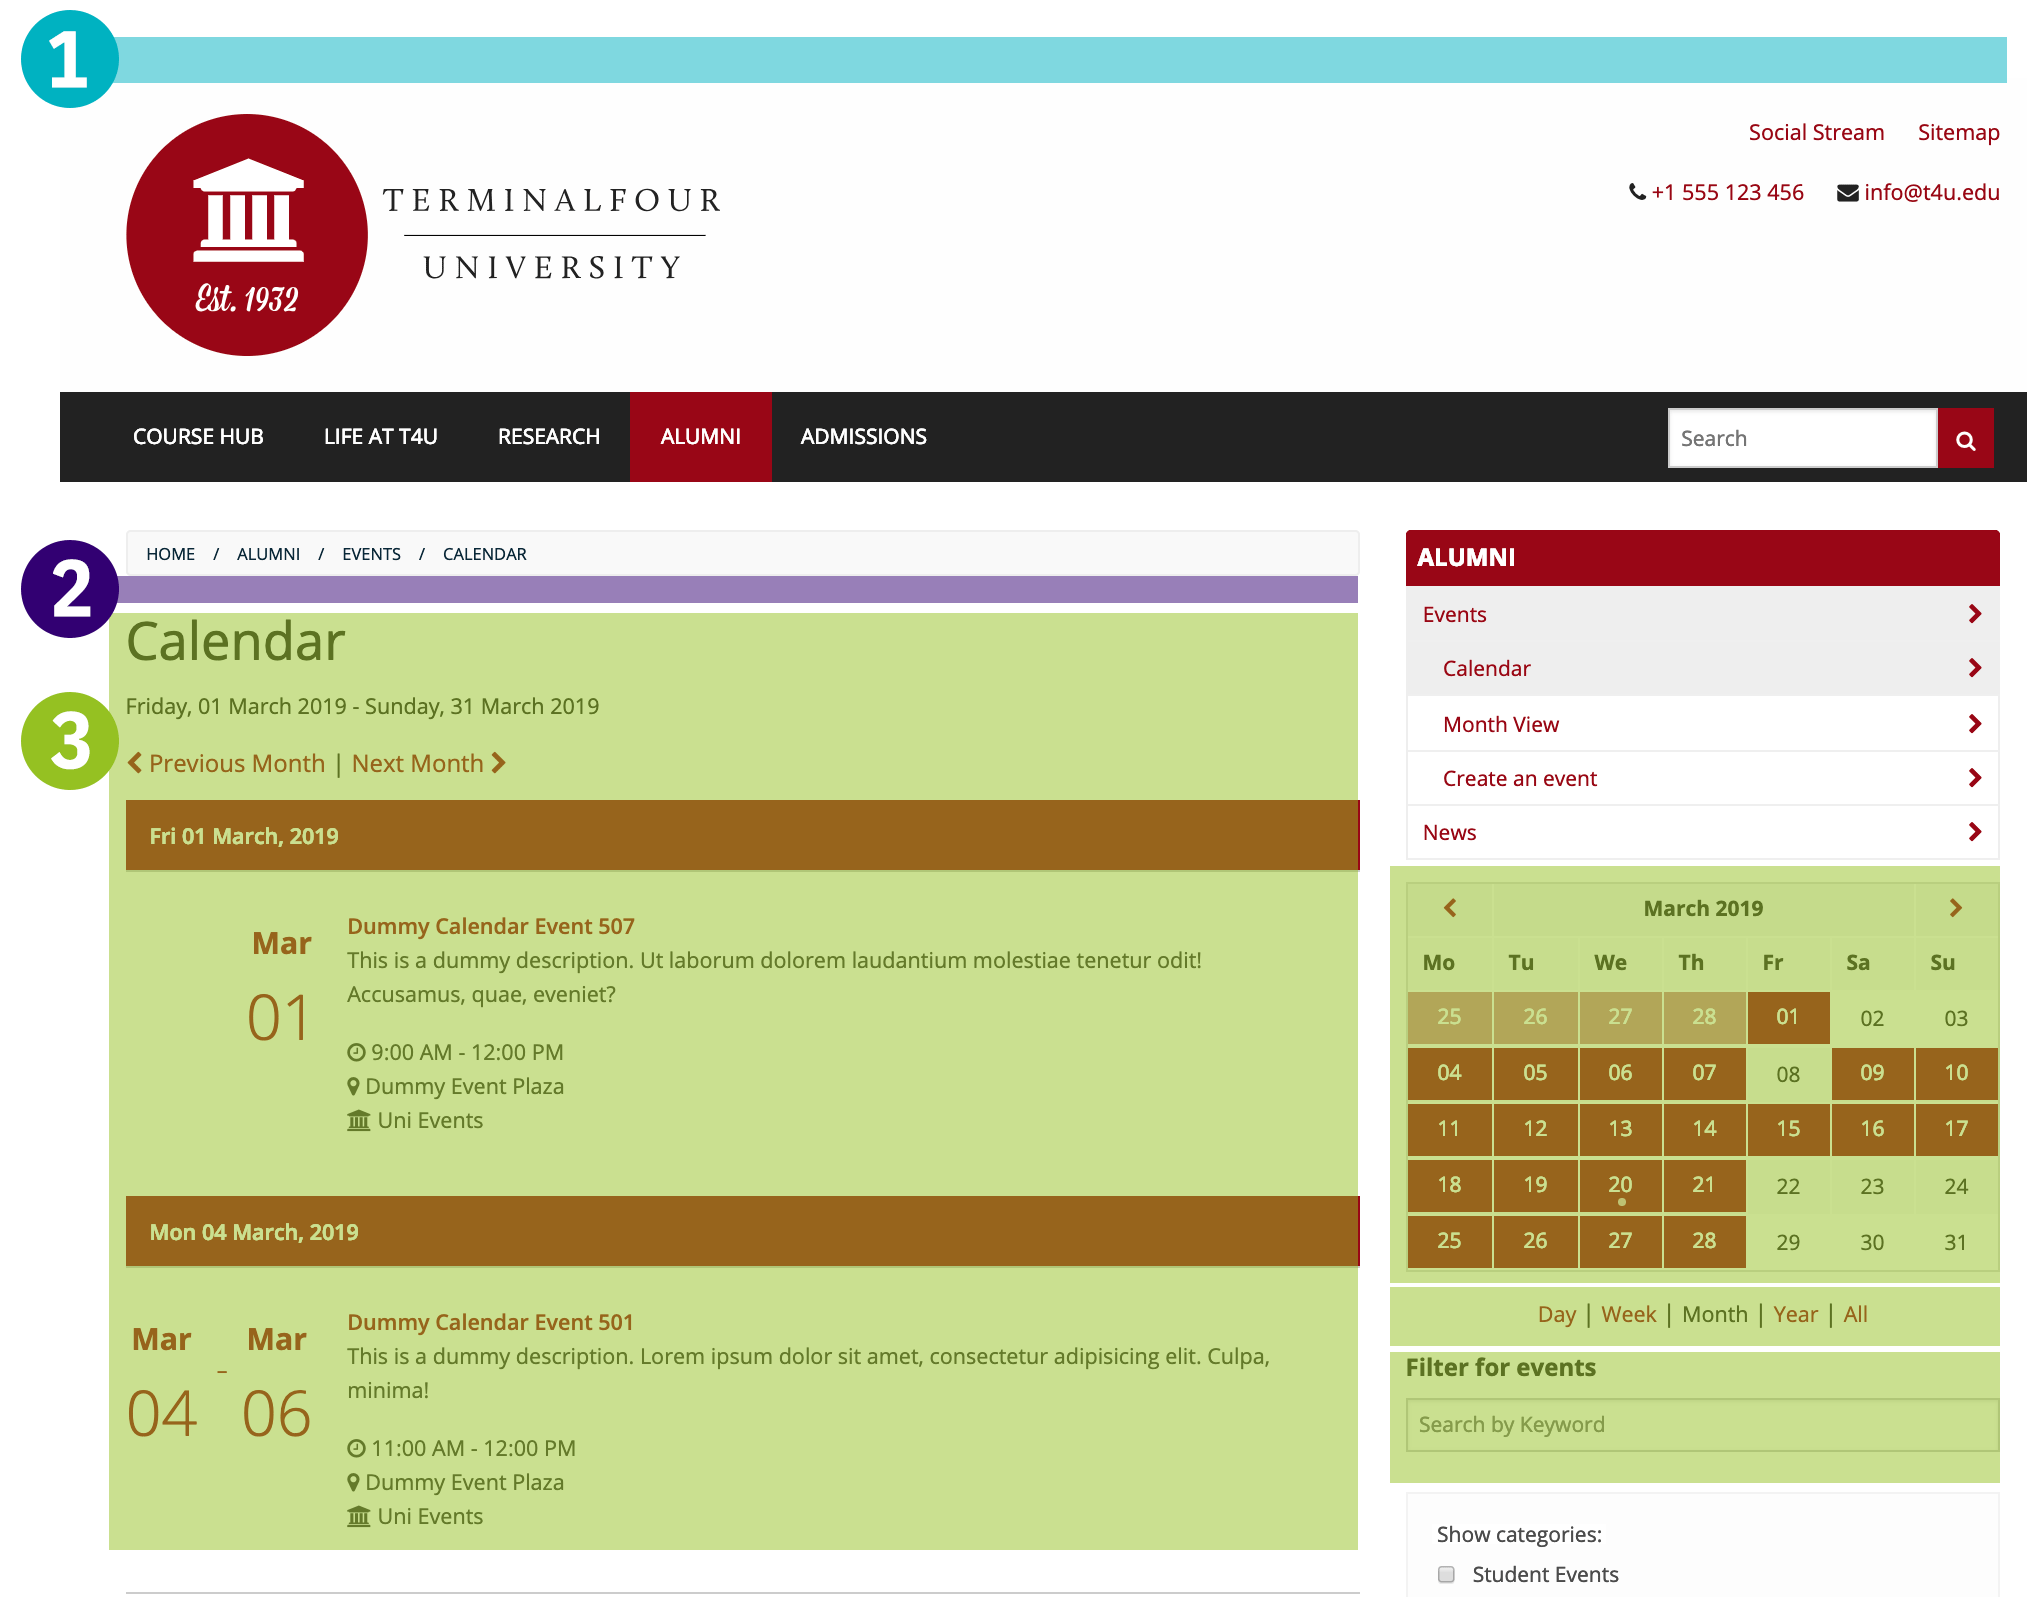
- The full Event Calendar as visible in the above screenshot
- Searchable Events with ajax functionality
- Canonical URLs in the Calendar Section
- Fulltext Page with PHP code and a download link.
Once you've completed this step, you can customize the design of the single views file and the configuration settings.
Back to top
