
Creating a Tiny MCE plugin
- Last Modified:
- 14 May 2026
- User Level:
- Administrator
Description
This article covers creating a custom TinyMCE plugin that can be used with Terminalfour's HTML Editor.
If you are on version 8.3.12+ have a look at this article on upgrading your plugins so they're compatible with TinyMCE 5.
Creating a plugin
Terminalfour's HTML Editor is built with TinyMCE 4 so you can use the plugins that are compatible with this version. In addition to the plugins pre-installed with your Terminalfour instance, you can also create custom plugins too.
There are details on how to create a plugin on the TinyMCE site including this sample plugin code.
Basics
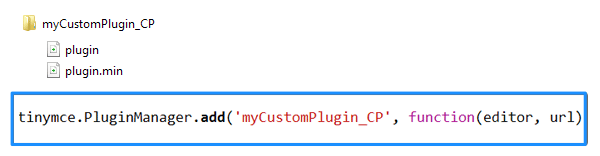
Create a directory. The name of the directory and the reference name for the plugin used in the script must match.
For Terminalfour to recognize a custom plugin:
- it should begin with a lowercase letter
- the plugin directory name should be appended with "_CP". Terminalfour will append "_CP" after the plugin folder name if you don't add it.
In the directory, add a file called "plugin.js" and a minified version of the file called "plugin.min.js".
The reference name of the plugin in the "plugin.js" file must also be appended with "_CP":
tinymce.PluginManager.add('myCustomPlugin_CP', function(editor, url) {})TinyMCE matches the folder name to the plugin name for loading, therefore both need to be "_CP" in order for it to show in the editor.
If you don't have a minified version of the plugin and Terminalfour is running in minified mode, a 403 error will be thrown when TinyMCE loads. Either create a minified version of your file and name it plugin.min.js or simply duplicate your plugin file and name it plugin.min.js
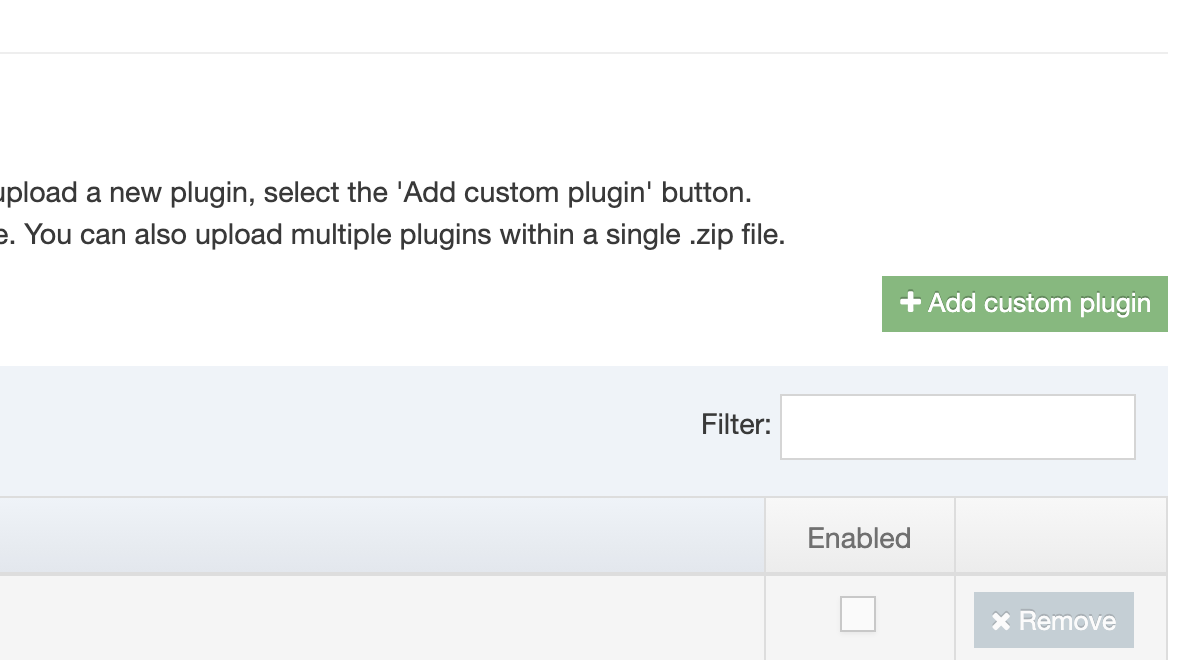
When you have written your plugin, zip the folder and upload it to System Administration > Hierarchy & Content Settings > HTML Editor:
Folders zipped on a Mac can create extra folders named _MACOSX and .DS_Store.These folders are hidden on macOS. When you upload your zipped plugin these extra folders can prevent the plugin from installing. As a workaround, you can zip your folder on a PC or use the command line to zip your folder.
Don't add the root folder to another folder and don't use spaces in the plugin's root folder.
Multiple plugins
If you have multiple custom plugins you can zip them & upload them together. Each plugin should have its own root folder and reference name as above. Select all of the plugin folders, right-click and zip them.
Don't add them to a single folder and zip and don't use spaces in the plugin's root folder.Upload the zip to System Administration > Hierarchy & Content Settings > HTML Editor as per single upload.
Handling translations for custom plugins
Terminalfour 8.4.4 introduced Spanish as a UI language for the Terminalfour system.
Any custom plugins you've created will continue to work regardless of what language the user has set the Terminalfour interface to. However, if you have hardcoded English strings, these strings will remain English for those users.
This guide aims to explain what's involved in supporting multiple languages for your TinyMCE plugins.
TinyMCE has built-in i18n: This is used by TinyMCE core and standard plugins. We’ve added the community language pack es_MX.js to provide Latin American Spanish translations for all built-in tinymce strings.
Your custom plugins can support multiple languages and can automatically switch based on the UI language selected by the user.
Step 1. Register your translations at the top of your plugin
Define a function to apply translations in your plugin code. For Spanish, ensure you're using es_MX
tinymce.addI18n('es_MX', {
'myPlugin.buttonLabel': 'Texto en español',
'myPlugin.otherLabel': '...', // add more translations as required
});
Step 2. Define a wrapper function to handle translations
This function is used to handle the i18n and provide a fallback string to use if no translation is found.
var t = function (translationKey, fallback) {
var result = tinymce.i18n.translate(translationKey);
return result !== translationKey ? result : fallback;
};
Step 3. Use your translation function for all user-facing strings
Instead of hard-coding strings, use the function you've created in step 1.
For example:
t('myPlugin.buttonLabel', 'English text');Now your plugins will support Spanish strings from your language files but will fall back to the English strings when not in Spanish.
A full example plugin with translation can be seen below.
(function () {
'use strict';
var global = tinymce.util.Tools.resolve('tinymce.PluginManager');
// Register translations directly in the plugin.
// Add a block for each supported language.
tinymce.addI18n('es_MX', {
't4test.tooltip': 'Complemento de prueba',
't4test.dialog.title': 'Diálogo de prueba',
't4test.dialog.message': 'Este es un complemento de prueba para soporte multiling\u00fce.',
't4test.dialog.close': 'Cerrar'
});
/**
* Translation wrapper for custom plugins.
* Uses TinyMCE's built-in i18n system (tinymce.i18n.translate).
* Falls back to the provided English default if no translation is found.
*
* @param {string} translationKey - The key to look up.
* @param {string} fallback - The English fallback text.
* @returns {string} The translated string or the fallback.
*/
var t = function (translationKey, fallback) {
var result = tinymce.i18n.translate(translationKey);
return result !== translationKey ? result : fallback;
};
function Plugin() {
global.add('t4test_CP', function (editor) {
editor.ui.registry.addButton('t4test', {
icon: 'help',
tooltip: t('t4test.tooltip', 'Test Plugin'),
onAction: function () {
editor.windowManager.open({
title: t('t4test.dialog.title', 'Test Dialog'),
body: {
type: 'panel',
items: [{
type: 'htmlpanel',
html: '<p>' +
t(
't4test.dialog.message',
'This is a test plugin for multilanguage support.'
) +
'</p>'
}]
},
buttons: [{
type: 'cancel',
text: t('t4test.dialog.close', 'Close')
}]
});
}
});
});
}
Plugin();
}());